This is a modern-English version of The Little Girl's Sewing Book, originally written by unknown author(s).
It has been thoroughly updated, including changes to sentence structure, words, spelling,
and grammar—to ensure clarity for contemporary readers, while preserving the original spirit and nuance. If
you click on a paragraph, you will see the original text that we modified, and you can toggle between the two versions.
Scroll to the bottom of this page and you will find a free ePUB download link for this book.
The Little Girl’s Sewing Book

Sewing Book

LITTLE GIRL’S
SEWING BOOK
EDITED BY FLORA KLICKMANN
New York:
Frederick A. Stokes Company, Publishers.

A Word to the Grown-ups.
This book contains lessons in practically all the stitches used in plain needlework, as well as the more useful of the fancy stitches. Each article described and illustrated will be found to contain instructions for some definite branch of sewing; and though all the stitches required in making the article will not necessarily be illustrated in that chapter, they will appear in other chapters, and can easily be referred to, by aid of the comprehensive index.
This book includes lessons on nearly all the stitches used in basic sewing, along with the more practical decorative stitches. Each item described and illustrated contains instructions for a specific type of sewing; and while not all the stitches needed to make the item will be illustrated in that chapter, they will be covered in other chapters and can be easily found using the detailed index.

Things you can
make for Yourself.
A Handy Work Apron.
If you are going to set to work to make some of the pretty articles described in this little book, the little work apron shown in the picture on this page is just the very thing you will need to put on while you are sewing.
If you’re going to get started on making some of the nice items described in this little book, the small work apron shown in the picture on this page is exactly what you’ll need to wear while you’re sewing.
It has two deep pockets and two small ones, and you will be able to put the silks and cottons necessary, for whatever it is you are making, into these, so that they will be ready as you want to use them.
It has two deep pockets and two small ones, allowing you to store the silks and cottons you need for whatever you're making, so they’ll be ready whenever you need them.

You will find it is so handy, too, to have a pocket to slip your scissors into after cutting your thread. You know what a nasty way they have of slipping off your lap on to the floor. And then, when you pick them up, it is quite likely that you get a little dust on your hands, and this gets on to your pretty work and makes it look soiled.
You’ll find it really convenient to have a pocket to put your scissors in after you cut your thread. You know how annoying it is when they slip off your lap and fall on the floor. Then, when you pick them up, you might end up with a bit of dust on your hands, and that gets onto your nice work and makes it look dirty.
Then, when your sewing time is ended for the day, how convenient it is to be able to fold your work away in your little work apron, so that it is kept well protected from any stray specks of dust, and will be quite ready for you when next you want it.
Then, when you're done sewing for the day, how convenient it is to fold your project away in your little work apron, keeping it protected from any stray dust, so it’s all set for you the next time you need it.
So you see how this little apron is going to help you to keep your work nice and clean, and I am sure you will want to make yourself one as quickly as ever you can, so let us see how it is done.
So you see how this little apron is going to help you keep your work neat and clean, and I'm sure you'll want to make one for yourself as soon as you can, so let's see how it's done.
You will only need 1 yard of material to make the apron, and this can be white or coloured as you prefer. A soft linen or sateen would make up well. For the featherstitching use coloured “Star Sylko” thread, as this will wash without the colour running.
You only need 1 yard of fabric to make the apron, and you can choose either white or any color you like. A soft linen or sateen would work well. For the feather stitching, use colored “Star Sylko” thread, as it won’t run when washed.
To cut out the apron, first measure off 4 inches of the material, and cut across from selvedge to selvedge; this will form the band.[4] The piece used for the apron itself is 32 inches long and 20 inches wide, and when you have cut this you will have a strip left for making the small pockets, which should each be 6 inches square. To make the points at the bottom of the pockets, fold each square right down the centre, measure 1½ inches up the double cut edges, and cut off the corners on the cross to the edge of the centre fold.
To cut out the apron, first measure 4 inches off the material and cut across from selvedge to selvedge; this will create the band.[4] The piece for the apron itself should be 32 inches long and 20 inches wide. After you cut this, you will have a strip left for the small pockets, which should each be 6 inches square. To shape the points at the bottom of the pockets, fold each square in half, measure 1½ inches up the folded edges, and cut off the corners at an angle to the edge of the fold.

Now take the piece you have cut for the apron, and turn a quarter-inch hem along both the sides and one of the ends of this strip, tack these along carefully, and hem neatly. We give directions for tacking and hemming on page 18.
Now take the piece you’ve cut for the apron and fold over a quarter-inch hem along both sides and one of the ends of this strip. Pin these down carefully and hem them neatly. We provide instructions for pinning and hemming on page 18.
To form the large double pocket, fold the hemmed end of the strip up 11 inches, and oversew the edges of the side hems together. Directions for oversewing are given on page page 28. Now place a tacking line right down the[5] centre of the pocket The small patch pockets should then be added. Turn a quarter-inch hem along the top of each of these, and a single narrow turning round the other edges. Hem one of these on to each side of the large pocket, placing them about 3½ inches down from the top of the large pocket, and 3 inches in from the side edges of the apron.
To create the large double pocket, fold the hemmed end of the strip up 11 inches, and sew the edges of the side hems together. Instructions for sewing are provided on page page 28. Now place a tacking line right down the[5] center of the pocket. Next, add the small patch pockets. Fold a quarter-inch hem along the top of each of these, and a single narrow hem around the other edges. Attach one of these to each side of the large pocket, positioning them about 3½ inches down from the top of the large pocket and 3 inches in from the side edges of the apron.

Now take the band strip, tack a single turning round all edges and fold right along the centre. Gather the top of the apron, draw the gathers up tightly (winding the thread round a pin so that it will be ready when you want to let them out again), and carefully stroke down each gathered stitch with your needle to make them set nicely. Now let out the gathers until the apron is 13 inches wide, place the gathered edge between the folded band, taking care that you get the centre of the band and the centre of the apron together, and hem along each side of the work. You will see that you have a little picture showing you exactly how this should be done.
Now take the band strip, tack a single turn around all edges, and fold it right down the center. Gather the top of the apron and pull the gathers tight (wrap the thread around a pin so it's ready when you want to loosen them later), and gently smooth down each gathered stitch with your needle to make them sit nicely. Now loosen the gathers until the apron is 13 inches wide, place the gathered edge between the folded band, making sure to align the center of the band with the center of the apron, and hem along each side of the work. You’ll see a little picture showing you exactly how this should be done.
The open edges of the ends of the band should be oversewn together.
The open ends of the band should be sewn together.
When you have finished sewing on your band you will need to put a button on one end and to make a buttonhole in the other end. If you are not quite sure how to make a buttonhole nicely you had better look carefully at the illustrations showing how to do this.
When you’re done sewing on your band, you’ll need to attach a button at one end and create a buttonhole at the other end. If you’re not sure how to make a buttonhole properly, you should take a close look at the illustrations that show you how to do it.
First fold the end of the band, and cut your buttonhole through[6] the fold and exactly in a line with a thread of the material; the buttonhole should be cut just large enough for you to put your button through easily. Before you commence to work the buttonholes make a line of running or “barring” stitches quite close to the edges, to hold them evenly together, as shown in the first part of the little diagram; the second part of the diagram shows another way of holding the edges together by working overcasting stitches over the hole, but this way is more often used when working on thicker materials. The third part of the diagram shows a finished buttonhole, and you will see that one end is worked round and the other square; the outside should be the round one, and the inner end the square one.
First, fold the end of the fabric, and cut your buttonhole through[6] the fold and exactly in line with a thread of the material; the buttonhole should be just large enough for you to easily pass your button through. Before you start working on the buttonholes, make a line of running or “barring” stitches close to the edges to hold them evenly together, as shown in the first part of the little diagram. The second part of the diagram shows another method of securing the edges together by using overcasting stitches around the hole, but this method is more commonly used for thicker fabrics. The third part of the diagram shows a finished buttonhole, and you’ll notice that one end is rounded and the other is square; the outside should be the rounded one, and the inner end should be square.

Now you are ready to commence to work the buttonhole. Thread a sewing needle with white cotton (say No. 40), make a knot, and just to fasten your thread to your work put your needle in on the wrong side just below the running stitches, at the inner end of the buttonhole, picking up one thickness of material only, and bring it out on the right side of your work between the edges of the buttonhole.
Now you’re ready to start working on the buttonhole. Thread a sewing needle with white cotton (around No. 40), make a knot, and to secure your thread to your project, insert your needle on the wrong side just below the running stitches, at the inner end of the buttonhole, catching only one layer of fabric, and pull it out on the right side of your work between the edges of the buttonhole.

Buttonholes are always worked on the right side of the work, and are worked from left to right. To make the first stitch (after fastening your cotton on as above), place the needle downwards through the buttonhole, and put it in just where you put it at first, only this time right through both thicknesses of material.
Buttonholes are always created on the front side of the piece, and they are made from left to right. To start the first stitch (after securing your thread as mentioned earlier), insert the needle downwards through the buttonhole, placing it exactly where you did initially, but this time going all the way through both layers of fabric.
When you have your needle in this position, place your cotton round it exactly as the little illustration shows it placed, pull your needle out, and you will[7] find that you have made a knotted stitch, which must be pulled up so that the knot comes right at the edge of the buttonhole; this completes one stitch, and you must work a row of these stitches right along, making the ends of the stitches even to a thread.
When your needle is in this position, wrap your cotton around it just like the small illustration shows, pull your needle out, and you will[7] see that you've made a knotted stitch, which should be pulled up so the knot sits right at the edge of the buttonhole; this finishes one stitch, and you need to create a row of these stitches in a straight line, making sure the ends of the stitches are even with a thread.
The round end is made in the same way that you do oversewing, and each stitch must be made the same length as the buttonhole stitches, and taken round to form a half-circle at the end of the hole; the lower part of the little illustration shows how the needle is placed for this.
The round end is made just like you do oversewing, and each stitch has to be the same length as the buttonhole stitches, going around to create a half-circle at the end of the hole; the lower part of the little illustration shows how the needle is positioned for this.
Work the second side in the same way as the first, then for the square end take a couple of ordinary back stitches right over the entire width of the worked buttonhole (from the lower edge of the stitches on one side to the lower edge of the stitches on the other), and work a row of buttonhole stitches across the end of the buttonhole, bringing the knots just over the bar of stitches you have just made across. This completes your buttonhole.
Work the second side just like the first, then for the square end, take a couple of standard back stitches all the way across the buttonhole (from the lower edge of the stitches on one side to the lower edge of the stitches on the other), and add a row of buttonhole stitches at the end of the buttonhole, placing the knots just over the bar of stitches you just made across. This finishes your buttonhole.
All that now remains to be done is the feather-stitching, and for the little girl who has not attempted this stitch before, we are giving an illustration showing exactly how it should be made.
All that’s left to do now is the feather-stitching, and for the little girl who hasn’t tried this stitch before, we’re providing an illustration that shows exactly how it should be done.
This is worked from right to left. If you look carefully at the illustration you will see that the thread is always brought round to the front of the needle before making a stitch, and for the upper part a small stitch is taken downwards towards you, and for the lower part a stitch of the same length is taken turning upwards towards you. The feather-stitching should be worked just over the hemming line, and this will serve as a guide for keeping it straight; the bottom of the top stitch should come just above the hemming line, and the top of the lower stitch just below it. The illustration clearly shows where the feather-stitching should be added.
This is done from right to left. If you look closely at the illustration, you’ll notice that the thread is always brought to the front of the needle before making a stitch. For the upper part, make a small stitch downwards towards you, and for the lower part, make a stitch of the same length turning upwards towards you. The feather-stitching should be done right over the hemming line, which will help keep it straight. The bottom of the top stitch should be just above the hemming line, and the top of the lower stitch should be just below it. The illustration clearly shows where the feather-stitching should be added.
For Ribbons and Bows.

Isn’t it just too tiresome when you want a particular bow to wear with a blouse, or a little lace collar that is just the right shape, and you look in vain through the drawer where you keep knick-knacks of this description. Then you know how the drawer gets all tumbled over, and you have finally to seize a bow that isn’t a bit the one you wanted, and rush off, to save being late for school. Have you ever been in a fix like that? If you have, you know all about it, and it is all the more annoying when you know all the time that the bow is there somewhere.
Isn’t it just so tiring when you’re looking for a specific bow to wear with a blouse, or a little lace collar that’s just the right shape, and you search in vain through the drawer where you keep those kinds of things? Then you realize how messed up the drawer gets, and you end up grabbing a bow that isn’t at all what you wanted, and you have to rush off to avoid being late for school. Have you ever been in that situation? If you have, you totally understand, and it’s even more frustrating when you know that the bow is somewhere in there.
Now what is really the trouble here? Why the fact of the matter is the drawer is too big, and the little bow loses itself among the other things in the drawer.
Now, what's really the problem here? The truth is that the drawer is too big, and the little bow gets lost among the other items in the drawer.
Now what you want is a little compartment where you can keep your bows or collars (as the case may be) all to themselves. A cardboard box inside the drawer won’t last any time. No; the better plan is to make yourself a really pretty box, that can stand on your dressing-table. You see the sweet one illustrated, don’t you? Well, it will be a very simple matter for you to make one in the same way. The outside of this one is covered with a pretty flowered cretonne, of which pink and green are the principal colours, and it is lined with biscuit-coloured sateen. But you would, of course, make your box in the colours that will go best with your little bedroom. A flowered material is probably nicest for the outside, though plain material could[9] be used. In any case, a deep cream is the best colour for the inside of the box.
Now, what you need is a small compartment where you can keep your bows or collars (depending on what you have) all to themselves. A cardboard box in the drawer won't last long. No; the better idea is to create a really pretty box that can sit on your dressing table. You see the cute one shown, right? Well, it’ll be very easy for you to make one just like that. The outside of this one is covered with a lovely flowered fabric, mainly in pink and green, and it's lined with light beige satin. But you would, of course, choose your box in colors that best match your little bedroom. A floral material is probably the nicest for the outside, although a solid fabric could also work. In any case, a deep cream is the best color for the inside of the box.
To make a box the same size as the one here shown, you will want four pieces of thin cardboard 6 inches long by 5½ inches wide for the lid and bottom, four pieces 6 inches by 3 inches for the sides, and four pieces 5½ inches by 3 inches for the ends. Then you will want two pieces of cream sateen 7 inches by 6½ inches, and two pieces of flowered cretonne the same size, two pieces of cream sateen and two pieces of cretonne 7 inches by 4 inches, and two pieces each of sateen and cretonne 6½ inches by 4 inches.
To create a box that matches the size of the one shown here, you will need four pieces of thin cardboard measuring 6 inches long by 5½ inches wide for the lid and bottom, four pieces that are 6 inches by 3 inches for the sides, and four pieces that are 5½ inches by 3 inches for the ends. You will also need two pieces of cream sateen sized 7 inches by 6½ inches, and two pieces of flowered cretonne of the same size, as well as two pieces of cream sateen and two pieces of cretonne measuring 7 inches by 4 inches, and two pieces each of sateen and cretonne sized 6½ inches by 4 inches.
The first step is to cover the cardboard pieces. This must be done very neatly. You will notice that the pieces of material are an inch larger each way than the cardboard they are to cover. When you lay a piece of cardboard on a piece of material there should be ½-inch of material all round, outside the cardboard, for turning over. Crease it over the edges of the cardboard all round, turning it in under again at the corners, as you see in the little picture. Start by taking a few stitches at the first corner, carry your needle on to the next corner, and again take a few firm stitches. When you have done all the corners, take a few long stitches from side to side, as you see in the illustration, to keep it secure.
The first step is to cover the cardboard pieces. Make sure to do this very neatly. You’ll notice that the pieces of fabric are an inch larger on each side than the cardboard they’re meant to cover. When you place a piece of cardboard on a piece of fabric, there should be ½ inch of fabric all around, outside the cardboard, for folding over. Crease it over the edges of the cardboard all around, tucking it under again at the corners, as shown in the small picture. Start by taking a few stitches at the first corner, then move your needle to the next corner and take a few firm stitches there. Once you’ve finished all the corners, take a few long stitches from side to side, as shown in the illustration, to keep it secure.

You must now sew the covered pieces together. Take a cretonne-covered piece, place it against a sateen-covered piece of the same size, having the turned-in sides together, and oversew neatly all round. Do this with all the pieces. Now you have six neat little sections, each of which is cream one side and coloured on the other.
You need to sew the covered pieces together now. Take a piece covered in cretonne and place it against a piece covered in sateen that’s the same size, making sure the turned-in sides are facing each other, and then sew neatly all around. Repeat this with all the pieces. Now you should have six neat little sections, each with one side cream and the other side colored.
Your next task is to oversew five of these sections together to make a box. First sew the two side and two end pieces together, and then sew the bottom piece to all four, taking care[10] that all the cream sides are inside and the coloured sides outside.
Your next task is to stitch five of these sections together to create a box. First, sew the two side pieces and the two end pieces together, and then attach the bottom piece to all four, making sure that all the cream sides are on the inside and the colored sides are on the outside. [10]
Before you sew the lid on, sew cord round all the edges with neat stitches, as you see in the picture. Green cord was used for this box, but you could use whatever colour goes best with your cretonne. Sew cord also round the edge of the lid.
Before you sew the lid on, stitch cord around all the edges with neat stitches, like you see in the picture. Green cord was used for this box, but you can use whatever color looks best with your fabric. Also, stitch cord around the edge of the lid.
All that now remains to be done is to fasten the lid to the box. This is done by oversewing on the inside the cord on one side of the box to that on the lid. You have now got not only a useful receptacle for your bows, etc., but a very pretty addition to your dressing-table. The size given is a very useful one, but you are not bound to make it this size if any other would suit your purpose better. For instance, if it is to hold handkerchiefs, a box that is square would be a better shape. But whatever size you decide on, see that each piece is cut and joined evenly, as this is most essential if the box is to be really a success.
All that's left to do is attach the lid to the box. This is done by sewing the cord on one side of the box to the one on the lid from the inside. Now you have not only a practical storage solution for your bows and so on, but also a lovely addition to your dressing table. The size provided is very practical, but you’re not required to stick to this size if another would work better for you. For example, if you want to store handkerchiefs, a square box would be a better shape. But whatever size you choose, make sure each piece is cut and joined evenly, as this is crucial for the box to be truly successful.
The Lambkin Bag.

This pretty bag is made just big enough to take a pair of little girl’s shoes, and would be just the very thing for you to keep at school to put your slippers in when you change them to come home; or you might like to use it to carry your slippers in when you go out to tea.
This cute bag is just the right size to hold a pair of little girl's shoes, and it would be perfect for you to keep at school to store your slippers when you change to go home; or you could use it to carry your slippers when you go out for tea.
Do you see the two frisky lambs gambolling on the grass, worked across the bottom of the bag? Don’t you wish that you were like them, and didn’t have to wear shoes that are always wearing out? This little bag was made of dark red sateen, and embroidered with white “Star Sylko” embroidery thread. The bag should be about 7½ inches wide and 10 inches deep, when finished, and to allow for seams and a nice wide hem at the top, you will want to cut a strip of material 8 inches wide and 24 inches long.
Do you see the two playful lambs hopping around on the grass, stitched across the bottom of the bag? Don’t you wish you could be like them and not have to wear shoes that are constantly wearing out? This little bag is made of dark red satin and features white “Star Sylko” embroidery thread. The bag should be about 7½ inches wide and 10 inches deep when finished, and to allow for seams and a nice wide hem at the top, you’ll want to cut a strip of fabric that’s 8 inches wide and 24 inches long.
It will be best to do your embroidery before you make up the bag, so that you can get at the work better. First fold your strip of material right across the centre, put a tacking line on this fold, and work your lambs just above this.
It’s better to do your embroidery before you put the bag together, so you can access the work more easily. First, fold your strip of fabric right across the center, add a tacking line on this fold, and stitch your lambs just above it.

If you turn to page 30 you will see how to work the cross-stitch designs, by placing canvas over your material first, and you have the lambs all drawn out for you in this article. Also you will find a whole alphabet of initials for working in cross-stitch on another page.
If you go to page 30, you'll see how to create the cross-stitch designs by layering the canvas over your fabric first, and the lambs are all sketched out for you in this article. You'll also find an entire alphabet of initials for cross-stitching on another page.

When you have finished the embroidery, fold the strip of material in half, with the right side inside, and sew it together at each side with a run and back stitch, leaving about 4 inches open at each side at the top of the back. When you[12] have joined the seams, you must oversew them along the edges on the wrong side as well, so that they will not fray.
When you’re done with the embroidery, fold the strip of fabric in half, with the right side facing in, and sew it together on each side using a running stitch and a back stitch, leaving about 4 inches open at the top of the back on each side. Once you’ve joined the seams, you also need to oversaw them along the edges on the inside so that they don’t fray.
Now turn down a 2-inch hem at the top, on both sides of the bag, turning in the side edges of the hems; you can tack down the sides of the hems, so as to keep the edges in, but don’t sew them together just yet.
Now fold down a 2-inch hem at the top on both sides of the bag, tucking in the side edges of the hems. You can temporarily secure the sides of the hems to keep the edges tucked in, but don’t sew them together just yet.

When you have hemmed the hems, you must put a row of running stitches along each hem, about half-an-inch above your hemming line, to make a runner, so that when you thread your ribbons through they will be held down at the bottom of the hem and not come right up to[13] the top of the bag. Now you can oversew the ends of the hems together, leaving the little space between the running line and the hemming line open, so that you can thread your ribbon through. This part of the work must be done with fine sewing cotton the same colour as your material, as you do not want the stitches to show too much.
When you’ve finished hemming, you need to sew a line of running stitches about half an inch above your hem line on each hem. This creates a runner so that when you thread your ribbons through, they'll stay at the bottom of the hem and won’t pull up to the top of the bag. Now you can sew the ends of the hems together, keeping the small space between the running line and the hem line open for threading your ribbon. This part should be done with fine sewing thread that matches your fabric, as you don’t want the stitches to be too visible.
If you like you can embroider an even row of white crosses over the stitches on the right side of the bag; this makes a pretty finish.
If you want, you can sew an even row of white crosses over the stitches on the front side of the bag; this creates a nice finish.
You can either use red cord or a narrow red ribbon for threading through your bag, and you will want a yard and a half. Cut this into two even lengths.
You can either use a red cord or a narrow red ribbon to thread through your bag, and you'll need a yard and a half. Cut this into two equal lengths.
Then thread a bodkin with one piece, and starting from the left hand side of the bag, thread it right round the bag through the runner you made at[14] the bottom of the hems. When you have got it right through, sew the two ends of the ribbon together, and pull it round from the right side so that the join does not show; this will leave you with a long loop of ribbon hanging from the right side of the bag. Now take the other piece of ribbon and do exactly the same from the left side of the bag.
Then take a needle and thread one piece of ribbon, starting from the left side of the bag. Thread it all the way around through the opening you made at[14] the bottom of the hems. Once it's through, sew the two ends of the ribbon together and pull it around to the front so the seam isn't visible; this will leave you with a long loop of ribbon hanging from the front of the bag. Now take the other piece of ribbon and do the same from the left side of the bag.
Now when you pull the loops at each side the bag will draw up nice and evenly at the top.
Now when you pull the loops on each side, the bag will tighten nicely and evenly at the top.

The Swallow Nightdress Pocket.
Isn’t it just lovely to be able to make things all by yourself, without having to wait to be shown what to do next all the time. Mother is sure to be busy just when you want to know how to go on, and not have the time to stop to arrange your work for you. This pretty nightdress pocket can be made out of a long straight strip of material, folded up like an envelope. That sounds quite easy, doesn’t it, and I am sure you have often folded up paper like an envelope, haven’t you? You just divide it into three, and let one end lie over the other like a flap.
Isn’t it just great to be able to create things all by yourself, without always having to wait for someone to tell you what to do next? Mom is likely to be busy exactly when you want to know how to proceed, and she might not have the time to help you with your work. This cute nightdress pocket can be made from a long, straight strip of fabric, folded up like an envelope. That sounds pretty simple, right? I’m sure you’ve often folded paper into an envelope before, haven’t you? You just divide it into three sections, and let one end overlap the other like a flap.
You will want about half a yard of white canvas, or linen, to make the pocket, and about 1½ yards of Cash’s Fancy Frilling, to put round the edge of the flap. Also you will need a ball of blue “Brighteye.”
You will need about half a yard of white canvas or linen to make the pocket, and about 1½ yards of Cash’s Fancy Frilling to go around the edge of the flap. You will also need a ball of blue “Brighteye.”

Now, take a tape measure and measure your material each way. You want to have a strip 30 inches long and 15 inches wide. When you have cut this, measure up 18 inches of the length, and cut 1½ inches off the width of the strip at each side up as far as this, leaving the remaining 12 inches wider, to allow of the deep hem round the flap.
Now, grab a tape measure and check your material in both directions. You need to have a piece that's 30 inches long and 15 inches wide. Once you cut that, measure up 18 inches from the length, and cut 1½ inches off the width on each side up to that point, leaving the remaining 12 inches wider for the deep hem around the flap.
Now turn a 1½ inch hem across the narrow end of your strip of material, hem it along on what will be the inside of the pocket, and fold this end of the strip up to form the pocket, until the lower edge[16] of the hem reaches where the material comes out wider at each side.
Now fold a 1½ inch hem across the narrow end of your piece of material, sew it along what will be the inside of the pocket, and then fold this end of the strip up to create the pocket, until the lower edge[16] of the hem meets where the material flares out on each side.

Sew up the side seams with a run and back-stitch, then oversew the edges of the seams together, so that you do not have any frayed edges inside your pocket. The ends of the hem are not joined into the seams at each side, but these are turned in and oversewn to make them neat. This loose hem at the top of the pocket makes it easier for the nightdress to be slipped in and out.
Sew the side seams with a running stitch and a backstitch, then overcast the edges of the seams together to prevent fraying inside your pocket. The ends of the hem aren’t attached to the seams on each side; instead, they're turned in and overstitched to keep them tidy. This loose hem at the top of the pocket makes it easier to slide the nightdress in and out.
You will see that your nightdress pocket would be quite complete without the frill, but this makes a very pretty finish to it. Cash’s Frillings are supplied with a thread that draws up already in, so that you will have no need to gather your frilling but just to draw it up. If you measure round the flap, and then draw your length of frilling up to this size and distribute the fulness evenly all the way along, you can then just oversew the drawn-up edge of the frill to the edge of the hem all round on the wrong side of the flap.
You’ll notice that your nightdress pocket would look fine without the frill, but it adds a nice finishing touch. Cash’s Frillings come with a thread that’s already gathered, so you won’t need to do any gathering yourself—just pull it tight. If you measure around the flap and then pull your length of frilling to that size, distributing the fullness evenly along the way, you can just sew the gathered edge of the frill to the hem’s edge all around on the inside of the flap.

An Easy-to-make Pinafore.

Every little girl would rather make something that is pretty and useful than something that is useful without being pretty. Now here is a very delightful pinafore that you can make for yourself, that is pretty, useful, and also easy.
Every little girl would prefer to create something that is attractive and practical rather than something that is just practical but not attractive. Here is a really lovely pinafore that you can make for yourself, which is pretty, useful, and also easy.

The little girl in the picture looks so stylish in her pinafore that you would hardly believe you could so easily make one like it. But look at the picture on page 19 and you can see better what an easy little pattern it is—just a straight piece of muslin, hemmed and tucked and pleated into a band. This band comes across the chest, the two ribbons are taken over the shoulders, crossed at the back (just like a nurse’s apron straps), and brought round the waist to tie in a bow in front. The pinafore is made of white spotted muslin, trimmed with a sweet little insertion and tucks, and the ribbon used on it is pink. A pinafore like this would brighten up your school frock, and I am sure you are wanting to set to work to make one at once.
The little girl in the picture looks so stylish in her pinafore that you’d hardly believe you could easily make one like it. But check out the picture on page 19 and you’ll see what a simple pattern it is—just a straight piece of muslin, hemmed, tucked, and pleated into a band. This band goes across the chest, with two ribbons over the shoulders, crossed at the back (just like a nurse’s apron straps), and wrapped around the waist to tie in a bow in front. The pinafore is made of white spotted muslin, trimmed with a cute little insertion and tucks, and the ribbon is pink. A pinafore like this would brighten up your school dress, and I’m sure you’re eager to start making one right away.
You will need a yard of spotted muslin 24 inches wide, a yard of insertion, and two pieces of 1¼-inch pink ribbon each 1¼ yards long. Now ask mother to tell you what length you require from the yoke to the bottom hem, because you want to have your pinafore the right length. The little girl in the picture is eight years old, and she measures 28 inches from where the pleats are put into the band, to the bottom of her pinafore. Then another 3 inches is allowed for turning up the[18] hem, making 31 inches altogether.
You will need a yard of spotted muslin that is 24 inches wide, a yard of insertion, and two pieces of 1¼-inch pink ribbon, each 1¼ yards long. Now, ask your mom to tell you how long you need from the yoke to the bottom hem, so you can make your pinafore the right length. The girl in the picture is eight years old and measures 28 inches from where the pleats are attached to the band to the bottom of her pinafore. Then, another 3 inches is added for turning up the hem, totaling 31 inches altogether.

Now, having cut off this length, the sides have to be hemmed. For this the edges must be folded over twice. The first fold is only enough to turn in the raw edge, the second fold should be ¼-inch wide. Now tack it, so as to keep the turnings straight, by making a long stitch on top and a short stitch underneath.
Now, with this length cut, the sides need to be hemmed. To do this, the edges must be folded over twice. The first fold should just cover the raw edge, and the second fold should be ¼-inch wide. Now pin it in place to keep the folds straight by making a long stitch on top and a short stitch underneath.
If you are not sure how to hem, look at the little picture on this page. Put the needle in just under the fold, slant it towards you, and put it through the fold near the edge. Repeat this stitch, taking up only a few threads of material each time.
If you're not sure how to hem, check out the little picture on this page. Insert the needle just under the fold, tilt it towards you, and push it through the fold near the edge. Keep repeating this stitch, picking up just a few threads of fabric each time.

Having hemmed the sides, make a deep hem at the bottom, first turning down a little fold, and then a deep 2½ inch fold. Tack and hem it.
Having finished the sides, create a deep hem at the bottom by first folding down a small flap, and then creating a deep 2½ inch fold. Secure it with tacks and sew it down.
For the lowest tuck, crease the material 3½ inches from the bottom of the pinafore, and tack it about ½-inch below the crease, to keep the fold in place. Now, we only want our little tuck to be ¼-inch, so just at that distance below the crease, start running it along with tiny stitches as you learned to do for the work apron on page 4. To keep the tuck the same size all the way, you might keep testing it with a piece of paper notched in two places—the notches to be ¼-inch apart—the width of your tuck. When you have finished the tuck, take out the tacking stitches and [19]turn the tuck down so that the stitches come at the top and the tuck below them.
For the lowest tuck, fold the material 3½ inches from the bottom of the pinafore, and secure it with a tack about ½-inch below the fold to hold it in place. We only want our little tuck to be ¼-inch, so just at that distance below the crease, start sewing tiny stitches, just like you learned to do for the work apron on page 4. To keep the tuck the same size all the way, you might want to check it with a piece of paper marked in two places—the marks should be ¼-inch apart—the width of your tuck. Once you've finished the tuck, remove the tacking stitches and [19]turn the tuck down so that the stitches are on top and the tuck is below them.

Make a second tuck above the first, the bottom of the second to be ½-inch above the top of the first. Make a third tuck, the bottom of which must be 2½ inches above the top of the second, and a fourth, having the bottom ¼-inch above the top of the third. In this way you have two tucks together, then a space, and two more tucks together. On to this space between the pairs of tucks you sew the insertion. Cut off enough to go across the pinafore, allowing a little more at each end to turn in. Tack it, and then when you are sure that it is quite straight, run the insertion along both edges on to the muslin, taking an occasional back-stitch to keep it quite firm.
Make a second tuck above the first one, with the bottom of the second tuck ½ inch above the top of the first. Next, make a third tuck, ensuring the bottom is 2½ inches above the top of the second, and a fourth tuck, with the bottom ¼ inch above the top of the third. This way, you’ll have two tucks together, then a space, and then two more tucks together. In the space between the pairs of tucks, sew the insertion. Cut enough to go across the pinafore, leaving a bit extra on each end to fold in. Tack it down, and once you're certain it's straight, sew the insertion along both edges onto the muslin, taking an occasional back-stitch to keep it secure.
The top part of the pinafore is now put into a band, which must be as long as your width across the chest. You were shown how to put material into a band on page 5. The little difference here, however, is that instead of gathering the material, you pleat it. Mark the centre both of the band and the material to be pleated into it, with a pin. Turn three little pleats on each side of the centre of the material. On the little girl in the picture these pleats are each ¼-inch wide, but you must test carefully and get them the size just to fit the band. The picture at the top of page 18 shows pleats being put into a band.
The top part of the pinafore is now placed into a band, which needs to be as long as your chest width. You were shown how to add material into a band on page 5. The only difference here is that instead of gathering the material, you’ll be pleating it. Use a pin to mark the center of both the band and the material that you’ll be pleating into it. Create three small pleats on each side of the center of the material. On the little girl in the picture, these pleats are each ¼-inch wide, but you need to measure carefully to make sure they fit the band perfectly. The picture at the top of page 18 shows pleats being added to a band.
Now sew on to the band a little length of insertion, as you did at the bottom. At each end of the top of the band, however, leave about[20] ¾-inch of insertion not sewn to the band. This makes two tiny pockets into which you can slip the pink ribbon afterwards, and you can then sew the ribbon and insertion through to the band. Then, as you won’t want to have the pink ribbon washed as often as you do the pinafore, you simply have to take out those few stitches each time the pinafore goes to be washed. Besides, you may not always want to wear pink. With some dresses you may prefer to have pale blue ribbon, or heliotrope, or even red. Whatever colour you choose, sew it into the pockets, and your pinafore is ready for wear.
Now sew a short piece of insertion onto the band, just like you did at the bottom. However, leave about [20] ¾-inch of insertion not sewn at each end of the top of the band. This creates two small pockets where you can later slide in the pink ribbon, and then you can sew the ribbon and insertion through to the band. Since you won't want to wash the pink ribbon as often as the pinafore, you can just remove those few stitches each time the pinafore is washed. Also, you might not always want to wear pink. For some dresses, you may prefer pale blue ribbon, or heliotrope, or even red. Whatever color you choose, sew it into the pockets, and your pinafore is ready to wear.

The Pink Sun-bonnet.
A sun-bonnet—what does it make you think of? Doesn’t it remind you of your last summer holiday—the country, the birds, the flowers? Close your eyes and try to imagine it. Can’t you almost feel the heat, and hear the hum of the insects, and hear, too, the rattle of the pails, as you used to hear it when Maggie, the rosy-cheeked milk maid, wearing her pretty lilac sun-bonnet, went down to milk Brindle and Beauty and Cherry. You thought that sun-bonnet looked so pretty, and kept the sun from Maggie’s head and neck so beautifully, and you wished you had one too. You will wish it again, when you go to the country for your next holiday, and I expect you will want one when you are working in the sun in your own garden at home.
A sun bonnet—what does it make you think of? Doesn’t it remind you of your last summer vacation—the countryside, the birds, the flowers? Close your eyes and try to picture it. Can’t you almost feel the heat, hear the buzz of the insects, and also hear the clink of the buckets, like when Maggie, the rosy-cheeked milkmaid, wearing her pretty lilac sun bonnet, went down to milk Brindle and Beauty and Cherry? You thought that sun bonnet looked so nice, keeping the sun off Maggie’s head and neck so well, and you wished you had one too. You'll wish it again when you go to the countryside for your next vacation, and I bet you'll want one when you’re working in the sun in your own garden at home.

Suppose, therefore, you start to make a sun-bonnet for yourself. This one, that is shown in the picture, is really very easy to make. It is of a pretty pink print, with tiny flowers on it. But perhaps your favourite colour is not pink. Probably, you want a lilac one. Whatever colour[21] you decide on, get ½-yard of print that shade, and you are ready to start.
Suppose you decide to make a sun bonnet for yourself. The one shown in the picture is actually quite simple to make. It's in a pretty pink print with tiny flowers on it. But maybe pink isn’t your favorite color. You might prefer lilac. Whatever color[21] you choose, get ½ yard of fabric in that shade, and you’re all set to start.
Cut off 18 inches along the full length of the print, and hem along one edge. About 1 inch from the hem make a ¼-inch tuck, and 1 inch from this, another tuck. Now fold your print in half, and join up the two edges for the back of the bonnet with a French seam, which is described in the chapter on “Dolly’s Underwear.”
Cut off 18 inches along the entire length of the fabric, and hem one edge. About 1 inch from the hem, make a ¼-inch tuck, and then another tuck 1 inch from that. Now, fold your fabric in half and connect the two edges for the back of the bonnet using a French seam, which is explained in the chapter on “Dolly’s Underwear.”
Your sun-bonnet is now rather square in shape. To get it rounded at the back, take hold of the point and draw it down a little way on to the seam at the back. There catch it with a few stitches.
Your sun bonnet is now pretty square-shaped. To make it rounded at the back, grab the point and pull it down a bit onto the seam at the back. Then, secure it with a few stitches.
No sun-bonnet is complete without a frill, so the next thing is to sew this on. Cut off 18 inches of print 5 inches wide, hem along one side and both ends. Gather the other side, and draw it up until it is the length of the bottom edge of the bonnet beyond the second tuck. Sew it on the inside to the bonnet edge, leaving a little piece of the edge above the gathered piece. Turn in the edge, and hem it over the seam. This makes it quite neat. The edges along where the frill does not come are also hemmed up.
No sunbonnet is complete without a frill, so the next step is to sew this on. Cut 18 inches of fabric that is 5 inches wide, hem one side and both ends. Gather the other side and pull it until it matches the length of the bottom edge of the bonnet beyond the second tuck. Attach it to the inside of the bonnet's edge, leaving a small section of the edge above the gathered piece. Fold in the edge and hem it over the seam. This makes it look quite neat. The edges where the frill doesn't go are also hemmed.
For the strings, cut off two lengths of 14 inches, each 1½ inches wide. Hem each side and one edge. Turn the opposite edge in, and sew it neatly to the inside of the bonnet.
For the strings, cut two pieces that are 14 inches long and 1½ inches wide. Hem each side and one end. Fold the opposite end in and sew it neatly to the inside of the bonnet.
Your sun-bonnet is now finished, and you will be able to ask nurse to put it into the trunk the next time she is packing to take you to stay at the farm. Won’t Maggie be surprised when you arrive with a bonnet like hers, only just a few sizes smaller!
Your sun bonnet is all done, and you can ask the nurse to put it in the trunk the next time she’s packing to take you to the farm. Won’t Maggie be surprised when you show up with a bonnet just like hers, only a few sizes smaller!
A Red Satin Housewife.

What a tiresome way needles have of getting lost, haven’t they, and even whole packets of needles have a trick of disappearing nobody knows where. Every little girl who does any sewing really needs some safe place in which to keep her needles. This little housewife, which is shown both open and closed, is just the thing. You can stick odd needles in the flannel, and slip packets of needles in the pocket at the end. If you always remember to do this, you cannot very easily get them mislaid, and the little red housewife will be quite a friend to you. And what is more, it is not difficult to make.
What a frustrating way needles have of getting lost, right? Even whole packs of needles have a way of disappearing without a trace. Every little girl who sews really needs a safe spot to keep her needles. This little housekeeper, shown both open and closed, is just perfect. You can stick random needles in the flannel and tuck packs of needles in the pocket at the end. If you always remember to do this, you won’t easily misplace them, and the little red housekeeper will be a great friend to you. Plus, it’s not hard to make.

To make one exactly like that in the picture, you want a piece of crimson satin, 12½ inches long by 3¾ inches wide, a piece of white flannel, 10 inches long by 2¼ inches wide, some crimson embroidery silk, salmon pink embroidery silk, some crimson sewing silk, and a pearl button.
To create one just like the one in the picture, you'll need a piece of crimson satin that's 12½ inches long and 3¾ inches wide, a piece of white flannel that's 10 inches long and 2¼ inches wide, some crimson embroidery thread, some salmon pink embroidery thread, crimson sewing thread, and a pearl button.

First lay your flannel on the wrong side of the satin. If you put it on quite straight, you will find there is ¾-inch of red showing each side of the flannel, and 1¼ inch at each end. At each side turn down a hem of satin, so that it comes over the edge of the flannel. Tack and hem it. Now turn down and hem each end in the same way. You will have wider hems here.
First, lay your flannel on the backside of the satin. If you place it straight, you'll see ¾ inch of red showing on each side of the flannel, and 1¼ inch at each end. On each side, fold down a satin hem so that it covers the edge of the flannel. Tack and hem it. Now, fold down and hem each end in the same way. The hems here will be wider.
Having hemmed the satin to the flannel all round (taking care that the stitches do not go right through to the right side of the satin), turn down[23] 2 inches at one end, to make the little pocket you see in the picture, sewing it neatly at each side with oversewing stitches. Oversew also the open ends of the opposite hem.
Having stitched the satin to the flannel all around (making sure the stitches don't come through to the front of the satin), fold down[23] 2 inches at one end to create the small pocket shown in the picture, and sew it neatly on each side with oversewing stitches. Also oversew the open ends of the opposite hem.
Now you know how to feather-stitch, don’t you, or if you do not, you will see on page 5 how it is done. Work single feather-stitch with salmon pink silk down each side and end of the housewife. The inside is now divided up into four divisions, by double feather-stitch worked in crimson. This is worked in the same way as single feather-stitch, only that you take first two stitches one way and then two the other, instead of one each way. A little piece of double feather-stitching has been separately worked for you to see how it is done.
Now that you know how to do a feather stitch, if you don’t, you can check out page 5 to see how it's done. Use single feather stitch with salmon pink silk down each side and at the ends of the housewife. The inside is now divided into four sections with double feather stitch done in crimson. This is done the same way as single feather stitch, but you take two stitches one way first, then two the other, instead of one each way. A small piece of double feather stitching has been worked separately for you to see how it's done.
At the end opposite the pocket, make a loop in red silk of two threads, covered with blanket stitch. This is described in the chapter on “Dolly’s Bed.”
At the end opposite the pocket, create a loop with two threads of red silk, wrapped in blanket stitch. This is detailed in the chapter on “Dolly’s Bed.”
Now, starting at the pocket end, fold the needle-case over and over, and just opposite where the loop comes, sew a little pearl button, and the housewife is finished, and quite ready for you to stick your needles in.
Now, starting at the pocket end, fold the needle case back and forth, and right where the loop is, sew on a small pearl button, and the housewife is done and ready for you to insert your needles.
You can use silk quite as well as satin for your housewife, and if you like any other shade better than red, make it of your favourite colour.
You can use silk just as well as satin for your housewife, and if you prefer any other color over red, make it in your favorite shade.

Presents you can make for People.
A Feeder in Cross-Stitch.

Here is a pretty little feeder for baby that you will be able to make all by yourself. I expect mother will be only too pleased to help you to get the materials. You will want about half-a-yard of some soft white washing material, a small quantity of Penelope canvas, a ball of coloured “Brighteye” embroidery thread, and three-quarters of a yard of a narrow silk ribbon.
Here is a cute little feeder for your baby that you can make all by yourself. I'm sure your mom will be more than happy to help you gather the materials. You’ll need about half a yard of some soft white fabric, a small amount of Penelope canvas, a ball of colored “Brighteye” embroidery thread, and three-quarters of a yard of narrow silk ribbon.
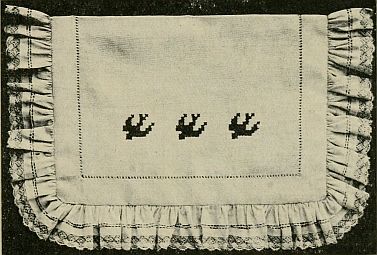
Do you see the three happy little dogs running after each other across the bottom of the feeder? These are worked in cross-stitch, also baby’s name in the centre.
Do you see the three happy little dogs chasing each other at the bottom of the feeder? These are stitched in cross-stitch, along with the baby's name in the center.
If you haven’t yet done any cross-stitch, you had better first look at the little illustration on page 26, and see exactly how it is done, before commencing to cut out your feeder.
If you haven't tried cross-stitch yet, you should first check out the little illustration on page 26 to see exactly how it's done before you start cutting out your feeder.
Just for practice, take a small square of canvas, and thread a crewel needle with the embroidery thread. Bring your needle up through one of the large holes in the canvas, count over two canvas threads to the right, and two upwards, put your needle in this hole, and pick up two threads towards the left. Pull your thread through, and this will give you the first part of the cross. Now put your needle in the hole two threads to the right of the hole you started from, and bring it up through the hole two threads to the left of [26]the first hole, as shown in the second part of the little illustration.
Just to practice, grab a small square of canvas and thread a crewel needle with the embroidery thread. Bring your needle up through one of the large holes in the canvas, count over two threads to the right, and two up, insert your needle into this hole, and catch two threads towards the left. Pull your thread through, and this will complete the first part of the cross. Next, insert your needle into the hole two threads to the right of where you started, and bring it up through the hole two threads to the left of [26]the first hole, as shown in the second part of the little illustration.

This, as you will see, completes the first cross, and brings the thread ready to make a second one in the same way.
This, as you’ll see, completes the first cross and prepares the thread to create a second one in the same way.
The lower part of the illustration shows the dog’s tail commenced, and how you should place your needle when you want to make a cross on the slant below. One thing you should be very careful about when working in cross-stitch: see that the threads are always crossed in the same direction, and not sometimes one way and sometimes another. Your work will look so much better if this rule is always followed.
The bottom part of the illustration shows how to start the dog's tail and where to position your needle when you want to make a slanted cross below. One important thing to keep in mind when doing cross-stitch is to always cross the threads in the same direction—don’t switch it up. Your work will look so much better if you stick to this rule.
When you feel quite sure you can work the crosses evenly, you can cut out the feeder. Perhaps you may like first to cut it out in paper. Take your tape measure and measure off a piece of paper 12 inches long and 11 inches wide. Fold this right down the centre, the longest way. Measure two inches down the fold and two inches up the cut edges from one end, and cut round from points A to B, as shown in the little diagram. This will give you a curve for baby’s neck. Now measure down an inch on the long outer edges, and cut from point B on the slant to this point, which we will call C.
When you’re sure you can evenly work the crosses, you can remove the feeder. You might want to first cut it out of paper. Grab your tape measure and measure a piece of paper that is 12 inches long and 11 inches wide. Fold it in half lengthwise. From the fold, measure two inches down and two inches up from the cut edges at one end, then cut around from points A to B, as shown in the little diagram. This will create a curve for the baby’s neck. Next, measure down one inch on the long outer edges, and cut from point B at an angle to this point, which we’ll call C.

Now that you have a paper[27] pattern, you will be able to place this over your material and cut it from this. You will want to have two pieces exactly alike, so that you can use one to line the feeder.
Now that you have a paper[27] pattern, you can place it over your material and cut it out. You'll need two identical pieces so you can use one to line the feeder.
We have now come to the interesting part of working the little dogs. Tack a strip of canvas along the bottom of the right side of one of the pieces you have just cut out; the dogs are nine crosses high, so the strip should be wide enough to take the design and leave a few extra threads of canvas above and below. It is best to commence with the centre dog, starting the centre cross of the design in the centre hole of the canvas, you will then be sure of getting it right in the middle. When working the other dogs, leave 16 threads of canvas between the middle one and each of these. You will then have your three little dogs at equal distances apart, and there will be no chance of their catching each other up! Canvas must be placed across the centre for the name in the same way.
We’ve now reached the fun part of working on the little dogs. Attach a strip of canvas along the bottom of the right side of one of the pieces you just cut out; the dogs are nine crosses high, so the strip should be wide enough to fit the design and allow for a few extra threads of canvas above and below. It’s best to start with the center dog, placing the center cross of the design in the center hole of the canvas to ensure it's perfectly centered. When working on the other dogs, leave 16 threads of canvas between the middle one and each of them. This way, you’ll have your three little dogs evenly spaced apart, so there’s no chance of them catching each other! You’ll also need to place a canvas strip across the center for the name in the same way.

From the illustrations of the dog and the letters, you will easily be able to count the crosses, and see how they are placed. If baby’s name is not May, and you want to work another name, designs for a whole alphabet appear on another page.
From the pictures of the dog and the letters, you can easily count the crosses and see how they're arranged. If the baby's name isn't May and you want to use a different name, designs for the entire alphabet are available on another page.
When you have worked all your designs, the canvas threads must be pulled away. Cut the canvas down fairly close to the embroidery, and pull out the threads one by one. Baby’s name is shown with all the threads of the ‘Y’ pulled out, and the ‘A’ as it looks when only the cross threads have been pulled away.
When you’ve finished all your designs, you need to remove the canvas threads. Cut the canvas down close to the embroidery and pull out the threads one by one. Baby's name is shown with all the threads of the ‘Y’ taken out, and the ‘A’ as it looks when only the cross threads have been removed.
To make up the feeder, place the plain portion of the feeder over the embroidered one, with the right sides facing one another, and run round all the edges about a quarter of an inch in from the edge, leaving[28] only the curved neck edges open. A running stitch, with a back-stitch put in now and then, is the best for this, as this will hold it firm. Turn the feeder out on the right side, then turn in the neck edges and oversew them together. How the oversewing stitch is made is shown in the little illustration on this page. Hold the edges to be joined together firmly in your left hand, and work from right to left, always putting your needle in slanting just as the little picture shows, and taking up about a couple of threads of the material from each of the edges you are joining together.
To assemble the feeder, place the plain part on top of the embroidered part, with the right sides facing each other. Sew around all the edges about a quarter of an inch from the edge, leaving only the curved neck edges open. A running stitch, with a backstitch added now and then, works best for this as it keeps everything secure. Turn the feeder right side out, then tuck in the neck edges and sew them together. The oversewing stitch is demonstrated in the small illustration on this page. Hold the edges to be joined together tightly in your left hand, and stitch from right to left, always inserting your needle at a slant just like the little picture shows, and catching about a couple of threads from each edge you are sewing together.

The piece of work in the illustration has been flattened out, in order that you may see the stitches more clearly; but when you are oversewing you will hold the two pieces together with the thumb and first finger of your left hand, oversewing the top of the two edges.
The work shown in the illustration has been flattened out so you can see the stitches more clearly; however, when you are oversewing, you should hold the two pieces together with the thumb and first finger of your left hand, oversewing the top of the two edges.
Now cut your length of ribbon in half, and sew one piece to each end of the neck of the feeder, so that it can be tied round baby’s neck when she wants to take her food.
Now cut your ribbon in half and sew one piece to each end of the neck of the feeder, so that it can be tied around the baby’s neck when she wants to eat.

Cats on a Chair Back.
Here is a very pretty thing that you will be able to make for Mother. How amused she will be, when she sees these two funny cats sparring at each other, and how nice the Chair Back will look hanging over the back of father’s chair, where he puts his head.
Here is a really cute thing you can make for Mom. She'll be so entertained when she sees these two silly cats playfully fighting with each other, and the Chair Back will look great hanging over the back of Dad's chair, where he rests his head.
The Chair Back is hemstitched at each side and across each end, so before we commence to make it we will find out how to do this stitch.
The Chair Back is hemstitched on each side and at both ends, so before we begin making it, we'll learn how to do this stitch.
Shall we take a small piece of linen and try and copy the little picture we have of the stitch just for practice? When you have tacked a hem along, draw out five of the horizontal threads of your linen, just beneath the edge of the hem.
Shall we take a small piece of linen and try to replicate the little picture we have of the stitch just for practice? When you’ve tacked a hem down, pull out five of the horizontal threads of your linen, just below the edge of the hem.

Now for the stitch itself. Hemstitching is always done on the wrong side of your piece of work, and the stitch is worked from right to left. Thread your needle with linen thread or a fairly coarse crochet[30] cotton, and fasten the end of it to the commencement of the hem.
Now for the stitch itself. Hemstitching is always done on the wrong side of your piece, and the stitch is worked from right to left. Thread your needle with linen thread or a fairly thick crochet[30] cotton, and secure the end to the start of the hem.
Now look how the needle is placed in the top part of the picture, and put yours in in the same way. Place it under four of the open threads, then pull your needle through, which draws these four threads up closely together. Then make a small upright stitch up through the hem, placing your needle as shown in the second part of your illustration. These two stitches are repeated all the way along. This is the simplest form of hemstitching, and is what is used on the sides of the Chair Back.
Now take a look at how the needle is positioned in the top part of the picture, and insert yours in the same way. Slide it under four of the open threads, then pull your needle through, which brings these four threads together tightly. Next, make a small upright stitch up through the hem, placing your needle as shown in the second part of your illustration. Repeat these two stitches all the way along. This is the simplest form of hemstitching, and it's what is used on the sides of the Chair Back.

For ladder hemstitching you work along the other side of the open threads, just as above, taking the same group of threads. When working on coarse linen, or canvas, two or three threads need only be picked up each time, all that really matters is that you keep to the same number all the way along.
For ladder hemstitching, you work on the other side of the open threads, just like before, taking the same group of threads. When working with coarse linen or canvas, you only need to pick up two or three threads each time; what really matters is that you stick to the same number throughout.

The stitch we have across the ends of our Chair Back is called[31] serpentine stitch, and the small piece of canvas at the bottom of the picture shows how to work this. The first side is worked as in the simple hemstitching, taking up four threads each time, but in working the second side four threads are again taken up, but the needle is here put between the threads taken up on the opposite side.
The stitch we have across the ends of our Chair Back is called[31] serpentine stitch, and the small piece of canvas at the bottom of the picture shows how to do this. The first side is done like simple hemstitching, picking up four threads each time, but for the second side, four threads are picked up again, and the needle is inserted between the threads picked up on the opposite side.
When you want to turn a corner in hemstitching a square cloth, you first draw your threads out where the edge of your hem is to come each way; then you fold the material on the wrong side diagonally through the corner, turn the pointed end in until the point reaches the open threads, make a crease, turn the point back and backstitch along the crease. You have a little picture showing just where the backstitching is done. After this cut off the point beyond the backstitching, turn the corner inside out, and you have a neat little seam going diagonally from the corner to the edge of your hem (as in illustration).
When you're ready to turn a corner while hemstitching a square cloth, first pull your threads out where the edge of your hem should be on each side. Then, fold the material on the wrong side diagonally at the corner, tuck the pointed end in until it reaches the exposed threads, create a crease, turn the point back, and backstitch along the crease. You’ll have a little guide showing exactly where the backstitching goes. After that, trim the point beyond the backstitching, turn the corner inside out, and you’ll have a clean seam running diagonally from the corner to the edge of your hem (as shown in the illustration).

You will find that these simple forms of hemstitching will be very useful to you in making all kinds of things.
You’ll see that these basic hemstitching techniques will be really helpful for creating all sorts of things.
To make the chair back you will want a strip of white Hardanger canvas, a yard long and about 17 inches wide; this will allow for the hems.
To make the chair back, you'll need a strip of white Hardanger canvas, a yard long and about 17 inches wide; this will account for the hems.
First measure up five inches from each end, and draw out four threads of canvas across each end, then draw out two threads at each side, about three-quarters of an inch in from the set of open threads at one end to the other; you will have to cut the threads at each end. Now tack all the hems[32] along; you can turn in the ends of the wide hems and oversew them together.
First, measure five inches from each end and pull out four threads of the canvas at each end. Then, pull out two threads on each side, about three-quarters of an inch in from the open threads at one end to the other; you'll need to cut the threads at each end. Now, tack all the hems[32] together; you can fold in the ends of the wide hems and oversew them.
Hemstitch the side hems in simple hemstitching, taking up three threads of canvas each time, and the wide hems in the serpentine stitch, taking two threads of canvas each time; you will remember to take the alternate sets on the second side.
Hemstitch the side hems with basic hemstitching, picking up three threads of canvas each time, and the wide hems with the serpentine stitch, picking up two threads of canvas each time; remember to take the alternate sets on the second side.
Now you have only to embroider the cats. These are worked in cross-stitch, using “Peri-lusta” Pearl Knit, size 5. Shade No 249 is a pretty red that would do beautifully. Directions for working cross-stitch on canvas are given on page 26, and you will be able to copy the cats from the enlarged designs given below.
Now you just need to embroider the cats. They're done in cross-stitch using “Peri-lusta” Pearl Knit, size 5. Shade No 249 is a lovely red that would work perfectly. Instructions for doing cross-stitch on canvas can be found on page 26, and you can copy the cats from the enlarged designs provided below.

If you fold the chair back right down the centre, and start the whiskers of the cats four threads on each side of this line, they will be about the right distance apart. The bristles on the legs and tails are made by working half crosses, and those on the back by making long single strokes, the length of two crosses.
If you fold the chair back down the middle and start the whiskers of the cats with four threads on each side of this line, they should be about the right distance apart. The bristles on the legs and tails are made by doing half crosses, and the ones on the back are created by making long single strokes, the length of two crosses.
The whiskers of the cat extend the length of three crosses. Three threads of the Hardanger canvas[33] are allowed for each cross. On the material used for the chair back in your picture, each cross worked out at about an eighth of an inch across, but if the canvas you are using happens to be a coarser one, you may perhaps find your crosses work out much larger, in which case you must go over two threads each time so as to get your animals the right size for the chair back.
The cat's whiskers are the length of three crosses. You should use three threads of the Hardanger canvas[33] for each cross. On the material for the chair back in your picture, each cross is about an eighth of an inch wide, but if your canvas is coarser, your crosses might turn out larger. In that case, you'll need to go over two threads each time to make sure your animals are the right size for the chair back.

Perhaps you would rather not make your chair back of Hardanger canvas at all, but would prefer to use linen, or some material that has not got wide even threads; this is not easy to count when working your crosses. In that case you must first tack Penelope canvas over your work, and embroider the cats over this; the enlarged designs in your pictures were worked on Penelope canvas, and you can see what nice large holes it has, and how easy it is to work on. And when you have finished the designs you just cut away the canvas quite close to the design, and pull the threads of canvas out of the crosses. You can put cross-stitch on to any material in this way.
Perhaps you'd prefer not to use Hardanger canvas for your chair back at all and instead want to use linen or another material that has uneven threads. This makes it hard to count while working your crosses. If that's the case, you should first tack Penelope canvas over your work and embroider the cats on this. The enlarged designs in your pictures were made on Penelope canvas, which has nice large holes that make it easy to work on. Once you've finished the designs, just cut away the canvas close to the design and pull the threads out of the crosses. You can apply cross-stitch to any material this way.
A Hardanger Handkerchief Sachet.
Have you thought yet what you are going to make Mother for her birthday present? How would you like to work her a handkerchief sachet in Hardanger Embroidery? You don’t know how? Well, if you follow this little talk very carefully, I think you will soon learn.
Have you thought about what you're going to make Mom for her birthday? How about making her a handkerchief sachet with Hardanger embroidery? Don’t know how? If you pay close attention to this little guide, I think you'll learn quickly.

What is Mother’s favourite colour? Rose Pink? Very well; how delighted she will be with what you are going to make!
What is Mom's favorite color? Rose pink? Great; she'll be so happy with what you're going to make!
Can’t you take Mother shopping with you one day, because you will want to buy a few little things for the sachet. You will want a piece of Congress Canvas—cream or white—a square 12 inches each way, a ball of Ardern’s “Star Sylko” No. 744, size 5, a square of white silk the same size as the canvas for lining the sachet, a crewel needle, 3 yards of pink ribbon half-an-inch wide. (The best kind to get is a silk ribbon having threads running through, that you pull and draw the ribbon up into a ruche. This saves you all the trouble of running a thread through to make a ruche). You also want a little pink sewing silk, some white sewing silk, a pair of sharp scissors with points, and, of course, your thimble.
Can’t you take Mom shopping with you one day? You’ll want to buy a few little things for the sachet. You’ll need a piece of Congress Canvas—cream or white—12 inches square, a ball of Ardern’s “Star Sylko” No. 744, size 5, a square of white silk the same size as the canvas for lining the sachet, a crewel needle, and 3 yards of pink ribbon that’s half an inch wide. (The best kind to get is silk ribbon with threads running through it that you can pull to gather the ribbon into a ruche. This saves you the hassle of running a thread through to create a ruche). You’ll also need some pink sewing silk, some white sewing silk, a pair of sharp scissors with pointed tips, and of course, your thimble.
First, make sure your canvas is perfectly even all round, 12 inches on each side. When cutting it, be careful to cut between the[35] same threads all the way down. Turn in about a quarter of an inch all round very carefully, and tack it. Fig. 1 shows the edge being tacked. When you come to a corner, just turn in again the end of the second side, to make it quite neat. You will see in Fig. 1 what I mean.
First, make sure your canvas is perfectly even all around, 12 inches on each side. When cutting it, be careful to cut between the[35] same threads all the way down. Fold in about a quarter of an inch all around very carefully, and tack it. Fig. 1 shows the edge being tacked. When you get to a corner, just fold in the end of the second side to keep it neat. You will see in Fig. 1 what I mean.

The tacking done, the pretty work begins. Thread your crewel needle with the “Sylko.” At one corner count 24 threads in from each side. The hole just where these threads cross is your starting point. Now leave 3 holes below, and in the 4th bring your needle up from underneath for a satin stitch. You will see how to do this stitch in making the doll’s bedspread (page 67), only as you are using a different kind of canvas here, you leave 3 holes instead of one. Make 4 of these stitches. Leave 3 holes, and into the 4th start another little block of satin stitches. Do 4 of these little blocks. This brings you to the corner. Fig. 2 shows the little blocks.
The tacking done, the fun work begins. Thread your crewel needle with the “Sylko.” At one corner, count 24 threads in from each side. The spot where these threads cross is your starting point. Now leave 3 holes below, and in the 4th, bring your needle up from underneath for a satin stitch. You'll see how to do this stitch when making the doll’s bedspread (page 67), but since you’re using a different type of canvas here, leave 3 holes instead of one. Make 4 of these stitches. Leave 3 holes, and in the 4th, start another little block of satin stitches. Create 4 of these little blocks. This takes you to the corner. Fig. 2 shows the little blocks.

To turn the corner, after making your 4th stitch, bring your needle up into the 4th hole from the top of your satin stitch, not the 4th from the bottom as before. Make one little block this way. Turn another corner in exactly the same way, bringing the needle up in the 4th hole from the top of the satin stitch. Start another block. When you have put the needle down for the 4th stitch of this block, bring it up 4 holes below the last hole at which you brought it up. Then put it back into the last hole at which you brought it up. Fig. 3 will make this clear. Make 4 stitches, now working from right to left. Turn again, and make[36] 4 stitches, working from left to right. You will notice that wherever you turn a little corner—or make an angle—2 stitches go into the same hole, one each way.
To turn the corner, after making your 4th stitch, bring your needle up into the 4th hole from the top of your satin stitch, not the 4th from the bottom like before. Make one small block this way. Turn another corner the same way, bringing the needle up in the 4th hole from the top of the satin stitch. Start another block. When you’ve put the needle down for the 4th stitch of this block, bring it up 4 holes below the last hole where you brought it up. Then put it back into the last hole where you brought it up. Fig. 3 will make this clear. Make 4 stitches now, working from right to left. Turn again, and make[36] 4 stitches, working from left to right. You'll notice that wherever you turn a little corner—or make an angle—2 stitches go into the same hole, one each way.

When you have made 8 little blocks in this way, turn again, and make 4 blocks of satin stitch as you did on the first side, the last stitch of the 4th block should take you back into the hole we called your starting point. If it doesn’t, you have made a little mistake somewhere—either you have missed a thread, or made two stitches in one hole, or something like that, and you will have to undo the work until you find your mistake. This sounds rather hard lines, doesn’t it, but unless you have got this outside part right, you cannot cut and draw the threads properly, and we want to have Mother’s sachet quite perfect, don’t we?
When you’ve made 8 little blocks like this, turn it around and create 4 blocks of satin stitch just like you did on the first side. The last stitch of the 4th block should bring you back to the hole we called your starting point. If it doesn’t, you’ve made a little mistake somewhere—maybe you missed a thread or stitched twice in one hole, or something like that, and you’ll need to undo your work until you find the mistake. This might sound pretty tough, but unless you get this outer part right, you won’t be able to cut and pull the threads properly, and we want Mother’s sachet to be perfect, right?

How much quicker we seem to get on with scissors than with a needle and cotton, don’t we? It is such quick work to cut a hole, but quite slow work to mend one! Well, you are going to do some “scissors work” now, but you will have to do it carefully, and make sure first just which threads you are going to cut. I want you to notice one important thing. Always cut across the ends of your stitches, never along the sides of them. Isn’t[37] this quite clear? Well, look at the little diagram for cutting, Fig. 5. You cut the 3 threads between A and B, and between A and C, and between C and J, and between D and E, and between G and H, but never those between J and I, or between I and D. You see what I mean now, don’t you? Then be careful always not to cut too far, that is to say, never cut beyond the satin stitches, only cut the threads enclosed by them.
How much faster we seem to work with scissors than with a needle and thread, right? It's so easy to cut a hole, but it takes time to fix one! Now, you’re going to do some “scissors work,” but you need to be careful and first identify which threads you plan to cut. I want you to pay attention to one important thing. Always cut across the ends of your stitches, never along their sides. Isn’t [37] this pretty clear? Now, look at the little diagram for cutting, Fig. 5. You’ll cut the 3 threads between A and B, and between A and C, and between C and J, and between D and E, and between G and H, but never those between J and I, or between I and D. You see what I mean now, don’t you? So always be cautious not to cut too far; that is, never cut beyond the satin stitches, only cut the threads that are enclosed by them.

Pull out the threads you have cut, and you will have a little corner, like that shown in Fig. 4.
Pull out the threads you've cut, and you'll have a little corner, like the one shown in Fig. 4.


Now you have to do the weaving, and this is very easy, and nice work to do. Only remember not to drag the threads too tightly, but you must not have them loose—just firm and even. Bring your needle up from underneath, in the middle of one of the groups of 4 threads, take it over 2 threads on one side up into the middle again, and over 2 threads on the other side. Look at Fig. 4 again. Repeat this until you have 5 stitches on each side. Bring your needle up between another set of threads, and repeat. When[38] you have finished all the weaving, fasten off neatly at the back of the canvas, and your corner is done. Work the other 3 corners in the same way.
Now you need to start weaving, and it’s really simple and enjoyable. Just remember not to pull the threads too tight, but don’t leave them loose—keep them firm and even. Bring your needle up from underneath, in the middle of one group of 4 threads, then take it over 2 threads on one side and back into the middle again, and over 2 threads on the other side. Look at Fig. 4 again. Repeat this until you have 5 stitches on each side. Bring your needle up between another set of threads and repeat. When[38] you’ve finished all the weaving, tie it off neatly at the back of the canvas, and your corner is complete. Do the same for the other 3 corners.


Take your ribbon and cut off two pieces, each 8 inches long. These are for the bow. Divide the remainder into four equal lengths, and mark each little division with a small pin. This is so that you will use just the same length on each of the four sides of your square. With a needle, draw out three or four threads running through the middle of the ribbon, and pull these gently to draw the ribbon up. It is not enough to pull on one thread or two, because, although it is easier to draw, it may snap before you get very far. Draw up the ribbon until it is exactly the size to go round your square; then pin the gathered ribbon round the sides, taking care to get one of the divisions marked by the pin on each side of the square.
Take your ribbon and cut two pieces, each 8 inches long. These are for the bow. Divide the leftover ribbon into four equal lengths, and mark each little section with a small pin. This way, you’ll use the same length on each of the four sides of your square. Using a needle, pull out three or four threads running through the middle of the ribbon, and gently pull these to gather the ribbon. It’s not enough to pull just one or two threads, because while it’s easier to pull, they might snap before you get very far. Gather the ribbon until it’s the right size to go around your square; then pin the gathered ribbon around the sides, making sure to place one of the marked divisions with the pin on each side of the square.

Thread a needle with pink sewing silk, and sew the ribbon[39] on, through the centre, taking a very tiny stitch on top, and a longer one underneath. Make a back-stitch every now and then, by putting the needle back instead of forward. This makes it a little more secure. Allow a little extra fulness at the corners, so as to turn these carefully and evenly, and here you will need one or two little backstitches. When you get round to the corner from which you started, turn in the end of your ribbon, and join it neatly to your starting end. Take out the pins.
Thread a needle with pink sewing silk, and sew the ribbon[39] on through the center, taking a tiny stitch on top and a longer one underneath. Make a back stitch every so often by putting the needle back instead of forward. This will make it a bit more secure. Allow a little extra fullness at the corners to turn them carefully and evenly, and here you’ll need one or two little back stitches. When you get back to the corner where you started, tuck in the end of your ribbon and join it neatly to the starting end. Take out the pins.


Take the square of white silk, and turn in once all round about a quarter-inch, and tack it. Lay it on your square of canvas, so that the turned-in sides of canvas and silk come together. Pin these together all round. With the white sewing silk, hem the silk to the canvas carefully, so that each stitch catches up a thread of the canvas, but does not come through the gathered ribbon. At the second corner, slip in one end of one of your lengths of ribbon[40] between the silk and canvas, and when you come to that, hem it in with the silk to the canvas. When the hemming is finished, the tacking stitches can be taken out of the silk.
Take the square of white silk and fold over a quarter inch all the way around, then tack it down. Place it on top of your square of canvas, aligning the folded edges of both the canvas and the silk. Pin them together all around. Using the white sewing silk, carefully hem the silk to the canvas so that each stitch catches a thread of the canvas but doesn't go through the gathered ribbon. At the second corner, slide one end of one of your ribbon pieces[40] between the silk and canvas, and when you reach that point, hem it in with the silk to the canvas. Once you finish hemming, you can remove the tacking stitches from the silk.

You have now got a silk-lined canvas square, with a little end of ribbon attached to one corner. You must now fold your square so that all the worked corners meet, as you see in the picture on page 34. We will call your square A, B, C, D, as the corners are marked in the diagram, Fig. 6. Divide each side in half (just put a tiny pin in to mark the division), and call these points E, F, G, and H. Now fold along the lines E to F, F to G, G to H, and H to E. This will bring your corners A, B, C and D all together in the middle if you have done your measuring quite carefully. (See Fig. 7). Let us call D the point that has the ribbon end. Now A, B and C have all to be joined together, but D is not sewn to them. D’s little ribbon end is only tied to the centre, so that the sachet can be opened and closed. Catch A F and B F and A E and C E together with just a few tiny stitches under the ribbon, sew the points A, B, C neatly together. And here is where you attach your last little bit of ribbon having turned in one end neatly. While you are sewing on this centre you had better keep your left fingers inside the sachet, and your thumb outside. Then you will be quite sure that you are not sewing right through the sachet, because it would be serious if when Mother came to put her handkerchiefs in, she couldn’t get them down because it was sewn through, wouldn’t it? You have now only to[41] tie your two ends of ribbon in a nice bow, and Mother’s handkerchief sachet is complete.
You now have a silk-lined square of fabric with a small piece of ribbon attached to one corner. Fold your square so that all the corners come together, as shown in the picture on page 34. We'll label your square corners as A, B, C, and D, as indicated in the diagram Fig. 6. Divide each side in half (just use a tiny pin to mark the middle), and call these points E, F, G, and H. Now fold along the lines E to F, F to G, G to H, and H to E. If you measured carefully, the corners A, B, C, and D will meet in the center. (See Fig. 7). Let's refer to D as the corner with the ribbon end. Now, you need to join A, B, and C together, but D won't be sewn to them. The little ribbon end from D is just tied to the center, so the sachet can open and close. Catch A F and B F and A E and C E together with a few tiny stitches beneath the ribbon to sew points A, B, and C neatly together. This is where you attach your last little bit of ribbon, having tucked in one end neatly. While you're sewing this center, it’s best to keep your left fingers inside the sachet and your thumb outside. This way, you'll make sure that you’re not sewing through the sachet, because it would be a problem if, when Mother tried to put her handkerchiefs in, she couldn’t get them down because it was sewn shut, right? Now, all you have to do is tie the two ribbon ends in a nice bow, and Mother's handkerchief sachet is complete.
Of course, you will want to make some more of these sachets, and you can work them in other colours, or line them with coloured silk. It would look pretty, for instance, to have a deep cream canvas, worked with Ardern’s “Star Sylko” No. 734, Size 5, which is a lovely cream shade. Then have for the lining, forget-me-not blue, and blue ribbon to match. Or you could work the satin-stitch in dark green, No. 753, and the weaving in a paler green, No. 751, and have a white silk lining and pale green ribbon. And I am sure you will think of lots of other pretty colours you can use.
Of course, you’ll want to make some more of these sachets, and you can use different colors or line them with colored silk. It would look nice, for example, to have a deep cream canvas, stitched with Ardern’s “Star Sylko” No. 734, Size 5, which is a lovely cream shade. Then use forget-me-not blue for the lining and blue ribbon to match. Or you could do the satin-stitch in dark green, No. 753, and the weaving in a lighter green, No. 751, with a white silk lining and pale green ribbon. I’m sure you can think of plenty of other pretty colors to use.
Perhaps you would rather work another kind of corner. Six others are shown, any of which you would be able to manage, I am sure. For four of them, you do not have to cut any threads. The one with the cross in the middle, Fig. 8, would be very quickly worked. The outer part of this is worked almost like the corner on the sachet, only there are no straight blocks in a row here, and you take 5 stitches over 5 threads for each block. Then you work 5 stitches over 5 threads each way into one hole in the middle for the centre cross.
Perhaps you'd prefer to work a different corner. Six other options are available, any of which you could easily handle, I'm sure. For four of them, you won't need to cut any threads. The one with the cross in the center, Fig. 8, could be done very quickly. The outer part is worked almost like the corner on the sachet, but there aren't any straight blocks in a row here, and you take 5 stitches over 5 threads for each block. Then, you work 5 stitches over 5 threads each way into a single hole in the center for the cross.
Fig. 9 is another little corner, just like the one on the sachet, only instead of cutting any threads, you fill up alternate squares with satin-stitch blocks.
Fig. 9 is another little area, just like the one on the sachet, but instead of cutting any threads, you fill in alternate squares with satin-stitch blocks.

Then the star pattern, Fig. 10, is pretty and easy. You start by taking a stitch over 8 threads, then take one[42] over 7, over 6, over 5, over 4, over 3, over 2. Now over 2 again, and so on, up to 8. Then start another row at right angles to the first, and two more rows in the same way. The long stitches in the middle are taken into the holes from which the short stitches were taken.
Then the star pattern, Fig. 10, is pretty and easy. You start by taking a stitch over 8 threads, then take one[42] over 7, over 6, over 5, over 4, over 3, over 2. Now over 2 again, and so on, up to 8. Then start another row at right angles to the first, and two more rows in the same way. The long stitches in the middle are taken into the holes from which the short stitches were taken.
Another easy little design shows two straight rows of satin-stitch crossing two in opposite ways (Fig. 11).
Another simple design features two straight rows of satin-stitch crossing each other in opposing directions (Fig. 11).
Sometimes a few rows of blocks outside a design will improve it, and make it look bolder. This is the case with the open-work square, Fig. 12. A second row of blocks has been added outside the first, working the stitches the other way.
Sometimes a few rows of blocks outside a design can enhance it and make it look bolder. This is the case with the open-work square, Fig. 12. A second row of blocks has been added outside the first, using stitches in the opposite direction.
In the last open-work corner, Fig. 13, 4 stitches are taken over 4 threads, and 5 over 8 threads, then 4 over 5 threads again, and so on. All the threads are then cut away, except the 4 in the middle of each side, and these are woven as usual.
In the last open-work corner, Fig. 13, 4 stitches are taken over 4 threads, and 5 over 8 threads, then 4 over 5 threads again, and so on. All the threads are then cut away, except the 4 in the middle of each side, and these are woven as usual.
Now set to work and see what you can do. After a little practice, you will probably be able to make up some corners for yourself, but until you are quite sure of the work, it is better to practise those I have shown you.
Now get to work and see what you can do. After some practice, you’ll probably be able to create some corners on your own, but until you’re completely confident in the work, it’s better to practice the ones I’ve shown you.

Pale Blue and Heliotrope.
You don’t know what to make for Auntie? Why not make her a pretty bag to keep her work in? The one on this page is in pale blue, and looks ever so pretty. Too difficult? Oh no, everything is easy when you know the way, and you are going to have a little lesson in Hairpin Work to-day. No, the work isn’t exactly done on a hairpin, but on a staple. This is similar in shape, only larger.
You’re not sure what to make for Auntie? How about making her a cute bag to store her work? The one on this page is in light blue and looks really nice. Think it’s too hard? Not at all! Everything is easy once you know how, and you’re going to get a little lesson in Hairpin Work today. No, the work isn’t actually done on a hairpin, but on a staple. It’s similar in shape, just bigger.

For this bag you will want your staple—get one about 2 inches in width—and a No. 1 steel crochet hook. You will also want a ball of Strutt’s Macramè Thread No. 512, Size 10. Then, if you want to line your bag, you will need something pretty for this. The bag you see here is lined with a heliotrope sateen, which peeps very prettily through the pale blue. One more thing—a few little white bone rings for the drawing-up strings to go through.
For this bag, you’ll need your staple—grab one that’s about 2 inches wide—and a No. 1 steel crochet hook. You’ll also need a ball of Strutt’s Macramè Thread No. 512, Size 10. If you want to line your bag, find something nice for that. The bag shown here is lined with a heliotrope sateen, which looks really pretty through the pale blue. One more thing—you’ll need a few little white bone rings for the drawstring to go through.

Commence by making a loop in your thread, you will want this loop to be as long as half the distance between the two prongs of your staple, so that when you hang it over one side the knot comes just in the middle. So do not tighten it until you see that it will come just here. Put this[44] loop over the left side of the staple. Put the thread across the front, and over the right prong of the staple. Now take your crochet hook, put it in the loop, and catch the thread that you have put over the right prong from front to back. This makes the first loop on the right. Slip the hook over the right prong *, turn the staple over towards you, wrapping the thread round the left prong, as you do so. By turning, you now make the left prong the right one, you have now one loop on your crochet hook. Put the hook under the loop which is now on the left side of the staple, draw the thread through this. This gives you two loops on your hook. Put the thread over the crochet hook, and draw it through the two loops. Slip the hook over the right prong, and repeat from *. The picture shows the thread being drawn through the loop.
Start by creating a loop in your thread; you want this loop to be about half the distance between the two prongs of your staple so that when you hang it over one side, the knot lands right in the middle. Don't tighten it until you're sure it will sit correctly. Next, place this[44] loop over the left side of the staple. Bring the thread across the front and over the right prong of the staple. Now take your crochet hook, insert it into the loop, and catch the thread that you placed over the right prong from front to back. This forms the first loop on the right. Move the hook over the right prong, turn the staple towards you, and wrap the thread around the left prong as you do this. By turning, the left prong now becomes the right one, and you'll have one loop on your crochet hook. Place the hook under the loop that’s now on the left side of the staple and pull the thread through it. This gives you two loops on your hook. Bring the thread over the crochet hook and draw it through both loops. Slip the hook over the right prong and repeat from the asterisk (*). The picture illustrates the thread being pulled through the loop.
You must keep on making these loops until you have 90 on each side of the staple. Then finish off in this way. When you have made the 90th loop, don’t turn the staple, but make two or three chain stitches, cut the thread from the ball about 3 inches from your hook, and draw it through the loop on your hook. This finishes the strip.
You need to keep making these loops until you have 90 on each side of the staple. Then finish it off like this. When you've completed the 90th loop, don't turn the staple, but make two or three chain stitches, cut the thread from the ball about 3 inches from your hook, and pull it through the loop on your hook. This completes the strip.
Take the strip off the staple. Don’t be afraid—it won’t come undone. Make 6 strips the same length. These strips are twice as long as the bag is deep. In making the strips, don’t pull the loops round the staple too tightly. After a little practice the work will come quite easy, and you will get along quickly with it.[45]
Take the strip off the staple. Don’t worry—it won’t come undone. Make 6 strips that are the same length. These strips should be twice as long as the bag is deep. While making the strips, don’t pull the loops around the staple too tightly. After a bit of practice, the work will become quite easy, and you’ll get through it quickly.[45]

Having finished your strips you have to join them. One of the pictures shows this being done. Take two strips and lay them side by side on the table, with the commencing ends of each towards you. Take up on your crochet hook three loops from the strip on the left, then three loops from the strip on the right. As the six loops lie on the hook—three from each side—draw the three from the right through the three from the left, with the help of your left thumb and first finger. (If you look at the picture you will see that these loops usually lie twisted. They should be taken on to the hook in this way, and if one is not twisted, turn it over with your finger and thumb).
Once you’ve finished your strips, you need to join them. One of the pictures shows how to do this. Place two strips side by side on the table, with the starting ends facing you. Use your crochet hook to pick up three loops from the strip on the left, then three loops from the strip on the right. With all six loops on the hook—three from each side—pull the three loops from the right through the three loops from the left using your left thumb and index finger. (If you check the picture, you’ll notice these loops often appear twisted. They should be taken onto the hook in this way, and if one is not twisted, just flip it over with your finger and thumb).
You have now three loops on your hook, which were picked up on the right hand strip. Take up three more from the left, and so on, for the length of the strip. When you get to the end of the strip (your last loop will have been taken from the right as you started on the left), stick the hook with the loops on into the middle of the strip on the left, and drawing through the length of thread which was left at the end of the strip, fasten off securely.
You now have three loops on your hook that you picked up from the right side of the strip. Pick up three more from the left, and keep going like this until you reach the end of the strip. When you get to the end (your last loop will be from the right since you started on the left), insert the hook with the loops into the middle of the strip on the left side, then pull through the length of thread you left at the end of the strip to securely fasten off.
Now take the third strip and lay it on the right of the second strip; start by taking up three loops from the third. In joining, see that you always commence on the odd strip, that is to say, on 1, 3, 5, 7, etc., so that whether you are joining strips 2 to 3, or 3 to 4, you commence on strip 3, and whether you are joining 4 to 5, or 5 to 6, you commence on strip 5.
Now take the third strip and place it to the right of the second strip; start by picking up three loops from the third. When joining, make sure you always start on the odd strip, meaning one, three, five, seven, etc., so whether you're joining strips two to three, or three to four, you start on strip three, and whether you're joining four to five, or five to six, you start on strip five.
You must now fold in half your long piece of work, and join up the sides to make it into a bag.[46] The sides are joined just the same as the other part, taking first 3 loops from one side and 3 from the other until you get to the bottom. With a little piece of thread, fasten off very neatly on the wrong side, sticking the hook in the middle of one of the strips before finishing off, to make it quite firm.
You now need to fold your long piece of work in half and connect the sides to create a bag.[46] Join the sides just like you did with the other part, taking 3 loops from one side and 3 from the other until you reach the bottom. With a small piece of thread, secure it neatly on the wrong side by inserting the hook in the middle of one of the strips before finishing off to make it really sturdy.
To finish the top of the bag make a loop in the thread, draw this through the top of one of the strips, make 5 chain stitches, then 1 double crochet into the joined loops, 5 chain, 1 d c into middle of next strip. Do this all round the top of the bag, and fasten off.
To complete the top of the bag, create a loop in the thread, pull this through the top of one of the strips, make 5 chain stitches, then 1 double crochet into the joined loops, followed by 5 chains, and 1 double crochet into the middle of the next strip. Do this all the way around the top of the bag, and fasten off.
For the cord, make a chain of 36 inches. Sew 10 little white rings at even distances round the bag, about 2 inches from the top. Run the cord through these rings twice, and when you get back the second time to the ring you started from, join the cord neatly with a needle and cotton. Now you see it will pull up quite nicely each side, and Auntie can hang the bag on her arm.
For the cord, make a 36-inch chain. Sew 10 small white rings at equal distances around the bag, about 2 inches from the top. Thread the cord through these rings twice, and when you return to the starting ring, join the cord neatly with a needle and thread. Now, you can see it will pull up nicely on each side, and Auntie can hang the bag on her arm.
We have not talked about lining the bag. Perhaps you don’t want to line it, but if you do, make a bag of silk or sateen (like the one described on page 11), the same size as the macramè bag, and slip it into it, just catching it at the corners with a few tiny stitches, so that the lining does not slip out of the bag. This lining should have a nice deep hem at the top, which could peep over the top of the macramè bag. Your bag is now finished, and if Auntie is not delighted with it, I shall be very much surprised.
We haven't discussed adding a lining to the bag. Maybe you don't want to line it, but if you do, make a silk or sateen bag (like the one mentioned on page 11), the same size as the macramé bag, and slip it inside, securing it at the corners with a few small stitches so that the lining doesn't slip out of the bag. This lining should have a nice deep hem at the top, which can peek over the edge of the macramé bag. Your bag is now complete, and if Auntie isn't thrilled with it, I'll be very surprised.
The Amiable Pussy Cats.
Doesn’t your pussy cat always like to be near at hand when the table is laid for tea, on the chance of perhaps getting a saucer of milk? Of course, you never let pussy himself sit on the table, but it would be rather uncommon, wouldn’t it, to have a cosy on the table with two dear little pussies worked on it like the one in the picture? I think Mother would like it, too, don’t you?
Doesn’t your cat always want to be nearby when the table is set for tea, hoping to get a saucer of milk? Of course, you never let the cat sit on the table, but wouldn’t it be quite unique to have a cozy on the table with two adorable little cats stitched on it like the one in the picture? I think Mom would like it too, don’t you?
The cosy cover in our picture was made of white Hardanger canvas, and is not fastened to the tea cosy itself, but is made loose, so that it can be taken off and washed. Red “Bright-eye” thread was used for working the cats.
The cozy cover in our picture is made of white Hardanger canvas and isn’t attached to the tea cozy itself; it’s designed to be loose so it can be removed and washed. Red “Bright-eye” thread was used to create the cats.

You will want to make it the right size for Mother’s tea cosy, won’t you? Well, you will be able to get it exactly the size, if you first take a piece of paper, lay the cosy on it, and draw round the cosy with a pencil, then cut the paper out on the pencil line.
You’ll want to make it the right size for Mom’s tea cozy, right? Well, you’ll be able to get it exactly the right size if you first take a piece of paper, lay the cozy on it, and trace around it with a pencil, then cut the paper out along the pencil line.
This gives you the shape of the side of the cosy, but the material will need to be cut larger than this to allow for a seam and a hem across the bottom, so take another piece of paper, and using the piece you have already cut as a pattern, cut the side out again, this time allowing an extra quarter of an inch all round the curved edge for the seam, and an inch along the straight edge for the hem.
This shows you the shape of the side of the cozy, but you'll need to cut the material larger to make space for a seam and a hem at the bottom. So, grab another piece of paper, and using the piece you've already cut as a template, cut out the side again. This time, leave an extra quarter inch all around the curved edge for the seam, and an extra inch along the straight edge for the hem.
Now that you have a pattern, cut out two pieces of canvas exactly this shape, and you can commence to make up your cosy cover.
Now that you have a pattern, cut out two pieces of canvas that match this shape, and you can start making your cozy cover.
The hems at the bottom of the cosy have to be hem-stitched, so you had better pull the threads out for this first. Measure each side up 1[48]¾ inches from the straight edge and draw out four threads.
The hems at the bottom of the cozy need to be hem-stitched, so you should pull the threads out first. Measure each side up 1[48]¾ inches from the straight edge and draw out four threads.
Directions for the simple hemstitching used are given on page 30, but before you do this part you must work your cats and join the two sides together, so that you can turn up your hem all along both sides evenly, and not have to join the hem after they are turned up.
Directions for the simple hemstitching are provided on page 30, but before you do this part, you need to work your cats and join the two sides together, so that you can evenly turn up your hem along both sides without having to join the hem after they've been turned up.
Work your cats in cross-stitch. This stitch was described on page 25, so that if you don’t know how to do it, just turn to this page and see how it is done.
Work your cats in cross-stitch. This stitch was described on page 25, so if you don't know how to do it, just turn to this page and see how it's done.
You will be able to count the crosses from the drawing you have of the two cats. The lowest cross of the tail of the cat sitting down should come six threads above the open threads for your hem; this will help you in starting to work the design. Work two cats on each side of the cosy.
You can count the crosses from the drawing you have of the two cats. The lowest cross of the tail of the sitting cat should be six threads above the open threads for your hem; this will help you start working on the design. Stitch two cats on each side of the cozy.

When you have finished the pussy cats, place the two sides together, with the right sides facing one another, and sew round the curved edges with a run and back-stitch, then oversew along the cut[49] edges to make them neat.
When you've finished the cats, put the two sides together with the right sides facing each other, and sew around the curved edges with a running stitch and a backstitch. Then, oversew along the cut[49] edges to tidy them up.

Now turn up your hem and hemstitch it, then turn the cosy on the right side, and sew a piece of red cord over the seam of the cosy, making three little loops in the centre at the top. You must use red cotton to sew on the cord, and take tiny hemming stitches that will not show too much.
Now turn up your hem and hemstitch it, then turn the cozy to the right side, and sew a piece of red cord over the seam of the cozy, making three small loops in the center at the top. You should use red cotton to sew on the cord and take small hemming stitches that won't show too much.
If you don’t want to make your cosy cover of canvas, but would like to use linen or some other material, you can work the cats on Penelope canvas, tacked over the material, as you learnt to do when making the Feeder.
If you don’t want to make your cozy cover out of canvas, but would prefer to use linen or another material, you can stitch the cats on Penelope canvas, tacked onto the material, just like you learned to do when making the Feeder.
The Orchid Flower Bag.
Have you been trying very hard to think of something else that you can make for Mother? I wonder if she has a Stocking Bag? If not, you could easily make her one of these, couldn’t you, and I know she would like to have one, especially if she has several little boys and girls to mend stockings for. If you make her a lovely big bag like the one in the picture, she will be able to keep all the stockings that need mending together, and will know exactly where to find them when mending day comes round.
Have you been trying really hard to think of something else you can make for Mom? I wonder if she has a Stocking Bag. If not, you could easily make her one of those, right? I know she would love to have one, especially if she has a few little boys and girls to fix stockings for. If you make her a nice big bag like the one in the picture, she’ll be able to keep all the stockings that need mending together and will know exactly where to find them when it’s time to mend.

It will be best to make the bag of a material that will wash nicely. A good strong Holland or Crash would be very suitable. You will want a strip of material about a yard long and fifteen inches wide to make a good-sized bag.
It’s best to make the bag out of a fabric that washes well. A sturdy Holland or Crash would work great. You’ll need a piece of fabric about a yard long and fifteen inches wide to create a decent-sized bag.

The pretty little flowers across the bag are worked in cross-stitch, and you have an enlarged diagram of the design which you will be able to count the crosses from.
The cute little flowers on the bag are done in cross-stitch, and you have a larger diagram of the design that you can use to count the stitches.
Use “Bright-eye” embroidery thread for working the flowers. A purple thread would look pretty, but perhaps you know another colour that Mother is very fond of, and would like to use that.
Use “Bright-eye” embroidery thread for working the flowers. A purple thread would look nice, but maybe you know another color that Mother really likes and would prefer to use that.
You must work the designs before you make up the bag. Fold the strip of material in half and tack a strip of Penelope Canvas across about four inches up from the fold. Directions for working cross-stitch over Penelope Canvas are given on page 27, in case you want to know how this is done.
You need to prepare the designs before you assemble the bag. Fold the strip of material in half and pin a piece of Penelope Canvas about four inches above the fold. Instructions for doing cross-stitch over Penelope Canvas are provided on page 27, if you're interested in learning how to do it.

How to make up a bag, too, was described on page 11, and you can make this one in exactly the same way. You will notice that this one has a cord threaded through rings outside of the bag instead of through a runner at the top though, and if you like this way better you can sew twelve white bone rings at equal distances apart round the outside of the bag just at the[52] bottom of the hem, and put the cord through these. You will want about two yards of coloured cord, in the same shade as the thread you used for working the flowers. Thread the cord twice round the bag through the rings, join it together, and your bag is complete.
How to make up a bag, too, is described on page 11, and you can make this one in exactly the same way. You'll notice that this one has a cord threaded through rings outside of the bag instead of through a runner at the top. If you prefer this method, you can sew twelve white bone rings at equal distances around the outside of the bag just at the bottom of the hem and thread the cord through these. You'll need about two yards of colored cord, in the same shade as the thread you used for the flowers. Loop the cord twice around the bag through the rings, join the ends together, and your bag is complete.
An Alphabet that can be copied in Cross-stitch.

More Letters for Cross-stitch.
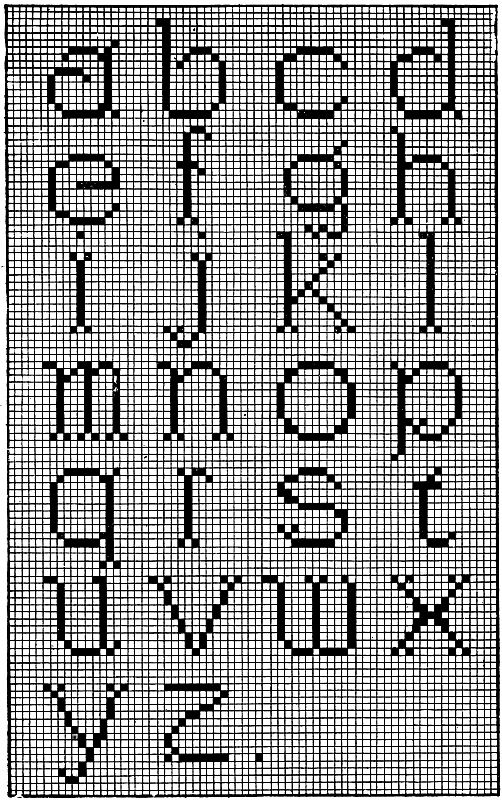

Furnishings for
Dolly’s Cottage.
For Dolly’s Bed.
One of the most enjoyable times of the day spent with dolly is the time when you can undress and put her to bed, just as mother does baby.
One of the most enjoyable times of the day with dolly is when you can undress her and put her to bed, just like mom does with the baby.
And how much nicer, too, if you can feel that you have made all the bedclothes yourself. You may perhaps think that you could never manage that, but just look at these pretty little pictures of the things and see how simple they all are. I am sure then that you will want to try and copy them for your own dear dolly.
And how much nicer it is if you know that you made all the bedding yourself. You might think that you could never do that, but just take a look at these cute little pictures of the items and see how simple they are. I’m sure you’ll want to try and make them for your beloved doll.
Before starting to make the outfit for the doll’s bed, get your materials together. Perhaps someone gave you a bedstead on your last birthday? If not, buy one the right size for your favourite doll. The one in the picture is a metal one with a wire mattress.
Before you start making the outfit for the doll’s bed, gather your materials. Did someone give you a bed frame for your last birthday? If not, buy one that fits your favorite doll. The one in the picture is a metal frame with a wire mattress.
For the mattress, try to get a material something like that generally used for mattresses, but not so thick; a striped print would do quite nicely. The mattress illustrated and the pillows are made of grey, and white striped material, bound with red ribbon.
For the mattress, try to find a material similar to what's typically used for mattresses, but not as thick; a striped pattern would work well. The mattress shown and the pillows are made of gray and white striped fabric, trimmed with red ribbon.
The cover for the wire mattress is made of white calico, the blankets of cream flannel, the sheets and pillow-cases of white linen; the bedspread and nightdress case of canvas worked with “Brighteye” thread.
The cover for the wire mattress is made of white calico, the blankets are made of cream flannel, the sheets and pillowcases are white linen; the bedspread and nightdress case are made of canvas stitched with “Brighteye” thread.

Cut out two pieces of material a little larger than the bedstead, and another long narrow piece the depth of the mattress. Sew one side[56] of the narrow piece around the sides of one of the large pieces (running stitch will do quite well for this part of the work), leaving the edges of the seam on the outside. Then join the other side of the narrow strip to three of the sides of the other piece you have cut, leaving one side open to put the filling in. This mattress is filled with horse-hair; but cotton wool, small pieces of rag, or paper could be used instead.
Cut out two pieces of fabric a little larger than the bed frame, and another long narrow piece the same depth as the mattress. Sew one side of the narrow piece around the sides of one of the large pieces (a running stitch works well for this part), leaving the edges of the seam on the outside. Then attach the other side of the narrow strip to three sides of the other piece you cut, leaving one side open for filling. This mattress uses horsehair for filling, but you could also use cotton wool, small bits of fabric, or paper instead.

When the mattress is filled, sew up the fourth side and bind all the seams with narrow ribbon. Red ribbon is used on the mattress illustrated, and a little specimen is illustrated, showing how to put it on. The ribbon is held over the seam edges with the left hand and back-stitched along, taking your stitches right through the seam edges and both edges of the ribbon each time.
When the mattress is filled, sew up the fourth side and bind all the seams with narrow ribbon. Red ribbon is used on the illustrated mattress, and a small sample is shown, demonstrating how to apply it. Hold the ribbon over the seam edges with your left hand and backstitch along, making sure to take your stitches through the seam edges and both edges of the ribbon each time.
Now you will need to stab the mattress in places, as in the picture, to make it look just like the one on your own bed.
Now you’ll need to poke the mattress in some spots, like in the picture, to make it look just like the one on your own bed.

Take a long needle threaded with coarse thread the same colour as the binding, put the needle through the mattress, leaving a long[57] end, make two more stitches through the mattress in the same place, pulling the thread tightly, finish at the same side as you began, tie a knot with the thread used and the long end left at the beginning and cut the threads, leaving small ends of threads beyond the knot.
Take a long needle threaded with thick thread the same color as the binding, push the needle through the mattress, leaving a long end, make two more stitches in the same spot, pulling the thread tight, finish on the same side you started, tie a knot with the thread you used and the long end left at the start, and cut the threads, leaving small pieces of thread beyond the knot.
Look at the illustration to see the positions in which you must put these stitches and knots.
Look at the illustration to see the positions where you need to place these stitches and knots.

Cut the material a little larger than the wire mattress to allow for a quarter-inch hem; hem the piece around, and sew two narrow pieces of tape (or coarse thread will do) at each corner of the cover: the cover is tied to the wire mattress with these pieces of tape.
Cut the fabric a bit larger than the wire mattress to allow for a quarter-inch hem; hem the edges all around, and sew two narrow pieces of tape (or you can use coarse thread) at each corner of the cover: the cover is tied to the wire mattress with these pieces of tape.
Cut the flannel out large enough to cover the top and sides of mattress and allow for tucking up.
Cut the flannel large enough to cover the top and sides of the mattress and have enough to tuck in.

Turn down about a quarter of an inch single turning at each end of the blanket on the wrong side, then work in blanket stitch across both ends. You will see that a little specimen of work is illustrated, showing how to make this stitch. It is worked from[58] left to right. The turned-in edge of your blanket must be held along the first finger of your left hand, and the needle placed in your work downwards towards you, the thread always being held under your thumb as you make a stitch, so that when you pull your needle you have a knot right at the edge of the work.
Turn down about a quarter of an inch at each end of the blanket on the back side, then sew a blanket stitch across both ends. You’ll see a small example of this stitch illustrated, showing how to do it. It’s worked from[58] left to right. Hold the turned-in edge of your blanket with your left hand's first finger, and position the needle pointing down towards you. Keep the thread under your thumb as you make each stitch, so when you pull the needle, it creates a knot right at the edge of the work.
These should be cut a little longer than the blankets to allow for the wide hems, and for turning back at the top. The very narrowest of hems should be put at each side of the sheets, and one about half an inch wide along the bottom of each; but the top hems are about three-quarters of an inch wide, and are worked in ladder hem-stitching. All about how to do hem-stitching will be found on page 30.
These should be cut a bit longer than the blankets to allow for the wide hems and for folding back at the top. The narrowest hems should be placed on each side of the sheets, and one about half an inch wide along the bottom of each; however, the top hems are about three-quarters of an inch wide and are done with ladder hem-stitching. You can find all the details on how to do hem-stitching on page 30.
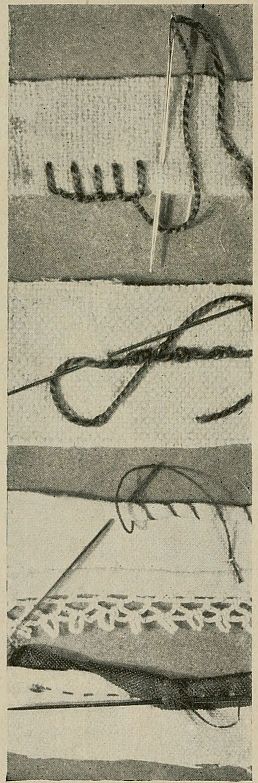
- No. 1 shows Blanket Stitch.
- No. 2 shows Outline Stitch.
- No. 3 shows Whipping Stitch.
- No. 4 shows the Stitch for Binding the Mattress.
At the corner of the top sheet the initial B is worked. Of course, you must work the first letter of your doll’s name. If you are not sure you can write the initial on linen yourself, get someone to do it for you; then work it over in a fancy outline stitch with embroidery thread. You have a little specimen of work showing how the outline stitch was made for the B. In working this you hold your thread down along the design of your initial with your left hand, and take a small stitch over the thread, putting your needle in just above the thread and bringing it out just underneath; this makes a little[59] knotted stitch, and the knots are repeated along the design at equal distances apart. You can use this outline stitch for many purposes.
At the corner of the top sheet, stitch the initial B. Of course, you should stitch the first letter of your doll’s name. If you’re not confident in your ability to write the initial on linen, ask someone to do it for you; then stitch over it in a decorative outline stitch with embroidery thread. There’s a little example showing how the outline stitch was made for the B. As you work on this, hold the thread down along the design of your initial with your left hand, and take a small stitch over the thread, inserting your needle just above the thread and bringing it out just below; this creates a little knotted stitch, and the knots are spaced evenly along the design. You can use this outline stitch for many different purposes.
Make the pillows of the same material as you used for the mattress. These will need to be each about three inches wide, and a little longer than half the width of the bed. For each pillow cut two pieces of material exactly the same size. Run the two pieces together round three of the edges on the wrong side, then turn on to the right side, stuff the pillows with wool or small pieces of rag, and oversew the edges of the fourth side together.
Make the pillows from the same material as the mattress. Each one should be about three inches wide and a bit longer than half the bed's width. For each pillow, cut two pieces of fabric to the same size. Sew the two pieces together on three of the edges with the wrong sides facing each other, then turn them right side out, fill the pillows with wool or small fabric scraps, and hand-stitch the edges of the fourth side closed.

Make the pillow-cases in the same way as the pillows but a little larger, and hem round one end so that you can slip the pillow in. Sew two pieces of very narrow tape to each side of the open end, and tie the pillow into the case.
Make the pillowcases the same way as the pillows but a bit larger, and hem one end so you can slip the pillow inside. Sew two pieces of very narrow ribbon to each side of the open end, and tie the pillow into the case.
One of the pillow-cases has a frill round. To make this, cut out a narrow piece of linen, hem one side of it, and work a simple crochet edge on to this. Or you can use Cash’s Frillings for this, which are made to draw up easily into frills.
One of the pillowcases has a frill around it. To make this, cut out a narrow piece of linen, hem one side of it, and crochet a simple edge onto this. Or you can use Cash’s Frillings for this, which are designed to easily gather into frills.

When the frill is ready to sew on, roll[60] the edge of the other side of frill between your finger and thumb and sew over the roll, as shown in the little illustration. Use a coarser thread for this, working from right to left, pulling the thread to gather the frill as you are working it. This is called whipping, and is really very much the same as oversewing, only the stitches are taken right over the hem. Cash’s Frilling needs no whipping.
When the frill is ready to attach, roll the edge of the other side of the frill between your finger and thumb and sew over the roll, as shown in the small illustration. Use a thicker thread for this, working from right to left, and pull the thread to gather the frill as you sew. This technique is called whipping, and it’s pretty much the same as oversewing, except the stitches go right over the hem. Cash’s Frilling doesn’t require any whipping.
Oversew the frill around the edge of the pillow-case.
Sew the frill around the edge of the pillowcase.

Cut out a piece of canvas large enough to cover the bed, and hang over the mattress, allowing extra around for the hem.
Cut out a piece of canvas big enough to cover the bed and hang over the mattress, leaving extra around for the hem.
Hemstitch around, taking two sets of threads together; for the second side of the hemstitch sew together two sets of threads, but take up alternate threads to those taken up on the other side; this serpentine stitch is shown on page 30.
Hemstitch around, taking two sets of threads together; for the second side of the hemstitch, sew together two sets of threads, but use alternate threads from those used on the other side; this serpentine stitch is shown on page 30.
The pattern of the bedspread is shown on page 61.
The design of the bedspread is displayed on page 61.
Each slanting stitch is worked over two holes—that is, pull the needle through a hole, leave two holes on the cross, put the needle into the next hole, leave two holes on the cross in the opposite direction, pull the needle up through the next hole, put the needle back into the same hole as the end of first stitch, and up again through the hole at the beginning of the second stitch.
Each diagonal stitch is made over two holes—that is, pull the needle through one hole, skip two holes on the diagonal, insert the needle into the next hole, skip two holes on the diagonal in the opposite direction, pull the needle up through the next hole, insert the needle back into the same hole as the end of the first stitch, and pull it up again through the hole at the start of the second stitch.
Continue to work in this way all round the piece of canvas.[61]
Continue working like this all around the piece of canvas.[61]
Work three more rows like this, arranged so that the stitches form a diamond pattern as you see illustrated.
Work three more rows like this, arranged so that the stitches create a diamond pattern as shown in the illustration.
Then fill in the corners with the same pattern, and work the pattern in the centre of dolly’s bedspread.
Then fill in the corners with the same design, and create the pattern in the center of Dolly’s bedspread.
The nightdress case is made with the same materials as the bedspread.
The nightdress case is made with the same materials as the bedspread.

Cut out a piece of canvas two and a half inches wide and four and a half inches long; fold this so that it makes a bag with a flap over it the same size as the bag. Put the two ends of the canvas for bag together, and work in blanket stitch round through both pieces at once, also around the edges of the flap to finish off the little case.
Cut a piece of canvas that’s two and a half inches wide and four and a half inches long; fold it to create a bag with a flap on top, the same size as the bag. Bring the two ends of the canvas together and use a blanket stitch to sew through both pieces at the same time, and also around the edges of the flap to finish off the little case.


Work three diamonds on the front of the nightdress case. This completes the outfit for dolly’s bed, and I am sure she will like it.
Work three diamonds on the front of the nightdress case. This completes the outfit for dolly's bed, and I'm sure she'll like it.

A Patchwork Quilt.

SUPPOSING Miss Seraphine’s doll-friend Clementine were to write and say she was coming on a visit next week. Wouldn’t you be in a fix with no nice bedspread for the spare bed, because you were reading that book instead of attending to the dolls’ spring cleaning? You will have to see about a new bedspread quickly, and you can make one that will be very pretty, with just a few little pieces. Here is where those scraps that Grandma gave you the other day will come in usefully.
SUPPOSING Miss Seraphine’s doll-friend Clementine were to write and say she was coming on a visit next week. Wouldn’t you be in trouble without a nice bedspread for the spare bed, since you were reading that book instead of taking care of the dolls’ spring cleaning? You'll need to sort out a new bedspread quickly, and you can make one that will look very pretty, with just a few little pieces. Here is where those scraps that Grandma gave you the other day will come in handy.
We are going to make a patchwork quilt. It won’t be as large as the one Grandma has, but Clementine doesn’t require a very big one to cover her. First, let us just see what pieces we have got together. Some unbleached calico, some pieces with roses and rosebuds on, some dark ones with leaves and bunches of grapes, one piece with a little pink flower all by itself, a few flowery bits, and some with different kinds of spots. There is just enough here to make something really lovely, and I shouldn’t wonder if when Clementine sees it she doesn’t want to change bedspreads with Seraphine.
We’re going to make a patchwork quilt. It won’t be as big as Grandma’s, but Clementine doesn’t need a very large one to cover her. First, let’s take a look at the pieces we’ve got. Some unbleached calico, some pieces with roses and rosebuds, some dark ones with leaves and bunches of grapes, one piece with a small pink flower all by itself, a few flowery bits, and some with different kinds of spots. There’s just enough here to create something really beautiful, and I wouldn’t be surprised if, when Clementine sees it, she wants to swap bedspreads with Seraphine.
But to get to work. We must think out a little scheme of how we are going to arrange the pieces. Whatever you do, don’t put the dark ones on one side, or throw them away, because they are just what you will want to show up the light ones nicely. We will decide to have our design in squares. A little square of the pink flower could come in the centre. Then to show it up, a dark square with leaves and a bunch of grapes could come above, below, and at each side of it. You might have four little spotty patterns at the corners between two dark bits, and above the top and below the bottom dark piece might be a little fancy pattern. At the four corners left, we will put a rose or rosebud. Look at the picture of a patchwork quilt, and you will see how we have arranged them all. Then we might have a border of the unbleached calico.
But let's get to work. We need to come up with a plan for how we're going to arrange the pieces. Whatever you do, don’t place the dark ones all on one side or throw them away, because they are exactly what you'll need to make the light ones stand out nicely. We’ll decide to arrange our design in squares. A small square with the pink flower could go in the center. Then to highlight it, a dark square with leaves and a bunch of grapes could be placed above, below, and on each side of it. You could add four little spotty patterns in the corners between two dark pieces, and above and below the top and bottom dark pieces, there could be a little fancy pattern. In the four remaining corners, we’ll place a rose or rosebud. Look at the picture of a patchwork quilt, and you’ll see how we’ve arranged everything. Then we could have a border of unbleached calico.
Before we go any further, do you know what makes this so[64] attractive and pretty? It is the dark pieces—the pieces you wanted to throw away—and the plain border. These darker pieces throw up the pretty light designs, and make them look even more pretty, whereas, if you put all light together, you could not so easily pick them out.
Before we continue, do you know what makes this so[64] attractive and beautiful? It’s the dark pieces—the ones you wanted to discard—and the simple border. These darker pieces highlight the beautiful light designs, making them look even more stunning. If you combined all the light pieces, it would be harder to distinguish them.

If you haven’t done any patchwork, you will wonder how to get the little squares even, and to join them together. This is how it is managed. You want 15 squares of stiff paper, each measuring 1½ inches each way. Stiff old letters will do beautifully to cut up for this. Get a piece of cardboard, 1½ inches each way, and cut your papers by this, taking great care that they are perfectly even and true. Cut out your 15 pieces of material in squares, which should measure 2 inches each way. That will allow you ¼ inch on each side for turning the end over the paper to make it neat. Tack a piece over each square of paper, as in the picture. When the 15 squares are covered, join them all together on the wrong side with oversewing stitches, arranging them as we decided. You will see how to do oversewing on page 28.
If you haven’t done any patchwork, you might be wondering how to make the little squares even and how to join them together. Here’s how to do it. You need 15 squares of stiff paper, each measuring 1½ inches on each side. Old stiff letters work great for this. Get a piece of cardboard that’s 1½ inches in each direction, and use it to cut your papers, making sure they’re perfectly even and straight. Cut out your 15 pieces of material in squares that measure 2 inches on each side. This will give you a ¼ inch on each side to fold over the paper neatly. Pin a piece of material over each square of paper, like in the picture. Once you’ve covered all 15 squares, join them together on the back with oversewing stitches, arranging them as we decided. You can see how to do oversewing on page 28.

This shows the right side of the square. The tacking threads are afterwards cut away and the paper pulled out.
This shows the right side of the square. The tacking threads are then cut away and the paper is pulled out.


For the border, cut a plain strip of unbleached calico, 2 inches wide and about 37 inches in length. On each side of this strip tack down ¼ inch. Now, leaving about 2 inches, start sewing on the border at one corner of the quilt, on the wrong side, with neat oversewing stitches. When you come to a corner you must mitre it. From the corner measure along your border twice the width of the border, i.e.,[65] 3 inches. Mark with a pin or thread. Now pleat your border strip so that the pin comes just on the corner. If you have done this quite neatly and evenly, your corner will be quite square. On the wrong side you will have a crease across the diagonal of the border. Stitch along this firmly with run and back-stitch. Then cut away just beyond the stitches, and oversew the raw edges to keep from fraying. When you come to the corner from which you started, you must join the two ends of the border, and this is done just the same as the other corners, by first creasing and then stitching on the diagonal.
For the border, cut a plain strip of unbleached calico, 2 inches wide and about 37 inches long. Tuck down ¼ inch on each side of this strip. Now, leaving about 2 inches, start sewing the border at one corner of the quilt, on the wrong side, using neat oversewing stitches. When you reach a corner, you need to miter it. From the corner, measure along your border twice its width, meaning 3 inches. Mark with a pin or thread. Now pleat your border strip so that the pin aligns just at the corner. If you do this neatly and evenly, your corner will be perfectly square. On the wrong side, you'll have a crease across the diagonal of the border. Stitch along this firmly with running and backstitching. Then cut away just beyond the stitches and oversew the raw edges to prevent fraying. When you reach the corner where you started, you must join the two ends of the border, which is done just like the other corners, by first creasing and then stitching on the diagonal.

On the quilt in the picture a little fancy stitch has been worked in coloured “Star Sylko,” and this is a great improvement. This is worked from left to right, with first a little horizontal stitch then a long slanting stitch, and below the slanting stitch another horizontal stitch. Bring your needle up from the wrong side. Take a few threads of material, bringing the needle out on a line with the first place at which you brought it up, but a little to the right of it. Bring it out under the stitch just made, and carry it down in a slanting direction and make another little horizontal stitch in the same way, this time, however, keeping your needle above the stitch. Then up again, and so on. The little pictures will make this stitch clear. When you have gone all round the border, you can take out all your tacking stitches and pull the paper away from the little squares.
On the quilt in the picture, a decorative stitch has been done in colored “Star Sylko,” which is a big improvement. This is done from left to right, starting with a small horizontal stitch, then a long slanted stitch, and below that, another horizontal stitch. Bring your needle up from the back. Take a few threads of the fabric, bringing the needle out on the same line as where you first brought it up, but slightly to the right of it. Bring it out beneath the stitch you just made, slant it down, and make another small horizontal stitch in the same way, but this time, keep your needle above the stitch. Then go back up, and repeat. The small pictures will make this stitch clear. Once you’ve gone all the way around the border, you can remove all your tacking stitches and pull the paper away from the little squares.
Now all that remains to be done is to line your quilt, and this is done by taking a piece of white sateen 7¾ inches wide by 10¾ inches long. Turn in once and then tack ¼ inch all round, and hem it neatly to the counterpane, as you were shown how to line the sachet on page 39. Be careful not to let the stitches come through to the right side of the quilt. If you want to make it extra warm you can put a layer of cotton wool in between the quilt and the lining. It is now quite ready for the spare bed.
Now all that’s left to do is to line your quilt. You need a piece of white sateen that’s 7¾ inches wide and 10¾ inches long. Fold in the edges once, then tack down ¼ inch all around, and hem it neatly to the counterpane, just like you learned to line the sachet on page 39. Make sure the stitches don’t show on the right side of the quilt. If you want it to be extra warm, you can add a layer of cotton wool between the quilt and the lining. It’s now all set for the spare bed.
But perhaps some little mother says: “I haven’t got any pretty pieces like those in the picture. I have only got plain pink, blue and white.” Well, you can arrange these to look pretty, even if they are only plain colours. Put a square of pink in the middle, have a white square above, below, and at each side. At the four corners, where the spotty bits are, have blue. The four outside corners could be pink, and the top and bottom centre ones white. Then you could have a white border with blue stitching on it. This is only one suggestion for plain colours. You will soon think of plenty more. There is ever so much you can do with a few pieces and a little patience.
But maybe some little mom says: “I don’t have any fancy pieces like those in the picture. I only have plain pink, blue, and white.” Well, you can make these look nice, even if they are just basic colors. Start with a pink square in the middle, then have a white square above, below, and on each side. In the four corners, where the dotted pieces are, put blue. The four outside corners can be pink, and the top and bottom center ones can be white. Then you might add a white border with blue stitching on it. This is just one idea for plain colors. You’ll quickly come up with plenty more. There’s so much you can do with a few pieces and a little patience.
For the New Perambulator.
There is one thing that dolly absolutely must have before you take her out to see her friends, and that is a new pram-cover. You had almost forgotten that, hadn’t you? Just think how you would feel to have her dressed in her best for visiting, and sitting in that beautiful perambulator that Uncle gave you, and no nice cover to match! Wouldn’t you feel dreadful?
There’s one thing that Dolly absolutely must have before you take her out to see her friends, and that’s a new pram cover. You had almost forgotten that, hadn’t you? Just imagine how you would feel having her dressed in her best for visiting, sitting in that beautiful stroller that Uncle gave you, and lacking a nice cover to match! Wouldn’t you feel awful?

Here is a pram-cover that you can make. This has been worked on pale pink sateen, with shaded green for the leaves and stems, and dark crimson for the rosebuds. Use a shaded green No. 8 “Star Sylko,” crimson, No. 8, and plain green thread, No. 5, the same shade as the darkest part of the shaded thread, for the lines around. Perhaps these colours won’t go quite nicely with dolly’s pram and outdoor clothes. In that case you must decide on some other shades.
Here’s a pram cover that you can make. It’s done in pale pink sateen, with shaded green for the leaves and stems, and dark crimson for the rosebuds. Use shaded green No. 8 “Star Sylko,” crimson No. 8, and plain green thread No. 5, which should match the darkest part of the shaded thread, for the outlining. If these colors don’t quite match your doll’s pram and outdoor clothes, then you’ll need to choose some other shades.
This pram-cover measures 10 inches long by 7½ inches wide, then another 2 inches has been added to the length, and 2 inches to the width for the hem. You may find you need your cover larger or smaller than this one, but whatever size you have, don’t forget to allow extra for a nice hem. Tack the hem down all round, but do not hem it: the stitches on the outside line keep it in place.
This pram cover measures 10 inches long by 7½ inches wide, with an additional 2 inches added to the length and 2 inches to the width for the hem. You might find that you need your cover to be larger or smaller than this one, but whatever size you choose, make sure to leave extra fabric for a nice hem. Secure the hem all around, but don’t sew it completely: the stitches on the outer edge will keep it in place.
Having tacked your hem, you have now to get the design transferred to your pram-cover. Just look at the outline design. This is just the size you will want. Now take a piece of tracing paper, and go carefully over the outline of the leaf wreath. Don’t trouble about the bud at present. Next turn the paper over and run over the back of the design with a fairly soft lead pencil—the outlines will show through the transparent[68] paper. Turn it over again and lay it on your cover, taking care to get it nicely in the centre. Keep it firm and follow every line with a slightly harder pencil, marking it firmly and evenly. When you take your paper up you will find the leaves transferred to your pram-cover. The buds are transferred to each corner in the same way, putting them whichever way up you want them.
Having tacked your hem, you now need to transfer the design onto your pram cover. Just look at the outline design—it's exactly the size you need. Take a piece of tracing paper and carefully trace the outline of the leaf wreath. Don't worry about the bud for now. Next, flip the paper over and lightly color the back of the design with a soft lead pencil; the outlines will show through the transparent [68] paper. Turn it back over and place it on your cover, making sure it's centered. Hold it steady and carefully trace every line with a slightly harder pencil, marking it firmly and evenly. When you lift the paper, you'll see the leaves transferred onto your pram cover. Transfer the buds to each corner in the same way, positioning them however you like.


Dolly will be highly pleased to have such a nice cover to her perambulator. She does like to be stylish, doesn’t she?
Dolly will be very happy to have such a nice cover for her stroller. She really likes to be fashionable, doesn't she?

A Bedspread for Victoria.

I wonder whether you have made the bedspread, shown on page 61, with the doll’s bed outfit. I daresay you have, and perhaps the patchwork quilt too. But of course you will not want all your doll-children’s beds to look quite the same, so how about a bedspread with a fringe to it for Victoria’s bed? You usually dress her in blue, don’t you, to match her eyes, so you had better work the bedspread in blue. No, I know she does not go to sleep with her eyes open, but she has lovely fair hair, and pink roses in her cheeks; and a cream bedspread, worked in blue, is what she needs to set her off properly.
I’m curious if you’ve made the bedspread, shown on page 61, with the doll’s bed outfit. I bet you have, and maybe the patchwork quilt too. But I know you wouldn’t want all your doll-children’s beds to look exactly the same, so what about a bedspread with a fringe for Victoria’s bed? You usually dress her in blue to match her eyes, right? So it would be best to make the bedspread in blue. Sure, she doesn’t sleep with her eyes open, but she has beautiful fair hair and pink roses on her cheeks; a cream bedspread, worked in blue, is what she needs to complement her perfectly.
The bedspread is worked in coarse cream Hardanger Canvas. The little detail of the stitch shows you the actual size of the canvas. If you use a finer canvas than this—as of course you can if you like—then you will have to take your stitches over more threads to get your design the same size as the one shown here.
The bedspread is made with coarse cream Hardanger Canvas. The small detail of the stitch shows the actual size of the canvas. If you choose to use a finer canvas than this—which you definitely can if you want—you'll need to take your stitches over more threads to make your design the same size as the one shown here.
The shade of blue that will suit Victoria beautifully is No. 709 in Ardern’s “Star Sylko,” size 5, and you could use this for the work on your bedspread; and you will also want some white “Star Sylko,” size 5, for the satin stitch. For sewing the fringe cream linen thread can be used.
The perfect shade of blue for Victoria is No. 709 in Ardern’s “Star Sylko,” size 5, and you can use this for your bedspread project. You’ll also need some white “Star Sylko,” size 5, for the satin stitch. For sewing the fringe, cream linen thread will work well.
If you have not yet learnt to work the stitches used in making this bedspread, the best plan would be to take an odd piece of canvas and practise on that first.
If you haven't learned the stitches used to make this bedspread yet, the best approach is to take a scrap piece of canvas and practice on that first.
We will start with the white outlines of the border. This is worked in satin stitch—a very simple stitch, but it needs to be worked evenly, and the thread must not be pulled too tightly. Do not make a knot to start the work, leave a piece of thread at the back, and put the needle through this piece before you work the second stitch. Start by putting the needle[72] up through a hole of the canvas, miss 1 hole, put the needle into the next hole; put the needle through the next hole on a line with the first, and go on working stitches like this in a straight line.
We will begin with the white outlines of the border. This is done using a satin stitch—a very simple stitch, but it’s important to keep it even, and the thread shouldn’t be pulled too tight. Don’t tie a knot to start; leave a length of thread at the back and slide the needle through that piece before you make the second stitch. Start by bringing the needle[72] up through one hole in the canvas, skip one hole, then insert the needle into the next hole; continue by putting the needle through the following hole in line with the first, and keep making stitches like this in a straight line.
If you do this in the right way, the stitches on the right side will be straight, and on the wrong side they will slant a little.
If you do this correctly, the stitches on the front side will be straight, and on the back side, they will be slightly angled.

The corners of this piece of work are done in an easy way, look carefully at the illustration, and I think you will see what to do. The 2 stitches on each side and the centre stitch are all worked into the same hole on the inside of the corner.
The corners of this piece are easy to do. If you look closely at the illustration, you'll see what to do. The 2 stitches on each side and the center stitch are all worked into the same hole on the inside of the corner.
Now if you can do satin stitch, the bedspread can be started.
Now, if you can do satin stitch, you can start on the bedspread.
Leave 12 holes around outside the satin stitch line. Work 50 stitches across both ends, 84 stitches on each side—not counting the 3 extra stitches at corners. Leave 14 holes on the side and work a line of stitches across to the other side, on both ends of work. Leave 14 holes, counting towards the centre from side, and work a second line on each side between the ones worked at each end.
Leave 12 holes around the outside of the satin stitch line. Work 50 stitches across both ends and 84 stitches on each side—not counting the 3 extra stitches at the corners. Leave 14 holes on the side and stitch a line across to the other side at both ends. Leave 14 holes, counting towards the center from the side, and work a second line on each side between the lines stitched at each end.
To divide this into squares, leave 14 holes, and work rows of satin stitch between the 2 lines.
To divide this into squares, leave 14 gaps, and work rows of satin stitch between the 2 lines.
Thread your needle with blue, and put it up through the corner hole, miss 2 holes, counting towards the centre, put the needle in the next hole, put the needle up through the third hole in a straight line from end of first stitch, then into same hole as the end of first stitch; work another straight stitch on the other side.
Thread your needle with blue, and push it through the corner hole, skip 2 holes counting towards the center, put the needle in the next hole, bring the needle up through the third hole in a straight line from the end of the first stitch, then into the same hole as the end of the first stitch; make another straight stitch on the other side.
Work 3 more stitches like the first 3. Do 3 more corners in the same way, and join these corners with 4 stitches, these stitches make the square in the centre.[73]
Work 3 more stitches just like the first 3. Do 3 more corners the same way, and connect these corners with 4 stitches; these stitches will form the square in the center.[73]
The fringe looks difficult, but it is easier than it looks.
The fringe seems challenging, but it's actually simpler than it appears.
Count 3 lines of thread from the satin stitch, this will leave 2 holes, draw out the next two lines of thread from across the canvas; this leaves a narrow piece of the canvas with threads one way only.
Count 3 lines of thread from the satin stitch; this will leave 2 holes. Pull out the next two lines of thread from across the canvas; this leaves a narrow strip of the canvas with threads in one direction only.
On page 30 you will see how to do the Serpentine Hem-stitching. This is the stitch that is used for the edge of this bedspread, only that here you have no hem. You just do the work on both sides of the threads. Then pull away the threads at the edge, outside the second row of stitches, and you will get your fringe.
On page 30 you will see how to do the Serpentine Hem-stitching. This is the stitch that is used for the edge of this bedspread, except that here you don't have a hem. You just work on both sides of the threads. Then pull away the threads at the edge, outside the second row of stitches, and you'll get your fringe.
For Dolly’s Cottage Window.

LITTLE casement curtains are quite the best kind for the doll’s cottage windows, and on this page is shown a very pretty one that you will probably like to make. This is of dark green sateen, and the work on it is done in light green and pink “Brighteye.” It looks very nice in the picture, but it looks a great deal prettier when you can see the colours just as they are. And isn’t the way the little circles are entwined just sweet? Are you thinking that you couldn’t manage it? Well don’t think it any more, because you can, if you just follow this little talk carefully.
LITTLE casement curtains are the best choice for the doll’s cottage windows, and on this page is a really lovely one that you’ll probably want to make. This one is made of dark green sateen, with the design done in light green and pink “Brighteye.” It looks nice in the picture, but it’s even prettier when you see the colors in person. And aren’t the little circles intertwined just adorable? Are you worried that you can’t do it? Well, stop worrying, because you can, as long as you follow this guide carefully.
The stitch on this little curtain is called chain stitch. It is worked from right to left, or to be really nearer the mark—from top to bottom. To make it, bring your needle up from underneath, leaving a little end at the back. Hold the thread down with the left thumb, and, putting the needle back where you brought it up, take up a few threads of the material with the needle. Pull the thread through, but not too tightly, repeat the stitch. One little picture shows you chain stitch being worked.
The stitch on this little curtain is called a chain stitch. It's done from right to left, or more accurately—from top to bottom. To make it, bring your needle up from underneath, leaving a small end at the back. Hold the thread down with your left thumb, and then put the needle back where you initially brought it up, picking up a few threads of the fabric with the needle. Pull the thread through, but not too tightly, and repeat the stitch. One small image shows you how to do the chain stitch.


For this curtain, a piece of sateen, 5 inches long by 4½ inches wide, is needed. Turn a narrow hem on all four sides, and tack it. The top edge[75] must be hemmed with tiny stitches, but the other three sides need not be hemmed, as the chain stitches will keep the hems down. This chain stitch can now be worked over the hems, on the right side. Now measure in 1 inch from the left side of chain stitch, and work another row in the same way. Between these two straight rows come the interwoven circles. To get these circles even, cut out a piece of cardboard the same size as the top of your thimble, and draw little circles round it on the sateen, allowing each circle to overlap the last one just a little bit. Now each little round touches the next one at two points. At one of these points it goes under, and at the other, over the next round. You will easily see what I mean by looking carefully at this little curtain. When the circles are all finished, they look like a chain, with one pink and one green link alternately. The only other thing to do is to sew the rings to the top of the curtain, for putting your curtain rod through. You will want one just like it for the other side of the window, and in making this, be sure and get your circles on the opposite side of the curtain, so as to make them a perfect pair.
For this curtain, you'll need a piece of sateen that is 5 inches long by 4½ inches wide. Fold a narrow hem on all four sides and secure it with tacks. The top edge[75] should be hemmed with small stitches, but the other three sides don’t need to be hemmed since the chain stitches will keep them in place. You can now work the chain stitch over the hems on the right side. Measure 1 inch in from the left side of the chain stitch and work another row in the same manner. In between these two straight rows, add the interwoven circles. To create evenly spaced circles, cut out a piece of cardboard the same size as the top of your thimble and draw small circles around it on the sateen, allowing each circle to slightly overlap the last one. Each little round should touch the next one at two points: at one point, it goes underneath, and at the other, it goes over the next round. You’ll understand what I mean by looking closely at the little curtain. Once the circles are finished, they will resemble a chain with alternating pink and green links. The only other task is to sew the rings to the top of the curtain so you can slide your curtain rod through. You’ll want to make another one just like it for the other side of the window, and when making this one, ensure your circles are on the opposite side of the curtain to make a perfect pair.

Carpets and Hearthrugs.
The worst of having a house papered and painted a fresh colour is that it means getting all the furnishings to match, and carpets, hearthrugs, curtains, etc., are expensive items, if you have to buy them. But one must have a change in the doll’s cottage sometimes, so suppose, to-day, you learn how to make a pretty carpet and hearthrug for it.
The biggest downside of having a house wallpapered and painted a new color is that you have to make all the furniture match, and things like carpets, rugs, curtains, and so on can really add up if you need to buy them. But sometimes you just need a change in the doll's house, so today let's learn how to make a nice carpet and rug for it.

You can make your carpet and rug of whatever shades you like, and it would be best to choose colours that will go nicely with your wall paper. For instance, if the sitting-room of your doll’s cottage is going to have a paper with pink roses and green leaves on the wall, you had better decide to have pink and green for your carpet and rug. If you have yellow walls, a carpet in a lovely shade of brown, and just a little yellow in it would be delightful. Of course, if the doll’s cottage has white or cream walls, you can choose whatever colours you like for the floor.
You can make your carpet and rug in any colors you want, and it’s best to pick shades that match your wallpaper. For example, if the sitting room of your dollhouse has wallpaper with pink roses and green leaves, it would be a good idea to choose pink and green for your carpet and rug. If you have yellow walls, a beautiful brown carpet with a touch of yellow in it would look great. Of course, if the dollhouse has white or cream walls, you can choose any colors you like for the floor.
Let us make this little rug first, as this is a particularly easy pattern. Cream Congress Canvas has been used for this, and on page 78 there is a picture of a little bit worked on canvas, that you may see[77] which way the stitches go. This rug measures 4 inches long by 2½ inches wide when finished, but it does not matter at all what size you make it. This has been worked in Baldwin & Walker’s Ladyship 3-ply Fingering, pink and green. This is a lovely soft wool to use.
Let’s start by making this small rug since it has a really simple pattern. For this, we’ll use cream Congress Canvas, and on page 78, there’s a picture of a bit of the canvas that shows you[77] how the stitches are arranged. When finished, this rug measures 4 inches long and 2½ inches wide, but the size doesn’t really matter. It’s made with Baldwin & Walker’s Ladyship 3-ply Fingering in pink and green. This wool is really soft and nice to work with.
Commence by turning the canvas in all round and tack it. Run the pink wool up a little way at the back of the canvas, leave a loop at the end, then start the first row between 2nd and 3rd threads from the left side, * pass the pink wool under 1 thread of canvas; then over 6 threads and under 2 threads 6 times, now over 6 threads and under 1 at end of canvas, leave a loop at end, and start the next row between the next two threads of canvas. *
Commence by turning the canvas all the way around and securing it. Bring the pink wool up a little way at the back of the canvas, leaving a loop at the end. Next, start the first row between the 2nd and 3rd threads from the left side. * Pass the pink wool under 1 thread of the canvas, then over 6 threads and under 2 threads, repeating this 6 times. Now, go over 6 threads and under 1 at the end of the canvas, leaving a loop at the end, and begin the next row between the next two threads of canvas. *
Work four more rows from * to *.
Work four more rows from * to *.

6th Row.—Pass the pink wool under 1 thread, over 2 threads, under 2 threads, over 6 threads 6 times; now under 2 threads, over 2 threads, under[78] 1 thread. Work 4 more rows like this. Repeat from 1st row to 10th row until the work is the right width.
6th Row.—Pass the pink wool under 1 thread, over 2 threads, under 2 threads, over 6 threads 6 times; now under 2 threads, over 2 threads, under 1 thread. Work 4 more rows like this. Repeat from 1st row to 10th row until the work is the right width.
Turn the canvas round and work the green wool across the canvas left between the pink wool.
Turn the canvas around and work the green wool across the space left between the pink wool.

1st Row.—Start between the 3rd and 4th threads from the top and the 6th and 7th threads from the side.* Pass the green wool over 6 threads and under 4 threads twice, then over 6 threads, slip thread on to next hole at the back of the canvas. Work 2 more rows like this from *.
1st Row.—Begin between the 3rd and 4th threads from the top and the 6th and 7th threads from the side.* Pass the green wool over 6 threads and under 4 threads twice, then over 6 threads, and move the thread to the next hole at the back of the canvas. Work 2 more rows like this from *.
4th Row.—Start the 4th row in the same hole as the 1st pink stitch of group ends. Pass the green wool over 5 threads, then under 4 threads and over 6 threads three times, now over 6 threads, slip the thread at back to the next hole for next row.
4th Row.—Begin the 4th row in the same hole as the 1st pink stitch of the group ends. Lay the green yarn over 5 threads, then under 4 threads, and over 6 threads three times, now over 6 threads. Move the thread at the back to the next hole for the next row.
Work 2 more rows like this. Oversew the 2 threads at the end of the rows with green wool, and twist the wool over the single thread at the end of the fringe loops.
Work 2 more rows like this. Sew the 2 threads at the end of the rows with green wool, and twist the wool over the single thread at the end of the fringe loops.
If there is any difficulty in counting the threads when working the green across, look at the back of the work.
If you have trouble counting the threads while working with the green across, check the back of the project.
Repeat the 6 rows until all the canvas between the pink threads is covered.
Repeat the 6 rows until the entire canvas between the pink threads is filled.
If you want to use the design for a carpet you can make it larger and square-shaped, or here is another design that is thicker, and will therefore be softer and nicer for the dolls’ feet.
If you want to use the design for a carpet, you can make it larger and square-shaped, or here’s another design that’s thicker, so it will be softer and nicer for the dolls' feet.

This twisted pattern is also shown[79] in the shape for a rug, which measures 5 inches long by 3 inches wide, but it can be made whatever size and shape you like. It has also been worked on Congress Canvas, with Baldwin & Walker’s Ladyship 3-ply Fingering. The colours used are light green for the twisted pattern, heliotrope for the star in the middle, and dark green for the darning. With this carpet a paper with pansies or violets would look very pretty.
This twisted pattern is also shown[79] in the design for a rug, which is 5 inches long and 3 inches wide, but you can make it any size and shape you want. It has also been created on Congress Canvas, using Baldwin & Walker’s Ladyship 3-ply Fingering. The colors used are light green for the twisted pattern, heliotrope for the star in the center, and dark green for the darning. With this carpet, a paper featuring pansies or violets would look really pretty.
Here again little samples of the stitches have been worked on canvas, that you may see clearly how they are done.
Here again, small samples of the stitches have been worked on canvas so you can clearly see how they're done.

The twisted pattern is worked in satin stitch over 4 threads of canvas.
The twisted pattern is done in satin stitch over 4 threads of canvas.
You will see this stitch is described on page 71, and if you look at the pattern carefully, you will get the twist over and under quite right. To make the corners, work the stitches over 3, then 2, and 1 thread, then over the middle, work the other side of corner over 1, 2, and 3 threads, finish over 4 threads into the same hole as the last stitch, over 4 threads on the other side of the corner. Look at the pattern on the canvas as you work this out, that will also show how many stitches to do, and the way they are arranged.
You’ll see this stitch is detailed on page 71, and if you examine the pattern closely, you'll get the twist over and under just right. To make the corners, stitch over 3, then 2, and 1 thread, then for the middle, work the other side of the corner over 1, 2, and 3 threads, finishing with 4 threads into the same hole as the last stitch, and 4 threads on the other side of the corner. Keep an eye on the pattern on the canvas as you work this out; that will also indicate how many stitches to make and how they should be arranged.
For the star in the centre, work from corner to corner twice, crossing the thread in the centre, then another stitch from the centre[80] hole on the top to the centre hole at opposite end, and another across the centre.
For the star in the center, work from corner to corner twice, crossing the thread in the center. Then make another stitch from the center hole at the top to the center hole at the opposite end, and another across the center. [80]
The canvas between the twisted pattern is darned, that is, pass the thread over 2 threads of canvas and under 2 threads—this also is plainly shewn on the coarse canvas.
The canvas in between the twisted pattern is stitched; that is, pass the thread over 2 threads of canvas and under 2 threads—this is also clearly shown on the coarse canvas.

Work blanket stitch into every hole around the edge.
Work a blanket stitch into every hole around the edge.
A square carpet of this design, with a small rug of the In-and-Out pattern, would look very well, but you would have to use the same colours for both, of course. The carpet could be fastened to the cottage floor with small drawing pins.
A square carpet with this design, paired with a small rug featuring the In-and-Out pattern, would look great together, but you'd need to use the same colors for both, of course. The carpet could be secured to the cottage floor with small push pins.

Here is still another kind of rug that you can make. It is also worked in Baldwin & Walker’s 3-ply Ladyship Fingering on Congress Canvas, and the colours that have been used are pale blue, grey, and violet. A row is worked in each colour until the rug is large enough. This little hearthrug shown measures 4 inches by 2 inches, but you can make it as large as you like.
Here’s another type of rug you can create. It’s made with Baldwin & Walker’s 3-ply Ladyship Fingering on Congress Canvas, using pale blue, grey, and violet colors. Work a row in each color until the rug is the size you want. This small hearth rug shown measures 4 inches by 2 inches, but you can make it as big as you’d like.
The rug is worked in satin stitch for the 1st row, the stitches are upright, over 4 threads, but each fresh stitch is started one thread lower, and of course finishes one thread lower. The next row is worked across, also over 4 threads, each stitch is started one thread farther back than the one before, and finished in the same hole as one of the stitches of the row before.
The rug is done in satin stitch for the first row, with the stitches standing up over 4 threads. However, each new stitch starts one thread lower and also finishes one thread lower. The next row is worked across, also over 4 threads, with each stitch starting one thread further back than the previous one and finishing in the same hole as one of the stitches from the row before.
If you look at the two little specimens that have been worked, I don’t think you will have any trouble over this. You will notice that when you come to the edge, and want to finish off straight, you have to take your stitches over 4 threads, 3 threads, 2 threads, and then 1 thread.
If you check out the two little samples that have been worked on, I don't think you'll have any trouble with this. You'll see that when you reach the edge and want to finish straight, you need to take your stitches over 4 threads, then 3 threads, then 2 threads, and finally 1 thread.
The edge of the rug is worked in blanket stitch.
The edge of the rug is finished with a blanket stitch.
This Poem was written over a hundred years ago.
This poem was written over a hundred years ago.

About Dolly’s
Wardrobe.
Cutting Out your Doll’s Clothes.
Whatever garment it is you are wanting to make for dolly, you should first get a good pattern to cut it out from.
Whatever outfit you want to make for your doll, you should first get a good pattern to cut it out from.
You will find that your paper pattern only gives half of the garment, and by cutting each piece on double material you get the whole article.
You’ll notice that your paper pattern only shows half of the garment, and by cutting each piece from double fabric, you’ll get the complete item.
For instance, if you are cutting out a chemise for dolly, the pattern will give you half of the back and half of the front, and you will notice that the straight edge of each portion is marked “place to fold,” which means that you must fold your material and place these edges along the fold, so that when you have cut out the two portions you will have the full front and the full back of the chemise.
For example, if you’re cutting out a chemise for your doll, the pattern will show you half of the back and half of the front. You'll see that the straight edge of each part is labeled "place to fold," which means you need to fold your fabric and align these edges along the fold. This way, when you cut out the two pieces, you will have the complete front and back of the chemise.
This rule of cutting on double material generally applies to all the portions of the pattern, but it is not always necessary to lay the edge against a fold, you only do this when your pattern is marked in this way. For instance, you will have the pattern for the whole sleeve when cutting out a frock, and by cutting it on double material you get a sleeve for each arm.
This rule of cutting on double material generally applies to all parts of the pattern, but you don't always have to lay the edge against a fold; you only do this when your pattern is marked that way. For example, when cutting out a dress, you'll have the pattern for the entire sleeve, and by cutting it on double material, you get a sleeve for each arm.

Before starting to cut out, clear your table of everything else, so that you have a nice flat surface;[84] and whatever you do don’t try to cut out with a cloth on the table, or you will find you are constantly pinning your pattern right through to the cloth, instead of to the material only.
Before you start cutting out, clear your table of everything else to create a nice flat surface; [84] and whatever you do, don’t try to cut out with fabric on the table, or you’ll end up pinning your pattern through the fabric instead of just the material.
You will want a sharp pair of scissors to cut out well, and a good supply of pins. You will notice that one blade of your cutting-out scissors has a very sharp point, while the other blade has a rounded blunt end. To cut out successfully, you must always hold your scissors so that the blunt blade comes underneath your work. This prevents the sharp point of the scissors from running into the material, and making a hole where you don’t want one!
You’ll need a sharp pair of scissors to cut well and a good supply of pins. You’ll notice that one blade of your scissors has a very sharp point, while the other blade has a rounded blunt end. To cut successfully, always hold your scissors so the blunt blade is underneath your work. This keeps the sharp point from poking into the material and creating a hole where you don’t want one!
Look at each portion of the pattern carefully, and place it on to the material according to what is marked on the paper pattern, then pin it down securely and cut round the portion close to the edge of the paper.
Look at each part of the pattern carefully and place it onto the material according to what’s marked on the paper pattern. Then pin it down securely and cut around the part close to the edge of the paper.
Be sure you cut into the little notches that you will find cut in some of the edges, as these will help you in putting the pieces together. The edge that has one notch has to be joined to another edge with one notch, the edge with two notches to another edge with two notches, and so on.
Be sure to cut into the little notches you’ll find on some of the edges, as these will help you assemble the pieces. The edge with one notch needs to be connected to another edge with one notch, the edge with two notches to another edge with two notches, and so on.
If the material has a pattern on it, be sure that you have it the right way up. For instance, if you are making dolly a frock out of a piece of material with birds on it, see that you arrange the pattern on the material so that the birds come with heads up. And also see that both the pieces of material, if you are cutting it double, are the same way up. Wouldn’t it look queer if it turned out that one half of dolly’s frock—when you had put it together—had birds standing on their feet, while the other half showed them standing on their heads!
If the fabric has a pattern, make sure you have it facing the right way. For example, if you’re making a dress for a doll out of fabric with birds on it, make sure you position the pattern so that the birds are upright. Also, ensure that both pieces of fabric, if you’re cutting it double, are oriented the same way. It would look odd if one half of the doll’s dress ended up with birds standing right side up while the other half had them upside down!
Making Dolly’s Underwear.

Good mothers always try to have their children dressed neatly and prettily, not only giving them nice hats and dresses, but having all the other clothes to match. Of course, you want to be like a good mother to dolly, but perhaps you do not know how to make some of the things.
Good mothers always try to keep their kids dressed neatly and nicely, not just giving them cute hats and dresses, but making sure all their other clothes match. Of course, you want to be a good mom to your doll, but maybe you’re not sure how to make some of the things.
Well, just look at this pretty set of underwear, and read what is written about them, and see if you can make a set for dolly.
Well, just look at this nice set of underwear, and read what’s written about them, and see if you can make a set for your doll.
The nightdress, chemise, flounced petticoat and the knickers are made of nainsook, and the plain petticoat of fine flannel.
The nightdress, chemise, flounced petticoat, and the knickers are made of nainsook, and the simple petticoat is made of fine flannel.
You have a little article on page 83 telling you how to cut out the garments from paper patterns.
You have a short article on page 83 explaining how to cut out clothing from paper patterns.
We will commence with the little nightdress. The seams of this are joined with what is called a run-and-fell seam. Lay the two edges to be joined over one another, placing the edge of the upper portion just below the edge of the under one, and run them together, about an eighth of an inch in from the upper edge. When you have finished running the seam, you turn the edge of the under portion over the upper edge, and fold the seam down flat and hem it (or fell it) along. This is shown in your illustration of the seam. The side you have hemmed is the wrong side of the seam.
We will start with the little nightdress. The seams are connected with what's called a run-and-fell seam. Lay the two edges to be joined on top of each other, placing the edge of the upper piece just below the edge of the lower one, and sew them together about an eighth of an inch from the upper edge. Once you finish sewing the seam, turn the edge of the lower piece over the upper edge, fold the seam down flat, and hem it (or fell it) along the way. This is illustrated in your seam diagram. The side you have hemmed is the wrong side of the seam.

When you have joined both the[86] seams, make a half-inch hem round the bottom of the nightdress, and make the very tiniest of hems round the neck and sleeve edges.
When you've attached both the[86] seams, create a half-inch hem around the bottom of the nightdress, and make the tiniest hems around the neck and sleeve edges.
To trim your night-gown you will want a little lace edging with a beading at the top that you can thread a piece of narrow ribbon through. Hem the edging along the hems you have made at the neck and sleeve edges, then thread in the ribbons with a bodkin, and draw them up to the size for dolly’s neck and wrists.
To trim your nightgown, you'll need some lace edging with a little beading at the top that you can run a narrow ribbon through. Hem the edging along the hems you've made at the neck and sleeve edges, then thread the ribbons through using a bodkin, and pull them tight to fit dolly's neck and wrists.

The chemise seams are joined in the same way as those of the night-gown, and narrow hems are placed round the neck and armhole edges, a little wider hem being put round the bottom of the chemise. Trim the neck and armholes with lace edging, as you did the night-gown, and draw up the neck only with ribbon.
The seams of the chemise are sewn together just like those of the nightgown, and narrow hems are added around the neck and armhole edges, with a slightly wider hem around the bottom of the chemise. Finish the neck and armholes with lace trim, just like you did for the nightgown, and gather the neck using a ribbon.

In making the little petticoat you have only one seam to join up at the centre back. You can use a French seam for this, and to make this you run the edges to be joined together on the right side, then turn your work over and run the seam[87] down a second time. I think the little picture will explain this quite clearly to you. The seam is shown being run the second time, and you will see how this covers up the raw edges and leaves you with a neat little double seam sticking out on the wrong side of your work. This seam will be useful when you want to make dolly frocks, etc., or anything where you don’t want to show any stitches on the right side of your work, and yet want it very neat on the wrong side.
In making the little petticoat, you only need to sew one seam at the center back. You can use a French seam for this. To create it, start by pinning the edges you want to join together on the right side, then flip your work over and sew the seam down a second time. I think the little picture will make this clear for you. The seam is shown being sewn the second time, and you’ll see how this covers the raw edges and leaves you with a neat double seam on the wrong side of your work. This seam will be handy when you want to make doll dresses or anything else where you don't want any visible stitches on the right side, while still keeping it tidy on the wrong side.


Don’t join the back of the petticoat all the way up, but leave about two inches open at the top to form a placket. Make a narrow hem down each of the two edges of the opening on the wrong side, then place one hem over the other and backstitch them together across the bottom of the placket; this will make it firm, so that you won’t tear the seam when dressing dolly. When you want to backstitch, you start as you would for running, but only taking one stitch at a time, and for each stitch you put your needle back into the end of the stitch you have just made, so that you have a row of even stitches without any spaces between. I think the illustration will explain this to you. If you are going to trim[88] your petticoat with a little embroidery flounce, you must turn a hem round it the same width as your flounce, then whip the top of flounce to the top of the hem. How to do whipping was described on page 60. The top of the petticoat is gathered and placed into a band the size for dolly’s waist; putting gathers into a band was described on page 4.
Don’t sew the back of the petticoat all the way up; leave about two inches open at the top to create a placket. Make a narrow hem along each edge of the opening on the wrong side, then fold one hem over the other and backstitch them together at the bottom of the placket. This will reinforce it so that you won’t rip the seam when dressing dolly. When you’re backstitching, start like you would for running stitch, but only take one stitch at a time. For each stitch, insert your needle back into the end of the stitch you just made, creating a row of even stitches with no gaps in between. I think the illustration will clarify this for you. If you plan to trim your petticoat with a little embroidered flounce, you need to fold a hem around it that’s the same width as the flounce, then whip the top of the flounce to the top of the hem. Instructions for whipping were covered on page 60. The top of the petticoat is gathered and attached to a band sized for dolly’s waist; putting gathers into a band was described on page 4.


The petticoat is fastened with a button and buttonhole. If you do not yet know how to make a buttonhole, turn to page 6 for this. You have an illustration on this page showing how the button is put on. Use a small white linen button, make a little bar of threads across the centre, just working over and over through the button and the band, then bring your needle out at the left end of the bar of threads and work buttonhole stitches closely together along the bar. When you have worked to the other end, put your needle through the button and bring your cotton out between the button and the band, wind the cotton round four or five times, then put your needle[89] down through the band and fasten off your cotton on the wrong side.
The petticoat is attached with a button and buttonhole. If you don't know how to make a buttonhole yet, check out page 6 for that. There's an illustration on this page showing how to attach the button. Use a small white linen button and make a few threads across the center, working over and over through the button and the band. Then bring your needle out at the left end of the threads and work buttonhole stitches closely along the thread. Once you reach the other end, put your needle through the button and pull the thread out between the button and the band. Wrap the thread around four or five times, then push your needle down through the band and tie off your thread on the back side.
In joining up the little knickers you must first join each of the leg seams, then you join the two legs together from the front to the back, leaving a placket at the back as you did in making the petticoat. Finish the placket as before, then make a narrow hem round the top of the knickers, and thread a piece of tape through this to tie round dolly’s waist.
In putting together the small underwear, first connect each of the leg seams, then join the two legs from the front to the back, leaving an opening at the back just like when you made the petticoat. Finish the opening as you did before, then create a narrow hem around the top of the underwear, and thread a piece of tape through this to tie around the doll's waist.
Gather the knee edges and place them into bands, and trim with a narrow lace or embroidery edging. Perhaps you will like to feather-stitch the bands; this stitch was described on page 7.
Gather the edges of the knees and secure them with bands, then trim with a narrow lace or embroidered edge. You might want to feather-stitch the bands; this stitch was described on page 7.
Now take the piece of flannel for your other petticoat. The seam of this has to be joined in a different way to the other garments you have been making. You first run the two edges to be joined evenly together, then fold them over and herring-bone the raw edges down flat. Herring-bone stitch is worked from left to right; you hold the edges of the seam down, and first take a little stitch below the edges, and then one just above, putting the stitches fairly close to each other so that the threads cross evenly. If you don’t feel quite sure of this stitch, take a small piece of flannel for practice and copy the little picture. Then, when you can work the stitch evenly, you can do your seam.
Now grab the piece of flannel for your other petticoat. The seam on this one needs to be joined differently than the other garments you've been making. First, line up the two edges that need to be joined evenly, then fold them over and herringbone the raw edges down flat. The herringbone stitch is done from left to right; you hold the edges of the seam down, start with a small stitch below the edges, then one just above, placing the stitches fairly close together so the threads cross evenly. If you’re unsure about this stitch, take a small piece of flannel to practice and follow the little picture. Once you can do the stitch evenly, you can work on your seam.
Place the top of the petticoat into a band and finish with a button and buttonhole. You will see that little pleats are made instead of gathers to bring the petticoat to the size of the band; the pleats set better in the flannel than gathers.
Place the top of the petticoat into a band and finish with a button and buttonhole. You'll notice that small pleats are created instead of gathers to adjust the petticoat to the size of the band; the pleats look better in the flannel than gathers.
Finish the bottom of the petticoat with a hem and tuck. How to make a tuck was described on page 18.
Finish the bottom of the petticoat with a hem and tuck. How to make a tuck was described on page 18.
The set of underwear illustrated was made for a doll 18 inches high, measuring from the top of the head to the sole of the foot. For this size set, about one yard of nainsook and a quarter of a yard of flannel will be sufficient. Two yards of lace edging, a yard of embroidery edging and two yards of bébé ribbon will also be needed.
The underwear shown is designed for a doll that's 18 inches tall, measured from the top of the head to the bottom of the feet. For this size, you'll need about one yard of nainsook and a quarter yard of flannel. Additionally, you'll require two yards of lace edging, a yard of embroidery edging, and two yards of baby ribbon.
A Frock and Coat for Dolly.

If you haven’t made dolly any dresses before, a simple yoked pattern like the one she has on in her picture will be an easy pattern to start with.
If you haven't made any dresses for a doll before, a simple yoke pattern like the one she's wearing in her picture will be an easy pattern to start with.
You will want about a yard of some pretty soft material. A fancy delaine or creponne with a pretty floral design on it would look well, or you may prefer to have a plain material. A yard of lace and two yards of bébé ribbon will also be required if you are going to trim your frock exactly like the one in the picture.
You’ll need about a yard of some nice soft fabric. A fancy delaine or creponne with a pretty floral pattern would look great, or you might prefer a solid color. You’ll also need a yard of lace and two yards of baby ribbon if you want to trim your dress just like the one in the picture.
Carefully cut out all the pieces you want to make the frock. You will find out how to do this on page 83. When you have all the pieces cut out in the material, take the yoke portions of the pattern and cut them out again from a little piece of nainsook or something that will do to make a lining.
Carefully cut out all the pieces you need to make the dress. You can find out how to do this on page 83. Once you have all the pieces cut out from the fabric, take the yoke parts of the pattern and cut them out again from a small piece of nainsook or something suitable to make a lining.
Join the side seams of the skirt with French seams, then cut a placket two inches long in the centre of the back part of the skirt, and finish it as you were told how in the article on making dolly’s underwear.
Join the side seams of the skirt with French seams, then cut a placket two inches long in the center of the back part of the skirt, and finish it as instructed in the article on making dolly’s underwear.
Now take the dress yoke portions, and join the shoulder seam. Just an ordinary little run together seam on the wrong side will do for these, as you will remember we are going to line the yoke.
Now take the dress yoke sections and stitch the shoulder seam. A simple seam on the inside will work for these, since you’ll remember we’re going to line the yoke.

Gather the top of the front of the skirt, and draw it up to the size of the lower edge of the front of the yoke. Place the edge of the yoke and the edge you have gathered together just as if you were going to make a seam (be sure you put the right sides[91] of the material inside) and backstitch along firmly.
Gather the top of the front of the skirt and pull it up to match the size of the lower edge of the front of the yoke. Align the edge of the yoke with the gathered edge as if you were about to sew a seam (make sure the right sides of the fabric are facing in) and backstitch securely.
Turn in a quarter-inch single turning, from the neck down to the lower edge of each of the backs of the yoke, then gather the backs of the skirt and join them to the yoke as you did the front.
Turn in a quarter-inch single fold from the neck down to the lower edge of each back of the yoke, then gather the backs of the skirt and attach them to the yoke just like you did with the front.
Join the lining yoke portions together, turn your dress on the wrong side, and place the lining yoke over the dress yoke, so that the edges of the seams come inside. Turn the lower edges of the lining yoke in and hem them along to the back of the gathers, making it all neat inside, and in the same way turn in the straight edges of the backs of the lining to meet the single turnings you made on the dress yoke; oversew these edges together.
Join the lining yoke sections together, turn your dress inside out, and place the lining yoke over the dress yoke, ensuring the seam edges are tucked inside. Fold the lower edges of the lining yoke inward and hem them to the back of the gathers, keeping it tidy inside. Similarly, fold in the straight edges of the back of the lining to align with the single folds you made on the dress yoke; sew these edges together.
You will notice that the top edge of your sleeve portion is curved up much higher one side than the other; the high side has to come on the shoulder, and the lower side underneath the arm. You will have to be careful in joining up the sleeves, that in the second sleeve the high side comes the opposite side of the sleeve to what it does in the first sleeve, so that you have one sleeve for the left and one for the right arm.
You’ll notice that the top edge of your sleeve is curved up much higher on one side than the other; the higher side goes on the shoulder, and the lower side goes underneath the arm. Be careful when attaching the sleeves: make sure that in the second sleeve, the high side is on the opposite side compared to the first sleeve, so you end up with one sleeve for the left arm and one for the right.
Join up the sleeves with French seams. Take your little cuff band, fold it in half and join up one side with a single seam, so that it is joined in a circle. Gather the bottom of the sleeve, until it is the same size as the cuff. Place the cuff over the bottom of the sleeve (with the right side of the material inside), and backstitch the gathered edge to the edge of the cuff. Fold the cuff piece in half over the gathers right round, then turn your sleeve on the wrong side, and hem the other edge of the cuff to the back of the gathers. Make the other sleeve in the same way.
Join the sleeves using French seams. Take your cuff band, fold it in half, and sew one side to create a circle. Gather the bottom of the sleeve until it matches the size of the cuff. Place the cuff over the bottom of the sleeve (with the right side of the fabric facing inward) and backstitch the gathered edge to the cuff's edge. Fold the cuff piece over the gathers all around, then turn the sleeve inside out and hem the other edge of the cuff to the back of the gathers. Make the other sleeve the same way.
To put the sleeves into the dress, first gather the tops, until they are the size of the armhole of the frock.[92]
To attach the sleeves to the dress, first gather the tops until they match the size of the armhole of the dress.[92]
Place the short part of the sleeve over the skirt seam, so that it will come under dolly’s arm, and place the sleeve seam to the seam joining the yoke to the skirt at the front. Make a seam of the armhole and the gathered edge of the sleeve. To neaten the armhole seams, bind them with narrow tape or ribbon.
Place the short part of the sleeve over the skirt seam, so it goes under dolly’s arm, and align the sleeve seam with the seam connecting the yoke to the skirt at the front. Sew the armhole and the gathered edge of the sleeve together. To tidy up the armhole seams, bind them with narrow tape or ribbon.
Now you are ready to turn up the bottom of the frock. Measure dolly from her neck to where you want the bottom of the frock to come. Then measure the same distance down from the neck of the frock in front, and turn up a nice wide hem evenly all round.
Now you're ready to hem the bottom of the dress. Measure from the doll's neck to where you want the dress to end. Then measure the same distance down from the neck of the dress in the front, and fold up a nice wide hem evenly all the way around.
If dolly’s frock is of plain material, instead of just hemming the hem, you might like to finish it with French knots along. You must work these with embroidery thread, and you have a picture showing how the knots are made.
If Dolly’s dress is made of solid fabric, instead of just hemming the edge, you might want to finish it with French knots. You need to use embroidery thread for this, and there's a picture showing how to make the knots.
Bring your needle up through the double hem on the right side, hold the thread down with the left hand thumb, and pick up a tiny stitch along the hem, just where the thread comes out; now, with the right hand, wind the thread round the needle (just as it is in the picture), pull your needle out, and you will find you have made a little twisted knot. Put your needle down through the hem again close to the knot, and bring it up a little further along the hem, ready for the next knot. Make your knots equal distances apart all round. This is a very good way of finishing any hem, where you do not want a row of hemming stitches showing on the right side.
Bring your needle up through the double hem on the front side, hold the thread down with your left thumb, and pick up a tiny stitch along the hem, right where the thread comes out; now, with your right hand, wrap the thread around the needle (just like it looks in the picture), pull your needle out, and you'll see you've created a small twisted knot. Put your needle back down through the hem again close to the knot, and bring it up a little further along the hem, ready for the next knot. Make your knots evenly spaced all around. This is a great way to finish any hem where you don’t want a row of hemming stitches visible on the front side.
Bind the neck of the frock with a narrow strip of the material.
Bind the neck of the dress with a narrow strip of the fabric.
Divide the lace into two equal lengths, then cut one length in half again. Pleat the longest piece into the neck of the dress, and one short piece into each cuff. Loop your ribbon up into a little rosette, leaving one or two long loops hanging, and place this on the left side of the yoke. Fasten the frock with buttons and buttonholes at the back.
Divide the lace into two equal pieces, then cut one piece in half again. Gather the longest piece into the neck of the dress, and one short piece into each cuff. Twist your ribbon into a small rosette, leaving one or two long loops hanging, and place this on the left side of the yoke. Secure the dress with buttons and buttonholes at the back.
Serge would be a good material to use. Half a yard would be sufficient to make it for an 18-inch doll, the size of the one in the picture.[93] Two yards of a tiny white braid were used to trim the coat.
Serge would be a good fabric to use. Half a yard would be enough to make it for an 18-inch doll, which is the size of the one in the picture.[93] Two yards of a small white braid were used to trim the coat.
When you have carefully cut out your coat pattern, join up the under-arm and shoulder seams. To join coat seams you must just place the two edges to be joined together evenly, and backstitch them together on the wrong side. To neaten the seams inside the coat, open them out flat and bind each of the raw edges separately. To get them quite flat you will have to press them with a hot iron.
When you’ve carefully cut out your coat pattern, sew the under-arm and shoulder seams together. To join the coat seams, just align the two edges evenly and backstitch them together on the inside. To tidy up the seams inside the coat, open them flat and bind each of the raw edges separately. To make them completely flat, you’ll need to press them with a hot iron.
The coat sleeve has two pieces, so you will have two seams to join for each sleeve; join them just as you did the shoulder and under-arm seams, and be careful to get one sleeve the reverse way to the other one.
The coat sleeve has two parts, so you'll have two seams to connect for each sleeve; attach them just like you did with the shoulder and underarm seams, and make sure to get one sleeve facing the opposite way from the other.
Now take the front facings, lay them on to the right side of the fronts of the coat (you will see they are just the same shape as the fronts at the outer edges). Backstitch these pieces on to the fronts all round where the edges meet the coat edges, then turn the facings inside the coat. Bind the straight raw edges of the facings that come inside the coat. Turn back the top of each front to form a rever.
Now take the front facings and lay them on the right side of the coat fronts (you’ll see they match the shape of the outer edges). Backstitch these pieces to the fronts all around where the edges meet the coat edges, then turn the facings inside the coat. Finish the straight raw edges of the facings that go inside the coat. Fold back the top of each front to create a lapel.
Turn a single turning half an inch wide round the bottom of the coat, and backstitch along about a quarter of an inch in from the fold; bind the raw edge of the turning inside the coat. Finish the wrist edges of the sleeves in the same way, and put them into the coat as you put in the dress sleeves; they will need very little gathering.
Turn a single half-inch hem around the bottom of the coat and backstitch about a quarter of an inch in from the fold; tuck the raw edge of the hem inside the coat. Finish the edges of the wrist of the sleeves the same way, and attach them to the coat like you would attach the dress sleeves; they will require very little gathering.
Cut a second collar out of a piece of soft sateen or lining, place the two pieces together and backstitch round three of the edges, leaving the curved neck edge open. Turn the collar inside out, pushing out the corners carefully. To join the collar to the coat, seam the neck of the coat to the neck edge of the lining of the collar, then turn the neck edge of the collar in over this seam and hem it along neatly.
Cut a second collar from a piece of soft sateen or lining, place the two pieces together, and backstitch around three of the edges, leaving the curved neck edge open. Turn the collar inside out, carefully pushing out the corners. To attach the collar to the coat, sew the neck of the coat to the neck edge of the lining of the collar, then fold the neck edge of the collar over this seam and neatly hem it.
Put the braid round all the edges of the coat as shown. Using white cotton, hold the braid along the work, and sew it on with small running stitches along the centre of the braid.
Put the braid around all the edges of the coat as shown. Using white cotton, hold the braid along the work, and stitch it on with small running stitches along the center of the braid.
Make three buttonholes on the right front of the coat, and sew buttons on the left front to correspond.
Make three buttonholes on the right front of the coat, and sew buttons on the left front to match.

This is the Peacock Cloth. One Peacock is standing on the top of a wall, while the other struts about on the grass and shows off his splendid feathers. Isn’t it pretty?
This is the Peacock Cloth. One peacock is perched on top of a wall, while the other struts around on the grass, flaunting his beautiful feathers. Isn’t it lovely?
A Chapter about Pretty Oddments.
A Peacock Cloth.

THE sight of these pretty peacocks makes you long to sit down and start working them, I am sure, and when worked on a square of white Hardanger canvas, they really make a most attractive little cloth or table-centre.
THE sight of these beautiful peacocks makes you want to sit down and start stitching them, I’m sure, and when stitched on a piece of white Hardanger canvas, they really create a lovely little cloth or table centerpiece.
The cloth in the picture was about 12 inches square when hemmed, but you can make it just what size suits you best; this will, of course, greatly depend on what you want to use it for.
The fabric in the picture was around 12 inches square when finished, but you can make it whatever size works best for you; this will, of course, depend a lot on what you plan to use it for.
There is one thing, however, that you must be very careful about, and that is that your piece of material is perfectly square, and not wider one way than the other. Also be sure you allow about an extra 1½ inches all round to the size you want the cloth to be when finished, so that you can have a nice wide hem.
There’s one thing you need to be careful about: make sure your piece of fabric is perfectly square and not wider in one direction than the other. Also, make sure to add about an extra 1½ inches all around to the size you want the finished cloth to be, so you can have a nice wide hem.
You must first hemstitch your cloth all round, and you learnt all about how to do this on page 30.
You need to first hemstitch your fabric all the way around, and you learned all about how to do this on page 30.

The peacocks are worked in cross-stitch with J. & J. Baldwin’s Beehive Shetland Wool, in a crimson shade. If you are making your cloth out of Hardanger canvas, you will be able to work the crosses very easily.[96] When working on the Hardanger canvas, you just make your crosses over three threads of the canvas each way.
The peacocks are stitched using cross-stitch with J. & J. Baldwin’s Beehive Shetland Wool in a deep red color. If you're creating your fabric from Hardanger canvas, you’ll find it easy to make the crosses. [96] When using Hardanger canvas, just stitch your crosses over three threads of the canvas in each direction.

I think you will find it quite easy to count the crosses from the diagrams given, and the best way to make sure of getting the peacocks nicely even in the corners, like they are in the picture, is to count the number of open squares, from the corners of the diagrams to the commencement of the designs, and allow three threads for each square on your canvas. For instance, taking the peacock on the left of your cloth, you will need to start on the sixteenth square up from the lower hemstitched border, and one square to the right of the side border.
I think you’ll find it pretty easy to count the crosses from the diagrams provided, and the best way to ensure the peacocks are nicely even in the corners, like they are in the picture, is to count the number of open squares from the corners of the diagrams to the start of the designs, and allocate three threads for each square on your canvas. For example, for the peacock on the left side of your cloth, you should begin on the sixteenth square up from the lower hemstitched border and one square to the right of the side border.
Remember, if you start the first cross right and work your crosses evenly, the design must come out even; all you have to do is to see that you don’t go over more than three threads of canvas for each cross.
Remember, if you start the first cross correctly and make sure your crosses are even, the design should turn out uniform; all you need to do is ensure that you don’t go over more than three threads of canvas for each cross.
This design would look very well on a cushion. In that case, the cushion cover could be made of serge, or of crash, or of linen. Crash is very easy to work on, and washes well. If the material is so fine that it tries your eyes to count the threads, then it is easy to tack Penelope canvas over the material, and work the cross-stitches on this, drawing the canvas threads out when the work is finished.
This design would look great on a pillow. In that case, the pillow cover could be made of serge, or crash, or linen. Crash is very easy to work with and washes well. If the fabric is so fine that it strains your eyes to count the threads, then it's easy to pin Penelope canvas over the fabric and do the cross-stitches on that, pulling out the canvas threads when you're done.
Some Pretty Bead-work.
There are very few little girls—or big ones either—who are not fond of beads. There is something so fascinating, isn’t there, in seeing what pretty things we can make by threading them. And there are so many lovely ways in which you can use beads.
There are very few little girls—or even older ones—who don't like beads. There's something so captivating about seeing the beautiful things we can create by stringing them together. Plus, there are so many wonderful ways to use beads.

You see the picture on page 98, showing four little rows of beads. Well, each is a section of a pretty chain, either of which any little girl could make. The top one is made of tiny metal beads and shell beads. There are 12 tiny beads, then 3 shell beads, all the way along.
You see the picture on page 98, showing four small rows of beads. Each row is a part of a cute chain that any little girl could make. The top row is made of tiny metal beads and shell beads. There are 12 tiny beads followed by 3 shell beads all the way across.
The next chain shows beads of four different sizes, some dark and some light. This is part of a lovely, long muff chain. Just below is another chain, which is a very simple arrangement, being simply 12 metal beads, then 1 ordinary coral bead. The bottom chain of the little group is made of small, dull blue beads—24 are threaded, then 2 little pink ones, next 1 deep coloured pearl bead, 2 pink, 24 blue, and so on.
The next chain features beads in four different sizes, some dark and some light. This is part of a lovely, long muff chain. Just below it is another chain, which is a very simple design, consisting of 12 metal beads followed by 1 regular coral bead. The bottom chain of the little group is made up of small, dull blue beads—24 are strung together, then 2 small pink ones, followed by 1 deep-colored pearl bead, then 2 pink ones, 24 blue, and so on.

The picture above shows a pretty necklace made on 2 threads. You thread the tiny[98] beads on single threads, then when you come to a larger bead, you put both threads through the same bead. The 5 very big beads are green Venetian beads, and look so pretty.
The picture above shows a beautiful necklace made with 2 threads. You thread the tiny[98] beads on individual threads, and when you get to a larger bead, you pass both threads through it. The 5 large beads are green Venetian beads, and they look really nice.
Another necklace worked on 2 threads is also shown. The beads here are pale blue, with a small pearl here and there. Both threads are put through the same beads, until you come to the front part. There they are divided, and more put on the lower thread, to make the little loops, then both are threaded through the same bead again. This is done 7 times, to make 7 loops, then for the remainder all the beads are threaded on 2 threads.
Another necklace made with 2 threads is also shown. The beads here are light blue, with a small pearl scattered throughout. Both threads go through the same beads until reaching the front section. There, they are split, and more beads are added to the lower thread to create the little loops, then both threads go through the same bead again. This is repeated 7 times to form 7 loops, and then for the rest, all the beads are threaded on 2 threads.
The upper picture on page 99 shows sections of 3 chains made of small beads. These are made on a bead loom. On these looms you can make lovely things, and the beads to use are Venetian Iridescent, Cut Tosca, or No. 8 Cut Metal. The work is very easy, and is done as follows:—
The upper picture on page 99 shows sections of 3 chains made from small beads. These are made on a bead loom. You can create beautiful things with these looms, and the beads you can use are Venetian Iridescent, Cut Tosca, or No. 8 Cut Metal. The work is very easy and is done as follows:—
Always cut one more warp thread than the number of beads to be used in width, for instance, if the width of work is to be 6 bead wide[99] cut 7 threads. Also in making necklaces cut the thread several inches longer, so as to prevent joining and to allow for the fastening on of the snap.
Always cut one more warp thread than the number of beads needed for the width; for example, if the work is supposed to be 6 beads wide[99], cut 7 threads. Also, when making necklaces, cut the thread several inches longer to avoid joining and to allow for attaching the snap.

After cutting threads, commence to tie all threads together at one end, fix this on the nail on the spool and then place each of the threads in rotation on the notches of bridge, carrying the threads to the opposite bridge. Then place the threads in same rotation on the second bridge; now draw the threads tight and with the remains of length tie on round the end of loom and fix in and around the pegs. This is called the warp. You now get your thread for threading the beads, and tie the end at the first or left-hand warp, thread the same number of beads in the way you want the first row made, and push them up between the warps, and repeat this again and again until the design is finished.
After cutting the threads, start tying all the threads together at one end, secure this to the nail on the spool, and then place each thread in rotation on the notches of the first bridge, carrying the threads to the opposite bridge. Next, place the threads in the same rotation on the second bridge; now pull the threads tight and with the remaining length tie it around the end of the loom and secure it in and around the pegs. This is called the warp. Now take your thread for threading the beads, and tie the end to the first or left-hand warp, string the same number of beads in the order you want for the first row, and push them up between the warps, repeating this until the design is complete.

Pretty Things in Woolwork.
Have you ever burnt your finger? If so, you know just what it is like, and you don’t want me to tell you how it feels! When you have once had a burn or a scald, you are very careful not to get another if you can help it, and you won’t want anyone else to burn themselves, I know.
Have you ever burnt your finger? If you have, you know exactly what it's like, and you definitely don't want me to describe how it feels! Once you've had a burn or a scald, you're super careful not to get another one if you can avoid it, and I know you wouldn't want anyone else to hurt themselves either.
Has Grandmamma a kettle holder? She certainly ought to have one, because it is really a nasty thing to pick up a hot kettle without a holder. You just want to drop it at once! Suppose you start right away to make a kettle holder. I mean a really pretty one, of course, that will be delightful to look at, as well as useful.
Has Grandmamma got a kettle holder? She definitely should have one because it's really unpleasant to pick up a hot kettle without a holder. You'd want to drop it immediately! How about you start making a kettle holder right away? I mean a truly cute one, of course, that will be lovely to look at and practical too.

It hangs up by the loop at the top.
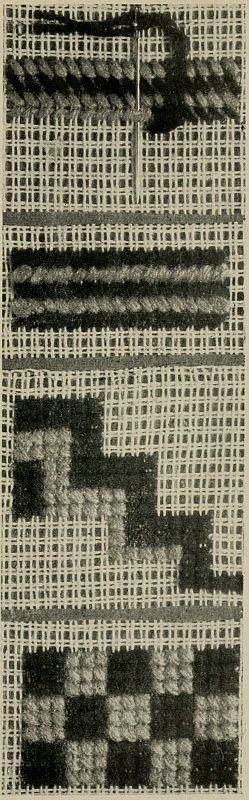
Here is a lovely chance for you to do some Berlin Woolwork. This is done on Penelope Canvas. You have already learnt to work cross-stitch designs on Penelope Canvas, haven’t you? so you have not so very much that is fresh to learn here. When you did the work before, however, you pulled the threads away afterwards, but here you do not pull any away, but you cover the whole of the canvas square with some pretty pattern. It may be alternate rows of two colours, or it may be a little square pattern, or it can be the “upstairs and downstairs” pattern that you see in the kettle holder on this page.
Here’s a great opportunity for you to try some Berlin Woolwork. This is done on Penelope Canvas. You’ve already learned how to do cross-stitch designs on Penelope Canvas, haven’t you? So there’s not too much new for you to learn here. When you worked on it before, you pulled the threads back afterward, but here you don’t pull any away; instead, you cover the entire canvas square with a beautiful pattern. It could be alternating rows of two colors, a small square pattern, or the “upstairs and downstairs” pattern that you see in the kettle holder on this page.
The easiest kind of kettle holder to start with would be one like the mat on page 103—in green and purple—working a row of green crosses, and then a row of purple crosses. When you are working several crosses in a row, you do not finish each cross before going on to the next. You make the halves of the crosses all one way, and then[101] go back and cross them all. You will see what I mean by the top illustration in the picture on this page, showing the stitches.
The easiest type of kettle holder to start with would be one like the mat on page 103—in green and purple—making a row of green crosses, followed by a row of purple crosses. When you’re working several crosses in a row, you don’t finish each cross before moving on to the next one. You create all the halves of the crosses in one direction, and then[101] go back and cross them all. You’ll see what I mean by the top illustration in the picture on this page, showing the stitches.
You will want some Penelope Canvas, and some purple and some green Berlin wool—J. and J. Baldwin’s English-made Berlin wool is the kind to get, as we all like to buy things that are made in England, don’t we? You also need a piece of thick serge or cloth to line the kettle holder, and a pretty cord to finish the edge.
You’ll need some Penelope Canvas, along with some purple and green Berlin wool—J. and J. Baldwin’s English-made Berlin wool is the best choice since we all prefer to buy things made in England, right? You’ll also need a piece of thick serge or cloth to line the kettle holder, and a nice cord to finish the edge.
To start the kettle holder, take a piece of canvas, about 7 inches each way. Before you commence the pattern, thread your needle with wool, and take over-and-over stitches all round the edge to keep the canvas from fraying out while you are doing the pretty work.
To begin the kettle holder, take a piece of canvas, about 7 inches on each side. Before you start the pattern, thread your needle with wool, and make over-and-over stitches all around the edge to prevent the canvas from fraying while you do the decorative work.
Now, starting half an inch in, work the cross-stitch, first doing a row of purple and then a row of green, leaving half an inch all round the edge. This will give you a worked square, 6 inches by 6 inches.
Now, starting half an inch in, work the cross-stitch, first doing a row of purple and then a row of green, leaving half an inch all around the edge. This will give you a stitched square, 6 inches by 6 inches.
Having finished the cross-stitch, turn in the edge all round as far as the work, and tack it. Take your piece of cloth, turn in and tack the edge of[102] that all round to the same size as the kettle holder. Place them together with the wrong sides facing, and hem the lining to the holder, not letting the stitches show through on the right side.
Having finished the cross-stitch, fold in the edge all around up to the work, and pin it down. Take your piece of cloth, fold in and pin the edge of[102] all around to match the size of the kettle holder. Place them together with the wrong sides facing each other, and sew the lining to the holder, making sure the stitches don't show on the front side.
The only thing to be done now is to sew the cord to the edge. This finishes the kettle holder very prettily, and at one corner it can be twisted up to make a loop to hang the holder up by, as you see in the picture on page 100.
The only thing left to do is to sew the cord to the edge. This completes the kettle holder beautifully, and at one corner, it can be twisted to create a loop for hanging it up, as you can see in the picture on page 100.
Do you see the little piece worked in squares at the bottom of the picture on page 101. This is a lovely design for a kettle holder. You see nine crosses are worked in light wool and nine in dark wool alternately.
Do you see the small section made up of squares at the bottom of the picture on page 101? This is a beautiful design for a kettle holder. You can see that nine crosses are made in light wool and nine in dark wool, alternating between them.

The “upstairs and downstairs” pattern is just a little bit more difficult, but even this only requires careful counting. You start in the top left-hand corner, and work six crosses in a row. Then take four downwards, then four more in a row with the last one down, then four more down, and so on. When you have worked from one corner to the other in this way, you start filling in the space at each[103] side of that diagonal line, working two rows in each colour. Light and dark green would look very pretty for this. The kettle holder worked in this design is shown hanging cornerwise, but of course it has to be worked straight, as in third specimen in the picture on page 101.
The “upstairs and downstairs” pattern is a bit more challenging, but it really just takes careful counting. You start in the top-left corner and make six crosses in a row. Then you go down four, then another four in a row with the last one going down, followed by four more down, and so on. Once you’ve worked from one corner to the other this way, you begin filling in the space on each side of that diagonal line, working two rows in each color. Light and dark green would look really nice for this. The kettle holder made in this design is shown hanging diagonally, but it actually needs to be made straight, as in the third example in the picture on page 101.

There is another thing that Grandma would find very useful, and that is a mat to stand on the table for her hot water-jug. You can make this in the same way as the kettle holder, with just two little differences. When the work on the front is finished, turn the canvas on the wrong side over a piece of cardboard before tacking it. Then line it with a strong piece of sateen. The cardboard keeps it firm, and it will then be quite a useful mat to stand the jug on. Then you do not make a loop to hang it up, as you did the kettle holder, but you simply finish the edge with a straight piece of cord.
There’s one more thing Grandma would find really handy: a mat to put under her hot water jug on the table. You can make this just like the kettle holder, but with two small differences. Once you finish the work on the front, flip the canvas to the back over a piece of cardboard before securing it. Then, line it with a sturdy piece of sateen. The cardboard will keep it firm, making it a practical mat for the jug. Instead of making a loop to hang it up like you did with the kettle holder, just finish the edge with a straight piece of cord.
If you have a thicker wool, or use the wool doubled, you can work the design in half crosses only, that is to say, just take a half stitch and do not cross it. You will see what I mean by the second little specimen in the picture on page 101.
If you have thicker wool or use the wool doubled, you can create the design using only half crosses, meaning you only take a half stitch and don’t cross it. You’ll understand what I mean by looking at the second little sample in the picture on page 101.
Does Grandma knit? If she does she will need a strong bag to keep her work in, as steel knitting needles have an aggravating way of poking their heads through the corners of a bag that is not very strong. You will see how to make a bag on page 11, and a way to make it extra strong is to work a strip of Berlin wool-work and sew it to the bottom of the bag, so that when you join up the seams of the bag, you sew in the strip of wool-work at the same time. Isn’t that a sweet bag on page 102. This is made of pretty grey material, and the work at the bottom is done in several lovely colours, purple, green, black, yellow and white, and you would hardly believe how lovely they all look blended together. The ribbons to draw up the bag, and the feather-stitching, are of a beautiful purple colour.
Does Grandma knit? If she does, she’ll need a sturdy bag to store her work since steel knitting needles have a way of poking through the corners of a bag that isn’t very strong. You’ll find out how to make a bag on page 11, and to make it extra strong, you can create a strip of Berlin wool-work and sew it to the bottom of the bag so that when you join the seams, you attach the wool-work strip at the same time. Isn’t that a lovely bag on page 102? It’s made from pretty gray material, and the work at the bottom features several beautiful colors—purple, green, black, yellow, and white—and you wouldn’t believe how lovely they all look together. The ribbons used to cinch the bag and the feather-stitching are a gorgeous purple color.
A Butterfly Pincushion.

This cushion case can be made of white Hardanger Canvas and embroidered with J. & J. Baldwin’s Beehive Shetland Wool in a blue shade, but you must first make a little calico case and stuff it with bran, then the embroidered case can be taken off and cleaned when it gets dirty.
This cushion case can be made from white Hardanger Canvas and embroidered with J. & J. Baldwin’s Beehive Shetland Wool in a blue shade, but you need to first create a small calico case and fill it with bran. Then the embroidered case can be removed and cleaned when it gets dirty.
Cut two squares of calico 4½ inches wide each way, run them together along three of the sides then turn the little square bag you have made inside out, and stuff it with bran. When you have put in as much bran as you can possibly manage to squeeze into the bag, turn the edges of the open side in and oversew them together.
Cut two squares of calico, each 4½ inches wide. Sew them together along three sides, then turn the little square bag inside out and fill it with bran. Once you've packed in as much bran as you can, fold the edges of the open side in and sew them together.
Now cut two squares of canvas the same size as you cut the two calico squares, for the case. The butterfly and the border are worked in cross-stitch. This stitch was described on page 26.
Now cut two squares of canvas the same size as the two calico squares you cut for the case. The butterfly and the border are stitched in cross-stitch. This stitch was described on page 26.

Make your first row of crosses 8[106] threads in from the edge of the square, going over three threads of canvas for each cross and leaving three threads between each. Then put the second row of crosses above the open spaces of the first row. A cross is then added at each corner three threads in from the border.
Make your first row of crosses 8[106] threads in from the edge of the square, going over three threads of canvas for each cross and leaving three threads between each. Then place the second row of crosses above the gaps of the first row. A cross is then added at each corner three threads in from the border.
To get the butterfly right in the centre of the square, count the crosses on the design and place the centre cross of the butterfly even with the centre cross of the border each way. Now sew your two squares of canvas together along three of the edges on the wrong side, taking a seam of four threads of canvas. Turn on to the right side, pull the case over the stuffed cushion, and oversew the edges of the fourth side together.
To position the butterfly perfectly in the center of the square, count the crosses in the design and align the center cross of the butterfly with the center cross of the border on all sides. Next, sew your two squares of canvas together along three edges on the reverse side, using a seam of four threads of canvas. Turn it inside out, pull the case over the stuffed cushion, and whip stitch the edges of the fourth side together.
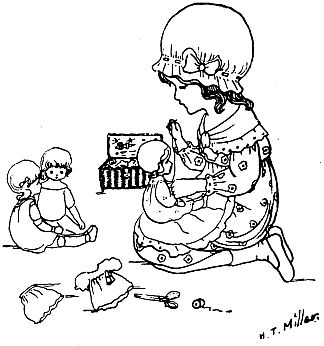
Finish the cushion with blue cord, making a loop at each corner; the cord should be hemmed on along the seam all round. The oversewn seam can be opened a little way and the ends of the cord tucked in and sewn securely to make a neat finish. Three-quarters of a yard of cord will be sufficient to go round the cushion.
Finish the cushion with blue cord, creating a loop at each corner; the cord should be hemmed along the seam all the way around. The oversewn seam can be opened slightly, and the ends of the cord tucked in and sewn securely for a neat finish. Three-quarters of a yard of cord will be enough to go around the cushion.
This little butterfly would also look very pretty on a cushion for Dolly’s chair or couch, and you could make the cushion in exactly the same way as the pincushion, only you would not need to stuff it so full, but leave it loose and soft for Dolly’s head.
This little butterfly would also look really nice on a cushion for Dolly’s chair or couch, and you could make the cushion in exactly the same way as the pincushion, only you wouldn’t need to stuff it so full, but leave it loose and soft for Dolly’s head.
Or, if you can knit, you could knit her a woollen bedspread, using J. & J. Baldwin’s 4-ply Beehive Fingering. Knit it in plain garter stitch, the length and width you require. Then work a cross-stitch border all round, and the butterfly in the centre. It is easy to work cross-stitch on plain knitting.
Or, if you can knit, you could make her a woolen bedspread using J. & J. Baldwin’s 4-ply Beehive Fingering yarn. Knit it in basic garter stitch to the length and width you want. Then add a cross-stitch border all around and a butterfly design in the center. It’s simple to do cross-stitch on plain knitting.
The Farmyard Curtain.
Isn’t this a pretty curtain? It has quite a farmyard of animals on it. First, there is the stately cock; then two rabbits, one running along and one sitting down; and then quite a group of ducks and ducklings. Perhaps if you were to ask mother, she would let you make some like it for your own bedroom.
Isn’t this a nice curtain? It has a whole farm’s worth of animals on it. First, there’s a proud rooster; then two rabbits, one hopping along and one sitting still; and then a bunch of ducks and ducklings. Maybe if you ask mom, she’ll let you make some like it for your own bedroom.
Cream Congress canvas was used to make the curtain, and it was lined with sateen of the same shade. The animals and border are worked in green “Star Sylko” thread, No. 5, Shade 754. The curtain in the picture is about 18 inches wide and 21 inches deep, but you would, of course, make it the right size for your own window.
Cream Congress canvas was used to make the curtain, and it was lined with sateen of the same color. The animals and border are stitched in green “Star Sylko” thread, No. 5, Shade 754. The curtain shown in the picture is about 18 inches wide and 21 inches deep, but you would, of course, make it the right size for your own window.
First cut your canvas to the size required, allowing about 6 threads of canvas extra all round for turnings. Turn in a single turning of 6 threads all round and tack securely.
First, cut your canvas to the required size, allowing about 6 threads of extra canvas all around for folding. Fold in a single turn of 6 threads all around and tack it securely.

Now look carefully at the border and see how this is done. You have an illustration showing how to make the various stitches used. You first work slanting up-and-down stitches all along the side[108] edges and across the bottom of the curtain, going over 4 threads of canvas.
Now, take a close look at the border and see how this is done. There's an illustration showing how to create the different stitches used. Start by working slanting up-and-down stitches all along the side edges and across the bottom of the curtain, covering 4 threads of canvas.[108]
Commencing from the top of the right side edge of the curtain, count 4 threads from the top edge, and put your needle up through the hole right on the edge; go over 4 threads to the right and 4 threads up, put your needle in and pick up 8 threads; make a slanting stitch back again down to the edge of the canvas, and put your needle into the hole you first brought it out of, pick up 8 threads along the edge, and repeat this up and down all the way round three sides of the curtain.
Starting at the top right edge of the curtain, count 4 threads down from the top edge, and push your needle up through the hole right at the edge; move over 4 threads to the right and 4 threads up, insert your needle, and pick up 8 threads; make a slanting stitch back down to the edge of the fabric, then put your needle into the hole you originally came out of, pick up 8 threads along the edge, and repeat this up and down all the way around three sides of the curtain.
I think the little picture will best show you how this is done; you will see that two slanting stitches meet at the corner. In picking up the lower threads only take up the single canvas, so that no stitches will be shown at the edge on the other side.
I think the small picture will best show you how this is done; you'll see that two diagonal stitches meet at the corner. When picking up the lower threads, only pick up the single canvas, so that no stitches will show at the edge on the other side.

Now to complete the edge, buttonhole stitches are worked around.[109] Directions for making buttonhole stitch are given on page 6. One stitch is placed at each point of the slanting stitches, putting your needle down through the fold of the edge of the curtain. How this should look can be seen in the second specimen in the illustration of the stitches. You will notice that three stitches are made into the one hole at the corner.
Now to finish the edge, buttonhole stitches are worked around.[109] Instructions for making a buttonhole stitch are provided on page 6. One stitch is placed at each point of the slanting stitches, inserting your needle down through the fold of the edge of the curtain. You can see how this should look in the second example in the illustration of the stitches. You'll notice that three stitches are made into one hole at the corner.

You have now to work the rows of stars around to finish the border. These are worked as shown in the third specimen in your illustration of stitches. All the stitches of the star start from the centre hole, the four long stitches being worked over four threads of the canvas, and the four short stitches over 2; one thread of canvas is left between each star. There should also be four threads left between the points of the first row of stars and the stitches round the edge of the curtain. One row of stars is worked all round, a second row and a row of half stars being added across the bottom.
You now need to work the rows of stars around to finish the border. These are done as shown in the third example in your stitch illustration. All the star stitches start from the center hole, with the four long stitches going over four threads of the canvas, and the four short stitches over two; leave one thread of canvas between each star. You should also leave four threads between the points of the first row of stars and the stitches around the edge of the curtain. One full row of stars is worked all the way around, and then a second row and a row of half stars are added across the bottom.
The animals are worked in cross-stitch, going over 2 threads of canvas for each cross. If you are not quite sure how to work cross-stitch, you can find out by looking at page 26. You will be able to count the crosses from the diagrams given. Of course, if your curtain is to be much larger than this one, you will have to leave more space between each animal.
The animals are stitched in cross-stitch, going over 2 threads of canvas for each cross. If you’re not entirely sure how to do cross-stitch, you can check out page 26. You’ll be able to count the crosses from the provided diagrams. Of course, if your curtain is going to be much larger than this one, you’ll need to leave more space between each animal.
Also, you might like to make your curtain of some other material[110] instead of the canvas, and if you are using a plain material, without even threads to count, you can first tack Penelope canvas where you want your animals, and work over this, pulling the threads of canvas away after, as you see explained on page 27. For instance, the curtain would look quite nice made of unbleached calico in this way. You have a set of pictures on page 111, showing the animals worked over Penelope canvas, and these will help you, if you are using calico, or casement cloth for your curtain.
Also, you might want to make your curtain from a different material[110] instead of canvas. If you're using a plain fabric, without even threads to count, you can first tack Penelope canvas where you want your designs and stitch over it, then pull the threads of the canvas away afterward, as explained on page 27. For example, the curtain would look really nice made from unbleached calico this way. There’s a set of pictures on page 111, showing the designs stitched over Penelope canvas, and these will help you if you're using calico or casement cloth for your curtain.

| 
|

| 
|
From these diagrams
you can easily count
the crosses for the
animals. | |
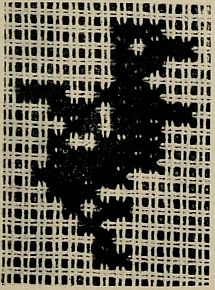
| 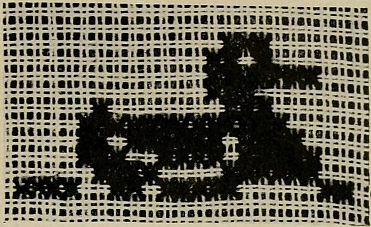
You can see that this is the Swimming
Duck. On the left is the Cock.
|

The pictures on this page show the animals worked over Penelope Canvas. You would do them this way if you make your curtain of sateen or unbleached calico.
The pictures on this page show the animals worked over Penelope Canvas. You would do them this way if you make your curtain from sateen or unbleached calico.
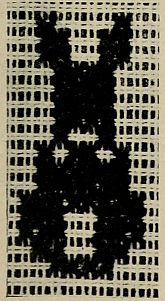
| 
This is the Running Rabbit. The one
on the left prefers to sit still.
|
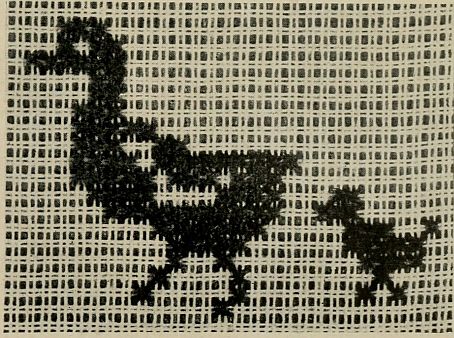
You now cut out a piece of sateen exactly the same size as you cut the canvas, turn in a narrow single turning, and tack the sateen to the wrong side of the curtain. The stitch used for sewing the lining to the curtain is shown at the bottom of your illustration of stitches. In working this, you hold a strand of your embroidery thread along just in from the edge of your work, and sew over this, with small slanting stitches, putting your needle in just above the line of thread, and bringing it out just underneath. The coloured thread is used for this; a white thread is used in the specimen, just to show you how the stitches should look.
You now cut out a piece of sateen that's exactly the same size as the canvas you cut, fold in a narrow single hem, and tack the sateen to the back side of the curtain. The stitch for attaching the lining to the curtain is shown at the bottom of your stitch illustration. In doing this, hold a strand of your embroidery thread just inside the edge of your work, and sew over this with small slanting stitches, inserting your needle just above the line of thread and bringing it out just below. The colored thread is what you use for this; a white thread is used in the example just to demonstrate how the stitches should look.

When you are doing this part of the work, be careful that you do not take your stitches through to the right side of the curtain, but only pick up the turned-in edge of the canvas with the sateen.
When you're working on this part, make sure you don't stitch through to the front side of the curtain; just catch the folded edge of the canvas with the sateen.
Sew 7 bone curtain rings to the top of curtain at even distances apart, and the curtain is complete.
Sew 7 curtain rings to the top of the curtain, spacing them evenly apart, and the curtain is finished.

You will need two curtains, or even three, if your window is a very wide one. But each curtain is made in exactly the same way. And when they are finished, you will be very proud of your needle-work I am sure. And all your friends will be able to see it, without any showing, every time they come into your room.
You’ll need two curtains, or maybe three if your window is really wide. But each curtain is made the same way. Once you’re done, you’ll be really proud of your sewing, I’m sure. And all your friends will notice it every time they come into your room.
Index.
| PAGE | |
| Alphabet, A Cross-stitch | 52, 53 |
| Amiable Pussy Cats, The | 47 |
| Apron, A Handy Work | 3 |
| Backstitching | 88 |
| Bag, The Orchid Flower Stocking | 50 |
| Bag, A Knitting | 102 |
| Bag, The Lambkin | 11 |
| Bag, Making a Macramè | 43 |
| Band, Putting Gathers into a | 4 |
| Bead Work | 97 |
| Bed, For Dolly’s | 55 |
| Bedspread for Victoria, A | 71 |
| Berlin Wool Work | 100 |
| Binding Seams | 58 |
| Blanket Stitch | 58 |
| Butterfly Pincushion, A | 105 |
| Buttonhole, Making a | 6 |
| Button, How to Sew on a | 88 |
| Carpets and Hearthrugs | 76 |
| Cats on a Chair Back | 29 |
| Cats, The Amiable Pussy | 47 |
| Cloth, A Peacock | 95 |
| Chain Stitch | 75 |
| Chair Back, Cats on a | 29 |
| Cosy Cover, Making a | 47 |
| Cottage Window, For Dolly’s | 74 |
| Covering Squares for Patchwork | 64 |
| Cross-stitch Alphabet, A | 52, 53 |
| Cross-stitch over Penelope Canvas, How to Work | 26 |
| Cross-stitch on Hardanger Canvas, How to Work | 95 |
| Cross-stitch, A Feeder in | 25 |
| Cross-stitch Designs | 12, 16, 27, 32, 48, 51, 95, 105, 110 |
| Curtain, The Farmyard | 107 |
| Cutting Out your Doll’s Clothes | 83 |
| Doll’s Clothes, Cutting Out your | 83 |
| Dolly, A Frock and Coat for | 90 |
| Dolly’s Underwear, Making | 85 |
| Double Featherstitching | 23 |
| Draw-strings in a Bag, Threading | 13 |
| Dressmaking | 46 |
| Easy-to-Make Pinafore, An | 17 |
| Farmyard Curtain, The | 107 |
| Featherstitching | 5 |
| Featherstitching, Double | 23 |
| Feeder in Cross-stitch, A | 25 |
| For Dolly’s Bed | 55 |
| For Dolly’s Cottage Window | 74 |
| For the New Perambulator | 67 |
| For Ribbons and Bows | 8 |
| French Knots | 91 |
| French Seam, A | 88 |
| Frock and Coat for Dolly, A | 90 |
| Gathering | 4 |
| Gathers into a Band, Putting | 4 |
| Handkerchief Sachet, A Hardanger | 34 |
| Handy Work Apron, A | 3 |
| Hardanger Handkerchief Sachet, A | 34 |
| Hardanger Corners | 41 |
| [114]Hairpin Work | 44 |
| Hearthrugs, Carpets and | 76 |
| Hemming | 18 |
| Hemstitching | 30 |
| Herring-boning | 88 |
| Housewife, A Red Satin | 22 |
| Invalid, The | 14 |
| Just Think | 66 |
| Kettle Holder, A | 100 |
| Knitting Bag, A | 102 |
| Ladder Hemstitching | 30 |
| Lambkin Bag, The | 11 |
| Macramè Bag, Making a | 43 |
| Mattress, Making a Doll’s | 55 |
| Mat for a Hot-water Jug, A | 103 |
| Mitre a Corner, How to | 65 |
| Mitring a Corner for Hemstitching | 31 |
| Night-dress Pocket, The Swallow | 15 |
| Night-dress Case, Making a Doll’s | 61 |
| Orchid Flower Bag, The | 50 |
| Ostrich and the Silkworm, The | 81 |
| Outline Stitch, An | 58 |
| Oversewing | 28 |
| Pale Blue and Heliotrope | 43 |
| Patchwork Quilt, A | 63 |
| Peacock Cloth, A | 95 |
| Perambulator, For the New | 67 |
| Pillow, Making a Doll’s | 59 |
| Pinafore, An Easy-to-make | 17 |
| Pincushion, A Butterfly | 105 |
| Pink Sunbonnet, The | 20 |
| Pleats, Making | 18 |
| Poems | 10, 14, 46, 49, 73, 81, 104 |
| Preparing for Visitors | 104 |
| Pretty Things in Woolwork | 100 |
| Putting Gathers into a Band | 5 |
| Putting Pleats into a Band | 18 |
| Quilt, A Patchwork | 63 |
| Red Satin Housewife, A | 22 |
| Ribbons and Bows, For | 8 |
| Run and Fell Seam, A | 88 |
| Running | 88 |
| Rug-making | 76 |
| Satin Stitch | 71 |
| Serpentine Hemstitching | 30 |
| Staple Work | 44 |
| Stocking Bag, A | 50 |
| Stroking | 4 |
| Such an Advantage | 10 |
| Sunbonnet, The Pink | 20 |
| Swallow Nightdress Pocket, The | 15 |
| Things in Woolwork | 100 |
| Threading Draw-strings in a Bag | 13 |
| Tucks | 18 |
| Two Dollies, The | 73 |
| Underwear, Making Dolly’s | 85 |
| What a Contrast | 49 |
| Whipping | 58 |
| Woolwork, Pretty Things in | 100 |
| Work Apron, A Handy | 3 |
Printed for the Proprietors of “The Girl’s Own Paper & Woman’s Magazine,”
by Curtis & Beamish, Ltd., Coventry, England.
Printed for the Owners of “The Girl's Own Paper & Woman's Magazine,”
by Curtis & Beamish, Ltd., Coventry, England.
Obvious punctuation errors repaired. Text uses both “Brighteye” and “Bright-eye.” This and other varied hyphenation was retained.
Obvious punctuation mistakes fixed. The text uses both “Brighteye” and “Bright-eye.” This and other different hyphenations were kept.
Page 21, “her’s” changed to “hers” (like hers, only just)
Page 21, “hers” changed to “hers” (like hers, only just)
Page 92, “embrodiery” changed to “embroidery” (with embroidery thread)
Page 92, “embroidery” changed to “embroidery” (with embroidery thread)
Page 98, “Iridiscent” changed to “Iridescent” (Venetian Iridescent, Cut Tosca, or)
Page 98, “Iridiscent” changed to “Iridescent” (Venetian Iridescent, Cut Tosca, or)
Page 109, “O” changed to “Of” (Of course, if your curtain)
Page 109, “O” changed to “Of” (Of course, if your curtain)
Page 113, “Macramé” changed to “Macramè” to match usage in text (Bag, Making a Macramè)
Page 113, “Macramé” changed to “Macramè” to match usage in text (Bag, Making a Macramè)
Page 114, “Macramé” changed to “Macramè” to match usage in text (Macramè Bag, Making a)
Page 114, “Macramé” changed to “Macramè” to match usage in text (Macramè Bag, Making a)
Download ePUB
If you like this ebook, consider a donation!