This is a modern-English version of How to Do Mechanical Tricks: Containing Complete Instruction for Performing Over Sixty Ingenious Mechanical Tricks, originally written by Anderson, A., active 1894-1902.
It has been thoroughly updated, including changes to sentence structure, words, spelling,
and grammar—to ensure clarity for contemporary readers, while preserving the original spirit and nuance. If
you click on a paragraph, you will see the original text that we modified, and you can toggle between the two versions.
Scroll to the bottom of this page and you will find a free ePUB download link for this book.
E-text prepared by Craig Kirkwood, Demian Katz,
and the Online Distributed Proofreading Team
(http://www.pgdp.net)
from page images generously made available by
the Digital Library of the Falvey Memorial Library,
Villanova University
(https://digital.library.villanova.edu)
| Note: | Images of the original pages are available through Digital Library of the Falvey Memorial Library, Villanova University. See https://digital.library.villanova.edu/Item/vudl:504090 |
Transcriber’s Note:
The Table of Contents was created by the transcriber and placed in the public domain.
The Table of Contents was made by the transcriber and is available in the public domain.
Additional Transcriber’s Notes are at the end.
__A_TAG_PLACEHOLDER_0__ are at the end.

CONTENTS
CONTENTS
The Pile of Draughtsmen.
The Decanter, Card, and Coin.
A Clever Blow.
The Obedient Coin.
To Cut a String With Your Hands.
The Rebound.
A Fiery Catapult.
To Make an Exact Balance.
The Recomposition of Light.
The Mysterious Apple.
Economical Letter-Scales.
Tracing a Spiral.
The Inclined Plane.
To Cut a Bottle With a String.
Equilibrium of a Knife in Mid-Air.
A Trick With Four Matches.
The Distance of an Inaccessible Point.
Practical Tracing of a Meridian Line.
To Measure the Height of a Mountain.
To Take Up Four Knives with One.
The Tack in the Ceiling.
The Jumping Pea.
To Acquire a True Eye.
The Air-Tight Stopper.
The Fusee Rocket.
A Novel Table Mat.
Geometrical Paper Band.
Photographic Camera.
The Phantom Needle.
Amphitrite.
Optical Illusions.
The Insensible Coin.
The Asses’ Bridge.
Another Way to Prove the Preceding Theorem.
Indented Angles.
A Cheap Shooting Gallery.
The Coin in Equilibrium.
The Submerged Coin.
The Smoke Rings.
The Walking Cork.
The Obstinate Cork.
Petroleum Pulverizer.
Electric Attraction and Repulsion.
The Bust of the Sage.
The Witchery of the Hand.
The Perspectograph.
Camphor in Water.
A Simple Multiplier.
The Drawing Room Mirror.
Elementary Gas-Burner.
Rapid Vegetation.
Miniature Volcanoes.

How to do it
MECHANICAL TRICKS.
Containing complete instruction for
performing over sixty ingenious
Mechanical Tricks.
Containing complete instructions for
performing over sixty clever
Mechanical Tricks.
By A. ANDERSON.
By A. Anderson.
FULLY ILLUSTRATED.
Fully Illustrated.
New York:
FRANK TOUSEY, Publisher,
24 Union Square.
NYC:
FRANK TOUSEY, Publisher,
24 Union Square.
Entered according to Act of Congress, in the year 1902, by
Entered according to Act of Congress, in the year 1902, by
FRANK TOUSEY,
FRANK TOUSEY,
in the Office of the Librarian of Congress at Washington, D. C.
in the Office of the Librarian of Congress in Washington, D.C.
HOW TO DO
MECHANICAL TRICKS.
HOW TO DO
MECHANICAL TRICKS.
The Pile of Draughtsmen.
“Matter is inert.” That is what you read in every treatise on physics—what does it mean? Here is a very simple experiment that will prove this truth to anyone.
“Matter is inactive.” That’s what you find in every physics textbook—what does it mean? Here’s a very straightforward experiment that will demonstrate this truth to anyone.
Pile up ten draughtsmen, as shown in Fig. 1. Before this pile place another piece on edge, and pressing its circumference with the forefinger, let it glide from underneath so that it strikes the pile with considerable force. The piece so thrown must, you will think, upset the whole pile of draughts; but no: the piece thus sharply sent forward will strike only one piece of the pile, and this alone will be dislodged without putting the others out of their equilibrium, and the whole column above will settle down together on the bottom piece.
Pile up ten checkers, as shown in Fig. 1. In front of this stack, place another piece on its edge, and using your index finger, let it slide out from underneath so that it hits the stack with significant force. You might expect that the thrown piece will topple the entire stack of checkers; however, that’s not the case: the piece that’s sharply pushed forward will only hit one piece of the stack, and just that one will get knocked loose without disturbing the others, allowing the whole column above to settle back down onto the bottom piece.

Fig. 1.
Fig. 1.
In effect, the force of the impulse, making itself felt on[4] the piece that is touched, the latter leaves the pile without transmitting its movement to the other pieces, which, following another physical law, that of gravity, descend vertically to fill the place left vacant.
In reality, the force of the impulse felt on[4] the piece that is touched causes it to leave the pile without passing its movement to the other pieces, which, according to another physical law—gravity—drop straight down to fill the empty space.
The experiment may be varied by using a knife and striking with it a sharp horizontal blow on one of the pieces. The piece struck will fall out of the pile without disturbing the symmetry of the others.
The experiment can be changed by using a knife and delivering a sharp horizontal strike to one of the pieces. The piece that gets hit will fall out of the stack without messing up the arrangement of the others.
The Decanter, Card, and Coin.
This law of “Inertia” will provide us with a few more experiments as curious as they are conclusive.
This law of "Inertia" will give us a few more experiments that are as interesting as they are conclusive.
Place a playing or an ordinary visiting card on a decanter; upon the card and just in the center, over the aperture of the decanter, put a small coin (a dime). Now, if with a sharp fillip, given horizontally on the edge of the card, you succeed in whisking it off (which is very easy), the coin will fall to the bottom of the decanter. The following phenomenon has taken place: the movement was too rapid to be transmitted to the coin, and the card alone was whisked off.
Place a playing card or a regular visiting card on a decanter; then, put a small coin (like a dime) in the center of the card, right above the opening of the decanter. Now, if you quickly flick the edge of the card horizontally and manage to swipe it away (which is quite easy), the coin will drop to the bottom of the decanter. What happens here is that the movement was too quick to transfer to the coin, and only the card was swiped away.

The coin being no longer sustained by the card falls, of course, vertically, without having in the least come out of position.
The coin, no longer supported by the card, falls straight down without changing its position at all.
A sharp horizontal knock given with a penholder or small stick on the edge of the card, will produce the same result, but the fillip is more effective.
A quick horizontal tap with a pen or small stick on the edge of the card will create the same effect, but the flick of the finger is more effective.
A Clever Blow.
Take a thin stick about a yard long, and thrust a pin firmly in each of its extremities. This done, place the stick on the bowls of two pipes, which a couple of persons hold by the stems, in such a manner that the pins only rest on the pipes. A third person then strikes the stick sharply in the middle, and it will break without injuring the pipes.
Take a thin stick about a yard long and firmly push a pin into each end. Once that's done, place the stick on the bowls of two pipes, held by two people by the stems, so that the pins only rest on the pipes. Then, a third person strikes the stick sharply in the middle, and it will break without damaging the pipes.
Ordinary clay pipes will do very well, as the more brittle the pipes are, the more striking is the experiment. How is this explained?
Ordinary clay pipes work just fine; in fact, the more fragile the pipes are, the more impressive the experiment becomes. How can this be explained?

The mechanical effect of the shock has not time to reach the bowls of the pipes (inertia), and is only manifested at the very point on which the blow falls, hence the stick unable to resist the force of the blow at the one point breaks in two pieces.
The mechanical shock doesn't have enough time to travel to the pipe bowls (inertia), and only appears at the exact spot where the impact occurs. As a result, the stick can't withstand the force at that one point and breaks into two pieces.
The Obedient Coin.
Take an ordinary wooden matchbox, and remove the drawer holding the matches. In the center place a small coin, a cent will be the best for the experiment, the object of which is to make the coin fall into the interior without[6] touching it. Tap lightly on that side of the box to which you desire the coin to come, until it rests upon the edge.
Take a regular wooden matchbox and take out the drawer with the matches. In the center, put a small coin; a penny is best for this experiment, which aims to make the coin fall inside without [6] touching it. Gently tap on the side of the box where you want the coin to go until it sits on the edge.

Then slightly raise the end of the box whereon the coin rests, and lightly tap with the finger once more. At once the coin will fall into the box. The secret of the experiment is this: the taps on the box only move the box, while the coin retains its position by reason of its own inertia, until the edge of the box reaches it. The last tap knocks away the support, and the coin, obedient to the law of gravity, falls vertically into the interior of the box. This little experiment is easily performed, and extremely interesting when done neatly.
Then slightly lift the end of the box where the coin is resting, and gently tap it with your finger again. Immediately, the coin will drop into the box. The secret of the experiment is this: the taps on the box only move the box, while the coin stays in place because of its own inertia, until the edge of the box reaches it. The last tap removes the support, and the coin, following the law of gravity, falls straight down into the box. This simple experiment is easy to perform and really interesting when done well.
To Cut a String With Your Hands.
With a little practice, and some briskness of movement, you may be able to break a string of considerable thickness by proceeding as follows:
With a bit of practice and some quick movements, you might be able to snap a thick string by doing the following:
Wind the string round your left hand, so as to make a loop, as shown in the figure. Pass it three or four times round the fingers to insure the solidity of the loop. Seize[7] firmly the other end of the string with your right hand, around which you wind it three or four times, then give a brisk pull. The string will be clean cut at the junction of the loop in the left hand.
Wind the string around your left hand to create a loop, as shown in the figure. Wrap it three or four times around your fingers to make sure the loop is secure. Grip firmly the other end of the string with your right hand, wrapping it three or four times around, then give it a quick tug. The string will be cleanly cut at the point where it meets the loop in your left hand.

When the knack is well acquired, one may break the string on two fingers only, by following always the same theory as above.
When you’ve mastered the skill, you can snap the string with just two fingers by consistently applying the same approach as mentioned above.
The Rebound.
On the neck of a bottle place a cork in an upright position. The cork must be large enough to rest on the neck without falling in.
On the neck of a bottle, put a cork in an upright position. The cork needs to be big enough to sit on the neck without falling in.
Now give a sharp fillip on the neck of the bottle, and you will see the cork fall, not on the other side of the bottle as most people expect, but forward in the direction of the hand giving the blow. This, again, is an illustration of the principle of inertia. A rapid blow tends to push the bottle from the cork before the movement is transmitted to the latter.
Now give a quick tap on the neck of the bottle, and you'll see the cork fall, not on the other side of the bottle as most people expect, but forward in the direction of the hand delivering the tap. This, again, is an example of the principle of inertia. A quick hit tends to push the bottle away from the cork before the movement is passed on to it.
Few people will execute this experiment properly the first time, for the instinctive fear to break the bottle and cut their fingers, will prevent them giving a blow sharp enough to make this experiment successfully at the first attempt; but with a little perseverance, the necessary degree of force will be gauged to a nicety.
Few people will pull off this experiment correctly on their first try because their natural fear of breaking the bottle and cutting their fingers will stop them from hitting hard enough to succeed at the outset; however, with a bit of persistence, they'll be able to figure out the exact amount of force needed.

A Fiery Catapult.
Take a match-box and place it upright edge-wise and place two matches in each side between the inner and outer box, heads up. They must be inserted deeply enough to stick firmly.
Take a matchbox and stand it up on its edge. Insert two matches on each side between the inner and outer boxes, with the heads facing up. They need to be pushed in deep enough to hold securely.
Place a third match cross-wise between them and it will stay there by the pressure the latter exercises on them.
Place a third match horizontally between them, and it will stay there due to the pressure the latter applies to them.
Now light the middle of the horizontal match and wait. What do you think will happen? Ask the bystanders which will first catch fire?
Now light the middle of the horizontal stick and wait. What do you think will happen? Ask the people watching which one will catch fire first.
The natural conclusion they will draw will be the following.
The natural conclusion they will draw is this.
From the middle the frame will spread of course to the two extremities and light the other two matches, probably this side first where the two phosphorous heads meet.
From the middle, the flame will spread to the two ends and light the other two matches, probably starting on this side where the two phosphorous tips meet.

Well, nothing of the sort happens. When the volume of the burning match has diminished, and consequently its rigidity also, the force of its resistance grows weaker as the combustion proceeds.
Well, nothing like that happens. As the size of the burning match decreases, and with it its rigidity, the strength of its resistance weakens as the combustion continues.
A moment comes when the two vertical matches, trying to assume again their original position, throw off, with a sway, the burning horizontal match.
A moment arrives when the two vertical matches, attempting to return to their original position, knock off the burning horizontal match with a sway.
The burning match was rendered flexible in the middle, and is not at all burned at the ends, and the two matches remain standing as before.
The burning match was bent in the middle, and neither end is burned at all, with the two matches still standing as they did before.
To Make an Exact Balance.
To construct by yourselves, with the help of simple materials a balance of great precision may seem impossible. Nevertheless it can be done.
To build a highly precise balance using just simple materials might seem impossible. Yet, it can be achieved.
A ruler, a tin box, (in which blacking was contained, for[10] example) three blocks of wood, two pins, thread, four nails, a small piece of glass, and cardboard are all the necessary materials, and now to work.
A ruler, a tin box (which held the blacking, for[10] example), three blocks of wood, two pins, some thread, four nails, a small piece of glass, and cardboard are all the materials you need. Now, let's get to work.
At a short distance from the center of the ruler, and on a cross line with one another, stick two pins so that they come out a little on the other side. At one end of the ruler, in C, nail a small piece of your box.
At a short distance from the middle of the ruler, and aligned with each other, stick two pins so that they poke through a little on the other side. At one end of the ruler, in C, attach a small piece of your box.

At the spot, where the hook to which the scale is suspended, is to hang, make an indentation with the point of a nail, so that the hook does not shift at the other extremity, in A, fasten a flat piece of tin, which will form one of the scales of your balance.
At the spot where the hook that holds the scale will hang, make a small indentation with the point of a nail so that the hook doesn’t move at the other end. At point A, attach a flat piece of tin, which will be one of the scales of your balance.
At the end of this pan solder a pin point downwards. Your second scale, B, destined to contain the object or substances to be weighed, will be formed by the lid of the blacking-tin.
At the end of this pan, solder a pin pointing downwards. Your second scale, B, which will hold the object or substances to be weighed, will be made from the lid of the blacking-tin.
On its rim at nearly equal distances pierce four holes, on which the suspension-strings will be tied, the latter at their upper end being united together in one string, which is tied to a hook (a bent pin or fishing hook will do.)
On its edge, there are four holes spaced pretty evenly apart, where the suspension strings will be attached. At the top, these strings are gathered into one single string, which is tied to a hook (a bent pin or a fishing hook will work).
Now the point of support remains to be constructed. On a wooden square, rather thick, E, fix another block, G, on which gum a piece of glass. In the largest block knock four nails to prevent the shaft of the balance swerving from right to left.
Now the support needs to be built. On a thick wooden square, E, attach another block, G, and glue a piece of glass on top of it. In the larger block, drive in four nails to keep the balance shaft from swaying from side to side.
The small truncated pyramid, D, which you perceive on the left of the design, and which is graduated, serves as bench-mark.
The small truncated pyramid, D, that you see on the left of the design, and which is marked with measurements, acts as a benchmark.
In order to weigh you use the method due to Borda, called the method of double weights.
To measure you, use the method developed by Borda, known as the method of double weights.
Place in the scale A a weight which you think is slightly over the one of the substance or object to be weighed. Then the scale B being occupied, get equilibrium by shifting more or less towards the ruler, the weight on the scale A.
Place a weight on scale A that you believe is just a bit heavier than the substance or object you want to weigh. With scale B already occupied, achieve balance by adjusting the weight on scale A closer or further from the ruler.
Then note the division indicated by the pin point, and take from scale B the article placed there, and put therein weights until the point of scale A tells you that the equilibrium is the same as when the substance was in the scale.
Then note the division indicated by the pin point, take the item from scale B that’s placed there, and add weights until the point of scale A shows that the equilibrium is the same as when the substance was on the scale.
It is not necessary that this balance be exact, provided it answers the very small differences in the pans.
It doesn’t have to be an exact balance, as long as it addresses the very minor differences in the pans.
The one we have indicated will weigh down to a fifty-thousandth part of a pound.
The one we've mentioned will weigh down to one-fiftieth of a pound.
The Recomposition of Light.
It is a great pity that exquisitely beautiful facts and mysteries are wrapped up in the crack-jaw terms of foreign languages, and so made to appear ugly.
It’s a real shame that incredibly beautiful facts and mysteries are hidden behind the difficult terms of foreign languages, making them seem unattractive.
There is no branch of knowledge more fascinating than light. To follow up its study is like walking along a shady lane, where at certain distances apart the wayfarer lights upon jewels of great brilliance.
There’s no area of knowledge more captivating than light. Exploring its study is like strolling down a tree-lined path, where at various intervals, you come across sparkling gems of incredible brilliance.
It has been said above that white light is formed by the union or combination of seven colors. When a ray of light passes through a prism it is split up into the parts of which it is composed, and seven colors as in the rainbow appear.
It has been mentioned earlier that white light is created by the combination of seven colors. When a ray of light goes through a prism, it breaks down into the components it's made of, revealing seven colors like those in a rainbow.
These colors shade off into one another with every variety of tint, like a band of rainbow-colored ribbon. This band is called a spectrum.
These colors blend into each other in every shade, like a strip of rainbow-colored ribbon. This strip is called a spectrum.
Now, where science classes are held there may be seen a complicated instrument, which is used to show how the seven colors unite to form white light. It is a disc on which the colors of the spectrum are painted, and it is made to spin round with great rapidity.
Now, in the science classrooms, you can see a complex instrument used to demonstrate how the seven colors combine to create white light. It's a disc with the colors of the spectrum painted on it, and it spins around very quickly.
The impression received by the eye, when looking at the revolving disc is total abstinence of color. In other words it is white light.
The impression you get from looking at the spinning disc is a complete lack of color. In other words, it’s white light.
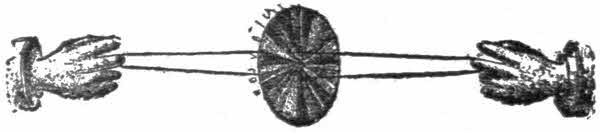
Fortunately, you can satisfy yourselves on this point without any other materials than a cardboard disc and a piece of string. On this disc paint in small sections the[12] colors of the spectrum, repeating them four or five times in the following order: red, orange, yellow, green, blue, indigo, violet.
Fortunately, you can figure this out with just a cardboard disc and a piece of string. On the disc, paint small sections in the[12] colors of the spectrum, repeating them four or five times in this order: red, orange, yellow, green, blue, indigo, violet.
That the experiment may be entirely successful, the sections must be marked off according to the following scale of width of section. Let orange, next to the circumference represent 2: then
That the experiment can be completely successful, the sections need to be marked off based on the following width scale. Let orange, next to the edge, represent 2: then
| Red will be represented by | 5 | |
| Orange | “““ | 2 |
| Yellow | “““ | 5 |
| Green | “““ | 4 |
| Blue | “““ | 5 |
| Indigo | “““ | 3 |
| Violet | “““ | 5 |
Now, in any diameter of the disc bore two holes not too near the edge. Through them pass a piece of string, and knot the two ends together. Take hold of the string with both hands, and make the disc spin round.
Now, in any diameter of the disc, bore two holes not too close to the edge. Pass a piece of string through them and knot the two ends together. Hold the string with both hands and make the disc spin around.
Then extend and approach the hands alternately to give a very rapid movement to the disc. When revolving rapidly enough you will not be able to distinguish the separate colors. They all become blended into white light.
Then extend and bring your hands together alternately to create a quick motion of the disc. When it spins fast enough, you won't be able to see the individual colors. They all mix into white light.
The Mysterious Apple.
Pierce an apple in such a manner as to obtain two holes tending toward the middle, and forming a pretty large angle as shown in the figure. Two quills or tin tubes should be inserted to make the inside passages smooth. Pass a string through the hole and your apple is prepared for a little trick, which, you may be sure will astonish all persons before whom you practice it, and who of course are not yet initiated.
Pierce an apple in a way that creates two holes aiming towards the center, forming a pretty wide angle as shown in the figure. Insert two quills or tin tubes to smooth out the inside passages. Thread a string through the hole, and your apple is ready for a little trick that will surely amaze anyone you perform it for, especially those who aren’t familiar with it yet.
You fasten one extremity of the string to your foot, and[13] take the other in your hand so as to produce at will the rigidity of the string. You can then command the apple to go down, or to stop, and it will obey your order immediately. Indeed, when you straighten the string, the part which enters the apple pushes against the angle formed by the two passages, and by the pressure, holds the apple. When on the contrary you let go a little, you take away the rigidity and the apple glides down.
You attach one end of the string to your foot, and[13] hold the other end in your hand to create tension in the string. You can then make the apple move down or stop, and it will respond right away. When you pull the string straight, the part that goes into the apple presses against the angle created by the two openings, holding the apple in place. Conversely, when you relax your grip a bit, the tension is released, and the apple slides down.

You can therefore alternately let the apple go down or stop its course, and we repeat it, persons not in the secret cannot imagine by what means you get this curious result.
You can either let the apple fall or stop it, and we must say, people who aren’t in the know can’t figure out how you achieve this interesting outcome.
If, instead of an apple one takes a wooden ball, the experiment will be more interesting and the article will last longer.
If, instead of an apple, you take a wooden ball, the experiment will be more engaging and the item will last longer.
Economical Letter-Scales.
Take a watch or small clock spring, and fix it by the center on a stick. At the other end attach a small brass hook to hold letters, etc., as shown in the figure.
Take a watch or small clock spring and attach it by the center to a stick. At the other end, add a small brass hook to hold letters and so on, as illustrated in the figure.
At the top of the hook fix horizontally a small band, running over a strip of cardboard, likewise hanging on the stick.
At the top of the hook, attach a small strip horizontally, running over a piece of cardboard that's also hanging on the stick.
Now graduate the cardboard strip with real weights, or their exact equivalents, and after this any small articles may be weighed with sufficient accuracy. The spring, being[14] of steel, always turns to its original position when the scale is empty.
Now calibrate the cardboard strip using actual weights or their exact equivalents, and after that, you can weigh any small items with enough precision. The spring, being[14] made of steel, always returns to its original position when the scale is empty.

Tracing a Spiral.
In geometry the process for tracing a spiral by the help of compasses is pretty long and tedious. The following method will enable you to do it far more quickly and as accurately.
In geometry, the process of drawing a spiral with a compass is quite lengthy and tedious. The method below will allow you to do it much faster and more accurately.

Take a wooden or cardboard cylinder, with a diameter equal to a fourth part of the distance you require between the spires (or trelices) to be traced. On this cylinder fasten one end of a string, B, and wind it up, and attach to the other end a pencil, C, or a point, according to what you want to do.
Take a wooden or cardboard cylinder with a diameter that's one-fourth of the distance you want between the spires (or trelices) you need to draw. Secure one end of a string, B, to this cylinder and wind it up. Then, attach a pencil, C, or a point to the other end, depending on what you're trying to achieve.
Now you have only to turn to right or left according to the direction in which the string was wound up, by holding the pencil down and keeping the string tight, and a spiral of perfect regularity will be traced.
Now you just need to turn right or left based on the direction the string was wound up, while holding the pencil down and keeping the string tight, and a perfectly regular spiral will be drawn.
The above figure clearly shows the process. The cylinder A has a diameter equal to the distance R S divided by 4.
The above figure clearly shows the process. Cylinder A has a diameter that's the distance R S divided by 4.
The Inclined Plane.
Take a piece of paper, roll it up into a tube large enough to hold a marble, and gum it lengthwise. Then introduce a marble and close the extremities with a strip of paper as shown below.
Take a piece of paper, roll it up into a tube big enough to hold a marble, and glue it along the length. Then insert a marble and seal the ends with a strip of paper as shown below.

When you think that it is well dried you place it upright on the upper end of an inclined board, or flat ruler, leaning on a pile of books for example. You will then see the paper cylinder lie down, get up and so on till it reaches the bottom of its course.
When you think it's dry enough, you stand it up on the upper end of a slanted board or a flat ruler, leaning against a stack of books, for example. You'll then see the paper cylinder roll down, stand up, and repeat until it reaches the bottom.
The effect is very curious and will be more so if you are somewhat of an artist, and able to draw or paint a figure on the cylinder.
The effect is quite interesting and will be even more so if you're somewhat of an artist and can draw or paint a figure on the cylinder.
To Cut a Bottle With a String.
Gum first two circular pads of paper on each side of the spot where you intend to cut your bottle. These pads are obtained by gumming several strips of paper one over the other, so as to leave between them a groove on which you wind the string round once.
Gluing two round pieces of paper on each side of the spot where you plan to cut your bottle. These pieces are made by gluing several strips of paper on top of each other, leaving a groove between them where you can wrap the string around once.
Catch hold of the extremities of the string, and draw it to and fro, see-saw fashion, by which friction the part of the glass operated on will be heated.
Grab the ends of the string and move it back and forth in a see-saw motion, which will create friction and heat up the part of the glass being worked on.

As soon as you think that the glass is hot enough, plunge the bottle in cold water, which you will have placed handy before, and at the spot where the friction was exercised the glass will be clean cut. According to the thickness of[17] the glass, more or less heat must be produced. This process is infallible.
As soon as you think the glass is hot enough, drop the bottle into cold water that you've had ready nearby, and at the point where the friction was applied, the glass will be cut clean. Depending on the thickness of[17] the glass, you'll need to generate more or less heat. This method is foolproof.
The same result can also be produced in another way. It is, when once the heat is sufficient to let glide a few drops of water along the string. The string must be well wetted. The cut will be as clean as by the other process.
The same result can also be achieved in another way. It happens when the heat is enough to allow a few drops of water to slide along the string. The string needs to be thoroughly wet. The cut will be as clean as with the other method.
Equilibrium of a Knife in Mid-Air.
Be reassured dear readers, we are not going to ask you to make a balance in mid air, that would be too much for our weak capabilities. The question is simply to swing a knife horizontally in the space which surrounds us. The experiment is curious and easily executed.
Be assured, dear readers, we’re not going to ask you to balance in mid-air; that would be too much for our limited abilities. The question is simply about swinging a knife horizontally in the space around us. The experiment is interesting and easy to do.

Take the cork of a champagne bottle. Pierce it lengthwise with a sharp knife, and let the knife stick out a third of its length from the thin end of the cork. Then insert into each side of the cork the prongs of two forks, so that they are perpendicular with the blade of the knife as shown in figure.
Take the cork from a champagne bottle. Cut into it lengthwise with a sharp knife, leaving a third of the knife sticking out from the narrow end of the cork. Then, insert the prongs of two forks into each side of the cork so that they are at a right angle to the knife blade as shown in the figure.
This operation accomplished, you have only to suspend the point of the blade on the loop of a string, and the knife will hang horizontally. You may then swing it if you choose, and the movement will not destroy the equilibrium.
This done, all you need to do is rest the tip of the blade on the loop of a string, and the knife will hang horizontally. You can then swing it if you like, and the movement won’t disrupt the balance.
A Trick With Four Matches.
Speaking of matches, there is yet one more trick to be played with four of them.
Speaking of matches, there's one more trick you can do with four of them.
At the non-phosphoric ends of two matches cut a small notch so that they fit into each other. Stretch the matches apart so as to form an angle, and place them vertically upon[18] the table. Then lean a third match against them so as to form a tripod, standing by itself.
At the non-phosphoric ends of two matches, cut a small notch so they can fit into each other. Pull the matches apart to create an angle, and stand them up vertically on the table.[18] Then, lean a third match against them to create a tripod that stands on its own.
The question now is to take up this trivet with a fourth match and carry it to another place without disturbing the harmony of the little construction.
The question now is to pick up this trivet with a fourth match and move it to another spot without disrupting the balance of the little structure.

At first sight this seems impossible; it is, however, easily done. You have only to slide the fourth match between the two stuck together, and the one serving as support.
At first glance, this seems impossible; however, it's actually quite simple. You just need to slide the fourth match between the two that are stuck together and the one acting as support.
By lightly pressing against the two first ones the third one will slide, and its upper extremity will come between the angle formed by the two others. By taking it up briskly, this extremity will be maintained, and you are then enabled to carry the little tripod to another place.
By gently pressing against the first two, the third one will slide, and its top will fit into the angle created by the other two. If you lift it quickly, this top will stay in place, allowing you to move the little tripod to another location.
The Distance of an Inaccessible Point.
Everyone knows what an angle is, and you say at once it is the inclination of two lines that meet each other. These lines by their branching off form an opening more or less wide. This opening is measured by the aid of an instrument called a protractor made of brass or horn, which[19] finds its place in nearly every box of mathematical instruments.
Everyone knows what an angle is, and you can immediately say it’s the space created by the inclination of two lines that meet. These lines, by diverging, create an opening that can be wider or narrower. This opening is measured with an instrument called a protractor, which is typically made of brass or horn, and[19] can be found in almost every set of mathematical tools.
It represents a semi-circumference, divided into 180 equal parts, called degrees, written thus: 180°. Each degree is divided into 60 minutes, expressed thus: 60 min.; and finally the minutes are divided again in 60 parts, called seconds, indicated thus: 60 sec. There are therefore in a whole circumference, 360 deg., 2,160 min., and 12,960 sec.
It represents a half-circle divided into 180 equal parts, called degrees, written as: 180°. Each degree is divided into 60 minutes, shown as: 60 min.; and the minutes are further divided into 60 parts, called seconds, indicated as: 60 sec. Therefore, in a full circle, there are 360 deg., 2,160 min., and 12,960 sec.
One degree, therefore, is the 360th part of a circumference, and thus we have a measure independent of all dimensions. For example, on a round table of 36 yards in circumference, one degree will be marked by one tenth of a yard; on a pond of 360 yards in circumference, one degree will be equal to one yard.
One degree is, therefore, one 360th of a circle, providing a measurement that doesn’t rely on any specific dimensions. For instance, on a round table with a circumference of 36 yards, one degree will be represented by one-tenth of a yard; on a pond with a circumference of 360 yards, one degree will equal one yard.
The degree, therefore, may be more or less, but it is always the 360th part of the circumference of a circle. Let it be quite understood that, whether an angle is to be on a sheet of paper, or in the skies, the divisions do not change.
The degree, therefore, can vary, but it is always the 360th part of the circumference of a circle. It should be clearly understood that whether an angle is represented on a piece of paper or in the sky, the divisions remain constant.

This must be well grasped, it is of the utmost importance for the explanations which follow. It is therefore settled: the measure of the angles has nothing to do whatever with a measure of length.
This needs to be clearly understood; it’s incredibly important for the explanations that come next. So, it's been established: the measurement of angles is completely unrelated to the measurement of length.
We have shown how to measure an angle. Let us examine[20] now what is a triangle, without pondering too much over this geometrical figure, which every one knows. The essential property of this three-cornered figure is that the sum of its three angles is always equal to 180 degrees.
We have shown how to measure an angle. Let’s now take a look at what a triangle is, without overthinking this geometric shape that everyone is familiar with. The key characteristic of this three-sided figure is that the sum of its three angles always equals 180 degrees.
In other words, the protractor placed successively at each angle will give three numbers, which, added, make up 180 degrees. Keep this property well in mind, as it will serve us hereafter.
In other words, the protractor used at each angle will give three numbers that, when added together, equal 180 degrees. Remember this property, as it will be important later on.
Now, to what distance does a degree correspond? For example, take a yardstick, and with the graphometer (an instrument by which angles are measured), in readiness, carry it from the latter instrument to a certain distance, till the two extremities of the yardstick measure one degree; this yard is then said to subtend an angle of one degree.
Now, how far does a degree correspond to? For instance, take a yardstick and have the graphometer (a tool used to measure angles) ready. Move the yardstick from this tool to a certain distance until both ends of the yardstick measure one degree; at this point, the yard is said to subtend an angle of one degree.
Now, measure the distance which divides the yardstick from the instrument, and you will find it to be 57 yards. Therefore, one degree corresponds to an object being at a distance of 57 times its height. A man two yards high at a distance of 57 times his height, or 114 yards will measure one degree.
Now, measure the distance between the yardstick and the instrument, and you'll find it's 57 yards. So, one degree corresponds to an object being 57 times its height away. A person who is two yards tall, standing 57 times his height away, or 114 yards, will measure one degree.
One minute will be represented by a piece of cardboard of a hundreth part of a yard long seen from a distance of 34 yards; and finally, a second will be given by a card a hundreth part of a yard seen from a distance of 2062 yards.
One minute will be represented by a piece of cardboard that's one-hundredth of a yard long, viewed from a distance of 34 yards; and finally, a second will be represented by a card that's one-hundredth of a yard long, seen from a distance of 2062 yards.
A hair seen at 20 yards about represents a second. This perhaps, you think to be too small to be seen by the naked eye.
A hair seen from 20 yards away roughly represents a second. You might think that's too small to be seen by the naked eye.
Suppose that you to measure the distance of a church situated on a height, and from which you are separated by a river (see fig.) Choose on the river’s bank two spots from which the steeple C can be seen, say A and B. At B plant a surveying-staff, and with the graphometer, go to A and find the angle formed by B A C.
Suppose you want to measure the distance to a church located on a hill, and you’re separated from it by a river (see fig.). Choose two points on the riverbank where you can see the steeple C, let's say A and B. At point B, set up a surveying staff, then go to point A with the graphometer and find the angle formed by B A C.
Suppose for example, it reads 84 degrees. Repeating the operation at B for the measure of the angle C B A, suppose it to be 95 degrees. Measure the distance from A to B and let it be 80 yards.
Suppose, for example, it shows 84 degrees. If we do the same at B to measure angle C B A, let's say it is 95 degrees. Measure the distance from A to B, and let's take it as 80 yards.
Now here is the statement of our problem:
Now here is the statement of our issue:
How to resolve a triangle of which the base is known to be 10 yards, and two of its angles. Well, we have said[21] above that the sum of the three angles is always the same, equal to 180 degrees, having on one side 84, and on the other 95, that makes together 84 by 95, equal to 179 degrees. The difference between this number and 180 is 1 degree, therefore the angle ABC measures one degree.
How to solve a triangle when the base is known to be 10 yards, and two of its angles. As mentioned[21] above, the sum of the three angles is always the same, equal to 180 degrees. With one angle measuring 84 degrees and the other 95 degrees, together they add up to 179 degrees. The difference between this sum and 180 is 1 degree, so the angle ABC measures one degree.
We know that an angle of one degree corresponds to a distance of 57 yards. Multiply the base of our triangle by 57 yards and you obtain a distance of the church from the points A and B, 10 by 57, equal to 570 yards. Nothing is more simple than this.
We know that an angle of one degree corresponds to a distance of 57 yards. Multiply the base of our triangle by 57 yards, and you'll get the distance from points A and B to the church, which is 10 times 57, equal to 570 yards. Nothing could be simpler than this.

The smaller the measured angle the further off the object will be. As seen in our figure, the upright lines, m o, m’ o’, m, o,, do not vary, but according to their distances from point C, they form various angles, ac, a’c’, a,c,, becoming smaller and smaller.
The smaller the measured angle, the further away the object will be. As shown in our figure, the upright lines, m o, m’ o’, m, o,, don't change, but depending on their distances from point C, they create different angles, ac, a’c’, a,c,, getting smaller and smaller.
A graphometer is not always to be had. When approximate distances only are required, the following contrivance may be used. Trace on a cardboard of large size a semi-circumference which one divides first into 180 equal parts, then each of these is divided again in 2, 3, 4 divisions, etc., according to the size given to the circumference, which constitutes a large protractor.
A graphometer isn’t always available. When only approximate distances are needed, you can use the following method. Draw a large semicircle on a piece of cardboard and divide it into 180 equal parts. Then, divide each of these parts into 2, 3, or 4 sections, etc., depending on the size of the semicircle, which creates a large protractor.
To measure an angle place the cardboard upright in an horizontal position, supporting it by the center of the semi-circumference by means of a screw fixed on a stick. Then proceed as stated above.
To measure an angle, set the cardboard upright in a horizontal position, supporting it at the center of the semi-circle using a screw attached to a stick. Then continue as described above.
From a pin stuck in the center mark the spot where the visual ray passes, go to A and to B, and you get approximately the desired result.
From a pin stuck in the center, mark the spot where the visual ray goes through, then go to A and to B, and you’ll get roughly the outcome you want.
Practical Tracing of a Meridian Line.
The meridian line of a place is an imaginary line passing through this place and the center of the sun, when the latter is at the highest point of the arc of the circle, which[22] it daily describes. At that very moment it is noonday exactly at the place in question.
The meridian line of a location is an imaginary line that goes through this location and the center of the sun when the sun is at the highest point in its daily path across the sky, which[22] it follows. At that exact moment, it is noon at that location.
As the position of the earth changes from day to day, the sun does not every day touch the meridian line at noon; sometimes it is in advance, sometimes behind.
As the position of the Earth shifts day by day, the sun doesn’t hit the meridian line at noon every day; sometimes it’s ahead, and sometimes it’s behind.
Various instruments have been invented to indicate in a practical manner the meridian of a place. We owe the following construction to Mr. E. Brunner of the longitudinal office.
Various instruments have been created to practically show the meridian of a location. We credit the following design to Mr. E. Brunner of the longitudinal office.
On a window-sill in a southerly position, fix in a solid, permanent manner, a small cupful of quicksilver; cover it with a lid made of varnished metal, and pierced in its center by a small round hole about a quarter of an inch in diameter. This lid must fit well, but not too tightly, so as to permit its being lowered in close proximity to the surface of the quicksilver.
On a windowsill facing south, securely place a small cup of mercury; cover it with a lid made of polished metal that has a small round hole in the center about a quarter of an inch in diameter. The lid should fit snugly but not too tightly, allowing it to be lowered close to the surface of the mercury.
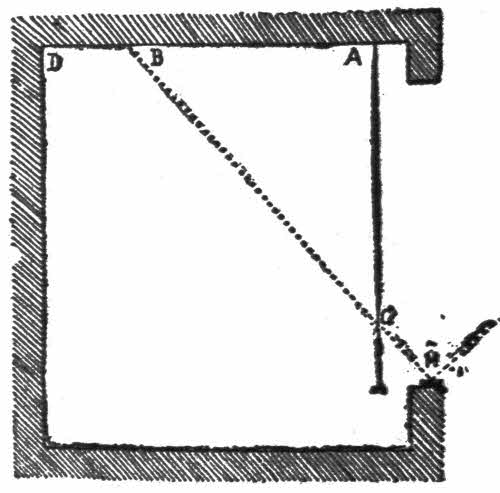
When the window is open the solitary ray reflected on the mercury will be projected on the ceiling of the room. At the exact noonday the center of the mirror and the[23] center of the reflected image are in the meridian plane. It remains only to be traced.
When the window is open, a single ray reflected off the mercury will shine on the ceiling of the room. At exactly noon, the center of the mirror and the center of the reflected image are aligned in the meridian plane. It just needs to be marked.
At the moment of its passage one marks in B, for example, a spot corresponding to the center of the reflected image; one knocks a small nail there, and with a string connect this point with another outside the window, so that the string passes through the center of the diaphragm, M. The line, B M, is the meridian plane. From A, suspend a lead-line which meets the string, B M.
At the moment of its passage, you mark point B, for example, which corresponds to the center of the reflected image; you then drive a small nail there, and with a string, connect this point to another outside the window, ensuring that the string goes through the center of the diaphragm, M. The line, B M, is the meridian plane. From point A, hang a lead-line that intersects with the string, B M.
All you have to do now is to join on the ceiling the points, A B, and continue them to D. A black thread may be stretched to serve as the line, and this is the meridian required.
All you need to do now is connect points A and B on the ceiling and extend that line to D. You can use a black thread as the line, and this will create the meridian you need.
To get the mean time one has only to note the exact passage, and deduct the corrections given in various astronomical papers.
To find the average time, you just need to record the exact moment and subtract the corrections mentioned in various astronomy articles.
To Measure the Height of a Mountain.
One can, without instruments, take the height of a building or a mountain, provided you are able to measure their base. A yardstick and two ordinary sticks are enough. Suppose the height of the tower, E F, is to be taken.
One can measure the height of a building or a mountain without any tools, as long as you can measure their base. A yardstick and two regular sticks will do the trick. Let's say we want to measure the height of the tower, E F.

Some distance off plant a stick, a yard high, A B; one yard from this we plant another and longer one, C D.[24] Measure exactly the distance, B F, and applying the eye at A, we aim at the summit of the tower, E; mark on the stick, C D, the point where the visual ray meets the stick, i.e., point G.
Some distance away, plant a stick that's a yard tall, A B; one yard from this, plant another, taller stick, C D.[24] Measure the distance exactly, B F, and from point A, look towards the top of the tower, E; mark on the stick, C D, where your line of sight intersects the stick, i.e., point G.
Then, by measuring the distance, D G, and subtracting one yard you get G I, and may be expressed in the following statement:
Then, by measuring the distance, D G, and subtracting one yard, you get G I, which can be expressed as follows:
A H : A I :: E H : G I
A H : A I :: E H : G I
In the given example let us suppose that A H = 150 yards, A I will, of course, be equal to one yard; G I =, say four fifths of a yard; the problem will be: 150 yards : 1 yard :: x : four fifths of a yard. Work the sum out, and the value of x is 120 yards.
In the given example, let's assume that A H = 150 yards, A I will, of course, be equal to one yard; G I =, let's say, four-fifths of a yard. The problem will be: 150 yards : 1 yard :: x : four-fifths of a yard. Solve for x, and the value of x is 120 yards.
Having taken our lease, A H, at one yard from the ground, we must add one yard to 120, making 121 yards, which is the height of the tower wanted.
Having taken our lease, A H, at one yard from the ground, we must add one yard to 120, making 121 yards, which is the height of the tower needed.
To Take Up Four Knives with One.
Here is one more trick of equilibrium, which appears to be interesting enough to find a place among these experiments.
Here’s one more balance trick that seems interesting enough to include among these experiments.
We need not give any long explanations, for our figure fully illustrates the way in which it has to be executed.
We don’t need to provide lengthy explanations, as our diagram clearly shows how it should be done.

First place a knife straight before you, then two others which you place, blade upon blade, over the first. Finally, the two last ones are arranged transversely, their blades passing over those of the two knives put down in the second instance, and below the blade of the first knife.
First, place a knife directly in front of you, then put two other knives on top of it, blade to blade. Finally, arrange the last two knives across them, their blades crossing over the ones in the second position and underneath the blade of the first knife.
By taking hold of the handle of the first knife, you can lift them up all at once without breaking the equilibrium.
By grabbing the handle of the first knife, you can lift them all at once without losing balance.
The Tack in the Ceiling.
To nail a tack in the ceiling without hammer, using a ladder or chair to reach it, seems as impossible as pulling the moon down from the sky. Yet, with a little cleverness, it is quite an easy thing to do.
To drive a tack into the ceiling without a hammer, using a ladder or chair to reach it, seems as impossible as pulling the moon down from the sky. Yet, with a bit of ingenuity, it’s actually pretty easy to do.
Place a tack, head downwards, on a half dollar, then place a small piece of tissue paper over it, so that the point of the tack passes through.
Place a thumbtack, point down, on a half dollar, then put a small piece of tissue paper over it, so that the point of the tack goes through.

Then turn the sides of the paper down round the coin. Throw the whole, point upwards, violently against the ceiling, trying to keep this projectile of a new description from turning over on its course.
Then fold the sides of the paper down around the coin. Throw the whole thing, point side up, forcefully against the ceiling, trying to prevent this new type of projectile from flipping over during its flight.
With a little practice the knack is soon acquired. The tack enters the ceiling, the violence of the shock tears the paper, which, carried away by the coin, falls to the ground.
With a bit of practice, you quickly get the hang of it. The tack hits the ceiling, the force of the impact rips the paper, which, pulled down by the coin, drops to the floor.
Suppose you have a light object to suspend on the ceiling; you may do it in this manner without much trouble. Simply tie a thread to the tack, the object being attached to the other end.
Suppose you have a light object to hang from the ceiling; you can do it this way without much hassle. Just tie a string to the tack, with the object attached to the other end.
If the projectile is well thrown the tack will go right in, and stick very firmly.
If the projectile is thrown properly, the tack will go right in and stick securely.
The Jumping Pea.
Take an unbroken straw, four or five inches long, not closed by knots, but forming a tube, and about one twentieth of an inch in diameter.
Take a straight straw that's four or five inches long, not blocked by knots but making a tube, and about one twentieth of an inch in diameter.
Divide one of its extremities to a length of about half an inch in four, five or six parts, which separate slightly, so as to form a truncated cone.
Divide one end to a length of about half an inch into four, five, or six sections, which should be spaced slightly apart to create a tapered shape.
After having thus prepared the straw, take a dry pea, with a larger diameter than that of the tube, and place it in the cone. Hold the tube upwards, and blow into it at the opposite end.
After preparing the straw this way, take a dry pea that’s bigger in diameter than the tube and put it in the cone. Hold the tube upright and blow into it from the other end.

The pea will be forced upward by the air column which you blow into the tube. It will remain suspended in the air as long as the interior pressure continues, then fall back into the arms of the cone.
The pea will be pushed up by the air column you blow into the tube. It will stay suspended in the air as long as the pressure inside lasts, then fall back into the cone's arms.
To vary that experiment pass a long pin through the pea, the point of which is turned into the tube. When well thrown up, the pea can be maintained at a distance of two or three inches from the mouth of the straw. According[27] to the stronger or weaker blast of breath, the pea will go up or down.
To change up that experiment, stick a long pin through the pea, with the pointed end inside the tube. When thrown just right, the pea can stay about two or three inches away from the end of the straw. Depending on whether you blow strongly or gently, the pea will move up or down.
To Acquire a True Eye.
Here is a peculiar and clever recreation, easily performed, though at first sight it may appear difficult.
Here is a unique and smart trick that’s easy to do, even though it might look challenging at first glance.
Put a tumbler upside down. By means of bread crumbs, fix a match vertically on the top. On the edge of the table place another match, partly raised on a piece of cork or wood.
Put a tumbler upside down. Using bread crumbs, secure a match vertically on top. On the edge of the table, position another match, slightly elevated on a piece of cork or wood.
Stoop down and aim at the vertical match on the glass, so that the one on the table is in the exact line of fire.
Stoop down and aim at the vertical match on the glass, so that the one on the table is in the direct line of fire.
When you think it is aimed straight, give it a fillip on the lower end, it will shoot up and touch the one placed on the glass if the aim be good.
When you think it’s aimed directly, give it a quick tap at the bottom, and it will shoot up and hit the one on the glass if your aim is good.

If you succeed, you may congratulate yourself on having good eyes—a very desirable gift if you should have to handle a gun, as a soldier or a sportsman.
If you succeed, you can pat yourself on the back for having good eyesight—a really valuable skill if you ever need to handle a gun, whether as a soldier or a sportsman.
The Air-Tight Stopper.
How many times has it happened to you, when wanting to cork a bottle, that the intended cork was too large to enter the neck?
How many times have you tried to cork a bottle only to find that the cork is too big to fit into the neck?
What have you done? Cut the cork all round, and obtained, but imperfectly, the desired end.
What have you done? You’ve cut the cork all around and achieved, though not perfectly, what you wanted.

Next time when the same occasion arises, turn the difficulty in this way: Instead of attacking the sides, cut four notches, bevel-shaped, into the cork as shown in the figure.
Next time the same situation comes up, address the challenge like this: Instead of hitting the sides, cut four notch-shaped bevels into the cork as shown in the figure.
Treated in this manner your cork will fit, and close the bottle hermetically.
Treated this way, your cork will fit and seal the bottle tightly.
The Fusee Rocket.
For this you only want a simple match box. Take out a match, and holding it on to the box as shown in figure, i.e., hold the box a little slanting, between the thumb and forefinger, and place the match head downwards on the side of the emery paper, where the match ignites when rubbed against.
For this, you just need a basic matchbox. Take out a match, and holding it against the box as shown in the figure, i.e., tilt the box slightly while grasping it between your thumb and forefinger, and place the match head down on the side of the emery paper that ignites when rubbed against it.
With medium force press on the match and with the other hand give it a fillip in the direction indicated by the arrow.
With medium pressure, push on the match and with your other hand, flick it in the direction shown by the arrow.
The little missile will fly into the air all ablaze, and fall down at a distance of four, five, or even six yards.
The small missile will shoot up into the air, all on fire, and land at a distance of four, five, or even six yards.
With a little practice you will succeed each time. It[29] looks like a small rocket, especially when done in complete darkness.
With a little practice, you will succeed every time. It[29]looks like a small rocket, especially when done in total darkness.

Be careful to make the experiment only where there is no danger of setting anything on fire.
Be careful to conduct the experiment only in places where there’s no risk of starting a fire.
A Novel Table Mat.
To construct this original table mat 6 objects, always at hand when table is laid for a meal, are required; 3 knives[30] and three tumblers of equal size and arrange the tumblers upside down, in the form of a triangle, and on each of them rest the handle of a knife. Cross the blades so that the first laid passes over the second and the second over the third, this latter passing over the first X.
To create this original table mat, you'll need 6 items that are always handy when setting the table for a meal: 3 knives[30] and 3 tumblers of the same size. Arrange the tumblers upside down in a triangle shape, and rest the handle of a knife on each one. Cross the blades so that the first one crosses over the second, and the second crosses over the third, with the third crossing over the first X.

The blades sustain themselves and you may place on them a dish or any other heavy object, without being afraid of a collapse.
The blades hold up well, and you can put a dish or any other heavy item on them without worrying about it breaking.
The arrangement is sufficiently shown in the design with out requiring more detailed explanation.
The design clearly reveals the arrangement without needing any further explanation.
Geometrical Paper Band.
Take a band of paper, say a postal wrapper; you observe that it has two lines and two surfaces (interior surface and exterior surface.) The problem is to arrange it so that it presents only one line and one surface. It may seem improbable, yet it is possible as you will see. Cut the band and gum together again the two pieces thus separated, after having turned over one of them as shown in figure as above. Arranged in this manner the paper has but one line and one surface, for it has the aspect of a screw without end.
Take a strip of paper, like a mailing wrapper; you’ll notice that it has two edges and two sides (an inside and an outside). The challenge is to position it so that it appears to have just one edge and one side. It might seem unlikely, but it can be done, as you will see. Cut the strip and then stick the two pieces back together after flipping one of them as shown in the figure above. When arranged this way, the paper has only one edge and one side because it resembles an endless screw.

Photographic Camera.
Here is a simple way to construct a camera for a pocket photographic apparatus.
Here’s a straightforward way to build a camera for a compact photography device.

Fig. 1.
Fig. 1.
Cut out of strong cardboard a piece of about 2 to 2 1/4 inches square. In the middle cut out a circle a little smaller than the lens with which you cover it, so that this lens holds on the edge of the hole.
Cut out a piece of sturdy cardboard measuring about 2 to 2 1/4 inches square. In the center, cut out a circle that’s slightly smaller than the lens you’re using to cover it, so that the lens fits snugly against the edge of the hole.
Cut out also two triangles of cardboard, having one side equal to the square, and a length in proportion to the focus of the lens; say for a simple lens of 3 inch focus, and one inch diameter, a length of one and a half inches.
Cut out two triangles from cardboard, with one side equal to the size of the square, and a length that corresponds to the focus of the lens. For example, for a simple lens with a 3-inch focus and a 1-inch diameter, the length should be one and a half inches.

Fig. 2.
Fig. 2.
Paste the two triangles on the square at A and B, their[32] base C must hold a rectangular mirror of the same dimensions as the side C of the square and the side of the triangles. On side D fix a roughened glass pane, or instead, a thin transparent sheet of paper; tissue paper for example.
Paste the two triangles onto the square at A and B, their[32] base C must support a rectangular mirror that has the same dimensions as side C of the square and the side of the triangles. On side D, attach a frosted glass pane, or alternatively, a thin transparent sheet of paper; like tissue paper, for example.

Fig. 3.
Fig. 3.

Fig. 4.
Fig. 4.
Pass through the holes, S S, an iron rod or a long needle, which must pass likewise through the upper angle of the triangles, forming the sides, (Fig. 1). When your lens has been fixed on the round hole of the square your camera is complete.
Pass through the holes, S S, an iron rod or a long needle, which must also go through the upper corner of the triangles that make up the sides, (Fig. 1). Once your lens is secured on the round hole of the square, your camera is ready.
The shade produces complete obscurity so that the operator can see in the middle of the camera the object or person he wishes to photograph.
The shade creates total darkness so that the operator can see the object or person they want to photograph in the center of the camera.
In order to fix it on the photographic apparatus, one may fasten a wire, in the form of an elongated U, just below the mirror at E.
To secure it to the camera, you can attach a wire shaped like a long U just below the mirror at E.
The Phantom Needle.
You know that when you sit at a window with a looking-glass in your hand, you can catch a beam of sunlight on the glass and throw it into the eyes of a person on the other side of the street.
You know that when you sit by a window with a mirror in your hand, you can catch a ray of sunlight on the mirror and reflect it into the eyes of someone across the street.

What have you done in this case? You answer at once that you have bent the sunlight out of its course and turned it in another direction. If the glass were not there it would fall in a straight line on the window seat. This bending out of the straight line is called reflection.
What have you done in this situation? You reply immediately that you have redirected the sunlight and sent it in a different direction. If the glass weren't there, it would hit the windowsill in a straight line. This bending off the straight path is called reflection.
Now for an experiment; cut a small round piece of cork, not quite half an inch thick. Run a needle into its center and place it in a tumbler two-thirds full of water, needle downwards.
Now for an experiment: cut a small round piece of cork, not quite half an inch thick. Push a needle through its center and place it in a glass that’s two-thirds full of water, needle down.
Looking down on the cork you cannot see the needle. Now alter your position, and stoop down so that your eye is on level with the table on which the glass stands. Then you will perceive the needle to be on the top of the cork.
Looking down at the cork, you can't see the needle. Now change your position and bend down so that your eye is level with the table where the glass is. Then you'll see the needle sitting on top of the cork.
This apparent topsy-turveydom is called total reflection. The needle is reflected on the top of the water, and as the ray from your eye meets the top of the water, you see the needle, as it were, on the top of the cork.
This seeming chaos is called total reflection. The needle is reflected on the surface of the water, and when the ray from your eye hits the surface, you see the needle, so to speak, on top of the cork.
Amphitrite.
At fairs, and in halls of mysteries a variety of optical illusions are presented. Under the name of Amphitrite, the spectacle is sometimes of a woman who seems to rise from the deep, moves about in the empty space, apparently without being sustained by anything or anybody.
At fairs and in mysterious halls, various optical illusions are showcased. Under the name of Amphitrite, the show sometimes features a woman who appears to rise from the depths, moving around in empty space, seemingly unsupported by anything or anyone.
She seems completely isolated in mid-air. She turns[35] about, sometimes in a circle, moving now the legs, then the arms. Then after several graceful evolutions in all directions, she stands straight and descends rapidly, seemingly precipitated into a decorated scenery representing the ocean.
She looks totally alone up in the air. She spins around, sometimes in circles, moving her legs first, then her arms. After several elegant moves in every direction, she straightens up and drops quickly, as if being pulled down into a decorated backdrop that looks like the ocean.

The illusion is produced in this way: Behind a well-stretched muslin curtain, M M, is painted D D, with the sky and clouds, below a canvas representing the sea. In front, in the direction of G G, is a mirror, without quicksilver back, inclined at an angle of forty-five degrees.
The illusion is created this way: Behind a tightly stretched muslin curtain, M M is painted D D, featuring the sky and clouds, underneath a canvas depicting the sea. In front, facing G G, is a mirror, with no reflective backing, tilted at a forty-five-degree angle.
Below the mirror is a round table moving on a pivot, and on this the actress, who takes the part of the Amphitrite, lays down.
Below the mirror is a round table that spins on a pivot, and on this the actress, playing the role of Amphitrite, lies down.
In executing various movements, the table in turning, reflects in the glass the image of the person on whom a vivid light is thrown. The spectators placed at S see the image on the canvas at the back, D D. When the time comes for making the lady disappear altogether, the table, which glides on rails, is drawn off the stage, and Amphitrite seems to plunge into the waters. It is by this process that the specters and ghosts at the theaters are produced.
In performing different actions, the table rotates and reflects in the mirror the image of the person illuminated by bright light. The audience positioned at S sees the image on the canvas at the back, D D. When it's time for the lady to completely vanish, the table, which slides on tracks, is pulled off the stage, and Amphitrite appears to dive into the water. This is how the spirits and apparitions are created in theaters.
You can perform this illusion, based on the reflection of the light at home, in reducing its construction to the simple proportions of a small theater of marionettes.
You can do this illusion at home, using light reflection, by simplifying its setup to the basic proportions of a small puppet theater.
Optical Illusions.
Illusions of the eye are numberless, and afford a wide field for experiment. For example, if you ask any one wearing a silk high hat, to what height he thinks his hat would reach if placed on the ground against the wall or door. Nine times out of ten the mark of the height guessed[36] will be half as much again, at least a third over the real height of the hat.
Illusions of the eye are countless and provide a great opportunity for experimentation. For example, if you ask someone wearing a silk top hat how high they think the hat would reach if it were placed on the ground against a wall or door, nine times out of ten, the height they guess[36] will be at least one and a half times, if not a third more, than the actual height of the hat.

Again, represents two triangles. Ask which is the one whose center is the better indicated. Every one will say, “triangle A.” Well, every one will be wrong, it is B. Take a pair of compasses and you will easily prove it.
Again, it shows two triangles. Ask which one has its center indicated more clearly. Everyone will say, “triangle A.” But they’ll all be wrong; it’s actually B. Grab a compass and you can easily demonstrate this.

The same occurs with the above figure. The two parallelograms, A B, are absolutely equal, and yet A appears to be larger than B. The two lines, A and B are both of equal length; yet B seems a third longer than A.
The same happens with the figure above. The two parallelograms, A and B, are exactly equal, but A looks bigger than B. The two lines, A and B, are the same length; yet B seems about a third longer than A.
The sides, AB, CD, BD of the middle figure, BE, AM, EM, etc., are equal, yet it seems to the eye that the surface, A B E M, is longer than the square A B C D.
The sides, AB, CD, BD of the middle figure, BE, AM, EM, etc., are equal, yet it seems to the eye that the surface, A B E M, is longer than the square A B C D.
There is another deception the eye is liable to. On a sheet of paper trace several circles, having the same center. Place the sheet on your thumb and turn it horizontally, it will then seem to you as if the rounds turned, though you watch with the utmost attention, the illusion will be complete.
There’s another trick your eyes can fall for. On a piece of paper, draw several circles that share the same center. Hold the paper on your thumb and tilt it horizontally; it will start to look like the circles are spinning, even if you’re watching closely—the illusion will be perfect.

In order to terminate this series, which can be varied infinitely, we will, in our turn, ask you this question: Which is the tallest man of the three personages appearing in the adjoining figure? Is it the first, the last, or the middle one?
In order to end this series, which can go on forever, we will, in turn, ask you this question: Who is the tallest man among the three characters shown in the adjacent figure? Is it the first one, the last one, or the one in the middle?
Try to find out without any instrument of course, simply[37] by the aid of your eyes which you suppose exact and true. It will appear to you at first sight that the artist has made a mistake, and has made a bad drawing. The last seems the tallest, whereas the first seems shortened.
Try to figure it out without any tools, just[37]using your own eyes, which you believe are accurate and reliable. At first glance, it may look like the artist messed up and made a poor drawing. The last one seems the tallest, while the first one seems shorter.

However, measure with a pair of compasses, and the illusion will at once disappear. The draughtsman was not mistaken; the first is the tallest, and the two others go diminishing in height.
However, if you measure with a pair of compasses, the illusion will immediately vanish. The draughtsman was right; the first is the tallest, and the other two decrease in height.
This terminates our experiments on optical illusions and you will now enter upon another field of knowledge altogether.
This wraps up our experiments on optical illusions, and you will now dive into a completely different area of knowledge.
The Insensible Coin.
Cut a piece of cardboard about six inches long, and by sticking the extremities together with a pin, or with gum, form a circle or ring. Balance it carefully on the neck of[39] a wine bottle or decanter, and on the top of the ring place a dime, exactly over the neck of the bottle. Now the trick to be performed is to take off the ring so that, without touching it, the coin falls into the bottle. On the inner side of the ring give a sharp knock with the finger, or, better still, with the thumb and forefinger, as in shooting a marble, as shown in figure. The ring will come off, and the coin which on account of its inertia, does not participate in the movement, will infallibly fall into the bottle. It is absolutely necessary to strike the interior of the circle, because in striking it from the outside one would not get any result at all, on account of the elasticity of the cardboard.
Cut a piece of cardboard about six inches long, and by sticking the ends together with a pin or some glue, form a circle or ring. Carefully balance it on the neck of[39] a wine bottle or decanter, and place a dime directly on top of the ring, right over the neck of the bottle. The trick is to remove the ring so that, without touching it, the coin falls into the bottle. On the inner side of the ring, give it a sharp knock with your finger, or even better, with your thumb and forefinger, like shooting a marble, as demonstrated in the figure. The ring will come off, and the coin, due to its inertia, won’t move and will inevitably fall into the bottle. It’s crucial to strike the inside of the circle because hitting it from the outside won’t produce any result at all due to the elasticity of the cardboard.

The Asses’ Bridge.
Every schoolboy knows which is the famous geometrical theorem, commonly called the Asses’ Bridge, and which is propounded as follows:
Every schoolboy knows what the famous geometrical theorem is, commonly referred to as the Asses’ Bridge, and it is stated as follows:

The square constructed on the hypotenuse of a right angled triangle is equivalent to the sum of the squares constructed on the two other sides.
The square built on the hypotenuse of a right triangle is equal to the sum of the squares built on the other two sides.
If we had only to propound this terrible theorem, it would be an easy matter, but the question is to prove it by A and B, and by means of the triangles, similar angles, equivalents, etc. Well, instead of all this, we give here a very[40] simple way to prove the truth; if not quite pedagogic, it is none the less real.
If we just had to state this awful theorem, it would be easy, but the real challenge is to prove it using A and B, and through triangles, similar angles, equivalents, and so on. Instead of all that, we present a very[40] straightforward method to show the truth; it might not be entirely educational, but it's still valid.
Trace on a piece of cardboard or thick paper a square, and divide into 49 parts. This done, cut it out in following the big lines. Take out on the center one division, which add to the small square, and then construct the figure 2.
Trace a square on a piece of cardboard or thick paper and divide it into 49 parts. Once that's done, cut it out along the main lines. Remove one division from the center and add it to the small square, then construct the figure 2.

Fig. 2.
Fig. 2.
The right-angled triangle A C D will be found by the sides of the three squares, and the sum of the two small squares constructed on the two sides of the triangle will be equivalent to the great square constructed on the hypotenuse. Effectively:
The right-angled triangle A C D can be found by the sides of the three squares, and the sum of the two smaller squares built on the two sides of the triangle will be equal to the larger square built on the hypotenuse. Basically:
| Square No. 1 has | 9 | divisions. |
| Square No. 2 has | 16 | divisions. |
| Together | 25 |
And the square No. 3 has also 25 divisions. Therefore the theorem is proved.
And square No. 3 also has 25 divisions. So, the theorem is proven.
Another Way to Prove the Preceding Theorem.
In a square A B D C, trace four similar and equal triangles; cut them out and dispose them as shown in Fig. 1. You will have in the middle an empty space forming a great square, which just has one of the sides of the hypotenuse of the right-angled triangle A E B.
In a square A B D C, draw four identical and equal triangles; cut them out and place them as shown in Fig. 1. You will have an empty space in the middle forming a large square, which corresponds to one of the sides of the hypotenuse of the right triangle A E B.

Trace the outlines of this square and remount the triangles one against the other, H C E, against A E B, and C D G, against B F G, you will get the Fig. below.
Trace the edges of this square and stack the triangles one on top of the other, H C E, onto A E B, and C D G, onto B F G; you will get the figure shown below.

Fig. 1.
Fig. 1.
The successively covered and uncovered parts of the two squares have not changed in extent. But this time the uncovered part is formed of the two squares 2 and 3 which correspond to those constructed on the two other sides of the triangle, A E B.
The areas of the two squares that are covered and uncovered haven’t changed in size. However, this time, the uncovered area is made up of squares 2 and 3, which correspond to those created on the other two sides of triangle A E B.
This very simple demonstration has the advantage of being applicable to any rectangle.
This straightforward demonstration can be applied to any rectangle.
Indented Angles.
Given two sheets of paper of the same size and form of[42] a rectangle, fold them both in four equal parts, one lengthwise and the other sideways, as shown below.
Given two sheets of paper of the same size and shape of[42] a rectangle, fold them both into four equal parts, one lengthwise and the other crosswise, as shown below.

Fig. 1.
Fig. 1.
When so folded take a fourth part off each. Part A in the figures. The question is now to cover quite exactly one of the remaining surfaces with the other, in cutting the latter in two perfectly equal parts.
When folded this way, take a quarter off each. Part A in the figures. The task now is to completely cover one of the remaining surfaces with the other by cutting the latter into two perfectly equal parts.

Fig. 2.
Fig. 2.
To resolve this question take the surface (parts A having been detached), with which it is intended to cover the other,[43] fold it again into equal parts, but this time in the opposite way to the one in which it was folded first, as indicated in Fig. 4: cut it out then in following the dotted line, F L, formed by the marks of the fold; this done one will obtain two parts absolutely equal, F L.
To solve this question, take the surface (with parts A removed) that you want to cover the other with,[43] fold it again into equal parts, but this time in the opposite direction from the first fold, as shown in Fig. 4: then cut it out along the dotted line, F L, marked by the folds; once you do this, you'll have two parts that are exactly equal, F L.

Fig. 3.
Fig. 3.
In order to cover the other surface, Fig. 3, all that is now necessary is to lower the angles, viz.: angle A’, must be in front of angle A, angle B’ in front of angle B, and angle C’ in front of angle C. When the angles are lowered in this[44] way, the two surfaces will be quite similar, and can be covered one by the other.
In order to cover the other surface, Fig. 3, all that's needed now is to lower the angles: angle A’ should be in front of angle A, angle B’ in front of angle B, and angle C’ in front of angle C. When the angles are lowered this[44] way, the two surfaces will be very similar and can be covered on top of each other.

Fig. 4.
Fig. 4.
This experiment can be made either with one or the other sheet, in lowering or raising the angles.
This experiment can be done with either sheet by adjusting the angles up or down.
In the example shown here it is the fourth Figure which is destined to cover the other one.
In the example shown here, it's the fourth figure that is meant to cover the other one.
When the operation is terminated as indicated above, part M, of Fig. 4, will be at M’ of Fig. 3, and part O at O’ of the covert figure.
When the operation is finished as mentioned above, part M in Fig. 4 will be at M’ in Fig. 3, and part O will be at O’ in the hidden figure.
A Cheap Shooting Gallery.
With a whalebone stay busk, make a bow and draw a target on a card. For the arrows, divide lengthwise a steel nib, choosing long shaped ones in the form of a lance and fix each part at the end of a match. You now have[45] complete a saloon shooting gallery, inoffensive and sufficiently recreative at least for your smaller friends.
With a whalebone stay busk, create a bow and draw a target on a card. For the arrows, split a steel nib lengthwise, choosing long ones shaped like a lance, and attach each part to the end of a match. You now have[45] complete a fun shooting gallery, harmless and entertaining, especially for your younger friends.

The Coin in Equilibrium.
Here is a curious demonstration of the balancing of bodies having their center of gravity displaced by a counterpoise.
Here is an interesting demonstration of how bodies balance when their center of gravity is shifted by a counterweight.
We propose to keep a coin horizontally in equilibrium on the rim of a tumbler, and it must rest on the glass only by its extreme edge, as shown by the figure which gives the complete demonstration.
We suggest placing a coin horizontally balanced on the rim of a glass, and it should only touch the glass at its very edge, as illustrated in the figure that provides the full demonstration.

Take a silver dollar and place it between the prongs of two forks covering each other, then place the edge of the coin upon the glass and draw the handles of the forks together, or distend them till the whole are balanced. The center of gravity will then be at the point of contact, and[46] you may give a slight swing without the risk of breaking the equilibrium thus obtained.
Take a silver dollar and put it between the tines of two forks that are crossing each other. Then, balance the edge of the coin on a glass and pull the fork handles together or apart until everything is balanced. The center of gravity will be at the point where they touch, and[46] you can give it a gentle swing without risking the balance you've achieved.
The Submerged Coin.
In order to make the previous experiment more significant, you may present it also in the following manner: In a soup plate place a coin; beside the latter an inverted glass, then pour water into the plate just to cover the coin. You then inform the spectators that you will withdraw the coin from the plate without wetting your fingers. You will meet with a great deal of disbelief from many of your friends looking on. Leave them in doubt as to the success of your operation.
To make the previous experiment more impressive, you can also present it like this: Place a coin in a shallow bowl; next to it, put an upside-down glass, then pour water into the bowl just enough to cover the coin. Tell the audience that you will remove the coin from the bowl without getting your fingers wet. Expect a lot of skepticism from your friends watching. Keep them guessing about whether you'll succeed.
Cut a round piece off a cork, on the top of which place some pieces of paper and matches, push the whole underneath the glass, light the matches and wait. As soon as the combustion is over, you will see the water leave the plate and enter the glass, wherein it rises, leaving the piece absolutely dry at the bottom of the plate. You can then execute what you offered at first—take out the coin without wetting your fingers.
Cut a round piece from a cork, place some pieces of paper and matches on top of it, then push the whole thing under a glass. Light the matches and wait. As soon as the burning is done, you'll see the water leave the plate and go into the glass, where it rises, leaving the piece completely dry at the bottom of the plate. You can then do what you intended at first—take out the coin without getting your fingers wet.

As a variation of the preceding experiment, obtain a flat-bottomed tumbler or glass goblet (but the bottom must be flat), a pocket handkerchief and a coin. These are to be seen by everybody present.
As a variation of the previous experiment, get a flat-bottomed tumbler or glass goblet (just make sure the bottom is flat), a pocket handkerchief, and a coin. These should be visible to everyone present.
Procure a watch glass, or a round piece of glass like an eye-glass. This is not to be shown.
Procure a watch glass, or a round piece of glass like a lens. This is not to be shown.
Now show to the bystanders that you place the coin (say a fifty-cent piece, for example) in the middle of the handkerchief, and, throwing back two sides of the latter, point out again that the coin is still in its place.
Now show the bystanders that you’ve placed the coin (let’s say a fifty-cent piece, for example) in the center of the handkerchief, and, as you pull back two sides of it, point out again that the coin is still in its position.
To show that there is no deception ask someone to hold the coin in the handkerchief.
To prove that there's no trick, ask someone to hold the coin in the handkerchief.
Then place underneath it a glass containing a little water and call out, “Hey, Presto! Fly!”
Then put a glass with a bit of water underneath it and shout, “Hey, Presto! Fly!”
The person lets go of the coin and the noise of its falling to the bottom of the glass is plainly heard.
The person drops the coin, and the sound of it hitting the bottom of the glass is clearly audible.
You take up the handkerchief, and every one is astonished at the disappearance of the coin, which you can produce from another person’s hat.
You pick up the handkerchief, and everyone is amazed at how the coin has vanished, which you can then pull from someone else's hat.
Really the trick is very simple. For the coin supposed to be held in the handkerchief you must dexterously substitute the watch glass or eye glass. The person holding it, of course, declares he has the coin fast.
Really, the trick is very simple. For the coin that’s supposed to be held in the handkerchief, you need to skillfully swap it for the watch glass or eyeglass. The person holding it, of course, claims he has the coin securely in place.
When he drops the eye glass it makes the same noise against the tumbler as would the coin, though, of course, it cannot be seen in the water.
When he drops the eyeglass, it makes the same noise against the tumbler as a coin would, although, of course, it can’t be seen in the water.
It is a capital trick if smoothly performed.
It's a great trick if done smoothly.
The Smoke Rings.
When the air of a room is very calm, have you ever noticed that tobacco smoke rises slowly and in a nearly vertical direction? Have you never watched with interest the grayish or bluish streaks of smoke issuing from the smoke of a cigar or pipe? And in seeing the smoke rise in such a capricious fashion, have you ever ascertained that it is due to the calm of the surrounding air?
When the air in a room is really still, have you ever noticed that tobacco smoke rises slowly and almost straight up? Have you ever watched with curiosity the gray or blue trails of smoke coming from a cigar or pipe? And while seeing the smoke move in such a random way, have you ever realized that it’s because of the stillness of the air around it?
One may get some amusement out of the agitation of the atmosphere. For the materials you only require a square or round cardboard box, in the lid of which cut a round hole of about two inches in diameter. In the interior of the box place two sheets of blotting paper, the one impregnated with muriatic acid, the other with ammoniac, in equal quantities. Immediately a whitish smoke will escape through the hole and rise straight to the ceiling. If with both hands you give a series of simultaneous taps on the sides of the box, you will see the smoke issue in well defined rings, which will disperse rapidly in the air, and[48] succeed each other as long as you continue the pressure. These rings are the result of the concussion of the air which you occasion in the box. The experiments can be made also with ordinary tobacco smoke, but it will last longer in the way we have indicated.
One can find some amusement in the disturbance of the air. For this, you just need a square or round cardboard box, and in the lid, cut a round hole about two inches in diameter. Inside the box, place two sheets of blotting paper, one soaked in muriatic acid and the other in ammonia, in equal amounts. Immediately, a whitish smoke will escape through the hole and rise straight to the ceiling. If you tap the sides of the box with both hands in a quick succession, you'll see the smoke come out in clearly defined rings that quickly disperse in the air, and[48] they will continue to appear as long as you keep tapping. These rings are caused by the air compression you create inside the box. You can also perform the experiment with regular tobacco smoke, but it will last longer with the method we've described.

The Walking Cork.
Stick two knives in a cork, on the same level, and opposite each other, so as to form a balance. In the bottom of the cork, at an equal distance, insert two pins, sufficiently deep not to bend under the weight which they will have to carry. Rest the pins on a flat ruler, slightly inclined, and give them a slight balancing movement. The weight of the apparatus will fall on the pin, A, on which the whole turns the knife placed at the side, B, will knock against the support, and will tend to bring the apparatus again into its original position as the oscillating movement continues, pin, B, will, in its turn, support the whole weight,[50] and pin, A, will shift on to the other point, A, indicated in the figure. The walking cork will thus continue its movement till it has gone over the course assigned to it. This recreation is interesting, for it demonstrates once more that all bodies are attracted by the earth, and that, as soon as they are thrown off their balance they obey the force which constantly draws them down.
Stick two knives into a cork, at the same level and opposite each other, to create a balance. At the bottom of the cork, insert two pins at equal distances, deep enough so they don’t bend under the weight they will need to support. Rest the pins on a slightly inclined flat ruler and give them a gentle balancing motion. The weight of the setup will rest on pin A, which is where the whole thing pivots. The knife on the side, B, will make contact with the support and will try to return the setup to its original position as it rocks back and forth. Eventually, pin B will take on the full weight, and pin A will move to the other point, A, shown in the figure. The cork will continue its movement until it has completed its designated path. This activity is interesting because it shows once again that all objects are attracted to the earth, and as soon as they are thrown off balance, they respond to the force that constantly pulls them downward.[50]

The Obstinate Cork.
Take a glass or metal tube, closed at one end, and cut a stopper in cork or india-rubber to its size so that it closes the tube hermetically, and take care that it glides in the tube without difficulty, and pierce it with a hole. On the top of this hole adapt a small piece of leather, rather larger than the hole, which you must take care to wet before proceeding with the following experiment. In order to be able to withdraw the cork when in the tube, you take the precaution to fasten in it both ends of a piece of string, as indicated in the figure.
Take a glass or metal tube, closed at one end, and cut a stopper from cork or rubber to fit it so that it seals the tube tightly. Make sure it slides easily in the tube, and then pierce it with a hole. On top of this hole, attach a small piece of leather, slightly larger than the hole, and make sure to wet it before moving on to the next step. To be able to remove the cork when it's in the tube, make sure to tie both ends of a piece of string to it, as shown in the figure.

These various objects being prepared, will serve to demonstrate once more the atmospheric pressure.
These different objects being prepared will help demonstrate atmospheric pressure once again.
Lift the valve up, force the cork into the tube towards the middle, and when there, put the valve in its place again, and pull quickly on the string as if trying to pull the cork out. The latter will not come out, for the reason that producing a vacuum before itself, the atmospheric prepare will prevent it from coming out. But if instead you draw it gently towards you, it will offer much less resistance, because the outer air will enter through the smallest[51] interval between the cork and the glass, and partly destroy the exterior pressure.
Lift the valve up, push the cork into the tube toward the middle, then replace the valve and quickly pull the string as if you're trying to pull the cork out. It won’t come out because the vacuum created will keep it in place due to atmospheric pressure. But if you gently pull it towards you, it will resist much less because outside air will flow in through even the smallest[51] gap between the cork and the glass, partially relieving the exterior pressure.
Petroleum Pulverizer.
With the aid of the compressed air reservoir you are able to conduct various soldering operations, requiring often great heat.
With the help of the compressed air tank, you can perform different soldering tasks that often need a lot of heat.
Let us construct the following pulverizer:
Let’s create the following pulverizer:
Into a bottle of the shape shown in the figure, put some petroleum, and introduce a glass tube that does not quite reach the bottom. Close with wax that no air can enter, and at the upper extremity of the tube let a fitting be embedded, a section of which is shown in the engraving. This fitting has three openings, two horizontals and one corresponding with the tube that is plugged into the petroleum.
Into a bottle shaped like the one in the figure, pour in some petroleum and insert a glass tube that doesn’t touch the bottom. Seal it with wax so that no air can get in, and embed a fitting at the top of the tube, a section of which is shown in the engraving. This fitting has three openings: two horizontal and one that aligns with the tube connected to the petroleum.

Adjust the india-rubber tube to the reservoir, and when the pressure is exercised on the surface of the liquid it will force the petroleum upwards through the tube, and thence it will be blown in a fine spray, which burns as if coming[52] out of an ordinary burner. The particles of oil are mixed with air, and consequently the atoms of air are heated to a high degree. This jet develops a heat of great intensity.
Adjust the rubber tube to the reservoir, and when pressure is applied to the surface of the liquid, it will push the petroleum upward through the tube, where it will then be released as a fine spray that burns like it’s coming out of a regular burner. The oil particles mix with air, causing the air atoms to heat up significantly. This jet produces a very high intensity of heat.
This pulverizer may serve also to disinfect rooms. You have only to replace the petroleum with an antiseptic liquid.
This pulverizer can also be used to disinfect rooms. You just need to swap the petroleum for an antiseptic liquid.
Electric Attraction and Repulsion.
The poles of the same sign repel, and the contrary poles attract each other, or, in other words, the negative, or the positive electricity attracts the electricity of a contrary sign, whereas the electricities of the same signs repel each other.
The poles with the same charge repel each other, while opposite poles attract. In other words, negative electricity attracts positive electricity, whereas like charges push each other away.
In order to demonstrate this principle we will contrive a little plaything which will be as interesting as amusing to see in operation.
To show this principle, we will create a little gadget that will be both interesting and fun to watch in action.

For a pivot take a needle stuck in a cork, and, as magnetic needles, two old corset steels will do very well. If these cannot be had a clock spring may do instead.
For a pivot, take a needle stuck in a cork, and, like magnetic needles, two old corset steels will work just fine. If you can't find these, a clock spring might do the trick instead.
Magnetize these two steel rods by rubbing them with a magnet. In the middle of one of the rods punch a small[53] hollow so that it may freely move on the needle in the cork without fear of falling off. You have thus manufactured a rough compass.
Magnetize these two steel rods by rubbing them with a magnet. In the middle of one of the rods, punch a small[53] hollow so it can move freely on the needle in the cork without the risk of falling off. You have now made a basic compass.
Then cut out four dolls in paper, two gentlemen and two ladies, and stick them in the extremities of the two magnetized needles. Remember to put at each end a figure of the opposite sex.
Then cut out four paper dolls, two men and two women, and attach them to the ends of the two magnetized needles. Make sure to place a figure of the opposite sex at each end.
Now, each time you present a man to the other man, which is placed on the magnetized needle, they will repel each other; if to a lady, the dolls are attracted.
Now, each time you show a man to the other man, which is positioned on the magnetized needle, they will push each other away; but if it's a lady, the dolls are drawn to each other.
The explanation is easy. You will have taken care to put the puppets on contrary poles: a man on the positive pole, a lady on the negative pole. In this way the principle enunciated above is thoroughly proved and easily grasped.
The explanation is simple. You will have made sure to place the puppets on opposite ends: a man on the positive end, a woman on the negative end. This way, the principle stated above is completely proven and easily understood.
One may easily vary this experiment by replacing the gentlemen and ladies by personages of actual notoriety, or of the company, in placing them in groups which have a mutual dislike to each other, such as the schoolmaster and pupil, etc.
One can easily change this experiment by swapping out the gentlemen and ladies for well-known figures or members of the group, arranging them in clusters that dislike each other, like the teacher and student, etc.
The Bust of the Sage.
Every person wonders how the sensational decapitation scene is produced.
Every person wonders how they create the shocking decapitation scene.
To all appearance a head is thrust through the neck opening of a guillotine, the knife descends and the head is cut off. However, in order that none of the fair sex may be alarmed, it may be varied as follows:
To all appearances, a head is pushed through the neck opening of a guillotine, the blade drops, and the head is severed. However, to ensure that none of the women are frightened, it can be changed as follows:
In a cabinet a mirror is set across, sloping from the top at the back to the front. It reflects the ceiling, which is covered with the same material as that which is seen of the floor in front of the mirror. In the center of the glass is cut a hole which admits of the passing through of a man’s head. He sits or stands in under the glass at his ease. The front edge of the mirror is concealed by a few astronomical and geographical instruments, old folio books, skulls, etc.
In a cabinet, a mirror is positioned at an angle, sloping from the back to the front. It shows the ceiling, which is covered with the same material as the floor in front of the mirror. In the center of the glass, there’s a hole that allows a man’s head to pass through. He sits or stands comfortably beneath the glass. The front edge of the mirror is hidden by some astronomical and geographical instruments, old folio books, skulls, and so on.
The head and shoulders are made up and draped like one of the seven wise men of Greece, and he answers questions in a grave, portentous voice.
The head and shoulders are styled and dressed like one of the seven wise men of Greece, and he responds to questions in a serious, significant voice.
The Witchery of the Hand.
In order to ascertain the existence of animal magnetism the following apparatus, very simple, and not at all difficult to construct, answers perfectly.
To determine the presence of animal magnetism, the following apparatus, which is quite simple and easy to build, works perfectly.
Stick a pin in a cork, point upwards. On that pivot place horizontally a sheet of paper so that it remains in perfect equilibrium.
Stick a pin into a cork, with the point facing up. Balance a sheet of paper on that pivot so it stays perfectly level.

If you now put your hand over the sheet of paper, a rotary movement will manifest itself, the sheet swerving from right to left. This movement is caused by the influence of the hand’s magnetism.
If you place your hand over the sheet of paper now, you'll see a rotary motion, the sheet moving from right to left. This motion is caused by the magnetism of your hand.
The Perspectograph.
This simple instrument, invented by Mr. Jarlot, renders the tracing of a sketch extremely easy, besides avoiding absolutely faults of perspective, which is, without doubt, the principal advantage of this instrument. Thanks to it, one obtains an easy reproduction on one plane of objects placed on different planes.
This simple tool, created by Mr. Jarlot, makes tracing a sketch very easy and completely eliminates perspective errors, which is definitely the main benefit of this tool. With it, you can easily reproduce objects on a single plane even if they are on different planes.
Here is a description of this very simple instrument. A[55] wooden frame A B C D, with a slot in the side, A B, in which a pane of glass can slide so as to cover the whole space of the frame, a, b, c, d, is fixed on a stand.
Here is a description of this very simple instrument. A[55] wooden frame A B C D, with a slot in the side, A B, in which a pane of glass can slide to cover the entire space of the frame, a, b, c, d, is fixed on a stand.

The frame is maintained in a perfectly horizontal position by means of a water level n n’, placed on the lower side of the frame. At E is a small rule moving on a hinge at E, allowing the angle to be varied at the plane A B C D, by resting it on two supports E E’.
The frame is kept perfectly horizontal using a water level n n’, located on the bottom side of the frame. A small ruler at E pivots on a hinge, letting the angle at the plane A B C D be adjusted by resting it on two supports E E’.
The supports themselves move round on an axle fixed on the rule. At the extremity E’ of this rule is fixed a copper blade curved in E’, C’, and pierced by a small hole of about an eighth of an inch in circumference, the edges are[56] made thinner as represented in the diagram placed above; the widened part is turned toward the frame.
The supports move around on an axle attached to the ruler. At the end E’ of this ruler, there’s a copper blade that’s curved at E’, C’ and has a small hole about an eighth of an inch in diameter. The edges are[56] made thinner as shown in the diagram above; the wider part faces the frame.
So much for the body of the instrument, now for the accessories. In the slot left in side, A B C D, lower a glass pane covering the space, a, b, c, d, which is not, however, a necessary condition, it depends on the size of the design you desire to take.
So much for the main part of the instrument, now let's talk about the accessories. In the slot left on the side, A B C D, place a glass panel covering the area, a, b, c, d, which isn't mandatory; it depends on the size of the design you want to create.
This pane requires a little preparation. It is done in this way: One chooses a pane of the desired glass, as free as possible from defects. Cover one side only with turpentine, and which you know is a natural varnish.
This pane needs a bit of preparation. Here’s how to do it: First, pick a pane of glass that has as few defects as possible. Then, coat just one side with turpentine, which is a natural varnish.
See that this coating is as thin as possible, and to ensure this, go over the surface with a very soft brush steeped in the liquid. When you see that the latter does not run any more, leave off brushing. Let it dry for two days if necessary; take care, meanwhile, to protect the varnished side from dust.
See that this coating is as thin as possible, and to ensure this, go over the surface with a very soft brush dipped in the liquid. When you notice that it’s no longer running, stop brushing. Let it dry for two days if needed; in the meantime, make sure to protect the varnished side from dust.
Now it remains only to show the use of the instrument. Put yourself in front of the object you wish to represent. Put the frame in a perfectly horizontal position, slide the pane in it, and dispose the rule, E E’ (Fig. 2), in such a manner that, when looking through the little hole, O, you are able to see the object you want to draw.
Now all that's left is to demonstrate how to use the instrument. Stand in front of the object you want to represent. Position the frame so it's completely horizontal, slide the pane into it, and place the rule, E E’ (Fig. 2), so that when you look through the small hole, O, you can see the object you want to draw.

Fig. 2.
Fig. 2.
Then, with a blue or other colored pencil, trace the outlines of the object on the glass coated with turpentine, the use of the latter being to allow the pencil marks to fix itself on the surface. One sees that the outlines thus obtained[57] will be those of the real object as clearly as possible because they are traced as seen, so to speak.
Then, with a blue or other colored pencil, trace the outlines of the object on the glass that has been coated with turpentine. The purpose of the turpentine is to help the pencil marks stick to the surface. You’ll notice that the outlines you get[57] will accurately represent the real object because they are outlined as you see them.
But the principal object of the instrument is not so much exactness of outline as to get the exact proportion existing between the different sizes of the objects placed in different planes. We will try to show this last result by means of another figure.
But the main purpose of the tool isn't so much to capture precise outlines as it is to determine the exact proportions between the various sizes of objects situated in different planes. We will attempt to demonstrate this final result using another figure.
Suppose A B to be an object situated at a certain distance from the eye posted at o, the rays from the eye, O A O B, meets the instrument at a and b, and the image of this object is given by the line, a b.
Suppose A B is an object located at a specific distance from the eye at o. The rays from the eye, O A O B, intersect the instrument at a and b, and the image of this object is represented by the line, a b.
Now, suppose A’ B’ to be another object situated beyond A B; the eye has not changed position, it cannot do so, with reference to the glass, on account of the small rule which is fixed; the image of the object A’ B’, will be a’ b’; thus, one has the true dimensions of A’ B’, in respect to A B.
Now, let's say A' B' is another object located beyond A B; the eye hasn’t moved position, nor can it, in relation to the glass, because of the fixed small rule; the image of the object A' B' will be a' b'; this way, we get the actual dimensions of A' B' in relation to A B.
It is precisely this proportion which must exist between the sizes of the objects placed in different planes, which constitute perspective. The instrument, therefore, well deserves its name of Perspectograph.
It’s exactly this ratio that needs to be maintained between the sizes of objects positioned at different levels that makes up perspective. The tool, then, truly earns its name, Perspectograph.
It will be observed that this apparatus obviates two difficulties: 1, that of the exactness of the sketch, in copying nature as it is presented to the eye; 2, that of perspective. Having the sketch on glass it is easy to transfer it on paper. Lift up the rule, E E’, so as not to be in the way, place oiled or transparent paper on the glass, and counter-draw the sketch on it.
It can be seen that this device solves two problems: 1. the accuracy of the sketch when replicating nature as it appears to the eye; 2. perspective. With the sketch on glass, it’s simple to transfer it to paper. Raise the ruler, E E’, so it’s out of the way, place oiled or transparent paper on the glass, and trace the sketch onto it.
You can then stick this paper on a cardboard, and, if the operator is a designer, he may reproduce in crayon a very fine drawing. For the shading he must use his own talent, the aim of the instrument not being to give a finished drawing, but only a sketch, vigorously exact, and in unexceptionable perspective.
You can then attach this paper to a piece of cardboard, and if the operator is a designer, he can create a very nice drawing with crayons. For the shading, he has to rely on his own skills, as the purpose of the instrument is not to produce a finished drawing, but rather to provide a sketch that is both precise and in excellent perspective.
This instrument is often very convenient. When wishing to have a true sketch, you trace it on the glass; you then transfer it to an oil-paper, and again on drawing paper if the former is not to be used. Besides, if one has an exact sketch on whatever paper, you may reproduce it in freehand, if you are blessed with any idea of drawing.
This tool is really handy. When you want to create an accurate sketch, you trace it on the glass. Then you move it to oil paper, and again to drawing paper if you don’t want to use the first one. Also, if you have a precise sketch on any paper, you can recreate it freehand if you have some drawing skills.
If the varnished plane has to serve again, wash it with[58] warm water, and let it get dry; then the varnishing can be done over again.
If the varnished surface needs to be used again, wash it with [58] warm water, and let it dry; then you can apply the varnish again.
Camphor in Water.
If you put very small pieces of camphor on the water, you will see them turn round each other with great velocity. These movements are due to the diminution of the superficial tension of the liquid in the vicinity of the pieces of camphor.
If you place tiny pieces of camphor on the water, you'll watch them spin around each other quickly. These movements happen because of the decrease in the surface tension of the liquid near the camphor pieces.
In order to stop them throw a drop of oil in the water, and you will produce a perfect calm. One may utilize the camphor for an amusing recreation.
To calm them down, just drop a bit of oil in the water, and you'll create a perfect stillness. You can use camphor for some fun entertainment.
Construct a small paper or cardboard boat and fasten underneath on the hind part or stern a piece of camphor. Your boat will maneuver on the water. Persons not initiated will be much puzzled, and be long to find out by what contrivance this small craft is propelled.
Construct a small paper or cardboard boat and attach a piece of camphor underneath at the back or stern. Your boat will move around on the water. People who aren’t in the know will be quite confused and will take a while to figure out how this little craft is powered.
A Simple Multiplier.
Write on a card or strong paper the letters, figures, etc., which you want to reproduce. Then all along the lines or tracing, with a needle, prick holes in close proximity at equal distances.
Write on a card or sturdy paper the letters, numbers, etc., that you want to replicate. Then, along the lines or tracing, use a needle to make close-set holes at equal distances.
Place the sheet so prepared on a pad made of several sheets of blotting paper, smeared with blue analine ink, or a mixture of lamp-black and oil.
Place the prepared sheet on a pad made of several sheets of blotting paper, coated with blue aniline ink, or a mix of lampblack and oil.
Fix the corners with tacks or drawing pins, and draw your copies by simply placing the blank sheets over the pricked one, and press them down. The words, figures or designs will be reproduced in dotted lines if the holes have been well pricked. In this way a good number of copies can be drawn.
Fix the corners with tacks or push pins, and create your copies by just placing the blank sheets over the pricked one and pressing them down. The words, numbers, or designs will be reproduced in dotted lines if the holes have been properly made. This way, you can easily make several copies.
The Drawing Room Mirror.
On one of the faces of a pane of glass smear some lamp-black mixed with oil. If you place this glass, thus prepared, vertically on an engraving representing flowers,[59] fruits, birds, etc., you will obtain an infinity of forms, some of which will be very striking.
On one side of a glass pane, smear some black lamp soot mixed with oil. If you position this prepared glass upright over an engraving of flowers,[59] fruits, birds, etc., you will create countless shapes, some of which will be quite striking.

If you want to reproduce these, to fix their outlines, you have only to interpose a transparent paper, to draw along the glass pane a line in pencil and to trace over the part of the picture which terminates at the foot of the pane.
If you want to recreate these, to define their outlines, just place a transparent sheet of paper in between, draw along the glass with a pencil, and trace over the part of the picture that ends at the bottom of the pane.
Fold the transparent paper along this pencil line, and to get the whole reproduced you have only to copy over the designs just traced. The glass, which does the duty of a mirror, doubles the forms in a symmetrical way, and as it is moved new forms come to view.
Fold the clear paper along this pencil line, and to get the complete reproduction, just copy the designs you just traced. The glass, which acts like a mirror, reflects the shapes symmetrically, and as it moves, new shapes appear.
Elementary Gas-Burner.
Fill an old round tin box, at least two inches high, with sawdust and pieces of blotting paper. Close it as well as possible, and introduce a small metal, or glass, tube in the lid to a depth of about one-third of the box.
Fill an old round tin box that’s at least two inches high with sawdust and small pieces of blotting paper. Close it tightly, and insert a small metal or glass tube into the lid to a depth of about one-third of the box.
Make the joint tight with putty. Put this box on any two supports and place the flame of a lamp or candle underneath it.
Make the joint secure with putty. Set this box on any two supports and position the flame of a lamp or candle beneath it.

Soon the overheated sawdust and blotting paper will evolve vapors of alcohol and combustible gases. Approach a lighted match to the upper end of the tube and you will see the gas ignite and continue to burn.
Soon the overheated sawdust and blotting paper will create vapors of alcohol and flammable gases. Bring a lit match close to the top of the tube and you'll see the gas ignite and keep burning.
Rapid Vegetation.
A cheap sponge can be converted into a hanging bunch of greenery for room decoration. Plunge it into hot water, press it dry, then put in its holes or pores seeds of millet, red clover, barley, linseed, grasses, etc., in fact any species of plants which germinate easily and produce, as far as possible, leaves or blades of different shades. Place[61] the sponge thus prepared on a vase or in a saucer, or better still, suspend it in the recess of a window, where it may get as much sunshine as possible. Every morning, for a week, sprinkle its surface lightly with water. Soon the seeds will germinate and grow. In a short time they will form a ball of greenery, making a charming decoration for a room.
A cheap sponge can be turned into a hanging bunch of greenery for decorating a room. Soak it in hot water, squeeze it dry, then fill its holes or pores with seeds like millet, red clover, barley, linseed, grasses, and any other types of plants that grow easily and have different shades of leaves or blades. Place[61] the prepared sponge on a vase or in a saucer, or even better, hang it in a window alcove where it can get plenty of sunlight. Every morning for a week, lightly mist its surface with water. Soon, the seeds will germinate and grow. Before long, they will create a vibrant ball of greenery, making a lovely decoration for your room.
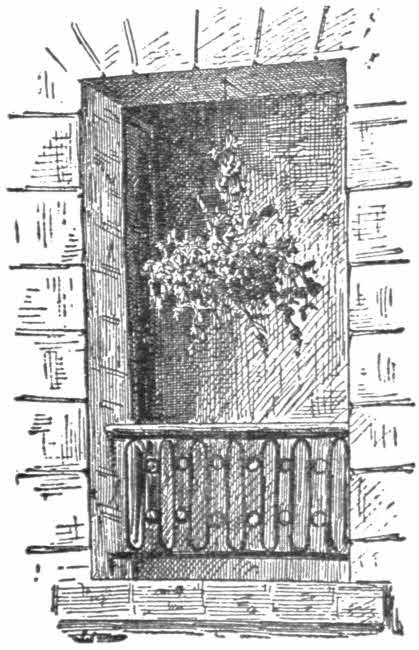
Miniature Volcanoes.
In a rather large porcelain or glazed earthenware basin place a small quantity of nitrate of lead. This may be obtained for a few cents from any painters’ supplies store. Then upon it throw some flakes of sal ammoniac. Immediately a number of conical elevations will be formed, which give off vapors and burst with a popping noise.
In a fairly large porcelain or glazed earthenware bowl, put a small amount of lead nitrate. You can buy this for just a few cents at any paint supply store. Then sprinkle some flakes of ammonium chloride on top. Right away, you'll see several cone-shaped bumps form that release vapors and pop with a noise.

Altogether the experiment represents very exactly, volcanoes in a state of eruption. When the eruption ceases, the rough, broken state of the remaining mats, represents as nearly as a thing on this earth of ours can, the appearance of the moon through a powerful telescope.
Altogether, the experiment very accurately represents volcanoes in the middle of an eruption. When the eruption stops, the rough, shattered condition of the remaining mats closely resembles what the moon looks like through a powerful telescope.
Indeed the moon at one time of its history was undoubtedly in the soft lava-like state that you will observe in the basin, during the first stage of this elegant and instructive experiment.
Indeed, the moon was once in a soft, lava-like state, which you can see in the basin during the first stage of this elegant and informative experiment.

USEFUL AND INSTRUCTIVE BOOKS.
Helpful and informative books.
HOW TO DO THE BLACK ART—Containing a complete description of the mysteries of Magic and Sleight-of-Hand, together with many wonderful experiments. By A. Anderson. Illustrated. Price 10 cents. Address Frank Tousey, publisher, N. Y.
HOW TO DO THE BLACK ART—Featuring a full explanation of the secrets of Magic and Sleight-of-Hand, along with several amazing experiments. By A. Anderson. Illustrated. Price 10 cents. Contact Frank Tousey, publisher, N. Y.
HOW TO BE A DETECTIVE—By Old King Brady, the world known detective. In which he lays down some valuable and sensible rules for beginners, and also relates some adventures and experiences of well-known detectives. Price 10 cents. For sale by all newsdealers in the United States and Canada, or sent to your address, post-paid, on receipt of price. Address Frank Tousey, publisher, New York.
HOW TO BE A DETECTIVE—By Old King Brady, the well-known detective. In this guide, he shares some valuable and practical rules for beginners, along with stories and experiences of famous detectives. Price 10 cents. Available at all newsstands in the United States and Canada, or can be sent to your address, postage paid, upon receipt of payment. Address: Frank Tousey, publisher, New York.
HOW TO BECOME A CONJURER—Containing tricks with Dominoes, Dice, Cups and Balls, Hats, etc. Embracing 36 illustrations. By A. Anderson. Price 10 cents. Address Frank Tousey, publisher, New York.
HOW TO BECOME A CONJURER—Featuring tricks with dominoes, dice, cups and balls, hats, and more. Includes 36 illustrations. By A. Anderson. Price 10 cents. Contact Frank Tousey, publisher, New York.
HOW TO DO MECHANICAL TRICKS—Containing complete instructions for performing over sixty Mechanical Tricks. By A. Anderson. Fully illustrated. Price 10 cents. For sale by all newsdealers, or we will send it by mail, postage free, upon receipt of price. Address Frank Tousey, Publisher, N. Y.
HOW TO DO MECHANICAL TRICKS—Includes detailed instructions for performing over sixty Mechanical Tricks. By A. Anderson. Fully illustrated. Price 10 cents. Available from all newsdealers, or we can send it by mail, postage paid, upon receipt of payment. Address Frank Tousey, Publisher, N. Y.
HOW TO DO SIXTY TRICKS WITH CARDS—Embracing all of the latest and most deceptive card tricks with illustrations. By A. Anderson. Price 10 cents. For sale by all newsdealers, or we will send it to you by mail, postage free, upon receipt of price. Address Frank Tousey, Publisher, N. Y.
HOW TO DO SIXTY TRICKS WITH CARDS—Embracing all of the latest and most deceptive card tricks with illustrations. By A. Anderson. Price 10 cents. For sale by all news dealers, or we will send it to you by mail, postage free, upon receipt of price. Address Frank Tousey, Publisher, N. Y.
HOW TO MAKE ELECTRICAL MACHINES—Containing full directions for making electrical machines, induction coils, dynamos, and many novel toys to be worked by electricity. By R. A. R. Bennett. Fully illustrated. Price 10 cents. For sale by all newsdealers in the United States and Canada, or will be sent to your address, post-paid, on receipt of price. Address Frank Tousey, publisher, New York.
HOW TO MAKE ELECTRICAL MACHINES—Containing full instructions for creating electrical machines, induction coils, dynamos, and a variety of unique toys powered by electricity. By R. A. R. Bennett. Fully illustrated. Price 10 cents. Available at all newsstands in the United States and Canada, or can be sent to your address, prepaid, upon receipt of payment. Contact Frank Tousey, publisher, New York.
HOW TO BECOME A BOWLER—A complete manual of bowling. Containing full instructions for playing all the standard American and German games, together with rules and systems of sporting in use by the principal bowling clubs in the United States. By Bartholomew Batterson. Price 10 cents. For sale by all newsdealers in the United States and Canada, or sent to your address, postage free, on receipt of the price. Address Frank Tousey, publisher, New York.
HOW TO BECOME A BOWLER—A complete guide to bowling. It includes detailed instructions for playing all the standard American and German games, along with the rules and systems used by major bowling clubs in the United States. By Bartholomew Batterson. Price 10 cents. Available at all newsstands in the United States and Canada, or can be sent to your address, postage free, upon receipt of the price. Address: Frank Tousey, publisher, New York.
HOW TO KEEP AND MANAGE PETS—Giving complete information as to the manner and method of raising, keeping, taming, breeding, and managing all kinds of pets; also giving full instructions for making cages, etc. Fully explained by 28 illustrations, making it the most complete book of the kind ever published. Price 10 cents. Address Frank Tousey, publisher, New York.
HOW TO KEEP AND MANAGE PETS—Providing detailed information on how to raise, care for, train, breed, and manage all types of pets; also including comprehensive instructions for building cages, and more. Fully illustrated with 28 images, making it the most complete book of its kind ever published. Price 10 cents. Contact Frank Tousey, publisher, New York.
HOW TO DO ELECTRICAL TRICKS—Containing a large collection of instructive and highly amusing electrical tricks, together with illustrations. By A. Anderson. Price 10 cents. For sale by all newsdealers, or sent, post-paid, upon receipt of the price. Address Frank Tousey, publisher, New York.
HOW TO DO ELECTRICAL TRICKS—Featuring a huge collection of fun and educational electrical tricks, along with illustrations. By A. Anderson. Price 10 cents. Available at all newsstands, or can be sent, post-paid, upon receipt of the price. Contact Frank Tousey, publisher, New York.
HOW TO WRITE LETTERS—A wonderful little book, telling you how to write to your sweetheart, your father, mother, sister, brother, employer; and, in fact, everybody and anybody you wish to write to. Every young man and every young lady in the land should have this book. It is for sale by all newsdealers. Price 10 cents, or sent from this office on receipt of price. Address Frank Tousey, publisher, New York.
HOW TO WRITE LETTERS—A great little book, explaining how to write to your girlfriend, dad, mom, sister, brother, boss; and, honestly, everyone you want to write to. Every young man and young woman in the country should have this book. It’s available at all newsstands. Price: 10 cents, or you can order it from this office upon payment. Address: Frank Tousey, publisher, New York.
HOW TO DO PUZZLES—Containing over 300 interesting puzzles and conundrums with key to same. A complete book. Fully illustrated. By A. Anderson. Price 10 cents. For sale by all newsdealers, or sent, post-paid, upon receipt of the price. Address Frank Tousey, Publisher, New York.
HOW TO DO PUZZLES—Featuring over 300 engaging puzzles and riddles, complete with answers. A comprehensive book. Fully illustrated. By A. Anderson. Price: 10 cents. Available at all newsstands, or can be sent, postage paid, upon receipt of payment. Contact Frank Tousey, Publisher, New York.
HOW TO DO 40 TRICKS WITH CARDS—Containing deceptive Card Tricks as performed by leading conjurers and magicians. Arranged for home amusement. Fully illustrated. Price 10 cents. Address Frank Tousey, publisher, New York.
HOW TO DO 40 TRICKS WITH CARDS—Containing deceptive Card Tricks as performed by top illusionists and magicians. Organized for home entertainment. Fully illustrated. Price 10 cents. Address Frank Tousey, publisher, New York.
HOW TO MAKE A MAGIC LANTERN—Containing a description of the lantern, together with its history and invention. Also full directions for its use and for painting slides. Handsomely illustrated, by John Allen. Price 10 cents. For sale by all newsdealers in the United States and Canada, or will be sent to your address, post-paid, on receipt of price. Address Frank Tousey, publisher, New York.
HOW TO MAKE A MAGIC LANTERN—This guide includes a description of the lantern, along with its history and invention. It also provides complete instructions for using it and painting slides. Beautifully illustrated by John Allen. Price 10 cents. Available from all newsdealers in the United States and Canada, or it can be sent to your address, postage included, upon receipt of payment. Contact Frank Tousey, publisher, New York.
HOW TO BECOME AN ACTOR—Containing complete instructions how to make up for various characters on the stage; together with the duties of the Stage Manager, Prompter, Scenic Artist and Property Man. By a prominent Stage Manager. Price 10 cents. Address Frank Tousey, publisher, N. Y.
HOW TO BECOME AN ACTOR—Featuring complete instructions on how to create different character looks for the stage; along with the responsibilities of the Stage Manager, Prompter, Scenic Artist, and Property Manager. By a well-known Stage Manager. Price 10 cents. Address Frank Tousey, publisher, N. Y.
OUR TEN CENT HAND BOOKS.
OUR 10 CENT HAND BOOKS.
USEFUL, INSTRUCTIVE AND AMUSING.
Helpful, educational, and entertaining.
Containing valuable information on almost every subject, such as Writing, Speaking, Dancing, Cooking; also Rules of Etiquette, The Art of Ventriloquism, Gymnastic Exercises, and The Science of Self-Defense, etc., etc.
Containing valuable information on almost every topic, such as Writing, Speaking, Dancing, Cooking; also Rules of Etiquette, The Art of Ventriloquism, Gymnastic Exercises, and The Science of Self-Defense, etc., etc.
1 Napoleon’s Oraculum and Dream Book.
1 Napoleon’s Oraculum and Dream Book.
2 How to Do Tricks.
2 How to Perform Tricks.
3 How to Flirt.
3 Ways to Flirt.
4 How to Dance.
4 How to Dance.
5 How to Make Love.
5 Ways to Make Love.
6 How to Become an Athlete.
6 How to Become an Athlete.
7 How to Keep Birds.
How to Care for Birds.
8 How to Become a Scientist.
8 How to Become a Scientist.
9 How to Become a Ventriloquist.
9 How to Become a Ventriloquist.
10 How to Box.
10 Boxing Tips.
11 How to Write Love Letters.
11 How to Write Love Letters.
12 How to Write Letters to Ladies.
12 How to Write Letters to Women.
13 How to Do It; or, Book of Etiquette.
13 How to Do It; or, Book of Etiquette.
14 How to Make Candy.
14 How to Make Candy.
15 How to Become Rich.
15 Ways to Get Rich.
16 How to Keep a Window Garden.
16 How to Maintain a Window Garden.
17 How to Dress.
17 How to Style.
18 How to Become Beautiful.
18 Ways to Be Beautiful.
19 Frank Tousey’s U. S. Distance Tables, Pocket Companion and Guide.
19 Frank Tousey’s U.S. Distance Tables, Pocket Companion, and Guide.
20 How to Entertain an Evening Party.
20 How to Host a Great Evening Party.
21 How to Hunt and Fish.
21 How to Hunt and Fish.
22 How to Do Second Sight.
22 How to Develop Second Sight.
23 How to Explain Dreams.
23 How to Interpret Dreams.
24 How to Write Letters to Gentlemen.
24 How to Write Letters to Gentlemen.
25 How to Become a Gymnast.
25 How to Become a Gymnast.
26 How to Row, Sail and Build a Boat.
26 How to Row, Sail, and Build a Boat.
27 How to Recite and Book of Recitations.
27 How to Recite and Book of Recitations.
28 How to Tell Fortunes.
28 How to Read Fortunes.
29 How to Become an Inventor.
29 How to Become an Inventor.
30 How to Cook.
30 Cooking Tips.
31 How to Become a Speaker.
31 How to Become a Speaker.
32 How to Ride a Bicycle.
32 How to Ride a Bicycle.
33 How to Behave.
33 How to Act.
34 How to Fence.
34 How to Fence.
35 How to Play Games.
35 How to Play Games.
36 How to Solve Conundrums.
36 How to Solve Puzzles.
37 How to Keep House.
37 How to Maintain a Home.
38 How to Become Your Own Doctor.
38 How to Be Your Own Doctor.
39 How to Raise Dogs, Poultry, Pigeons and Rabbits.
39 How to Raise Dogs, Chickens, Pigeons, and Rabbits.
40 How to Make and Set Traps.
40 How to Make and Set Traps.
41 The Boys of New York End Men’s Joke Book.
41 The Boys of New York End Men’s Joke Book.
42 The Boys of New York Stump Speaker.
42 The Boys of New York Stump Speaker.
43 How to Become a Magician.
43 How to Become a Magician.
44 How to Write in an Album.
44 How to Write in an Album.
45 The Boys of New York Minstrel Guide and Joke Book.
45 The Boys of New York Minstrel Guide and Joke Book.
46 How to Make and Use Electricity.
46 How to Make and Use Electricity.
47 How to Break, Ride and Drive a Horse.
47 How to Train, Ride, and Drive a Horse.
48 How to Build and Sail Canoes.
48 How to Build and Sail Canoes.
49 How to Debate.
49 How to Debate.
50 How to Stuff Birds and Animals.
50 How to Stuff Birds and Animals.
51 How to Do Tricks with Cards.
51 How to Perform Card Tricks.
52 How to Play Cards.
52 Card Game Instructions.
53 How to Write Letters.
53 How to Write Emails.
54 How to Keep and Manage Pets.
54 How to Keep and Manage Pets.
55 How to Collect Stamps and Coins.
55 How to Collect Stamps and Coins.
56 How to Become an Engineer.
56 How to Become an Engineer.
57 How to Make Musical Instruments.
57 How to Make Musical Instruments.
58 How to Become a Detective.
58 How to Become a Detective.
59 How to Make a Magic Lantern.
59 How to Make a Magic Lantern.
60 How to Become a Photographer.
60 How to Become a Photographer.
61 How to Become a Bowler.
61 How to Become a Bowler.
62 How to Become a West Point Military Cadet.
62 How to Become a West Point Military Cadet.
63 How to Become a Naval Cadet.
63 How to Become a Naval Cadet.
64 How to Make Electrical Machines.
64 How to Make Electrical Machines.
65 Muldoon’s Jokes.
65 Muldoon’s Jokes.
66 How to Do Puzzles.
66 How to Solve Puzzles.
67 How to Do Electrical Tricks.
67 How to Perform Electrical Tricks.
68 How to Do Chemical Tricks.
68 How to Perform Chemical Tricks.
69 How to Do Sleight of Hand.
69 How to Do Sleight of Hand.
70 How to Make Magic Toys.
70 How to Create Magic Toys.
71 How to Do Mechanical Tricks.
71 How to Perform Mechanical Tricks.
72 How to Do Sixty Tricks with Cards.
72 How to Do Sixty Card Tricks.
73 How to Do Tricks with Numbers.
73 How to Do Tricks with Numbers.
74 How to Write Letters Correctly.
74 How to Write Letters Correctly.
75 How to Become a Conjuror.
75 How to Become a Magician.
76 How to Tell Fortunes by the Hand.
76 How to Tell Fortunes by the Hand.
77 How to Do Forty Tricks with Cards.
77 How to Do Forty Tricks with Cards.
78 How to Do the Black Art.
78 How to Practice the Black Art.
79 How to Become an Actor.
79 How to Become an Actor.
80 Gus Williams’ Joke Book.
80 Gus Williams' Joke Book.
All the above books are for sale by newsdealers throughout the United States and Canada, or they will be sent, post-paid, to your address, on receipt of 10c. each.
All of the books listed above are for sale at newsstands across the United States and Canada, or they can be sent to your address, postage paid, upon receiving 10 cents each.
Send Your Name and Address for Our Latest Illustrated Catalogue.
Send us your name and address for our latest illustrated catalog.
FRANK TOUSEY, Publisher,
24 UNION SQUARE,
NEW YORK.
FRANK TOUSEY, Publisher,
24 Union Square,
NYC.
Transcriber’s Note:
Illustrations have been moved to paragraph breaks near where they are mentioned.
Illustrations have been relocated to paragraph breaks close to where they are referenced.
Punctuation has been made consistent.
Punctuation is now consistent.
Variations in spelling and hyphenation were retained as they appear in the original publication, except that obvious typos have been corrected.
Variations in spelling and hyphenation were kept as they appear in the original publication, except that obvious typos have been corrected.
Changes have been made as follows:
Changes have been made as follows:
Download ePUB
If you like this ebook, consider a donation!