This is a modern-English version of Drawing in charcoal and crayon for the use of students and schools, originally written by Fowler, Frank.
It has been thoroughly updated, including changes to sentence structure, words, spelling,
and grammar—to ensure clarity for contemporary readers, while preserving the original spirit and nuance. If
you click on a paragraph, you will see the original text that we modified, and you can toggle between the two versions.
Scroll to the bottom of this page and you will find a free ePUB download link for this book.
Transcriber’s Notes
Obvious typographical errors have been silently corrected. Variations in hyphenation have been standardised but all other spelling and punctuation remains unchanged.
Obvious typos have been silently corrected. Variations in hyphenation have been standardized, but all other spelling and punctuation remains unchanged.
The volume of illustrations referred to in the book is not available.
The illustrations mentioned in the book are not available.
DRAWING IN
CHARCOAL AND CRAYON
FOR THE USE OF
STUDENTS AND SCHOOLS
BY
FRANK FOWLER
AUTHOR OF “OIL PAINTING,” “A HAND-BOOK,”
ETC., ETC.
BY
FRANK FOWLER
AUTHOR OF “OIL PAINTING,” “A HAND-BOOK,”
ETC., ETC.
CASSELL PUBLISHING COMPANY
104 & 106 Fourth Avenue, New York
CASSELL PUBLISHING COMPANY
104 & 106 Fourth Avenue, New York
Copyright
1885
By O. M. DUNHAM
Copyright
1885
By O. M. DUNHAM
CONTENTS.
| PART FIRST. | |
| CHAPTER I. | |
| Charcoal and crayon art. | 1 |
| CHAPTER II. | |
| Outfit Required for Charcoal and Crayon Drawing. | 4 |
| CHAPTER III. | |
| Basic Practice. | 25 |
| PART SECOND. | |
| CHAPTER IV. | |
| Work Style. | 36 |
| CHAPTER V. | |
| Measurement, Actual and Comparative. | 50 |
| CHAPTER VI. | |
| Crayon portraits; hair; drapery; backgrounds. | 58 |
| CHAPTER VII. | |
| Charcoal and Crayon Drawing with Points; Landscapes; Proportions, etc. | 74 |
| APPENDIX. | |
| Plates Overview. | 82 |
PREFATORY NOTE.
This little volume, with accompanying plates, is designed to prepare students for the interesting study of drawing from life. The general demand for a work of this kind is the occasion of its appearance.
This small book, along with the included illustrations, is meant to get students ready for the engaging exploration of drawing from real life. The overall need for a resource like this is the reason it has been made available.
[Pg 1]
[Pg 1]
DRAWING IN CHARCOAL AND CRAYON.
Charcoal and crayon drawing.
CHAPTER I.
CHARCOAL AND CRAYON DRAWING.
In learning to draw, charcoal is the most available material that can be used, as, with it, large and striking effects are so easily and quickly produced, while it is also adapted to the most careful work, and may be carried on to any degree of finish. Another quality which renders charcoal especially of value as a medium for beginners in drawing is that it is so easily erased.
In learning to draw, charcoal is the most accessible material you can use, as it allows for large and bold effects to be created quickly and easily, while also being suitable for detailed work that can be refined to any level of finish. Another benefit that makes charcoal particularly valuable for beginners is that it can be easily erased.
Charcoal is used for drawing from the cast and from the human figure in all the large art schools of Europe as well as in[Pg 2] our own country, and is especially adapted to sketching from nature, as by its use most charming landscape and marine effects may be obtained.
Charcoal is used for drawing from casts and the human figure in all the major art schools in Europe and in our own country. It's especially suited for sketching from nature since it can create beautiful landscape and marine effects.
TWO DIFFERENT METHODS.
There are two methods of working in charcoal—one, in which the charcoal point is used alone, the shading being put in with lines which are not blended, no stump, or rubbing together of any kind being allowed.
There are two ways to work with charcoal—one method uses the charcoal point on its own, with shading added using lines that are not blended, without any stumping or rubbing of any kind.
This style of drawing is principally used in illustrating, as it is more easily reproduced than those in which the stump is used. Full details of working in this manner will be given later.
This style of drawing is mainly used in illustrations, as it can be reproduced more easily than those that use a stump. Detailed instructions on working in this way will be provided later.
The other method is that in which the charcoal is blended with a stump, no lines being visible in the modeling.
The other method involves mixing the charcoal with a stump, resulting in no visible lines in the shading.
This manner of drawing is that most generally employed in art schools, and is susceptible of higher finish than the other.
This way of drawing is the most commonly used in art schools and can be refined to a higher level than the others.
It is also in this way that charcoal and[Pg 3] crayon portraits are managed, such drawings being generally finished with crayon, and the two materials worked together. This subject also will be treated at length further on.
It’s also how charcoal and [Pg 3] crayon portraits are created, as these drawings are usually completed with crayon and the two materials are combined. This topic will also be discussed in detail later on.
As we are writing for the benefit of those who have no knowledge whatever of charcoal drawing, we will begin at the very beginning, and shall endeavor to omit nothing that can be of practical use to the student.
As we’re writing for those who have no knowledge of charcoal drawing, we’ll start from the very beginning and aim to include everything that can be practically useful for the student.
[Pg 4]
[Pg 4]
CHAPTER II.
OUTFIT NECESSARY FOR CHARCOAL AND CRAYON DRAWING.
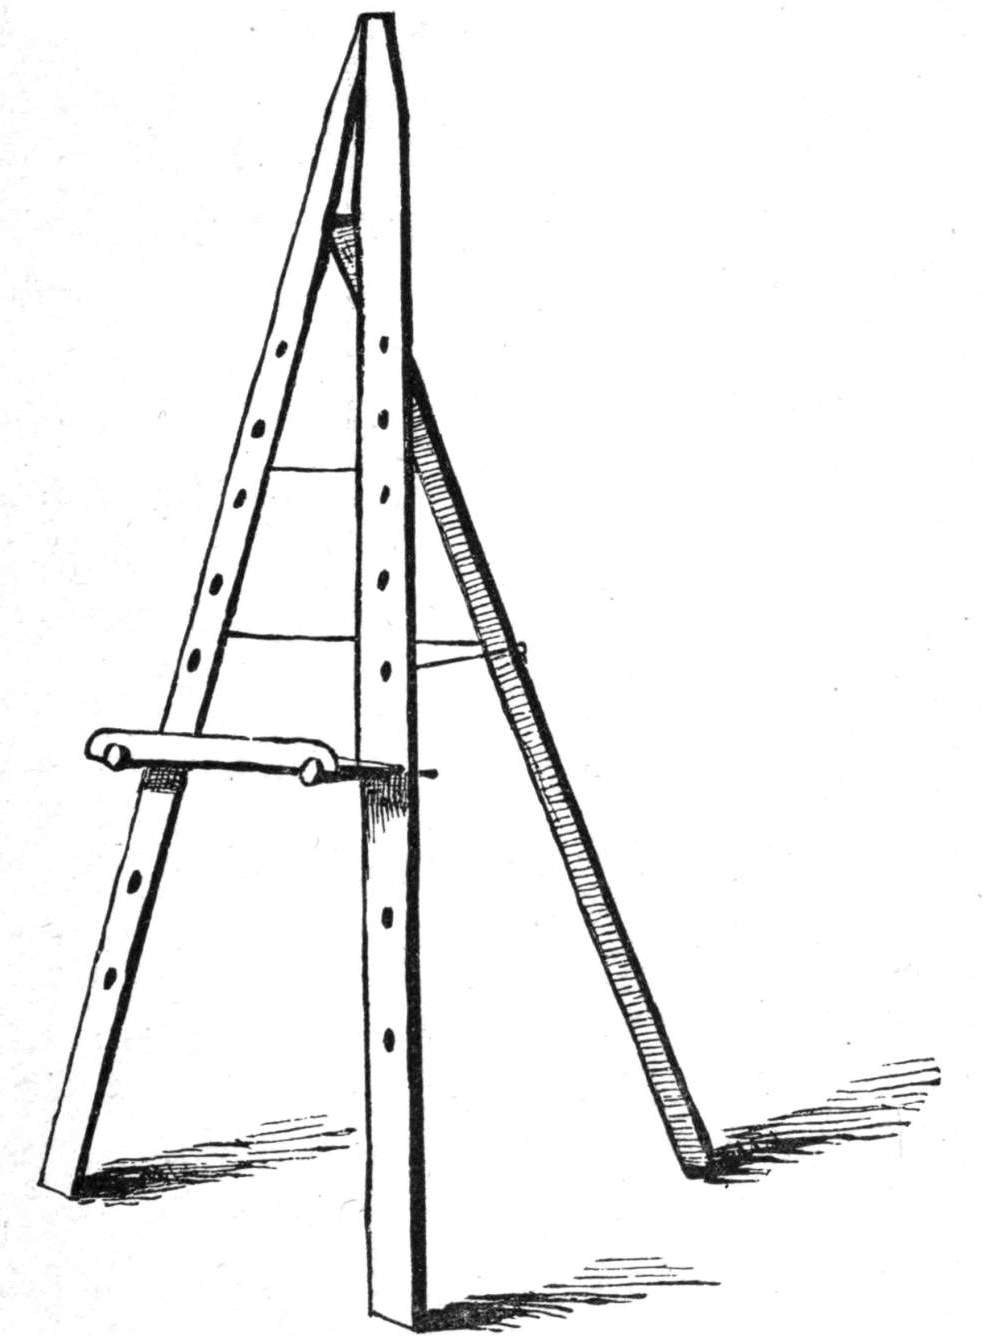
The first thing to be provided is an easel, which is used now entirely for drawing, it being considered much better practice to work in an upright position than in the old-fashioned way of leaning over a table.
The first thing to provide is an easel, which is now solely used for drawing, as it's considered much better practice to work in an upright position rather than the old-fashioned method of leaning over a table.
This easel may be of the simplest character, and is made of three straight bars of pine wood jointed so as to stand upright, with holes perforated through two of the bars about two or three inches apart. Through these holes pegs are stuck upon which to hold a narrow wooden tray. Upon this the stretcher, drawing-board, or portfolio is placed.
This easel might be pretty basic, made from three straight pine wood bars joined together to stand upright, with holes drilled through two of the bars about two or three inches apart. Pegs are inserted into these holes to support a narrow wooden tray, on which the stretcher, drawing board, or portfolio rests.
DRAWING-BOARD.
This board is made from any light wood,[Pg 5] and should measure about 20×24 inches square, and be as thin as it can be made without warping.
This board is made from any light wood,[Pg 5] and should measure around 20×24 inches square, and be as thin as possible without warping.
[Pg 6]
[Pg 6]
In place of the drawing-board, many artists prefer to use a large pasteboard portfolio made with covers stiff enough to serve as a foundation in drawing, while its convenience as a receptacle for the reserve sheets of paper and finished work is obvious.
Instead of a drawing board, many artists prefer using a large portfolio made of stiff enough covers to act as a base for drawing, and its convenience for holding extra sheets of paper and completed work is clear.
The portfolio which is now most in use, is generally covered with smooth mottled paper outside, and should be large enough to hold without folding the regular sheets of charcoal paper; 20×24 inches will be sufficient for this.
The portfolio that's currently most popular is usually made of smooth, mottled paper on the outside and should be big enough to hold regular sheets of charcoal paper without folding them; 20×24 inches will work well for this.
THE PAPER.
There are a great many varieties of charcoal and crayon paper, some smooth, some rough. For ordinary purposes, such as making studies and life drawings, the rough French charcoal paper is the best. That used in the French schools is of two kinds; the roughest is called the “Michelet” paper, and the other is known as “Lalanne.” They are, however, very similar in texture, and either one will serve[Pg 7] the purpose. These come in sheets of uniform sizes, costing from three to six cents each.
There are many types of charcoal and crayon paper, some smooth and some rough. For everyday use, like making studies and life drawings, the rough French charcoal paper is the best choice. The kind used in French schools comes in two types: the roughest is called “Michelet” paper, and the other is known as “Lalanne.” However, they are very similar in texture, and either one will work for the purpose. These are available in sheets of standard sizes, costing between three to six cents each.[Pg 7]
For more careful drawings, such as finely finished portraits in charcoal and crayon, a more expensive paper is to be preferred. This comes in much larger sheets and should be stretched before using.
For more detailed drawings, like finely finished portraits in charcoal and crayon, it's better to choose a higher-quality paper. This paper comes in much larger sheets and should be stretched before use.
Whatman’s rough crayon paper is among the best for this purpose. In all cases, both for studies and finished portraits, the white paper, generally a yellow-white, being preferable to blue-white.
Whatman’s rough crayon paper is one of the best options for this purpose. In all situations, whether for sketches or final portraits, the white paper, typically a yellow-white, is preferred over blue-white.
HOW TO STRETCH PAPER.
Paper is stretched and mounted for this work in the following manner: A simple frame of wood is made an inch or two wide and three-quarters of an inch or more in thickness, according to the size of the drawing to be made. This is covered with cotton cloth stretched as tight as possible and tacked all along the[Pg 8] four sides. The cloth is turned over and tacked on the outside of the stretcher, not on the face of it, which should present a perfectly smooth, flat surface.
Paper is prepared and mounted for this work in this way: A simple wooden frame is made about an inch or two wide and three-quarters of an inch or thicker, depending on the size of the drawing. This frame is covered with cotton cloth stretched as tightly as possible and tacked along all four sides. The cloth is wrapped around and tacked on the outer edge of the stretcher, not on the front, which should have a completely smooth, flat surface.[Pg 8]
The paper having been cut the proper size, that is, large enough to turn over nearly an inch all around, is dampened on the wrong side. To do this take a clean cloth dipped in cold water, lay the paper flat upon a table and pass the cloth rapidly all over the surface, wetting it evenly.
The paper has been cut to the right size, which means it's large enough to fold over nearly an inch on all sides. It's then dampened on the back side. To do this, take a clean cloth soaked in cold water, lay the paper flat on a table, and quickly wipe the cloth over the surface to wet it evenly.
Have ready some good flour paste and put this all around the edge of the paper for about an inch. Now begin to spread the paper while still damp upon the cloth-covered stretcher, starting at the bottom and working upward, carefully smoothing out with the hands all creases or air bubbles. Turn over and press down the edges of the paper which have been covered with the paste, holding them till they stick to the cloth, and cut a V-shaped piece from each corner of the paper, so that it will fold over neatly.
Have some good flour paste ready and put this all around the edge of the paper for about an inch. Now start to spread the damp paper onto the cloth-covered stretcher, beginning at the bottom and working your way up, carefully smoothing out any creases or air bubbles with your hands. Flip it over and press down the edges of the paper that have the paste on them, holding them until they stick to the cloth, and cut a V-shaped piece from each corner of the paper so that it folds over neatly.
[Pg 9]
[Pg 9]
This takes time and experience to do well, but is worth the trouble, for crayon portraits especially.
This takes time and experience to do well, but it's worth the effort, especially for crayon portraits.
For ordinary studies and drawings, the Michelet or Lalanne paper fastened to the portfolio or drawing-board with thumb tacks is quite sufficient.
For regular studies and drawings, the Michelet or Lalanne paper attached to the portfolio or drawing board with thumbtacks is totally fine.
CHARCOAL.
There are many different kinds of charcoal offered by dealers. All that is necessary, however, is a medium quality of imported charcoal, such as the Fusains Venitians, costing 30 cts. a box of fifty sticks. Finer and more expensive kinds are the Conte and Rouget charcoal.
There are many different types of charcoal available from suppliers. However, all you really need is a decent quality of imported charcoal, like the Fusains Venitians, which cost 30 cents for a box of fifty sticks. The more premium options are the Conte and Rouget charcoal.
CRAYON.
Among the various manufactures of crayons that most generally preferred by artists is the French crayon Conté. This comes in several numbers, and is to be had in two forms. First, the wooden pencils, which are very convenient, and again, the short sticks of black crayon,[Pg 10] which are sold by the dozen. These are much cheaper than the pencils, and are fastened in a holder while using. The Conté crayon No. 2 is sufficient for all purposes, therefore it is unnecessary to have the several different numbers so often recommended.
Among the various types of crayons that artists commonly prefer is the French Conté crayon. It comes in several options and is available in two forms. First, there are the wooden pencils, which are very convenient, and then there are the short sticks of black crayon, [Pg 10] which are sold by the dozen. These are much cheaper than the pencils and can be held in a holder while in use. The Conté crayon No. 2 works well for all purposes, so it's not necessary to have all the different numbers that are often recommended.
Another kind of crayon is also used by some artists in addition to the stick crayon. This is a fine, black, powdered crayon, called the “sauce crayon,” and comes put up in little tin cases. It is very useful when large masses of dark are necessary, and is rubbed on with a stump, while the stick crayons and charcoal sticks are sharpened to a point before using.
Another type of crayon is also used by some artists besides the stick crayon. This is a fine, black, powdered crayon called the “sauce crayon,” and it comes in small tin cases. It's very useful when large areas of darkness are needed and is applied with a stump, while the stick crayons and charcoal sticks are sharpened to a point before using.
Stumps are made variously of leather, chamois-skin and paper. The most useful in charcoal and crayon drawing are the paper stumps, which will be found to answer every purpose. The paper stumps come in two forms; first, the gray, rough paper stumps with points on both ends; these are made in various sizes, from the smallest, which measures only about one[Pg 11] fourth of an inch in diameter, up to those measuring an inch and more.
Stumps can be made from leather, chamois skin, and paper. The most practical for charcoal and crayon drawing are the paper stumps, which work well for every need. Paper stumps come in two types: first, the gray, rough paper stumps that have pointed ends on both sides; these are available in different sizes, ranging from the smallest, which is roughly a quarter of an inch in diameter, to those that are an inch or more.
[Pg 12]
[Pg 12]
The other form of paper stump, known as the tortillon, is made of strips of paper rolled to a point like spills, and sold in bundles of a dozen for a few cents. Some artists prefer these, but for general purposes, the double-pointed paper stump is the best. About six of these are necessary: two large, two medium, and two very small ones; for it is always better to have a clean duplicate of each size.
The other type of paper stump, called a tortillon, is made from strips of paper rolled to a point like thin spirals and sold in packs of a dozen for just a few cents. Some artists prefer these, but for general use, the double-pointed paper stump is the best choice. You typically need about six of these: two large, two medium, and two very small ones; it’s always better to have a clean duplicate of each size.
BREAD.
A supply of the soft part of home-made, if possible, or good ordinary baker’s bread, one day old, is indispensable. This should not have any butter, or even milk, in its composition, otherwise it will grease the paper, which naturally should be avoided, as grease spots are most difficult to overcome.
A supply of the soft part of homemade bread, if possible, or good ordinary day-old baker’s bread, is essential. This should not contain any butter or even milk, as it will grease the paper, which should definitely be avoided since grease spots are really hard to get rid of.
The bread is used for rubbing out charcoal or crayon, erasing mistakes, and for taking out lights from a mass of dark. The soft crumb is rolled between the fingers until a point is formed, and then[Pg 13] applied to the paper. It is surprising what brilliant effects can be obtained by means of this simple process; its full resources can only be understood by practice.
The bread is used to wipe away charcoal or crayon, erase mistakes, and lift highlights from a dark area. The soft center is rolled between the fingers until it comes to a point, and then[Pg 13] applied to the paper. It's surprising what vibrant effects can be achieved with this simple method; you'll really grasp its full potential only through practice.
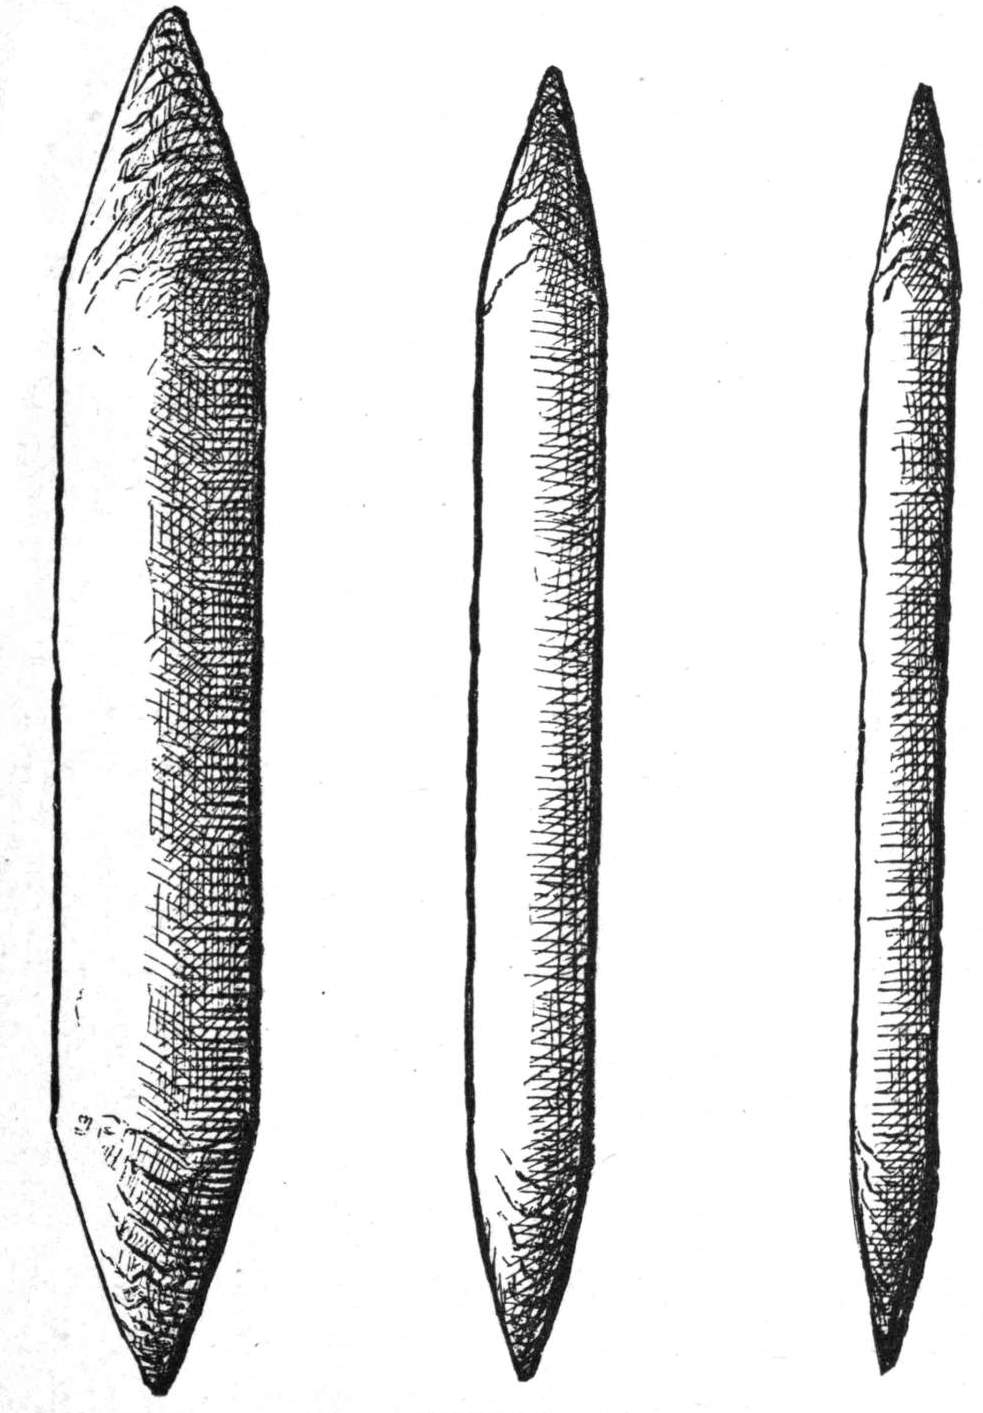
THE RUBBER STUMP.
This consists of a long, narrow bar of fine artist’s rubber, ground to a point on each end. It is used for rubbing out small spots in places where the bread can not be so easily managed, and where a firmer point is needed.
This is a long, narrow piece of fine artist’s rubber, sharpened to a point on each end. It’s used for erasing small spots in areas where the bread can't be easily controlled, and where a firmer point is necessary.
It is also useful in modeling fine details of the features, and in places where, the surface of the paper being worn by rubbing, the bread will not act satisfactorily.
It is also helpful in capturing fine details of the features, and in areas where the surface of the paper is worn down from rubbing, the bread won't work as well.
These cost from five to ten cents each, according to size.
These cost between five and ten cents each, depending on the size.
RAGS.
A fine, soft cotton rag is one of the most important adjuncts to our outfit, as it is impossible to work without one. The rag is used sometimes to dust off charcoal[Pg 14] from the paper, and if the charcoal has not been very heavily used, the rag is often sufficient, neither bread nor rubber being necessary.
A good, soft cotton rag is one of the most crucial parts of our setup, since we can't work without one. We use the rag to wipe off charcoal[Pg 14] from the paper, and if we haven't used too much charcoal, the rag is often enough, without needing bread or rubber.
A rag is also useful when too much charcoal or crayon has been rubbed on a tone.
A rag is also helpful when too much charcoal or crayon has been applied to a tone.
Let us say, for instance, a shadow appears too black. A soft rag is passed gently over the surface, taking care not to rub too hard, and the superfluous charcoal or crayon will come off, leaving a beautiful soft tone of much lighter quality behind.
Let’s say, for example, a shadow looks too dark. A soft cloth is lightly wiped over the surface, being careful not to press too hard, and the extra charcoal or crayon will come off, revealing a beautiful soft tone that’s much lighter.
This tone can of course be darkened somewhat, or worked over in any manner desired.
This tone can definitely be made darker or adjusted in any way you want.
The rag is often used in sketching landscapes, to spread a smooth, even tint for the sky. Many artists prefer it to a stump for this purpose. A fine, soft cotton rag is rolled in a long, smooth roll, and applied lightly to the surface of the paper.
The rag is often used in sketching landscapes to apply a smooth, even color for the sky. Many artists prefer it over a stump for this purpose. A fine, soft cotton rag is rolled into a long, smooth shape and gently applied to the surface of the paper.
The charcoal may be powdered in such[Pg 15] a case if preferred, or for crayon drawing the “sauce crayon” is used.
The charcoal can be powdered in that case if you prefer, or for crayon drawing, the "sauce crayon" is used.
TO “FIX” DRAWINGS.
Charcoal will of course rub off, and drawings become smeared and defaced if left unprotected. For that reason it is customary to “fix” the drawing by the application of some preparation to its surface.
Charcoal will definitely smudge and drawings will get ruined if not protected. Because of this, it's common practice to "fix" the drawing by applying some kind of preparation to its surface.
This should be done with much care, and only the very best materials should be used for this purpose. Amateurs and students sometimes endeavor to manufacture fixative for themselves out of shellac and alcohol. This may succeed in fixing the drawing, but will be very liable to turn the paper yellow in time. Artists, therefore, prefer to buy an imported fixative, which is made by a reliable manufacturer. That most generally in use, and which we have found by experience to be in every way satisfactory, is the Fixatif Rouget, which comes in good-sized glass bottles, costing at retail fifty cents each.
This should be done very carefully, and only the best materials should be used for this purpose. Amateurs and students sometimes try to make their own fixative using shellac and alcohol. This might work to set the drawing, but it will likely cause the paper to turn yellow over time. Therefore, artists prefer to buy an imported fixative made by a trusted manufacturer. The one most commonly used, and which we have found to be satisfactory in every way, is the Fixatif Rouget. It comes in decent-sized glass bottles that retail for fifty cents each.
[Pg 16]
[Pg 16]
There are two methods of fixing drawings. First, that in which the fixative is applied to the back of the drawing. This is preferred by some artists; and the French students, who are only anxious to preserve their drawings, without regard to the changing of color in the paper, use milk, with which they wash over the back of the drawing.
There are two ways to fix drawings. First, there's the method where the fixative is applied to the back of the drawing. Some artists prefer this; and French students, who just want to preserve their drawings without worrying about the paper's color changing, use milk to wash over the back of the drawing.
In cases where a large design or cartoon is made in charcoal for temporary use, this way will answer perfectly, being very much less expensive than the other. The fixative Meusnier, which is imported by all dealers, is also applied to the back of the paper with a large brush.
In instances where a large design or cartoon is created in charcoal for temporary use, this method works perfectly and is much cheaper than the alternative. The fixative Meusnier, which is available from all suppliers, is also applied to the back of the paper with a large brush.
The other method, and that generally preferred, is to apply the fixative to the front or surface of the drawing.
The other method, which is usually preferred, is to apply the fixative to the front or surface of the drawing.
This process should of course be managed with care, as too much fixative will cause the charcoal to run down in streaks, while too little will cause it to come off in spots.
This process should definitely be handled carefully, as too much fixative will make the charcoal run down in streaks, while too little will make it come off in spots.
The fixative for applying to the surface[Pg 17] of the drawing is sprayed through a glass atomizer by blowing through one tube while the other rests in the bottle containing the liquid.
The fixative for applying to the surface[Pg 17] of the drawing is sprayed using a glass atomizer by blowing into one tube while the other stays in the bottle with the liquid.
These atomizers are now sold by all art dealers, and may be had from the simplest and most inexpensive kind up to those represented by quite a costly apparatus. The cheapest consist of two small tubes of glass, pointed at one end and straight at the other. These are connected by two bands of metal, which in turn are fastened together by a small hinge or pivot.
These atomizers are now available from all art dealers and can be found in a range from the simplest and cheapest versions to more expensive, elaborate ones. The least expensive models consist of two small glass tubes; one end is pointed while the other is straight. These tubes are joined by two metal bands, which are held together by a small hinge or pivot.
This is so arranged that the two tubes of glass meet at a right angle, the small pointed ends coming in contact, but so as to leave both orifices open.
This is arranged so that the two glass tubes meet at a right angle, with the small pointed ends making contact, but still keeping both openings clear.
One end, as already mentioned, is now placed in the fixative, while through the other the breath is blown. This causes the liquid to mount in the lower tube and dissolve in a cloud of spray which is so light as not to dislodge the delicate particles of the charcoal and yet will[Pg 18] attach them firmly to the paper, so that ordinary rubbing will not efface the drawing.
One end, as mentioned earlier, is now put in the fixative, while breath is blown through the other end. This makes the liquid rise in the lower tube and dissolve in a light cloud of spray that doesn't disturb the delicate charcoal particles but still attaches them securely to the paper, so that regular rubbing won't erase the drawing. [Pg 18]
Great care should be taken in blowing through an atomizer to make the breath as steady as possible, avoiding short, unequal puffs. The atomizer must not be held too near to allow the particles to vaporize sufficiently, or else the fixative will run down in streams and ruin the drawing. Again, if held too far off, it will vaporize too much, and will fail to fix the charcoal at all.
Great care should be taken when using an atomizer to make your breathing as steady as possible, avoiding short, uneven puffs. The atomizer shouldn't be held too close, or the particles won’t vaporize enough, causing the fixative to run down in streams and ruin the drawing. If it's held too far away, it will vaporize too much and won't fix the charcoal at all.
The more expensive vaporizers, while conducted on the same principle, are supplied with air from one or sometimes two rubber globes or balls, which have the advantage of transmitting the air in a regular stream, and one is thus saved the fatigue of blowing with the mouth, which, in case of a large drawing, becomes very tiresome.
The pricier vaporizers, though operating on the same principle, come with one or sometimes two rubber balloons that supply air. This setup allows for a steady airflow, so you won't have to tire yourself out by blowing with your mouth, which can get exhausting during a large draw.
These atomizers are generally made with metal tubes, which will become clogged and useless unless washed out after[Pg 19] using each time, with warm water. The simple glass atomizers must also be kept clean in this way, for they are very easily broken if a pin is used to clean the openings, and the slightest break at the joints renders them useless.
These atomizers are usually made of metal tubes, which will get clogged and useless unless rinsed out with warm water after each use.[Pg 19] The simple glass atomizers also need to be kept clean this way, as they can easily break if you use a pin to clean the openings, and even a tiny break at the joints makes them useless.
OUTFIT FOR SKETCHING.
Charcoal is used by artists for sketching out of doors in preference to any other material, as by its means such quick results are obtained and large effects produced with comparative ease.
Charcoal is favored by artists for outdoor sketching over any other material because it allows for quick results and creates large effects with relative ease.
As one never knows how long a tramp will be necessary before the proper subject or view appears, it is well to make every thing as compact as possible.
As you never know how long it will take to find the right subject or view, it’s a good idea to keep everything as compact as possible.
A small sketching easel which can be reduced to a thin bundle of sticks is considered indispensable by some, but as this is rather awkward to carry, most artists prefer a block.
A small sketching easel that can be folded down into a thin bundle of sticks is seen as essential by some, but since it's pretty awkward to carry, most artists prefer a pad of paper.
THE BLOCK, OR PAD.
This consists of a number of sheets of[Pg 20] charcoal paper, cut exactly the same size, laid together and pressed so as to greatly reduce the bulk of the paper in its ordinary shape. These form a block or table of sufficient substance and firmness to be held comfortably upon the knees while sketching.
This is made up of several sheets of [Pg 20] charcoal paper, all cut to the same size, stacked together and pressed to significantly lessen the thickness of the paper in its usual form. These create a block or pad that is sturdy enough to be comfortably held on your lap while sketching.
The upper leaf is used for the drawing, and is then loosened with a penknife passed around the edges, which are held together with a band of paper. This leaf is then easily detached from the block, and being fixed is laid aside while another drawing is commenced on the clean sheet exposed on the top of the block.
The top sheet is used for the drawing and is then loosened with a penknife along the edges, which are held together with a paper band. This sheet is then easily removed from the block and, once secured, set aside while another drawing starts on the clean sheet placed on top of the block.
These blocks can be bought already prepared at any good art dealers at reasonable prices, which vary according to the size and quality of the paper.
These blocks can be purchased ready-made at any decent art supply store at fair prices, which fluctuate based on the size and quality of the paper.
A block made of ordinary French charcoal paper measuring 4½×6 inches costs at retail, 25 cents. A small block like this is only good for pocket sketches and notes. A more useful size is 6×9, which may be obtained for 35 cents.
A pad made of regular French charcoal paper measuring 4½×6 inches sells for 25 cents. A small pad like this is only suitable for quick sketches and notes. A more useful size is 6×9, which can be bought for 35 cents.
[Pg 21]
[Pg 21]
A still larger one, measuring 10×14, can be procured for 70 cents. Any thing beyond this must be made to order, and will in that case be more expensive in proportion.
A larger one, measuring 10×14, can be bought for 70 cents. Anything beyond this size has to be custom made, and that will be more expensive accordingly.
A small camp stool is necessary to the sketching outfit, and this should be made as light as possible. These are made in various shapes, so as to fold up as tightly as possible, and are provided by all dealers at from fifty cents up.
A small camp stool is essential for a sketching kit, and it should be as lightweight as possible. These come in different shapes to fold up as compactly as they can, and you can find them from all retailers starting at fifty cents.
Some are even to be found combined with the sketching easel. These are very convenient, being made in so compact a form as to occupy very little more space than either an easel or camp stool separately.
Some are even found combined with the sketching easel. These are really convenient, designed in such a compact way that they take up only a little more space than either an easel or a camp stool alone.
Such an apparatus costs $5.50 at retail. The small, light folding easel for sketching, which is only 4½ feet high, costs $2.50, while a stool which stands upon three legs when open and folds into the shape of a thick cane can be bought for $1.00.
Such a device costs $5.50 at retail. The small, lightweight folding easel for sketching, which is just 4½ feet tall, costs $2.50, while a stool that opens up on three legs and folds into a thick cane shape is available for $1.00.
[Pg 22]
[Pg 22]
THE UMBRELLA.
A sketch can not be truthful to nature and carefully studied, with the sun shining in one’s eyes or upon the paper; it is therefore well to be provided with an umbrella.
A sketch can't accurately represent nature when the sun is shining in your eyes or on the paper, so it's a good idea to have an umbrella handy.
The sketching umbrella is generally of creamy white or very light gray cotton. It is so constructed as to be separated from the long stick upon which it is arranged when in use, this stick itself being divided into two or more parts, according to its length. These are arranged to fit into each other firmly, the lower end terminating in a long, sharp iron point which is to be planted in the ground.
The sketching umbrella is usually made of creamy white or very light gray cotton. It's designed to be removable from the long stick it sits on when in use, and this stick is divided into two or more sections depending on its length. These sections fit together securely, with the lower end ending in a long, sharp iron point meant to be stuck into the ground.
The umbrella itself is furnished with a rather short handle, and is attached to the long staff by a movable screw joint which permits of its being arranged at any angle necessary to protect the sketcher from the sun.
The umbrella has a short handle and is connected to the long staff by a adjustable screw joint that allows it to be positioned at any angle needed to shield the sketcher from the sun.
The whole outfit complete with a waterproof gingham umbrella costs $8.00.
The entire outfit, along with a waterproof gingham umbrella, costs $8.00.
[Pg 23]
[Pg 23]
The long folding stick is sold separately. This is 6 ft. high with an adjustable joint to which any ordinary umbrella can be fastened. These cost about $3.00.
The long folding stick is sold separately. It stands 6 feet tall and has an adjustable joint that can attach to any regular umbrella. These cost around $3.00.
A long and narrow tin box with compartments completes the outfit. This holds the charcoal, crayon, stumps, bread, rag and rubber. The charcoal and crayon must always be kept shut up in their separate compartments, or failing that, in respective boxes, as, if allowed to knock around loosely in the box, they will soil the stumps, rubber and rags.
A long and narrow tin box with sections finishes off the set. It holds the charcoal, crayon, blending stumps, bread, cloth, and eraser. The charcoal and crayon should always be kept in their own separate sections, or at least in different containers, because if they're left to move around loosely in the box, they'll dirty the stumps, eraser, and cloth.
The paper generally used in sketching blocks is the ordinary grade of French charcoal paper with a rough surface already mentioned. This paper comes in a variety of tints, the most popular being the cream-white and the gray. The white paper is generally preferred for serious studies involving careful drawing and correctness of value.
The paper commonly used for sketching blocks is regular French charcoal paper with a rough texture, as previously mentioned. This paper is available in various shades, with cream-white and gray being the most popular. The white paper is usually favored for serious studies that require careful drawing and accurate values.
Some artists, however, prefer to use gray or light brown paper in sketching, as if one is skillful a very effective result[Pg 24] may be obtained with little labor by using the local tone of the paper for the half tints, quickly rubbing in the shadow with charcoal or crayon, both being sometimes used.
Some artists, however, prefer to sketch on gray or light brown paper, as if being skilled can yield a very effective result with minimal effort. They use the paper's natural tone for the mid-tones, quickly blending in shadows with charcoal or crayon, often using both. [Pg 24]
The high lights are then cleverly touched in with white chalk or pastel. Chinese white water-color paint is sometimes substituted for the chalk in putting in such lights. It has the advantage of being more permanent in one way as the chalk rubs off, but in the course of time this white paint so used has a tendency to turn yellow, especially if the sketch is shut up in a book or kept from the air.
The highlights are then skillfully applied with white chalk or pastel. Sometimes, Chinese white watercolor paint is used instead of chalk for these highlights. This paint is more durable in some ways since the chalk can rub off, but over time, this white paint tends to yellow, especially if the sketch is stored in a book or kept away from the air.
On the other hand, the white chalk will turn yellow if fixed, so that the high lights must not be put in the sketch until it is all finished and fixed, which is of course a disadvantage to the artist who wishes to study the relations of his tones as he proceeds. This method will be explained at length later on.
On the other hand, white chalk will turn yellow if it's fixed, so the highlights shouldn't be added to the sketch until everything is finished and fixed. This is a drawback for the artist who wants to study the relationships of tones as they work. This method will be explained in detail later on.
[Pg 25]
[Pg 25]
CHAPTER III.
ELEMENTARY PRACTICE.
To those who have never had any experience whatever in drawing, it is best to begin with straight lines. This is especially necessary in the case of children, who must first be taught to control the hand before proceeding further.
To those who have never had any experience in drawing, it's best to start with straight lines. This is especially important for children, who need to learn to control their hand before moving on to anything else.
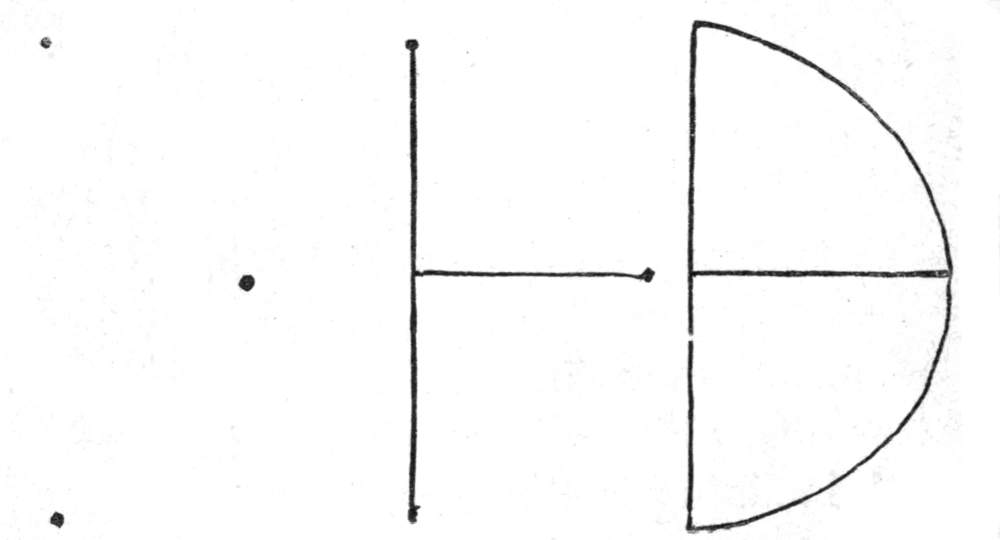
The next step is to draw curved lines representing half of a circle.
The next step is to draw curved lines that represent half of a circle.
From this proceed to draw angles, circles, squares, and other such simple forms in outline, until the muscles of the hand have learned to obey the will.
From this, start drawing angles, circles, squares, and other simple shapes in outline until your hand has learned to follow your commands.
The system we wish to teach is first to begin in this way, then to advance gradually by copying some simple drawings, executed in the modern method, until the use of charcoal and crayon is thoroughly understood.
The system we want to teach starts by beginning this way and then gradually progressing by copying some simple drawings done in the modern method, until the use of charcoal and crayon is completely understood.
[Pg 26]
[Pg 26]
These drawings should be progressive, commencing with the features in different positions, and leading gradually to the full head, feet, hands, torso, etc., until the full length figure is reached.
These drawings should be done step-by-step, starting with the features in various positions and gradually moving to the complete head, feet, hands, torso, etc., until the full-length figure is achieved.
By this time sufficient proficiency will have been attained to enable the student to put aside copying and proceed to drawing from the cast, when the same progressive studies should be observed until a sufficiently thorough foundation in drawing is acquired to warrant the final step of drawing from life, which is the most difficult though the most interesting of all.
By this point, the student should have developed enough skills to stop copying and start drawing from the model. The same progressive studies should continue until they have a solid foundation in drawing that justifies the final step of drawing from life, which is the hardest but also the most engaging of all.
In view of these necessities, a series of studies in charcoal and crayon have been prepared to accompany this volume. These should be carefully copied, according to the directions given.
In light of these needs, a collection of studies in charcoal and crayon has been created to go along with this volume. These should be closely followed, according to the provided instructions.
ARRANGEMENT OF LIGHT.
Before beginning to draw, whether from copies, from the cast, or from life,[Pg 27] it is most important that the room be properly lighted.
Before you start drawing, whether from copies, from models, or from life,[Pg 27] it's really important that the room is well-lit.
If possible a north light should be selected, although that is not absolutely necessary, it is, however, most generally preferred by artists, as the light is more steady, and less influenced by the direct rays of the sun. There should be no cross light, the light coming from one direction only; therefore, if there are several windows on different sides of a room, all should be darkened while working except those on one side.
If possible, you should choose north light, although it's not absolutely necessary. However, artists generally prefer it because the light is more consistent and less affected by direct sunlight. There shouldn't be any cross light; the light should come from just one direction. So, if there are multiple windows on different sides of a room, all of them should be darkened while you work, except for the ones on one side.
This light should so be arranged as to come from above rather than from below, and if the window is a long one, curtain off the lower part, so that the light begins about six feet from the floor. If more than one person is working in the same room, several windows on the same side are admissible. If, however, a studio were being built expressly for the purpose, the ideal light would be one large, high side window, extending from six to ten feet along the wall, beginning at the floor[Pg 28] and reaching to the ceiling, where it is joined by a skylight, which is arranged with an adjustable curtain, so that it may only be uncovered when needed. In the same way the lower half of the window should be curtained off up to a height of six feet for ordinary purposes. The whole length of the window is sometimes useful in simulating an out-of-door effect of light.
This light should be arranged to come from above rather than below. If the window is long, cover the lower part with a curtain so that the light starts about six feet off the floor. If more than one person is working in the same room, it's okay to have several windows on the same side. However, if a studio were being built just for this purpose, the ideal setup would be one large, high side window that stretches six to ten feet along the wall, starting at the floor and reaching up to the ceiling, where it connects to a skylight. This skylight should have an adjustable curtain so it can be uncovered only when needed. Similarly, the lower half of the window should be covered with a curtain up to six feet for regular use. Sometimes, having the entire length of the window is helpful for creating an outdoor lighting effect.[Pg 28]
Some famous painters have had studios built entirely of glass, so that they could have all the advantages of working in the open air without the exposure. Adjustable curtains would turn the glass-house into an ordinary in-door studio, with conventional light. Few of us are so fortunate as to command these conveniences, and truth compels us to admit that they are not strictly necessary to good work.
Some well-known painters have had studios made entirely of glass, allowing them to enjoy the benefits of working outdoors without being exposed to the elements. Adjustable curtains could convert the glass studio into a regular indoor workspace with standard lighting. Not many of us are lucky enough to have these conveniences, and the truth is, we have to acknowledge that they aren't absolutely essential for producing great work.
As we have already stated, the easel is now universally adopted for drawing, as well as painting, instead of the old methods, which necessitated leaning over a[Pg 29] table. The plate to be copied is also placed upright, in the same upright position that would be occupied by a cast or live model, so that, even in this elementary training, the eye becomes accustomed to look naturally from the object or study being copied to the paper on the easel.
As we mentioned before, the easel is now widely used for both drawing and painting, replacing the old methods that required leaning over a[Pg 29] table. The image to be copied is also set up vertically, in the same position as a cast or live model, so that even in this basic training, the eye learns to comfortably shift focus from the object or study being copied to the paper on the easel.
When preparing to draw, the easel should be placed in front of the window and so arranged that the light will come from behind, and fall over the left shoulder of the worker.
When getting ready to draw, the easel should be set up in front of the window and positioned so that the light comes from behind and shines over the worker's left shoulder.
Two or three sheets of charcoal paper are now firmly fastened to the portfolio or drawing-board, which should in no case be smaller than the paper, but even larger, projecting at least half an inch beyond the regular-sized “Lalanne” or “Michelet” sheets.
Two or three sheets of charcoal paper are now securely attached to the portfolio or drawing board, which should definitely be larger than the paper, extending at least half an inch beyond the standard “Lalanne” or “Michelet” sheets.
To fasten the paper use ordinary flat brass-headed paper tacks, putting one in each corner, and one on each side between, making six in all. The two sheets of paper underneath the one used for drawing are so placed in order to make a firmer[Pg 30] and smoother foundation than could be obtained by spreading a single sheet directly upon the hard surface of the wooden board or portfolio, where any crack, knot, wrinkle, or other imperfection would show through when rubbed with the stump.
To secure the paper, use regular flat brass-head tacks, placing one in each corner, and one on each side in between, totaling six tacks. The two sheets of paper underneath the one you're drawing on are arranged this way to create a more solid and smoother base than if you were to lay a single sheet directly on the hard surface of the wooden board or portfolio, where any crack, knot, wrinkle, or other flaw would show through when blended with the stump.[Pg 30]
This arrangement is of great importance, and should never be neglected.
This arrangement is very important and should never be overlooked.
For the benefit of the actual beginners, we will commence with the drawing of straight lines, which is not nearly so easy as might be supposed.
For the benefit of true beginners, we'll start with drawing straight lines, which is not as easy as it might seem.
STRAIGHT LINES.
The foundation of technical skill in drawing of many kinds, notably the charcoal and crayon point, pen and ink, and pencil, depends upon the power of making lines with correctness and dexterity; and though later on, in drawing and painting, we learn to see only by form, almost entirely discarding the line per se, yet this early training of the hand often gives firmness and surety of touch to the[Pg 31] painter’s brush which might otherwise be wanting, and is in many ways felt to be valuable.
The foundation of technical skill in various types of drawing, especially charcoal and crayon, pen and ink, and pencil, relies on the ability to create lines accurately and skillfully. Later on, in drawing and painting, we start to focus predominantly on form, almost completely ignoring the line per se. However, this early training of the hand often provides the painter's brush with a sense of firmness and confidence that might otherwise be lacking, and is considered valuable in many ways.[Pg 31]
To begin the practice of drawing straight lines, first make two dots of several inches apart, let us say, about three inches from one point to the other. Let these dots at first be perpendicular, one being directly above the other.
To start practicing drawing straight lines, first make two dots a few inches apart, let's say about three inches from one point to the other. Initially, position these dots vertically, with one directly above the other.
Sharpen the charcoal to a point and draw it slowly from the upper to the lower point several times, at first without actually touching the paper, to accustom the eye to the distance; then make the actual line between the two, bearing lightly upon the paper and making a line of uniform thickness.
Sharpen the charcoal to a point and draw it slowly from the top to the bottom several times, first without actually touching the paper to get your eye used to the distance. Then, make the real line between the two, applying a gentle pressure on the paper to create a line of consistent thickness.
Make these lines in rows parallel to each other and about an inch apart, continuing the exercise until you are able to make perfectly straight upright lines.
Make these lines in rows parallel to each other and about an inch apart, continuing the exercise until you can create perfectly straight upright lines.
The next exercise consists of drawing horizontal lines in the same manner. After this, oblique lines should be practiced, inclining in different directions.
The next exercise involves drawing horizontal lines in the same way. After that, you should practice diagonal lines, tilting them in different directions.
[Pg 32]
[Pg 32]
Remember that no ruling, measuring or mechanical aids of any kind are to be made use of, the object being to train eye and hand.
Remember that no rulers, measuring tools, or mechanical aids are to be used; the goal is to train the eye and hand.
CURVED LINES.
Curved lines are of course more difficult than straight for those who are entirely untrained. Begin to draw these by making the two dots at first as for the straight line; connect these dots with a very light line, and then through the center draw another line at right angles, dividing the first exactly in two. This line, projecting from one side only, must be exactly the same length as half the first line thus
Curved lines are definitely harder than straight ones for those who have no training at all. Start by marking two dots just like you would for a straight line; then connect those dots with a very light line. Next, draw another line right through the center at a right angle, splitting the first line perfectly in half. This line, extending from only one side, must be exactly the same length as half of the first line.
[Pg 33]
[Pg 33]
Now connect the extremity of these lines with a curved line extending from one end to the middle and thence to the other end. When practice has enabled the student to draw these curves correctly, the straight lines are omitted and the curves drawn only from point to point.
Now connect the ends of these lines with a curved line that goes from one end to the middle and then to the other end. Once the student gets enough practice to draw these curves accurately, the straight lines can be left out, and the curves will only be drawn from point to point.
Let this simple exercise be repeated by drawing the curves in every direction. When the pupil is able to draw both straight and curved lines thus with ease he has already gained an important step.
Let this simple exercise be repeated by drawing the curves in every direction. When the student can draw both straight and curved lines with ease, they have already achieved an important milestone.
After this, simple forms should be drawn in outline, using such copies as 120 studies in freehand, called “How to Draw,” by Chas. Ryan, costing 25 cents, published by Cassell & Company.
After this, simple shapes should be outlined, using copies like the 120 studies in freehand, titled “How to Draw,” by Chas. Ryan, which costs 25 cents, published by Cassell & Company.
A box of blocks should next be procured, which are sold by art dealers for the purpose, and the student should begin with the simplest forms and draw them from nature, in outline at first, progressing gradually to more complicated forms.
A box of blocks should be obtained next, which art dealers sell for this purpose, and the student should start with the simplest shapes and draw them from nature, initially in outline, gradually moving on to more complex forms.
The next step is shading, which is done at first in the simplest manner. The[Pg 34] outline sketched in, the proportions are ascertained to be correct and the shadow and light are divided into two great masses without detail and blocked in as broadly as possible, according to the method given in the following pages.
The next step is shading, which is initially done in the simplest way. The[Pg 34] outline is drawn, the proportions are confirmed to be accurate, and the shadow and light are split into two large areas without detail and filled in as broadly as possible, following the method described in the upcoming pages.
Learn to begin a drawing properly and the finishing will be easy enough, being merely a matter of practice when once the manner of working is understood. How often we see exposed for sale and on exhibition drawings and paintings elaborately finished of which the drawing is so faulty as to render them worthless.
Learn to start a drawing correctly, and finishing it will become easy—it’s just a matter of practice once you understand the technique. How often do we see drawings and paintings for sale or on display that are elaborately finished but have such poor drawing that they are essentially worthless?
Students, therefore, who are thoroughly in earnest must be content to postpone all idea of finishing at first, occupying themselves in the preliminary studies with correctness of outline and proportion only. For this reason when the shadows are blocked in broadly and the drawing appears to be as nearly right as you can make it, put it aside and take up something a little more difficult and carry it on to the same stage without endeavoring to[Pg 35] elaborate it. Thus continue your practice, always progressing until you feel fitted to begin the study of the human face and form, which is, as we have said, the most difficult thing in art.
Students who are truly committed need to be willing to put aside the idea of finishing right away. Instead, they should focus on the basics, like getting the outline and proportions correct. Once you’ve broadly shaded in the shadows and the drawing looks as good as you can make it, set it aside and move on to something a bit more challenging, bringing it to the same level of completion without trying to refine it too much. Keep practicing this way, always making progress until you feel ready to tackle the study of the human face and form, which, as we mentioned, is the most challenging aspect of art.[Pg 35]
[Pg 36]
[Pg 36]
PART SECOND.
PART TWO.
CHAPTER IV.
MANNER OF WORKING.
Those who have already had sufficient practice in the elementary drawing indicated in the first part, can of course omit the foregoing pages, and begin at once with the preparatory studies of the face and figure, which are necessary before proceeding to drawing from the cast.
Those who have already practiced enough in the basic drawing mentioned in the first part can skip the previous pages and start directly with the preparatory studies of the face and figure, which are essential before moving on to drawing from the cast.
These studies consist of eight plates, carefully prepared by the author, according to the modern methods of charcoal and crayon drawing now employed in all large art schools both in Europe and our own country.
These studies include eight plates, carefully created by the author using the contemporary techniques of charcoal and crayon drawing that are now used in all major art schools both in Europe and in our country.
By carefully copying these plates in[Pg 37] their regular order, the student learns the method of using charcoal and crayon, so as to be perfectly acquainted with these materials and their resources before beginning to work from Nature; the design also being to familiarize the eye with the constructional drawing and proportion of the human figure beforehand, thus materially lessening the difficulties of drawing from life. The general manner of working is as follows:—
By carefully replicating these plates in[Pg 37] their correct sequence, the student learns how to use charcoal and crayon, becoming fully familiar with these materials and their capabilities before starting to draw from real life. The aim is also to help the eye get used to the structural drawing and proportions of the human figure in advance, which significantly reduces the challenges of drawing from life. The general method of working is as follows:—
Arrange the light, place the easel in position, and fasten the charcoal paper to the drawing board or portfolio in the way already described. We will suppose the subject to be drawn is a head. First make a small mark or dot on the paper with your charcoal, to show where the top of the head will come. A corresponding dot will indicate the bottom of the face or chin, while a mark on each side will show the width of the head.
Arrange the light, set up the easel, and attach the charcoal paper to the drawing board or portfolio as described earlier. Let's assume the subject you're drawing is a head. Start by making a small mark or dot on the paper with your charcoal to indicate where the top of the head will be. A matching dot will mark the bottom of the face or chin, while marks on each side will indicate the width of the head.
Before beginning to draw a line, these marks will suggest whether the head be properly placed on the sheet. See that[Pg 38] there be not too much space on either side, and that the head is not too high or too low.
Before you start drawing a line, these marks will help you see if the head is positioned correctly on the sheet. Make sure there isn't too much space on either side, and that the head isn't too high or too low. [Pg 38]
If these preliminary precautions be neglected the head may be placed most awkwardly; too much to one side or otherwise wrong, and the mistake not be noticed until the drawing be nearly finished. The importance, therefore, of properly placing the head at first can not be overestimated.
If these initial precautions are ignored, the head may end up positioned awkwardly; too far to one side or otherwise incorrectly, and the mistake might not be noticed until the drawing is almost complete. Therefore, the importance of properly positioning the head from the beginning cannot be overstated.
The position being decided, the outlines are lightly sketched in with long, sweeping lines, following the general direction of the head without any attention at first to details of any kind. Let these lines next determine the oval described by the face, sketching at the same time the lines of the throat, and ascertaining the action of the body in relation to the head by one or more long, sweeping lines across the bust from shoulder to shoulder.
The position decided, the shapes are loosely outlined with long, flowing lines, following the general direction of the head without focusing on any details at first. Next, let these lines define the oval of the face, while simultaneously sketching the lines of the throat, and determining the body's action in relation to the head with one or more long, sweeping lines across the chest from shoulder to shoulder.
Next draw a line with the charcoal point across the oval of the face where the hair meets the forehead, one through[Pg 39] the middle of the eyes, one at the base of the nose, through the center of the mouth and the lowest point of the chin.
Next, use the charcoal to draw a line across the oval of the face where the hair meets the forehead, one through the middle of the eyes, one at the base of the nose, through the center of the mouth, and the lowest point of the chin.[Pg 39]
These lines determine the proportions of the face, and are drawn very lightly with the charcoal, sharpened to a fine point, as they are erased when the features are drawn in. Next proceed to place the features on these lines, blocking them in only in their general forms at first with very little detail, and draw these forms as squarely as possible, seeking for angles and avoiding curves.
These lines set the proportions of the face and are drawn lightly with charcoal, sharpened to a fine point, since they are erased when the features are added in. Next, start placing the features along these lines, initially blocking them in with their general shapes and minimal detail, and make these shapes as angular as possible, looking for angles and avoiding curves.
It is easy to turn angles into curves in finishing a drawing, but if we begin with curves we have nothing to depend upon, and the drawing loses strength, becoming soft and weak in the end.
It’s easy to change angles into curves when finishing a drawing, but if we start with curves, we have nothing solid to rely on, and the drawing loses its strength, becoming soft and weak in the end.
Having ascertained that the features are in the right place, go back to the outline and bring that into shape, though without trying to finish it carefully as yet.
Having confirmed that the features are in the right place, return to the outline and refine it, but don’t worry about finishing it perfectly just yet.
The next step is to block in the shadows in their general forms, dividing the whole head into two distinct[Pg 40] masses of light and shade. To do this, make a faint outline of the exact form of the shadows where they meet the light; now fill in with charcoal all the mass of shadow within the outline, making one flat, even tone of dark without variation of shade. To do this draw the charcoal in straight parallel lines slightly oblique, almost touching each other, until the whole shadow is covered. No special care need be taken in putting in these lines, as the main object is to get the paper sufficiently covered with the charcoal. The largest paper stump is now used, to unite these charcoal lines into one flat tone of dark.
The next step is to outline the shadows in their basic shapes, splitting the entire head into two clear areas of light and dark. To do this, lightly sketch the exact shape of the shadows where they meet the light; then, fill in the entire shadow area with charcoal, creating a smooth, consistent dark tone without any variation in shade. Use straight, slightly angled parallel lines that almost touch each other until the shadow is completely covered. You don’t need to worry too much about these lines; the main goal is just to cover the paper well with charcoal. Now take the largest paper stump and use it to blend these charcoal lines into one smooth dark tone.
The stump is held in the fingers, so that about an inch of the point lies on the paper, not merely the tip end. With this the charcoal is rubbed in until no lines appear, only one simple even tone of dark filling the outline of the shadow.
The stump is held in the fingers so that about an inch of the tip rests on the paper, not just the very end. Using this, the charcoal is blended in until no lines are visible, just one smooth, even shade of dark filling the outline of the shadow.
Put in the eyes, nose, mouth, etc., and in the same way drawing the form of the general shadow first without any detail,[Pg 41] as already mentioned, and putting in the flat tone with the charcoal and stump.
Put in the eyes, nose, mouth, etc., and similarly, draw the overall shape of the shadow first without any details,[Pg 41] as mentioned earlier, and apply the flat tone using the charcoal and stump.
When the principal shadows are thus laid in, look at the head from a distance and see if the proportions are correct. Any mistake will be easily seen in this stage, and should be corrected at once before proceeding further.
When the main shapes are filled in, step back and check the head from a distance to see if the proportions look right. Any mistakes will be obvious at this point and should be fixed immediately before going on.
To correct a line or erase the charcoal in any way, use the crumb or soft part of stale bread. This is done by taking a small piece between the fingers, and rolling it into a little ball, then shaping it to a point. Be sure the bread is not too fresh or made with butter, as greasy bread will ruin the paper, so that it is impossible to work nicely on it. If, however, such a grease spot becomes evident when the drawing is somewhat advanced, it can be remedied in the finishing, by touching carefully with a sharp-pointed crayon, and rubbing with a pointed rubber stump; working with both alternately, making fine, small touches, until the spot is even in tone with the rest.
To fix a line or erase the charcoal in any way, use the crumb or soft part of stale bread. Take a small piece between your fingers, roll it into a little ball, and then shape it to a point. Make sure the bread isn’t too fresh or made with butter, since greasy bread will ruin the paper and make it hard to work on. If a grease spot appears when your drawing is somewhat complete, you can fix it during the finishing by carefully touching it with a sharp-pointed crayon and rubbing it with a pointed rubber stump; alternate between the two, making fine, small touches until the spot matches the tone of the rest.
[Pg 42]
[Pg 42]
In using the bread, never press hard; if the charcoal or crayon will not come off, use the pointed rubber stump.
In using the bread, never press hard; if the charcoal or crayon won’t come off, use the pointed rubber stump.
In laying in a mass of shadow, if too much charcoal gets on the paper, so as to become inconvenient, wipe it off lightly and evenly with a soft cotton rag, and if then the tone is too light, work on it again with charcoal, as before, using the stump in the same way until it becomes the right tone.
In creating a large shadow, if you get too much charcoal on the paper and it becomes a problem, gently wipe it off with a soft cotton cloth. If the tone is then too light, go over it again with charcoal like you did before, using the stump in the same way until you achieve the right tone.
In working heads, life studies, etc., in charcoal it is the practice in all the large art schools to finish them with black crayon. The crayon is not touched, however, until the shadows are all put in and the proportions found to be correct. The whole effect being blocked in the way already described, the crayon is taken up and the two materials used together at first, as required, in the following manner:
In drawing heads, life studies, etc., with charcoal, it's common practice in all the major art schools to finish them with black crayon. The crayon isn't applied until all the shadows are added and the proportions are confirmed to be right. Once the entire effect is blocked in as described, the crayon is picked up and the two materials are used together initially, as needed, in the following way:
The outline, which has been sketched in with charcoal, is now very carefully drawn with a finely pointed Conté crayon No. 2. First dust off the charcoal a little[Pg 43] with a rag until the outline is quite light, though easily seen, and do not make the crayon outline too dark and thick.
The outline, which was roughly drawn with charcoal, is now being carefully refined with a fine-pointed Conté crayon No. 2. First, lightly dust off the charcoal with a rag until the outline is subtle but still visible, and avoid making the crayon outline too dark and thick.[Pg 43]
Next proceed to block in the hair with charcoal. Do this at first in the simple masses of light and shade, rubbing in the charcoal in close lines at first, so as to well cover the paper, and then using the stump to make one flat, even tone.
Next, move on to filling in the hair with charcoal. Start by creating basic shapes of light and shadow, rubbing in the charcoal with tight lines at first to fully cover the paper, and then use the stump to create a smooth, even tone.
If the hair is dark, cover the light mass with a general tone of light gray, using the charcoal very lightly and rubbing it flat with the stump as before. If the hair is light, put in a fainter tone for the dark mass and a very delicate tone over the light mass. Do not attempt to see any reflected lights or small details as yet.
If the hair is dark, cover the light area with a general shade of light gray, using the charcoal very lightly and blending it smoothly with the stump like before. If the hair is light, add a softer shade for the dark area and a very subtle shade over the light area. Don't try to include any reflected lights or small details just yet.
Having the head now well started, we proceed to carry it on by putting in the half tints which connect the masses of light and shadow all over the face. Do this with a clean, medium-sized paper stump by dragging the charcoal from the shadow over the light. Do not put any new charcoal on for the half tints, as it is[Pg 44] very important that they be kept light at first. Keep a clean stump always at hand for delicate half tints, and never use an old one.
Having the head well defined, we continue by adding the midtones that blend the areas of light and shadow across the face. Use a clean, medium-sized paper stump to drag the charcoal from the shadow into the light. Avoid adding new charcoal for the midtones, as it's crucial to keep them light at the beginning. Always have a clean stump available for subtle midtones, and never use a worn-out one.
The face now begins to model and look round, and is further carried on by putting in the dark accents of shadow and taking out reflected lights with bread.
The face starts to take shape and look more rounded, and this process continues by adding dark shadows and removing highlights with bread.
The features are brought into shape, using the sharp pointed charcoal and a small stump.
The features are shaped using a sharp pointed charcoal pencil and a small blending stump.
At this stage the crayon is taken up permanently and the charcoal laid aside.
At this point, the crayon is picked up for good, and the charcoal is set aside.
The Conté crayon No. 2 sharpened to a fine point is rubbed all over the mass of shadow already laid in with charcoal and is then softened with the stump in the manner already described, the charcoal and crayon together producing a beautiful quality of tone.
The Conté crayon No. 2 sharpened to a fine point is rubbed across the area of shadow that has already been created with charcoal and is then blended with the stump as previously described, the combination of charcoal and crayon resulting in a beautiful tone.
Let me here mention that some artists prefer to use the sauce crayon for putting in large masses of dark, such as shadows, hair, drapery, etc. The student should[Pg 45] try both methods and use either or both, as he may prefer.
Let me mention that some artists prefer to use the crayon for filling in large areas of dark, like shadows, hair, drapery, etc. The student should[Pg 45] try both methods and use either one or both, whichever they prefer.
The sauce crayon should be rubbed off on a small piece of charcoal paper and tacked on one side of the drawing so as to be convenient for use.
The crayon should be rubbed off on a small piece of charcoal paper and attached to one side of the drawing for easy access.
The point of the large stump is now rolled around in the sauce or powdered crayon thus prepared, and is then rubbed into the shadow until the whole is covered with the crayon and presents an even dark tone.
The big stump is now rolled around in the sauce or the powdered crayon that’s been prepared, and then it’s rubbed into the shadow until everything is covered with the crayon, creating a smooth dark tone.
The sauce crayon is only to be employed for large spaces, and is useful in saving time, as it takes longer to cover the surface with lines made by the crayon point. Still many prefer the latter.
The sauce crayon is meant only for large areas and helps save time since it takes longer to fill in with lines made by the crayon tip. Still, many people prefer the latter.
The crayon point is always used in finishing up the drawing, which is carried on by degrees. The dark accents are put in the eyes, nose, mouth and ears, and the small stump is used to soften the marks of the crayon, but should not be rubbed too much.
The crayon tip is always used to finalize the drawing, which is done gradually. The darker details are added to the eyes, nose, mouth, and ears, and the small stub is used to smooth out the crayon marks, but it shouldn't be rubbed too much.
If the head be rather dark in its general[Pg 46] effect, a very delicate gray tint should be put all over the light mass of the face. This is done with a clean stump which has been used for half tints, and the tone is put on in the same manner, the crayon point not being used here.
If the head appears mostly dark overall[Pg 46], a subtle gray shade should be applied to the light areas of the face. Use a clean blending stump that has been used for half tints, and apply the tone in the same way, without using the crayon tip here.
The high lights are taken out with the bread rolled to a point, and should be made sharp and distinct. The hair is carried on in the same manner as the face, the dark accents and details being put in with the crayon point and softened a little with the stump. The half tints are developed and reflected lights taken out with bread. The high lights are lastly rubbed out in the same way, taking care always to preserve the exact form of the lights where they meet the shadows.
The highlights are removed using bread rolled into a point, and they should be made sharp and clear. The hair is treated the same way as the face, with dark accents and details added using the crayon point and slightly softened with a stump. The half-tones are developed and reflected lights are removed with bread. The highlights are finally smudged in the same manner, making sure to maintain the precise shape of the lights where they meet the shadows.
In drawing hair, do not attempt to put in too much detail. The deepest shadows and the highest lights should always be kept simple. The most detail is generally seen in the half tint, but should be very carefully studied only in the most prominent parts, the rest being left in a suggestive way.
In drawing hair, don't try to add too much detail. The darkest shadows and brightest highlights should always be simple. The most detail is usually found in the mid-tones, but it should be carefully focused on the most prominent parts, while the rest should be left more implied.
[Pg 47]
[Pg 47]
In working thus with charcoal and crayon, there are one or two things that should be always kept in mind.
In working with charcoal and crayon like this, there are a couple of things that should always be kept in mind.
In the first place, the charcoal and crayon must always be kept sharpened while drawing, a fine point being most necessary. A sharp knife should always be at hand, and also a piece of sandpaper, as it is very difficult to sharpen the crayons with a knife, they break so easily.
In the first place, the charcoal and crayon should always be kept sharp while drawing, as a fine point is essential. A sharp knife should always be nearby, along with a piece of sandpaper, since it's really hard to sharpen the crayons with a knife because they break so easily.
Always buy the best materials, and always keep plenty on hand. Have a box of charcoal, and at least half a dozen crayons, and keep one or two clean stumps in reserve no matter how many you have already in use.
Always buy the best materials, and always keep plenty on hand. Have a box of charcoal and at least six crayons, and keep one or two clean stumps in reserve no matter how many you already have in use.
In rubbing on charcoal, and before using the stump, be sure to cover the paper well, so that very little rubbing will spread the tone into an even mass. No matter how much charcoal you get on at first, you can always take off the superfluity with a rag; but if there is not enough one is tempted to rub the paper too hard, and if the surface of the paper gets roughened[Pg 48] by too much rubbing at first, you can never do any thing with it afterward.
When applying charcoal, make sure to cover the paper thoroughly before using the stump, so that a little bit of rubbing can evenly spread the tone. No matter how much charcoal you apply at first, you can always wipe away the excess with a cloth; however, if you don’t apply enough, you might be tempted to rub the paper too hard. If the paper's surface gets rough from too much rubbing at the start, it will be difficult to work with later.[Pg 48]
In putting on the crayon, however, we must be more careful.
In applying the crayon, however, we need to be more careful.
Put on a little and try it with the stump; if it does not spread well, add more, and so on. Even when dispensing entirely with the sauce crayon and using only the pointed sticks, it is well to rub off some of the crayon on a small piece of paper and pin it up on one side of the drawing, for using in very light tones where the point must not be employed. For instance, in covering the light side of the face with a delicate tone, the stump is rubbed on this, and tried first on a piece of paper before using it on the drawing.
Put on a little and try it with the stump; if it doesn’t spread well, add more, and so on. Even if you're not using the sauce crayon and just using the pointed sticks, it's a good idea to rub off some of the crayon on a small piece of paper and pin it up on one side of the drawing for use in very light tones where the point shouldn't be used. For example, when covering the light side of the face with a delicate tone, rub the stump on this and test it first on a piece of paper before applying it to the drawing.
Never let the hand rest directly upon the drawing itself. If not convenient to rest it upon the margin, have a sheet of clean writing paper to place underneath the hand.
Never let your hand rest directly on the drawing itself. If it's not convenient to rest it on the margin, use a clean sheet of writing paper to place underneath your hand.
In sketching in, or drawing long, sweeping lines, do not steady the hand upon the paper at all, as one does in[Pg 49] writing, but try to acquire freedom of handling by practice, resting the hand upon the paper only when absolutely necessary, as in drawing fine details, or when great precision is required.
In sketching or drawing long, sweeping lines, don't steady your hand on the paper like you do when writing. Instead, try to gain freedom in your movements through practice, only resting your hand on the paper when absolutely necessary, such as when drawing fine details or when high precision is needed. [Pg 49]
[Pg 50]
[Pg 50]
CHAPTER V.
MEASUREMENT, ACTUAL AND COMPARATIVE.
By actual measurement is meant the measurement of the object itself by holding against it a ruler or straight strip of paper, and marking off the number of inches or exact distance from one given point to another. These measurements are then compared with the drawing, and the same distances are marked off on the paper.
By actual measurement, we mean measuring the object directly by using a ruler or a straight piece of paper against it, and marking the number of inches or the exact distance from one point to another. These measurements are then compared with the drawing, and the same distances are marked on the paper.
In mechanical and architectural drawing this system of measurement is in constant use, but in freehand drawing, and in the method practiced by artists, actual measurement is not allowed. Never measure in any way when beginning a drawing, but strike out bravely, resolving to depend upon the eye only, if possible.
In mechanical and architectural drawing, this measurement system is always used, but in freehand drawing and the techniques used by artists, actual measurements aren't allowed. Don't measure at all when starting a drawing; just dive in confidently and try to rely on your eye as much as you can.
[Pg 51]
[Pg 51]
After the first outlines are put in, and the proportions are as nearly correct as you can make them, it is perfectly legitimate to “prove” a drawing by actual measurement, if it is a copy. If one is drawing from a cast, or from life, and it is necessary that the head be exactly the same size, a measurement may be taken from the top of the head to the chin, and compared with the sketch you have made. Beyond this no actual measurement should be allowed.
After you’ve outlined the initial shapes and the proportions are as accurate as possible, it's totally fine to "prove" a drawing by taking actual measurements, especially if you're copying something. If you’re drawing from a cast or from life and need the head to be an exact size, you can measure from the top of the head to the chin and compare it with your sketch. However, beyond this, you shouldn’t rely on any further measurements.
COMPARATIVE MEASUREMENT.
This is a very important thing in drawing from Nature, or objects of any kind, and must be thoroughly understood by the student, as without it no drawing can be made absolutely correct.
This is a very important aspect of drawing from nature or any kind of objects, and the student must fully understand it, as without this knowledge, no drawing can be completely accurate.
Comparative measurements are entirely proportional. The manner of taking them is as follows:
Comparative measurements are completely proportional. Here's how to take them:
Place yourself opposite the object to be measured, at the same distance from which your drawing is taken. Let us say[Pg 52] you are drawing the bust of Apollo, and wish to discover just the exact height of the whole, also the width across the shoulders.
Place yourself in front of the object you want to measure, at the same distance from where you're drawing it. Let’s say[Pg 52] you're drawing the bust of Apollo and want to find the exact height of the whole piece, as well as the width across the shoulders.
Extend your arm in a perfectly straight line at right angles to the cast, holding in your hand a long lead-pencil. The pencil must be held parallel to the general direction of the cast, neither end being allowed to swerve the slightest.
Extend your arm straight out at a right angle to the cast, holding a long pencil in your hand. The pencil should be held parallel to the general direction of the cast, with neither end allowed to move even slightly.
Now, closing one eye to concentrate the vision, measure off with your thumb upon the pencil, which is held crosswise, the apparent distance from the outside of one shoulder in a direct line to the outside of the other. Keep your thumb tightly upon the pencil at the place measured, and slowly turn the hand around, keeping the arm extended at the same distance from the body, and the eye in the same position as before.
Now, close one eye to focus your vision. Use your thumb to measure the distance on the pencil, which you hold sideways, from the outside of one shoulder straight across to the outside of the other. Keep your thumb firmly on the pencil at the point you measured, and slowly rotate your hand, keeping your arm extended at the same distance from your body and your eye in the same position as before.
The pencil is now held straight up and down, and your object is to see how many times the distance measured off on the pencil will go into the whole length of[Pg 53] the cast, beginning at the top of the head and measuring down to the foot of the bust, slowly moving the pencil downward and checking off with the eye each time the measurement is repeated.
The pencil is now held straight up and down, and your goal is to see how many times the distance marked on the pencil fits into the entire length of[Pg 53] the cast, starting from the top of the head and measuring down to the foot of the bust, gradually moving the pencil down and visually checking each time the measurement is repeated.
In this way we can find out exactly whether the cast is just twice as long as it is wide, or less—in other words, the comparative proportions.
In this way, we can find out exactly whether the cast is just twice as long as it is wide, or less—in other words, the comparative proportions.
This kind of measurement is invaluable in out-of-door sketching, and the eye soon becomes so trained by practice that relative proportions are compared instinctively, and one scarcely needs to use the pencil.
This type of measurement is incredibly useful in outdoor sketching, and with practice, your eye becomes so trained that you instinctively compare relative proportions, and you hardly need to use the pencil.
THE PLUMB LINE.
Another most valuable adjunct in drawing from life and from the cast is the plumb line. This consists of a piece of strong twine with a weight on one end, which serves to keep the string perfectly straight and steady when suspended from the hand. A straight line is thus simulated which is dropped from a given point[Pg 54] to one directly underneath, forming one side of a triangle, which will ascertain for us the different positions that certain other parts assume in relation to this line.
Another very useful tool for drawing from life and from a model is the plumb line. This is made up of a piece of strong string with a weight on one end, which helps keep the string perfectly straight and steady when hung from your hand. This creates a straight line that drops from a specific point[Pg 54] to a point directly below it, forming one side of a triangle. This will help us determine the different positions that certain other parts take in relation to this line.
For instance, we hold the plumb line so as to make a straight line from the chin of a standing figure to the ground. The top and bottom of the line form two points of a triangle, the third to be represented by the man’s heel.
For example, we hold the plumb line to create a straight line from the chin of a standing person to the ground. The top and bottom of the line make two points of a triangle, with the third point represented by the person's heel.
Imaginary lines are now drawn through these points, forming the triangle, whose base determines the direction of the heel in relation to the center-line of the body. In this way the balance of a figure can be accurately ascertained, and the most difficult action correctly suggested.
Imaginary lines are now drawn through these points, creating the triangle, whose base determines the direction of the heel in relation to the body's center line. This way, the balance of a figure can be accurately assessed, and the most challenging action can be correctly suggested.
In the actual drawing the real lines may be sketched in charcoal from point to point at the same angle determined by the plumb, and the corrections made accordingly, these straight lines being of course erased afterward.
In the actual drawing, the real lines can be sketched in charcoal from point to point at the same angle set by the plumb, and corrections made accordingly, with these straight lines being erased afterward.
[Pg 55]
[Pg 55]
VALUES.
The term “value,” as understood by artists, is used to express the comparative relation of tones to each other, irrespective of color. There may be many different colors before us all of the same value; also, there may be only one color used in a drawing, yet many different values are seen, which goes to show that we are to compare tones and not colors.
The term “value,” as understood by artists, is used to express the comparative relation of tones to each other, regardless of color. There can be many different colors in front of us that have the same value; likewise, only one color might be used in a drawing, but we can observe many different values. This shows that we need to compare tones, not colors.
For example, in drawing or painting a landscape we look at the tone of the trees against the sky and observe which is the darker. If a stormy, heavy sky is seen behind light, feathery, green trees we see that the sky is darker in value.
For example, when we draw or paint a landscape, we check the shade of the trees against the sky and notice which one is darker. If there’s a stormy, dark sky behind light, fluffy green trees, we can see that the sky is darker in tone.
If, on the contrary, trees with dark, rich foliage are observed to be strongly relieved against a bright, sunny sky, we perceive at once that the sky is lighter in value than the trees. In like manner we compare the rocks with the water, the[Pg 56] fence with the road, and so on, according to the different objects to be regarded in the picture.
If, on the other hand, we see trees with dark, lush leaves clearly standing out against a bright, sunny sky, we immediately notice that the sky is lighter in shade than the trees. Similarly, we compare the rocks to the water, the fence to the road, and so forth, depending on the various elements in the picture.
In drawing a head in charcoal or crayon it is well to establish at once the darkest value in the whole, selecting the deepest spot of shadow with which all the other tones of dark may be compared.
In drawing a head with charcoal or crayon, it's best to determine the darkest value right away, choosing the deepest shadow as a reference point for all the other darker tones.
Look for instance, at the shadow over the eye or under the nose, which are generally very dark, and compare it with the shadow on the cheek, behind the ear, or under the chin. In the same way decide upon the highest light in the face. Say it is found upon the forehead or on the cheek bone. Be sure that it is the brightest spot in the face, and then compare all the other degrees of light with this.
Look at the shadow over the eye or under the nose; these areas are usually very dark. Now compare that with the shadow on the cheek, behind the ear, or under the chin. Similarly, determine where the brightest highlight on the face is located. It could be on the forehead or the cheekbone. Make sure this is the brightest spot on the face and then compare all the other levels of light with it.
By studying in this way, and observing the comparative variety of these tones, we arrive at correct values.
By studying this way and observing the different varieties of these tones, we arrive at accurate values.
This is a most important quality in art and can not be overestimated, for upon a just appreciation of the values in a pict[Pg 57]ure depends its truth. This also serves to illustrate the necessity of making studies directly from nature whenever possible.
This is a really important quality in art and can’t be overstated, because the truth of a picture relies on a proper understanding of its values. This also highlights the need to make studies directly from nature whenever we can.
[Pg 58]
[Pg 58]
CHAPTER VI.
CRAYON PORTRAITS.
Crayon is especially adapted to portraiture, on account of the brilliant effects which it is capable of producing, as well as the great softness and delicacy of finish which may be obtained by its use.
Crayon is particularly well-suited for portraits because of the vibrant effects it can create and the softness and delicacy of the finish that can be achieved with it.
Portraits should, of course, always be taken from life if possible, though if the person be an invalid or is for any other reason unable to give many sittings, a photograph may be used for the beginning. The portrait is carried on from this until well advanced; if one or two sittings from life can then be had in finishing, it will be a great advantage, especially in regard to the expression.
Portraits should always be taken from life whenever possible. However, if the person is ill or unable to do multiple sittings for any reason, a photograph can be used as a starting point. The portrait will be developed from this until it's well advanced; if one or two sittings from life can then be arranged for the finishing touches, it will be a significant advantage, especially for capturing the expression.
In portraits of children a photograph is frequently a great assistance, particularly[Pg 59] if the artist has not had much experience.
In portraits of children, a photograph is often really helpful, especially if the artist doesn’t have a lot of experience. [Pg 59]
In all such cases, however, it is best to decide upon the pose, and sketch it from life, and then have the photograph taken in the pose you have selected.
In all these cases, it's best to choose the pose, sketch it from life, and then have the photo taken in the pose you've picked.
In this way, the light and shade are arranged to suit the artist, and the pose being decided upon by him, the portrait will have the effect of being drawn from life instead of being merely a copy from a conventional photograph.
In this way, the light and shadow are set up to suit the artist, and with the pose chosen by them, the portrait will look like it was created from life instead of just being a standard copy of a photograph.
In general the effect of light used by photographers is exactly the reverse of that chosen by artists. It will be noticed that ordinary photographs have the greater part of the face either in shadow or covered by strong half-tints.
In general, the effect of light used by photographers is the exact opposite of what artists choose. You’ll notice that regular photographs often have most of the face either in shadow or covered by strong highlights.
An artist, on the contrary, in posing a head for a portrait, prefers exactly the opposite arrangement, selecting broad and simple effects of light with only enough shadow to give the necessary variety and relief to the features.
An artist, on the other hand, when setting up a head for a portrait, chooses the exact opposite approach, opting for broad and simple lighting effects with just enough shadow to provide the needed variety and depth to the features.
When arranging the preliminaries for a[Pg 60] portrait, there are several things to be considered.
When setting up the basics for a[Pg 60] portrait, there are a few things to keep in mind.
In the first place, study the head carefully and see which view is most agreeable. Sometimes features in the same face look differently when seen from opposite directions. Some noses or mouths look well on one side and distorted on the other.
In the first place, study the head closely and see which angle is the most pleasing. Sometimes, features on the same face appear different when viewed from opposite directions. Some noses or mouths look good from one side and strange from the other.
A very broad face should not be given a full front pose, but would look better seen in three-quarter.
A very broad face shouldn't be shown straight on; it looks better from a three-quarter angle.
A very retreating chin must not be seen in a profile view.
A very receding chin shouldn’t be visible from the side.
This same pose, however, for a person with a cast in the eyes is preferable, and so on. After all such matters have been considered, see that the head is not thrown up too high, as it will make the nose look short, while lowering the chin too much will make the nose look long. A good rule is that the eyes of the sitter should be on a line with those of the artist as he sits or stands at his work.
This same pose, however, is better for someone with squinty eyes, and so on. Once all these factors have been considered, make sure that the head isn’t tilted too far up, as this will make the nose look short, while lowering the chin too much will make the nose look long. A good rule is that the eyes of the subject should be on the same level as those of the artist while he sits or stands at his work.
The method most generally in use for crayon portraits is that described in the[Pg 61] preceding pages, in which the stump is used. All the old-fashioned ways of stippling and hatching are seldom resorted to, and not considered artistic.
The most commonly used method for crayon portraits is the one described on the[Pg 61] previous pages, where the stump is utilized. The old-fashioned techniques of stippling and hatching are rarely used and aren't seen as artistic.
In drawing a life-sized head the artist must not be too far from his subject, the easel being placed about four or five feet distant. It is well to get up and walk back occasionally, looking at the work from a distance so as to see the general effect.
In drawing a life-sized head, the artist shouldn't stand too far from their subject; the easel should be set about four or five feet away. It's a good idea to get up and step back occasionally to look at the work from a distance, so as to see the overall effect.
There are several different kinds of paper used for crayon portraits, some artists preferring one make, some another. The ordinary “Lalanne” and “Michelet” papers used for charcoal and crayon studies are a little too rough in texture to please every body, and do not produce quite so fine a finish as is desirable. They come in too small-sized sheets for a large portrait head, for which one wants plenty of room.
There are several different types of paper used for crayon portraits, with some artists favoring one brand over another. The typical "Lalanne" and "Michelet" papers used for charcoal and crayon studies are a bit too rough in texture to satisfy everyone, and they don’t deliver quite the smooth finish that’s ideal. They also come in sheets that are too small for a large portrait head, where you need a lot of space to work.
This, however, is merely a matter of taste, that can be indulged when one has become sufficiently proficient in the work[Pg 62] to judge for himself. We will suggest that Whatman’s crayon paper is one of the most satisfactory; this comes in large sheets, and should be stretched before using in the manner already described. A good sized stretcher for an ordinary portrait is 20×24.
This, however, is simply a matter of preference, which can be enjoyed once someone has become skilled enough in the work[Pg 62] to evaluate for themselves. We recommend that Whatman’s crayon paper is one of the best; it comes in large sheets and should be stretched before use, as previously mentioned. A good size stretcher for a typical portrait is 20×24.
If more of the figure than the shoulders is to be seen, a larger size would be better.
If more of the body than just the shoulders is visible, a bigger size would be better.
The portrait is first lightly sketched in with charcoal, and if the student is not very proficient in drawing from life it is better to make the first sketch upon an ordinary sheet of charcoal paper.
The portrait is initially lightly sketched in with charcoal, and if the student isn't very skilled at drawing from life, it's better to make the first sketch on a regular sheet of charcoal paper.
When all corrections are made, and the general proportions of the face appear to be right, the outline is transferred to the stretcher in the following manner:—
When all the adjustments are made and the overall proportions of the face look correct, the outline is transferred to the stretcher in the following way:—
Take the sheet of charcoal paper on which the sketch is made, and with a stick of charcoal “scribble,” so to speak, all over the back, so that the paper is entirely covered behind your sketch.
Take the sheet of charcoal paper with your sketch on it, and using a stick of charcoal, cover the entire back with “scribbles,” so that the whole backside of the paper is filled.
Now lay this sheet with the face upward[Pg 63] on the clean stretcher, placing it so that the head will come in exactly the right place, neither too high nor too low.
Now lay this sheet face up[Pg 63] on the clean stretcher, positioning it so that the head is in just the right spot, not too high or too low.
Fasten it with pins at the top and bottom, so that the paper will not slip, and then with a sharp, hard lead-pencil carefully go over the outline, and every important part of the face and head. If the paper should move in the least the whole thing is spoiled, therefore it is best in transferring to lay the drawing upon a table till finished. Remember not to rest the hand heavily upon any portion of the paper except the line to be traced, as every touch leaves a black spot beneath.
Fasten it with pins at the top and bottom so the paper won't slip, and then carefully trace over the outline and every important part of the face and head with a sharp, hard pencil. If the paper shifts even a little, the entire thing is ruined, so it's best to lay the drawing flat on a table until you're finished. Remember not to put too much pressure on any part of the paper except where you're tracing, as any contact will leave a black mark underneath.
On removing the sketch a perfect outline will be found upon the stretcher, which will be a sufficient guide to the proportions and general likeness. Now, with a sharply pointed charcoal stick begin to draw in the head, following the outline, block in the features, massing the shadows in the face and hair.
On taking off the sketch, you'll find a perfect outline on the stretcher, which will serve as a good guide for the proportions and overall likeness. Now, using a sharply pointed charcoal stick, start drawing the head, following the outline, sketching in the features, and shading the face and hair.
Do not begin to use the crayon until the general likeness is assured, for the[Pg 64] paper must not be roughened by too much erasing.
Do not start using the crayon until the overall shape is certain, because the[Pg 64] paper shouldn't be damaged by excessive erasing.
Use the soft cotton rag for dusting off charcoal whenever you can, instead of bread, as too much rubbing with bread will grease the paper; for very large spaces, where erasing is necessary, use Faber’s India rubber.
Use a soft cotton cloth for dusting off charcoal whenever you can, instead of bread, as too much rubbing with bread will make the paper greasy; for very large areas where erasing is needed, use Faber’s rubber eraser.
When the crayon is put on, advance slowly, remembering that in a portrait there is much more careful work than in an ordinary life study, and that there are many more things to be considered than merely the drawing. The likeness is to be secured, which is sometimes a difficult thing even for those with experience.
When you start using the crayon, go slowly. Keep in mind that creating a portrait requires much more precision than a typical life study, and there are many more factors to consider than just the drawing. You need to capture the likeness, which can be challenging even for experienced artists.
This is accomplished gradually; the student must not always expect to see the likeness in the first sketch; it comes by degrees, as the drawing progresses, and it is a good rule to draw the head in exactly as you see it, emphasizing the salient points, no matter how ugly it may appear. Do not attempt to improve and[Pg 65] modify until the drawing and general likeness are secured.
This happens gradually; the student shouldn’t expect to see the resemblance in the first sketch. It develops over time as the drawing evolves, and it’s a good rule to draw the head exactly as you see it, highlighting the most noticeable features, no matter how unattractive it looks. Don’t try to enhance or change it until the drawing and overall likeness are established.[Pg 65]
The expression comes last of all, and with it the beauty. If you attempt to make the face pretty at first, you will weaken the drawing and lose the character. For this reason, many artists make it a rule never to show their portraits until finished. The sitter does not understand the methods of working and is tempted to criticise, which renders the worker timid.
The expression comes at the very end, and with it comes the beauty. If you try to make the face look nice right away, you'll weaken the drawing and lose the character. For this reason, many artists make it a rule never to show their portraits until they're finished. The person being painted doesn't understand the working methods and is likely to criticize, which makes the artist hesitant.
After the head is put in with the crayon and modeled with the stump, in the manner described in a previous chapter, the finishing is carried on with the crayon point, the small stump, and the pointed rubber stump, which is found more useful than bread at the last.
After the head is created with the crayon and shaped with the stump, as explained in a previous chapter, the finishing work is done using the crayon tip, the small stump, and the pointed rubber stump, which turns out to be more helpful than bread in the end.
The animated expression is put in the eyes by dark touches in the pupil and under the lids, while sharp lights are accented in the iris and on the eyeball.
The lively expression is created in the eyes with dark shadows in the pupil and below the eyelids, while bright highlights are emphasized in the iris and on the eyeball.
The form of the under lid must be carefully studied.
The shape of the bottom lid needs to be examined closely.
[Pg 66]
[Pg 66]
The nose, also, has much to do with the expression; especially the shape of the nostrils, and the direction of the lines at the side of the nose running down to the mouth. Observe whether the nostrils droop downward at the outward edge; this gives a serious expression; if, on the contrary, the line is elevated, it tends to give a bright and animated appearance to the face.
The nose also plays a big role in expression, especially the shape of the nostrils and the lines on the sides of the nose that lead down to the mouth. Notice if the nostrils tilt downward at the outer edge; this creates a serious look. On the other hand, if the line is raised, it tends to make the face look more cheerful and lively.
The mouth, of course, is of great importance, and influences the expression more than any other feature; when smiling, the corners are turned upward, and the lines or dimples are curved in an outward direction. In a sad face the corners of the mouth drop downward and the lines grow straight.
The mouth is really important and has a bigger impact on expression than any other feature. When someone smiles, the corners turn up, and the lines or dimples curve outward. On a sad face, the corners of the mouth drop down, and the lines go straight.
If the student learns to look for such indications in many faces, he will find more suggestions of importance to aid him in developing the expression. Without such knowledge, he may accidentally reverse these conditions, and work on blindly, puzzling himself vainly to find out where[Pg 67] he is wrong and why the expression is just the opposite of what it should be.
If a student learns to look for these signs in many faces, he'll discover more helpful hints for developing his expression. Without this knowledge, he might inadvertently do the opposite and work aimlessly, frustrating himself as he tries to figure out where[Pg 67] he's going wrong and why his expression is completely different from what it should be.
THE HAIR.
In drawing the hair, no matter how elaborate its arrangement, it must be blocked in at first in simple flat masses of light and shade without any attempt at detail. Try, however, to give the general character of the hair in putting in the form of the shadows where they meet the light. In smooth, black hair, the effect will be large masses of black with sharp, clearly-defined high lights.
In drawing hair, no matter how intricate the style, start by defining it with simple flat shapes of light and shadow, without going into details. However, aim to capture the overall look of the hair by depicting the shapes of the shadows where they meet the light. For smooth, black hair, this will result in large areas of black with sharp, well-defined highlights.
Light curly hair will have much lighter tone in the shadow and much less brilliant lights.
Light curly hair will appear much lighter in the shadows and less vibrant in direct light.
After the hair is thus laid in with charcoal and the stump, the crayon is taken up.
After the hair is laid in with charcoal and the stump, the crayon is picked up.
The half tints are studied and the deep accents of dark put in the shadows, always following the outline of the form of each shadow very carefully.
The half tones are analyzed, and the strong dark accents are added to the shadows, always carefully following the shape of each shadow.
Avoid putting in a number of lines to[Pg 68] represent hair, as this destroys the effect and means nothing. All details are expressed by carefully rendered light and shade.
Avoid drawing multiple lines to[Pg 68] represent hair, as this ruins the effect and serves no purpose. All details are shown through carefully rendered light and shade.
In finishing, the high lights are taken out with bread rolled to a point, or if more convenient, the india-rubber stump is used.
In the end, the highlights are removed using a pointed piece of rolled bread, or if it's easier, a rubber eraser is used.
Soften the hair where it touches the face, never leaving a hard, dark line. When a tone is too dark, it is not always necessary to use either bread or rubber, but first try rubbing with the stump, which may be found sufficient.
Soften the hair where it meets the face, avoiding any harsh, dark lines. If a shade is too dark, you don't always need to use bread or rubber. Instead, start by rubbing with the stump, which might be enough.
BACKGROUNDS.
A background gives relief and importance to the head, and should be managed with judgment.
A background highlights the main subject and should be handled thoughtfully.
In the first place, never make the background exactly the same value as the head. If the hair is light and the general effect of the face fair and delicate, the background should be darker than the head, though not too dark.
In the first place, never make the background the same value as the head. If the hair is light and the overall effect of the face is fair and delicate, the background should be darker than the head, but not too dark.
[Pg 69]
[Pg 69]
Everything must be harmonious, and a spotty appearance is to be avoided.
Everything needs to be harmonious, and a patchy look should be avoided.
For instance, a very light effect of hair and face with a moderately dark dress and a jetty-black background is very bad. Also, a head with black hair, white dress and very light background. All violent contrasts should be avoided.
For example, a very light effect on the hair and face paired with a moderately dark dress and a pitch-black background is not good. Similarly, a head with black hair, a white dress, and a very light background should also be avoided. All harsh contrasts should be kept to a minimum.
Put the background in at first with charcoal only, using parallel lines in one direction, then crossing them diagonally. After this take the large stump and rub these lines into one tone, yet leaving a slight suggestion of the lines to show through.
Put the background in first with charcoal only, using parallel lines in one direction, then crossing them diagonally. After this, take the large stump and blend these lines into one tone, while leaving a slight hint of the lines visible underneath.
Put in this tone only around the shoulders and lower part of the head, leaving the upper part of the paper bare, or nearly so.
Put this tone only around the shoulders and the lower part of the head, leaving the upper part of the paper empty, or nearly so.
In this way try the effect, working slowly and adding more charcoal as the tone needs to be darker.
In this way, test the effect by working slowly and adding more charcoal as the tone needs to be darker.
When you have decided that the background has the right effect in relation to the head, use the crayon point in the same way as the charcoal, putting in crossed[Pg 70] lines and rubbing them together again with the stump until a transparent effect is achieved, which will give atmosphere and relieve the head.
When you've determined that the background looks good with the head, use the crayon tip like you would the charcoal, creating crossed[Pg 70] lines and blending them again with the stump until you achieve a transparent effect that adds atmosphere and highlights the head.
If you get on too much crayon rub it all over with a soft rag. This is an excellent thing to do occasionally, as it softens and unites the whole while making the tone lighter.
If you use too much crayon, just rub it all over with a soft cloth. Doing this now and then is a great idea, as it softens and blends everything while lightening the tone.
Sometimes in finishing, a few touches of the rubber point may be used at the edges of the background and where it softens off at the top. Use the rubber in the same manner as the crayon point, making light lines crossing obliquely.
Sometimes when finishing, a few touches of the rubber point can be used at the edges of the background and where it fades at the top. Use the rubber in the same way as the crayon point, making light lines that cross diagonally.
Remember that hardly any appearance of lines must be seen. When all is done they must be so softened with stump and rag as to present almost the appearance, at a little distance, of an even tone.
Remember that there should be hardly any visible lines. When everything is finished, they should be smoothed out with a stump and rag so that they appear almost like a uniform tone when viewed from a distance.
In some cases the background may be carried up higher than the middle of the head, but it is very rarely necessary to surround the whole head with it.
In some cases, the background can be extended higher than the middle of the head, but it’s very rarely needed to surround the entire head with it.
Sometimes a very light tone may be[Pg 71] put all over the paper with the large stump and rag.
Sometimes a very light tone can be[Pg 71] applied all over the paper using a large stump and rag.
In this case the lines are only used at the darkest part around the shoulders. These matters must be determined by individual taste, and the composition of the portrait, as it is impossible to make general rules for every case.
In this case, the lines are only used in the darkest areas around the shoulders. These details should be decided based on personal preference and the overall composition of the portrait, as it’s impossible to create general rules that apply to every situation.
Never attempt to make landscape backgrounds or effects of drapery and still-life behind a simple portrait head. Every thing should be kept subordinate to the face, which is the most important thing of all. Never use white chalk or crayon with the black in such portraits; take all lights out with bread, or leave the paper clean.
Never try to create landscape backgrounds or effects of drapery and still life behind a simple portrait head. Everything should be kept secondary to the face, which is the most important aspect of all. Avoid using white chalk or crayon with the black in such portraits; remove all highlights with bread, or leave the paper untouched.
DRAPERY.
All drapery in a crayon portrait must be treated as simply as possible, being regarded only as secondary in importance to the head, which is, of course, the main object of interest.
All drapery in a crayon portrait should be handled as simply as possible, viewed only as secondary to the head, which is, of course, the main focus.
[Pg 72]
[Pg 72]
All elaborate trimmings or pronounced fashions should be avoided.
All fancy decorations or flashy styles should be avoided.
Different kinds of material are interpreted by carefully studying the different forms of the lights and shadows in each. For instance, black satin is rendered by large masses of black, as black as crayon can be made with sharp, narrow high lights, so light as to be almost white.
Different types of material are understood by closely examining the various shapes of light and shadow in each. For example, black satin is depicted with large areas of deep black, as dark as crayon can get, combined with sharp, narrow highlights that are so bright they’re nearly white.
In black silk, the masses of dark are lighter in their general tone, and the lights less sharp and brilliant.
In black silk, the dark areas are softer in tone, and the highlights are less intense and bright.
The different colors are represented by lighter or darker tones, as the case may be.
The various colors are represented by lighter or darker shades, depending on the situation.
In black velvet, the masses of dark are softer than in satin and not so jetty black, while the lights are less brilliant and more diffused in effect, leaving more half tints than are seen either in silk or satin. In black cloths the lights are quite low in tone and the darks are not very black, no sharp high lights are seen at all, both light and shade taking large and simple forms.
In black velvet, the dark areas are softer than in satin and not as deep black, while the lights are less intense and more spread out, creating more shades than in silk or satin. In black fabrics, the lights are quite muted and the darks aren't very dark; there are no sharp highlights, and both light and shadow have large, simple shapes.
White stuffs, such as lace, muslin, etc.,[Pg 73] are also kept simple in effect, and are laid in with a very delicate tone all over the mass of light, and the high lights are taken out with bread.
White materials, like lace and muslin, [Pg 73] are also kept straightforward in appearance, and are applied with a very soft tone across the bright areas, while the highlights are removed using bread.
The shadows should also be delicate and transparent and not too dark. White hair is treated in this way also, the character of the hair being indicated by the form of the lights.
The shadows should be light and transparent, not too dark. White hair should be handled in the same way, with the quality of the hair shown through the shape of the highlights.
When there is a white cap upon the head or lace of any kind, do not make it too prominent, but carefully study its value in relation to the face.
When there’s a white cap on the head or any lace, don’t make it too noticeable; instead, pay close attention to how it complements the face.
[Pg 74]
[Pg 74]
CHAPTER VII.
CHARCOAL AND CRAYON DRAWING WITH
THE POINT; LANDSCAPES, PROPORTIONS,
ETC.
This method is principally used by artists in making drawings for illustration, as stump drawings can not well be reproduced. The manner of working is as follows:—
This method is mainly used by artists for creating illustrations, as stump drawings are difficult to reproduce. The way it is done is as follows:—
Sketch in the outline with the charcoal stick, sharpened to a point, and then proceed to block in the shadows, which must be drawn in with careful attention to the form, for the reason that it is best to make a distinct outline of each mass of shadow where it meets the light. These shadows are now filled in with the pointed charcoal, used in close parallel lines until a[Pg 75] flat, even tone is obtained. It is not necessary that these lines should be distinct, or of exact regularity, as in the very darkest shadows no lines at all should be seen. The half tints are managed in the same way with the point, which may be used in the direction of the features to some extent.
Sketch the outline with a sharpened charcoal stick, then start filling in the shadows, paying close attention to the shape. It's important to clearly define the outline of each shadow where it meets the light. Use the pointed charcoal to fill in these shadows with closely spaced parallel lines until you achieve a flat, even tone. These lines don’t need to be distinct or perfectly regular; in the darkest shadows, no lines should be visible at all. The mid-tones are handled the same way with the point, which can be used to follow the direction of the features to some degree.
The main thing to be remembered is that no stump must be used, nor the charcoal rubbed in any way. For erasing, bread is the best, though rubber is sometimes found useful.
The main thing to remember is that no stump should be used, and charcoal shouldn't be rubbed in any way. For erasing, bread is the best option, though rubber can sometimes be helpful.
The crayon point is employed in exactly the same way as the charcoal, the directions applying equally to both. All drawings should be fixed as soon as finished.
The crayon tip is used in the same way as charcoal, with the same instructions applying to both. All drawings should be secured as soon as they are completed.
PROPORTIONS OF THE FIGURE.
A few conventional rules for the general proportions of the face and figure may be found useful to the student in drawing from life, and are regulated according to the standard of beauty as determined by[Pg 76] the Greek statues. Such proportions will naturally vary in individual cases, yet are valuable as a foundation, which may be modified when necessary.
A few standard guidelines for the overall proportions of the face and body can be helpful for students drawing from life, based on the beauty standards set by [Pg 76] Greek statues. While these proportions will naturally differ from person to person, they serve as a useful foundation that can be adjusted as needed.
The height of a well developed man is eight heads or eight times the length of his own head.
The height of a well-developed man is eight heads tall, or eight times the length of his head.
The height of a woman, seven heads.
The height of a woman is seven heads tall.
The human figure may be divided into four parts of equal length, viz.: from the top of the head to the arm-pit, thence to the middle of the body, thence to the knees, thence to the soles of the feet.
The human body can be divided into four equal parts: from the top of the head to the armpit, from there to the middle of the body, from there to the knees, and from there to the soles of the feet.
The arms extended straight out at right angles to the body will measure from finger-tip to finger-tip the length of the figure from crown of head to sole of foot.
The arms extended straight out at right angles to the body will measure from fingertip to fingertip the length of the figure from the top of the head to the bottom of the foot.
The face may be divided into three parts. From the top of the forehead to the root of the nose; from there to the bottom of the nose, thence to the bottom of the chin. The ear is the length of the nose, and its general direction is parallel to it.
The face can be divided into three sections. From the top of the forehead to the bridge of the nose; from there to the bottom of the nose, and then down to the bottom of the chin. The ear is as long as the nose, and it generally points in the same direction.
From the top of the shoulder to the[Pg 77] elbow measures twice the length of the face, or one head and a half.
From the top of the shoulder to the[Pg 77] elbow measures twice the length of the face, or one and a half heads.
From the elbow to the wrist one head.
From the elbow to the wrist is one head.
The hand measures three-quarters of a head from the tip of the middle finger to the wrist.
The hand measures three-quarters of a head from the tip of the middle finger to the wrist.
The foot measures one-sixth of the whole length of the body.
The foot is one-sixth of the total body length.
LANDSCAPE.
Charcoal is a favorite medium with many artists for landscape subjects, and it is, as before stated, especially useful in sketching from nature.
Charcoal is a popular medium among many artists for landscape subjects, and it is, as mentioned earlier, particularly helpful for sketching from nature.
In beginning to draw a landscape in charcoal, first sketch in lightly the horizon line, the outlines of the trees and different objects, in their general aspect.
In starting to draw a landscape with charcoal, first lightly sketch the horizon line, the outlines of the trees, and various objects in their overall shape.
It is always well to select a subject where there is a good effect of light and shade and sufficient variety to give interest.
It’s always a good idea to choose a topic that has a nice balance of light and shadow and enough variety to keep things interesting.
After the composition is sketched in, look for the large masses of shadow, and divide the whole into two distinct masses[Pg 78] of light and shade, as in figure drawing. The sky is covered with a light tone, at first, and even the masses of light are also covered with a delicate half-tint.
After the sketch of the composition is done, identify the large areas of shadow, and split the whole into two clear sections of light and dark, just like in figure drawing. The sky starts off with a light tone, and even the sections of light have a subtle half-tint. [Pg 78]
The whole drawing may be made entirely with the point if it is desired, but the French artist Allongé, who is celebrated for his charcoal landscapes, prefers the use of the stump, with the point in finishing.
The entire drawing can be done completely with the point if you want, but the French artist Allongé, known for his charcoal landscapes, prefers using the stump, finishing with the point.
If in place of the stump the finger sometimes is used to blend the charcoal, and for rapid sketches, this is very effective.
If instead of the stump, the finger is sometimes used to blend the charcoal, it can be very effective for quick sketches.
After the general masses are put in, the details are drawn with the point, being somewhat softened with the stump, though in trunks of trees, dark branches, rocks, etc., the marks of the point are left unsoftened to give strength.
After the general shapes are added, the details are refined with the point, slightly softened with the stump, although in tree trunks, dark branches, rocks, and similar elements, the point's marks are left sharp to maintain strength.
The lights are taken out with bread or rubber; sometimes a piece of chamois skin is found useful in lightening a tone. The light clouds are taken out with bread from the sky which has been covered with a half-tint, and the dark clouds are put in[Pg 79] with the stump or point, according to the method employed.
The lights are removed using bread or rubber; sometimes, a bit of chamois leather is helpful for lightening a tone. The light clouds are taken out using bread from the sky that has been shaded with a half-tint, and the dark clouds are added in with the stump or point, depending on the method used.[Pg 79]
In sketching from nature out of doors, it is always well to adopt some prominent object as a standard of measurement; for instance, take a house or tree in the middle distance, and compare this in height with objects in the background and foreground. In this way your perspective, if simple, may be made correct without any elaborate rules.
In drawing from nature outside, it's a good idea to use a prominent object as a reference point for measurement. For example, pick a house or tree in the middle distance and compare its height with objects in the background and foreground. This way, if your perspective is straightforward, you can make it accurate without needing complex rules.
Objects in the distance are naturally smaller than those in the foreground, and the exact proportions can be determined by comparative measurement.
Objects far away look smaller than those up close, and you can figure out the exact sizes through comparison.
In drawing a road or path, notice that it will become narrower as it recedes into the distance. For those who have never studied perspective such suggestions are useful.
In drawing a road or path, notice that it gets narrower as it goes into the distance. For those who have never studied perspective, these tips are helpful.
It is very important also that the values should be carefully studied; it is a good thing to establish the darkest spot of shadow in the whole sketch, and compare all the other darks with it, as already sug[Pg 80]gested in figure drawing. Determine also the brightest light, and let the other lights be in their proper relation to it.
It’s really important to analyze the values closely; it helps to identify the darkest part of the sketch and compare all the other dark areas to it, as mentioned before in figure drawing. Also, find the brightest light and make sure the other light sources are accurately positioned relative to it. [Pg 80]
Either crayon or charcoal, or both, may be used for landscapes; it is always better to sketch in the drawing with charcoal, even if crayon is used afterward.
Either crayon or charcoal, or both, can be used for landscapes; it’s always better to start the sketch with charcoal, even if you use crayon later on.
Some very good effects are produced by using crayon or charcoal on tinted paper, either gray, blue, or light brown, and, leaving the tone of the paper for the half-tint, put in the high lights with white chalk.
Some great effects can be achieved by using crayon or charcoal on colored paper, like gray, blue, or light brown. By leaving the paper’s tone for the midtones, you can add the highlights with white chalk.
In such drawings the stump must not be used, nor should the tones be rubbed or blended in any way. Use the crayon or charcoal point in the manner already described, and put the lights in at the last with crisp, strong touches.
In these drawings, you shouldn't use the stump, and the tones shouldn't be smudged or blended at all. Use the crayon or charcoal point as described before, and add the highlights at the end with sharp, strong strokes.
As the student continues his practice he will find out the resources of these most interesting materials, and will develop new possibilities for himself as he becomes more adept, but it must be remembered that there is no “royal road to learning,”[Pg 81] and to succeed in acquiring proficiency in drawing of any kind, requires patience and perseverance, with constant practice.
As the student keeps practicing, they'll discover the potential of these fascinating materials and create new opportunities for themselves as they get better. However, it’s important to remember that there’s no easy shortcut to learning, and becoming skilled in drawing of any kind requires patience, perseverance, and consistent practice.[Pg 81]
[Pg 82]
[Pg 82]
APPENDIX.
EXPLANATION OF THE PLATES.
The intention of the author in presenting these plates is that the student, by copying a series of progressive drawings, may be prepared to study from the cast and from life. For those who are entirely inexperienced, it is much easier to learn this method from such flat copies at first, as it not only teaches the use of the materials, but familiarizes the student with the forms of the different features, so that when confronted with nature he finds his difficulties considerably lessened.
The author aims to help students by providing these plates, allowing them to copy a series of progressive drawings to get ready for studying from casts and life models. For complete beginners, it's much simpler to learn this approach using flat copies initially, as it not only teaches them how to use the materials but also helps them get used to the shapes of different features. This way, when they encounter real life, they will find their challenges significantly reduced.
PLATE I.
This plate is intended to show the drawing of the human eye and mouth in[Pg 83] different positions, as well as to familiarize the student with the general form of these important features. Only charcoal sharpened to a point is necessary for these outlines, which should be carefully practiced before proceeding to Plate II.
This plate is meant to display the drawing of the human eye and mouth in[Pg 83] different positions, and to help the student get used to the general shape of these important features. All that's needed for these outlines is charcoal sharpened to a point, which should be practiced carefully before moving on to Plate II.
PLATE II.
This study is intended for those who have never drawn from the cast, and have had no practice in using charcoal. A. represents the manner of beginning a drawing. Make a dot on the paper for the top, and one for the bottom of the fragment to ascertain where to place the lines, and then with a sharply pointed charcoal stick, draw the general form of the outline in the manner shown in the plate, without attempting any detail. The shadows are then blocked in squarely with the point. When the proportions are thus ascertained to be correct, proceed to finish the drawing as is seen in B.
This study is for those who have never engaged in drawing from a model and have no experience using charcoal. A. shows how to start a drawing. Make a dot on the paper for the top and another for the bottom of the section to figure out where to place the lines. Then, using a sharp charcoal stick, sketch the general shape of the outline as shown in the plate, without trying to add any details. Next, fill in the shadows straightforwardly with the tip of the charcoal. Once you confirm the proportions are correct, go ahead and finish the drawing as seen in B.
To do this, rub the shadows with the stump till one flat, even tone is obtained,[Pg 84] and carefully draw the outline, turning the angles into curves.
To do this, blend the shadows with the stump until you achieve one flat, even tone,[Pg 84] and carefully draw the outline, softening the angles into curves.
This plate is for the most elementary practice in drawing, and no further degree of finish than this should be attempted, until the student has learned to do this much well.
This plate is for the most basic practice in drawing, and no more refinement than this should be attempted until the student has learned to do this part well.
PLATE III.
This represents a simple study of the hand, drawn from a cast. A. indicates the manner of laying in the study, the curved lines being drawn to show the direction and movement of the fingers.
This is a straightforward study of the hand, created from a cast. A. shows how the study is laid out, with curved lines indicating the direction and movement of the fingers.
In B. the stump is used in the shadows, and the modeling is carried on further than in Plate II., the half-tint being added. The outline is carefully finished with the pointed crayon, which is also used in the shadows.
In B, the stump is utilized in the shadows, and the modeling is taken further than in Plate II, with half-tint being added. The outline is meticulously refined with a pointed crayon, which is also used in the shadows.
PLATE IV.
The part drawn from the cast here represented, is laid in with charcoal, as in Fig. A., and then carried on in crayon[Pg 85] as in Fig. B. The outline is carefully drawn and the shadows blocked in squarely at first as usual, and then changed with great care into the necessary correct forms.
The section taken from the cast shown here is sketched in with charcoal, like in Fig. A, and then continued with crayon[Pg 85] as in Fig. B. The outline is drawn precisely, and the shadows are initially filled in squarely, just like usual, and then carefully adjusted into the correct shapes.
It will be noticed that this study is a little further advanced than those already given, more detail being shown, as well as a little greater variety in the half-tints. The straight lines across the base and ends of the toes serve to direct the eye to the difference between their general direction and a perfectly horizontal line.
It’s worth noting that this study is a bit more progressed than the previous ones, showing more detail as well as a greater variety in the half-tints. The straight lines across the base and ends of the toes guide the viewer's eye to the contrast between their overall direction and a perfectly horizontal line.
PLATE V.
In this plate the whole profile view of a face is given, Fig. A. representing the way to lay in a head. The straight lines outside may be ruled, as they have nothing to do with the drawing, but are merely mechanical aids by which the angle of the features is determined.
In this plate, the complete profile view of a face is shown, with Fig. A illustrating how to position a head. The straight lines on the outside can be drawn using a ruler, as they don’t affect the drawing itself but are simply mechanical aids that help establish the angle of the features.
In B. the modeling of the features is carried on still further than in any of the[Pg 86] preceding studies, the half-tints and shadows, however, being still kept flat.
In B, the modeling of the features goes even further than in any of the[Pg 86] previous studies, although the half-tints and shadows are still kept flat.
PLATE VI.
This plate gives a more difficult study in the three-quarter view of a male head. In laying in the drawing, as in Fig. A., be careful to get the proportions as perfectly correct as possible before proceeding to carry the modeling further, as in Fig. B.
This plate presents a more challenging study of a male head in a three-quarter view. When starting the drawing, as shown in Fig. A, make sure to get the proportions as accurate as possible before moving on to develop the modeling further, as seen in Fig. B.
This head, though more finished than any other yet given, purposely stops short of the final extent to which such drawings may be carried, as the object of the author is to familiarize the student with each step by the way. In the smaller touches about the eyes, nose, etc., the pointed rubber stump will be found more available than bread. For the large masses of shadow it would be well to rub off some sauce crayon on a small piece of drawing paper and fasten it one side of the easel, or, if preferred, rub the pointed crayon on the rough paper until[Pg 87] a sufficient quantity adheres. The stump is rolled around in this until sufficient is taken up to cover the large mass of shadow. The more careful work is carried on with the pointed Conté crayon, small stump, and pointed rubber, or bread, as before explained.
This head, while more refined than any previous versions, intentionally stops short of the final detail that such drawings can reach because the author's goal is to help the student become familiar with each step along the way. For the finer details around the eyes, nose, and so on, a pointed rubber stump is more effective than bread. For the larger areas of shadow, it’s a good idea to rub a bit of sauce crayon onto a small piece of drawing paper and attach it to one side of the easel, or if you prefer, rub the pointed crayon on the rough paper until[Pg 87] enough collects. The stump is rolled in this until it picks up enough to cover the large shadow areas. The more detailed work is done with the pointed Conté crayon, a small stump, and the pointed rubber or bread, as previously explained.
PLATE VII.
Plate VII. is intended to prepare the student for drawing the full length figure from the cast, and should be carefully copied. An excellent exercise would be to draw Fig. A. several times first, in order to practice the manner of beginning such a drawing; then when this is fully mastered proceed to finish as in Fig. B., which in this plate shows a fully completed drawing from the cast.
Plate VII. is meant to get the student ready to draw the full-length figure from the cast and should be copied carefully. A great exercise would be to draw Fig. A. several times first to practice how to start such a drawing; then, once this is fully mastered, move on to finish like in Fig. B., which on this plate shows a fully completed drawing from the cast.
PLATE VIII.
This plate represents a study of the male figure taken directly from life, and is a most carefully finished drawing in every respect. Fig. A. shows the manner[Pg 88] of beginning such a figure; the outline is sketched in with long, sweeping lines at first, to determine the direction of the pose; the proportions are noted and the outline corrected, though drawn in angles, the general masses of shadow being blocked in as usual.
This plate showcases a study of the male figure created from a live model, and it's a meticulously finished drawing in every way. Fig. A. illustrates how to start such a figure; the outline is initially sketched with long, sweeping lines to establish the direction of the pose. Proportions are noted and the outline adjusted, even though drawn with angles, while the overall areas of shadow are filled in as usual.[Pg 88]
In Fig. B. the crayon and stump are taken up and the drawing is carefully carried on as shown by the plate, until completed.
In Fig. B, the crayon and stump are picked up and the drawing is carefully continued as shown in the plate, until it's finished.
The End.
The End.
Download ePUB
If you like this ebook, consider a donation!