This is a modern-English version of Animated cartoons : How they are made, their origin and development, originally written by Lutz, Edwin George.
It has been thoroughly updated, including changes to sentence structure, words, spelling,
and grammar—to ensure clarity for contemporary readers, while preserving the original spirit and nuance. If
you click on a paragraph, you will see the original text that we modified, and you can toggle between the two versions.
Scroll to the bottom of this page and you will find a free ePUB download link for this book.
Footnote anchors are denoted by [number], and the footnotes have been placed at the end of the chapter.
Footnote anchors are marked by [number], and the footnotes are located at the end of the chapter.
Some minor changes to the text are noted at the end of the book.
Some small updates to the text are mentioned at the end of the book.
ANIMATED CARTOONS
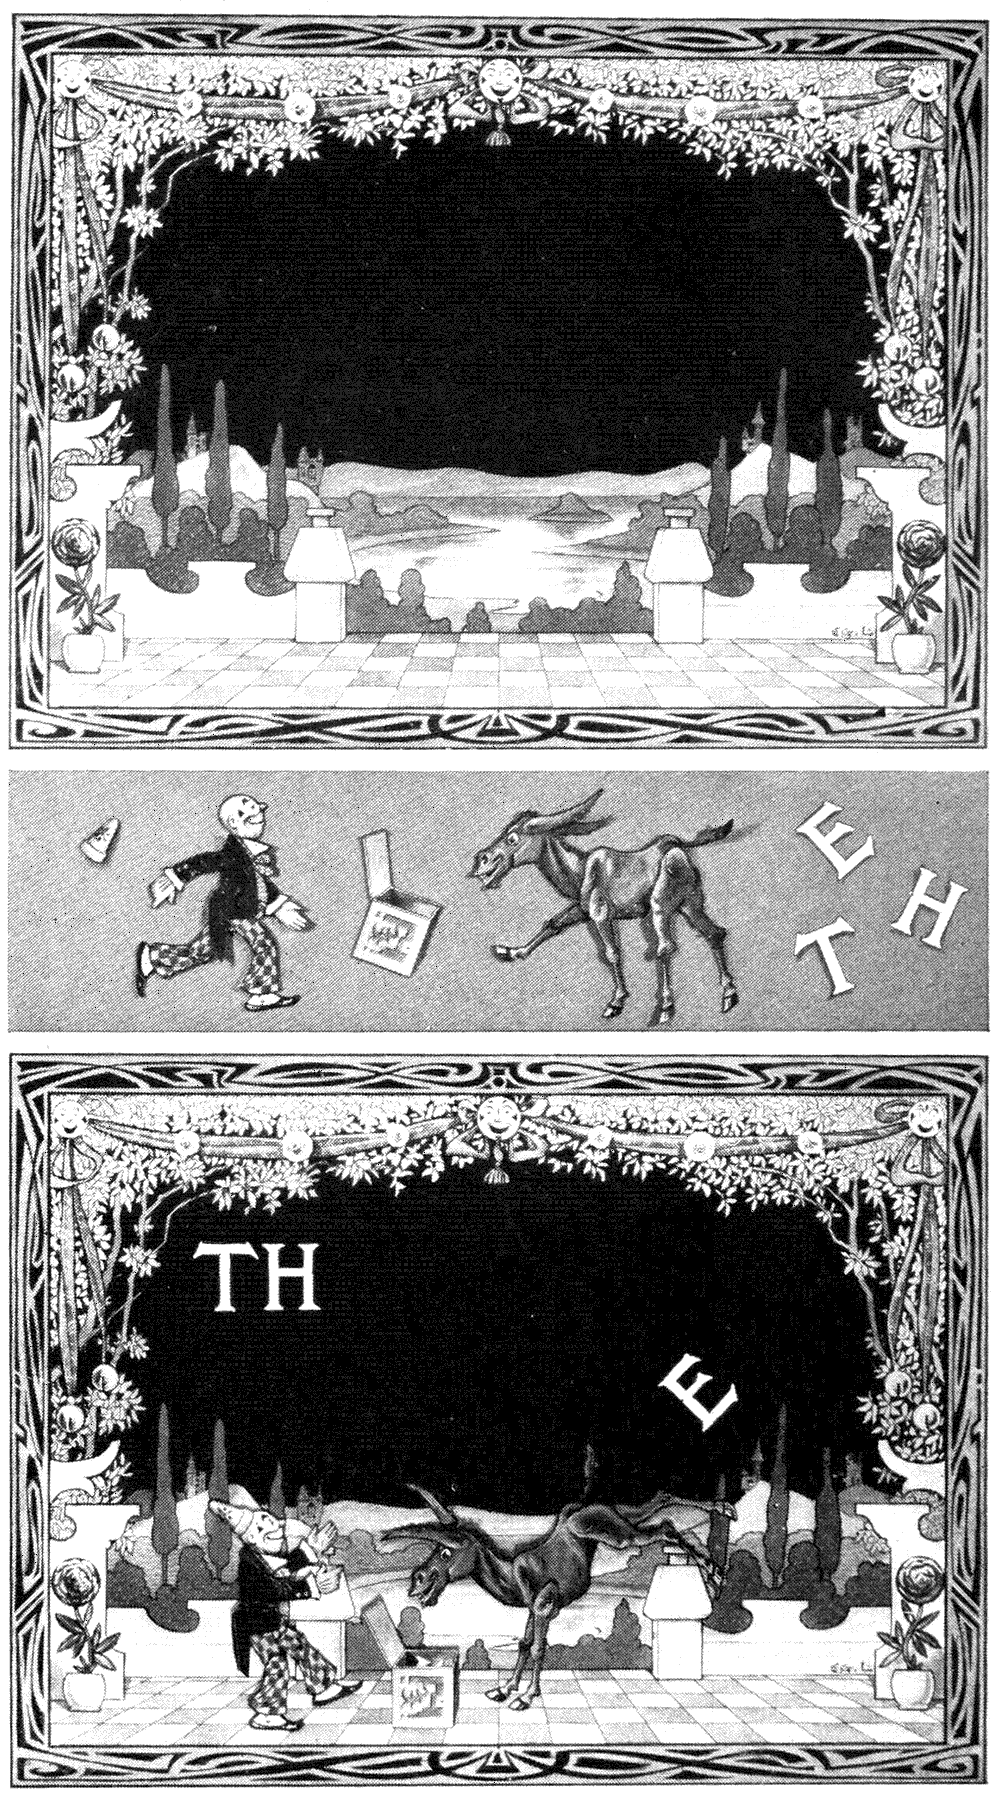
Above: Background scene and the separate items.
Above: Background scene and the individual items.
Below: Completed scene showing one phase of the performance of the little cardboard actors and stage property.
Below: Finished scene displaying one part of the performance with the small cardboard characters and stage props.
[See page 90]
[See page __A_TAG_PLACEHOLDER_0__]
ANIMATED CARTOONS
HOW THEY ARE MADE
THEIR ORIGIN AND DEVELOPMENT
Animated cartoons
HOW THEY ARE CREATED
THEIR ORIGIN AND GROWTH
BY
E. G. LUTZ
BY
E. G. LUTZ
ILLUSTRATED
ILLUSTRATED
NEW YORK
CHARLES SCRIBNER’S SONS
1920
NEW YORK CHARLES SCRIBNER’S SONS 1920
Copyright, 1920, by
CHARLES SCRIBNER’S SONS
Copyright, 1920, by
CHARLES SCRIBNER’S SONS
Published February, 1920
Published February 1920
[Pg v]
[Pg v]
INTRODUCTION
We learn through the functioning of our senses; sight the most precious shows us the appearance of the exterior world. Before the dawn of pictorial presentation, man was visually cognizant only of his immediate or present surroundings. On the development of realistic picturing it was possible, more or less truthfully, to become acquainted with the aspect of things not proximately perceivable. The cogency of the perceptive impression was dependent upon the graphic faithfulness of the agency—a pictorial work—that gave the visual representation of the distant thing.
We learn through our senses; sight, the most valuable, shows us how the outside world looks. Before the time of paintings, people were only aware of their immediate surroundings. With the advancement of realistic art, it became possible, to some extent, to learn about things we can't see directly. The strength of our perception was based on how accurately the artwork represented the distant object.
It is by means of sight, too, that the mind since the beginning of alphabets has been made familiar with the thoughts and the wisdom of the past and put into relationship with the learning and reasoning of the present. These two methods of imparting knowledge—delineatory[vi] and by inscribed symbols—have been concurrent throughout the ages.
It is through sight that the mind, since the start of alphabets, has become familiar with the thoughts and wisdom of the past and connected with the learning and reasoning of the present. These two methods of sharing knowledge—visual representation[vi] and written symbols—have existed side by side throughout history.
It was nearly a century ago that Joseph Nicéphore Niepce (1765-1833), at Châlons-sur-Saône, in France, invented photography. Since that time it has been possible to fix on a surface, by physicochemical means, pictures of the exterior world. It was another way of extending man’s horizon, but a way not dependent, in the matter of literalness, upon the variations of any individual’s skill or intent, but rather upon the accuracy of material means.
It was almost a hundred years ago that Joseph Nicéphore Niepce (1765-1833) invented photography in Châlons-sur-Saône, France. Since then, it has been possible to capture images of the outside world on a surface using physicochemical methods. It was yet another way to broaden human experience, but unlike other forms of art, it didn’t rely on an individual's skill or intention, but instead on the precision of the tools used.
Thoughts and ideas once represented and preserved by picture-writing, recorded by symbolical signs, and at last inscribed by alphabetical marks were, in 1877, registered by mere tracings on a surface and again reproduced by Mr. Edison with his phonograph. As in the photograph, the procedure was purely mechanical, and man’s artificial inventions of linear markings and arbitrary symbols were totally disregarded.
Thoughts and ideas that were once represented and preserved through pictures, recorded with symbolic signs, and eventually written down with letters were, in 1877, captured by simple traces on a surface and later reproduced by Mr. Edison with his phonograph. Just like in photography, the process was completely mechanical, and the artificial inventions of linear markings and arbitrary symbols created by humans were completely overlooked.
Through photography we learn of the exterior nature of absent things and the character of the views in distant places. Or it preserves these[vii] pictorial matters in a material form for the future. The phonograph communicates to us the uttered thoughts of others or brings into our homes the melodies and songs of great artists that we should not otherwise have the opportunity to hear.
Through photography, we discover the outer nature of things that are no longer present and the essence of views from far-off places. It also keeps these visual elements in a physical form for future generations. The phonograph shares the spoken thoughts of others or brings the melodies and songs of great artists into our homes that we wouldn’t otherwise get a chance to hear.
And now a new physicochemical marvel has come that apprehends, reproduces, and guards for the future another sensorial stimulus. It is the motion-picture and the stimulus is movement.
And now a new physicochemical wonder has arrived that captures, reproduces, and preserves for the future another sensory experience. It is the motion picture, and the experience is movement.
Photography and the rendering of sounds by the phonograph have both been adopted for instruction and amusement. The motion-picture also is used for these purposes, but in the main the art has been associated with our leisure hours as a means of diversion or entertainment. During the period of its growth, however, its adaptability to education has never been lost sight of. It is simply that development along this line has not been as seriously considered as it should be. Motion-pictures, it is true, that may be considered as educational are frequently shown in theatres and halls. Such, for instance, are views in strange lands, scenic wonders, and pictures showing the manufacture of some useful article or the manner[viii] of proceeding in some field of human activity. But these are effected entirely by photography and the narration of their making does not come within the scope of this book.
Photography and sound recordings from the phonograph have both been used for teaching and entertainment. Motion pictures are also utilized for these purposes, but generally, this art form is more connected with our free time as a source of fun or enjoyment. However, as it developed, its potential for education has never been overlooked. It’s just that this aspect hasn’t been taken as seriously as it should be. There are indeed motion pictures that can be considered educational and are often shown in theaters and community centers. For example, films featuring foreign lands, natural wonders, and demonstrations of how useful items are made or how various human activities take place. But these are created solely through photography, and the storytelling behind their creation isn't covered in this book.
Our concern is the description of the processes of making “animated cartoons,” or moving screen drawings. Related matters, of course, including the inception and the development of motion-pictures in general, will be referred to in our work. At present, of the two divisions of our subject, the art of the animated comic cartoon has been most developed. It is for this reason that so much of the book is given to an account of their production.
Our focus is on describing the processes of creating “animated cartoons,” or moving drawings on screen. Related topics, of course, including the origin and evolution of motion pictures in general, will also be discussed in our work. Currently, among the two main areas of our topic, the art of animated comic cartoons has seen the most growth. That's why a large portion of the book is dedicated to their production.
But on the making of animated screen drawings for scientific and educational themes little has been said. This is not to be taken as a measure of their importance.
But not much has been said about creating animated screen drawings for scientific and educational topics. This shouldn't be seen as a reflection of their importance.
It is interesting to regard for a moment the vicissitudes of the word cartoon. Etymologically it is related to words in certain Latin tongues for paper, card, or pasteboard. Its best-accepted employment—of bygone times—was that of designating an artist’s working-size preliminary[ix] draft of a painting, a mural decoration, or a design for tapestry. Raphael’s cartoons in the South Kensington Museum, in London, are the best-known works of art coming under this meaning of the term. (They are, too, the usual instances given in dictionaries when this meaning is explained.) The most frequent use of the word up to recently, however, has been to specify a printed picture in which the composition bears upon some current event or political topic and in which notabilities of the day are generally caricatured. The word cartoon did not long particularize this kind of pictorial work but was soon applied to any humorous or satirical printed picture no matter whether the subject was on a topic of the day or not.
It’s interesting to take a moment to consider the twists and turns of the word cartoon. Etymologically, it’s linked to words in some Latin languages for paper, card, or pasteboard. Its most recognized use in the past was to refer to an artist’s working-size preliminary[ix] draft of a painting, mural decoration, or tapestry design. Raphael’s cartoons in the South Kensington Museum in London are the most famous artworks associated with this meaning of the term. (They are also the typical examples given in dictionaries when explaining this definition.) However, until recently, the word was most commonly used to describe a printed picture that focuses on a current event or political issue, often caricaturing notable figures of the time. The term cartoon didn’t take long to expand beyond this specific type of artwork and came to refer to any humorous or satirical printed image, regardless of whether the subject was topical or not.
When some of the comic graphic artists began to turn their attention to the making of drawings for animated screen pictures, nothing seemed more natural than that the word “animated” should be prefixed to the term describing their products and so bringing into usage the expression “animated cartoons.” But the term did not long remain restricted to this application, as[x] it soon was called into service by the workers in the industry to describe any film made from drawings without regard to whether the subject was of a humorous or of an educational character. Its use in this sense is perhaps justified as it forms a convenient designation in the trade to distinguish between films made from drawings and those having as their basic elements actuality, that is, people, scenes, and objects.
When some comic artists started creating drawings for animated films, it made perfect sense for them to use the term “animated” alongside the word that described their work, leading to the phrase “animated cartoons.” However, this term quickly expanded beyond its original meaning, as[x] industry professionals began using it to refer to any film made from drawings, regardless of whether it was funny or educational. This broader usage is probably justified, as it provides a handy term in the industry to differentiate films made from drawings from those based on real life, meaning people, scenes, and objects.
Teachers now are talking of “visual instruction.” They mean by this phrase in the special sense that they have given to it the use of motion-picture films for instructional purposes. Travel pictures to be used in connection with teaching geography or micro-cinematographic films for classes in biology are good examples of such films. But not all educational subjects can be depicted by the camera solely. For many themes the artist must be called in to prepare a series of drawings made in a certain way and then photographed and completed to form a film of moving diagrams or drawings.
Teachers nowadays are discussing “visual instruction.” They use this term specifically to refer to the use of motion-picture films for teaching purposes. Travel films for geography lessons or micro-cinematographic films for biology classes are great examples of this type of film. However, not all educational topics can be captured solely by the camera. For many subjects, an artist must be involved to create a series of drawings in a specific style, which are then photographed and compiled to make a film of moving diagrams or illustrations.
As it is readily understood that any school topic presented in animated pictures will stimulate[xi] and hold the attention, and that the properties of things when depicted in action are more quickly grasped visually than by description or through motionless diagrams, it is likely that visual instruction by films will soon play an important part in any course of studies. Then the motion-picture projector will become the pre-eminent school apparatus and such subjects as do not lend themselves to photography will very generally need to be drawn; thereupon the preponderance of the comic cartoon will cease and the animated screen drawing of serious and worth-while themes will prevail.
It's clear that any school topic shown in animated pictures will capture attention and keep it, and that it's easier to understand things when they're shown in action rather than through words or still diagrams. Therefore, visual instruction through films is likely to become a key part of any curriculum. The movie projector will become the leading educational tool, and subjects that can’t be photographed will usually need to be illustrated. As a result, the dominance of comic cartoons will fade, and serious and meaningful animated screen drawings will take their place.
E. G. L.
E. G. L.
CONTENTS
| PAGE | ||
| I. | The Beginning of Animated Drawings The Start of Animated Art |
3 |
| II. | The Genesis of Motion-Pictures The Birth of Motion Pictures |
35 |
| III. | Making Animated Cartoons Creating Animated Cartoons |
57 |
| IV. | Further Details on Making Animated Cartoons Further Details on Creating Animated Cartoons |
83 |
| V. | On Movement in the Human Figure On Movement in the Human Figure |
99 |
| VI. | Notes on Animal Locomotion Notes on Animal Movement |
131 |
| VII. | Inanimate Things in Movement Moving Inanimate Objects |
153 |
| VIII. | Miscellaneous Matters in Making Animated Screen Pictures Miscellaneous Issues in Creating Animated Screen Images |
171 |
| IX. | Photography and Other Technical Matters Photography and Other Tech Issues |
201 |
| X. | On Humorous Effects and on Plots On Humorous Effects and on Plots |
223 |
| XI. | Animated Educational Films and the Future Animated Educational Films and the Future |
245 |
ILLUSTRATIONS
| Illustrating the method of making animated cartoons by cut-outs | Frontispiece | |
| PAGE | ||
| Magic-lantern and motion-picture projector compared | 7 | |
| Geneva movement | 9 | |
| A motion-picture projector | 11 | |
| Illustrating the proportions of light and dark periods during projection in two types of shutters | 12 | |
| Section of an animated cartoon film | 15 | |
| The thaumatrope | 17 | |
| Two instruments used in early investigations of optical phenomena | 18 | |
| Apparatus on the order of Faraday’s wheel | 19 | |
| An antecedent of the phenakistoscope | 20 | |
| A phenakistoscope | 21 | |
| Phenakistoscope combined with a magic-lantern | 22 | |
| Phenakistoscope with a cycle of drawings to show a dog in movement | 23 | |
| The zootrope | 24 | |
| Zoetrope of William Lincoln | 25 | |
| Reynaud’s praxinoscope | 26 | |
| The theatre praxinoscope | 28[xvi] | |
| Projection praxinoscope | 29 | |
| Optical theatre of Reynaud | 30 | |
| The kineograph | 31 | |
| Plan of the apparatus of Coleman Sellers | 36 | |
| The ostrich walking; from Muybridge | Facing page 40 | |
| Marey’s photographic gun | 42 | |
| Plan of the kinora | 43 | |
| Plan of Edison’s first kinetoscope | 46 | |
| Projector and motion-picture camera compared | 48 | |
| A negative and a positive print | 49 | |
| Plan of a motion-picture camera | 50 | |
| Types of camera and projector shutters | 51 | |
| One foot of film passes through the projector in one second | 53 | |
| “Animator’s” drawing-board | 61 | |
| A sheet of perforated paper and the registering pegs | 63 | |
| Illustrating the making of an animated scene | 67 | |
| Illustrating the making of an animated scene with the help of celluloid sheets | 71 | |
| Arrangement of board, pegs, and hinged frame with glass | 75 | |
| Balloons | 78 | |
| Three elements that complete a scene | 79 | |
| Phenakistoscope with cycle of drawings of a face to show a movement of the mouth | 80 | |
| Cardboard model of an airplane with separate cut-out propellers | Facing page 84[xvii] | |
| The laws of perspective are to be considered in “animating” an object | 86 | |
| Perspective applied in the drawing of birds as well as in the picturing of objects | 87 | |
| Articulated cardboard figures | 89 | |
| Illustrating the animation of a mouse as he runs around the kitchen | 95 | |
| Successive phases of movements of the legs in walking | 101 | |
| Illustrating the action of the foot in rolling over the ground | 103 | |
| Successive phases of movements in walking | 105 | |
| Phases of movement of a quick walk | 107 | |
| Contractions and expansions as characteristic of motion | 109 | |
| Order in which an animator makes the sequence of positions for a walk | 112 and 113 | |
| Phases of movement of a walk. Six phases complete a step | 115 | |
| A perspective walk | 117 | |
| Four positions for a perspective run | 118 | |
| Phases of movement for a perspective run | 119 | |
| Running figure | 121 | |
| Phases of movement for a quick walk | 123 | |
| Walking movements, somewhat mechanical | 124 | |
| Phases of movement for a lively walk | 125 | |
| Phases of movement for a quick walk | 127 | |
| Walking movements viewed from above | 128 | |
| Trotting horse | 134 | |
| Trotting horse (continued) | 135[xviii] | |
| A panorama effect | 138 | |
| Galloping horse for a panorama effect | 139 | |
| The elephant in motion | 140 | |
| The elephant in motion (continued) | 141 | |
| Pigeon in flight; from Muybridge | Facing page 142 | |
| Comic walk of a duck | 143 | |
| Cycle of phases of a walking dog arranged for the phenakistoscope | 144 | |
| Phenakistoscope with a cycle of drawings to show a dog in movement | 145 | |
| Running cow | 147 | |
| Phases of movement of a walking lion | 148 | |
| Dog walking | 149 | |
| Various kinds of wave motion | 150 | |
| Cycle of drawings to produce a screen animation of a waving flag | 157 | |
| Cycle of drawings for an effect of falling water | 159 | |
| Cycle of drawings for a puff of vapor | 161 | |
| An explosion | 162 | |
| The finishing stroke of some farcical situation | 163 | |
| Piano practice | 164 | |
| Three drawings used in sequence and repeated as long as the particular effect that they give is desired | 165 | |
| A constellation | 166 | |
| Simple elements used in animating a scene | 167 | |
| Symbolical animation of snoring | 172[xix] | |
| Series of drawings used to show a baby crying | 173 | |
| A “close-up” | 175 | |
| Illustrating the use of little “model” hats to vivify a scene | 176 | |
| “Cut-out” eyes | 178 | |
| Illustrating the making of “in-between” drawings | 179 | |
| Illustrating the number of drawings required for a movement | 180 | |
| Illustrating a point in animating a moving limb | 182 | |
| Making drawings in turning the head | 183 | |
| Easily drawn circular forms and curves | 186 | |
| Foreground details of a pictorial composition | 190 | |
| Making an animated cartoon panorama | 193 | |
| Illustrating the apparent slowness of a distant object compared to one passing close to the eye | 195 | |
| Distinguishing marks on wheels to give the illusion of turning | 197 | |
| Elements used in giving a figure the effect of trembling | 198 | |
| Typical arrangement of camera and lights | 203 | |
| Part of a length of film for a title | 208 | |
| Vignetter or iris dissolve | 211 | |
| To explain the distribution of light in a cross dissolve | 213 | |
| Illustrating the operation of one type of motion-picture printer | 217 | |
| Another plan for an animator’s drawing-board | 218 | |
| Canine thoughts | 219 | |
| Plenty of movement demanded in screen pictures | 224 | |
| The plaint of inanimate things | 227[xx] | |
| The pinwheel effect of two boys fighting, elements needed in producing it | 231 | |
| Cycle of drawings to give the illusion of a man spinning like a top | 235 | |
| A blurred impression like that of the spokes of a turning wheel is regarded as funny | 236 | |
| Hats | 239 | |
| Radiating “dent” lines | 240 | |
| A laugh-provoking incident in an animated cartoon | 241 | |
| The Mad Hatter | 246 | |
| Detail of a fresco by Michael Angelo | 248 | |
| Mr. Frost’s spirited delineation of figures in action | 249 | |
| The peep-show | 250 | |
| Demeny’s phonoscope | 251 | |
| Drawings used in making a film of a gasolene engine in operation | 255 | |
| Character of drawings that would be prepared in producing moving diagrams of the muscles in action | 258 | |
THE BEGINNING OF ANIMATED DRAWINGS
THE START OF ANIMATED DRAWINGS
CHAPTER I
THE BEGINNING OF ANIMATED DRAWINGS
The picture thrown on the wall by the magic-lantern, although an illusion, and no more tangible than a shadow, has nevertheless a certain tactile quality. If it is projected from a drawing on a glass slide, its design is definite; and if from a photographic slide, the tones are clearly discernible. It is—unless it is one of those quaintly moving amusing subjects operated by a crude mechanism—a quiescent picture. The spirited screen picture thrown by the lens of a motion-picture projector is an illusion, too. It exemplifies, however, two varieties of this class of sensory deceptions. First: it is an illusion for the same reason that the image from the magic-lantern is one; namely, a projected shadow of a more or less opaque design on a transparent material intervening between the illuminant and the lens. And secondly, it is an illusion in that it synthesizes mere pictorial spectres into the appearance of life and movement. This latter particular, the seeming[4] activity of life, is the fundamental dissimilarity between pictures projected by the magic-lantern and those thrown on the screen by the motion-picture apparatus.
The image cast on the wall by the magic lantern, while an illusion and no more substantial than a shadow, still has a certain tactile quality. If it's projected from a drawing on a glass slide, its design is clear; and if from a photographic slide, the tones are distinctly visible. It is—unless it’s one of those amusing moving subjects powered by a simple mechanism—a still image. The lively screen image created by the lens of a movie projector is also an illusion. However, it illustrates two types of these sensory deceptions. First: it is an illusion for the same reason that the image from the magic lantern is one; that is, it’s a projected shadow of a somewhat opaque design on a transparent material placed between the light source and the lens. Second, it is an illusion because it combines mere pictorial fragments into the appearance of life and movement. This last aspect, the apparent[4] activity of life, is the key difference between images projected by the magic lantern and those shown on the screen by the movie projector.
And it is only the addition to the magic-lantern, of a mechanism that makes possible this optical vibration of life and motion, that constitutes the differing feature in the two types of projecting machines.
And it’s just the addition of a mechanism to the magic lantern that allows for this optical vibration of life and motion, which distinguishes the two types of projectors.
In the magic-lantern and its improved form, the stereopticon, separate views of different subjects are shown in succession. Each picture is allowed to remain on the screen long enough to be readily beheld and appreciated. But the picture is at rest and does not move. With the motion-picture projector a series of slightly varying pictures of the same subject are projected in quick succession. This succession is at such a rapid rate that the interval of time during which one picture moves out of place to make way for the next is so short that it is nearly imperceptible. In consequence, the slightly varying pictures blend on the screen and we have a phantasmagoria of movement.
In the magic lantern and its upgraded version, the stereopticon, separate images of different subjects are displayed one after another. Each image stays on the screen long enough to be easily viewed and appreciated. However, the image is still and doesn’t move. With the motion picture projector, a series of slightly different images of the same subject are shown quickly one after the other. This rapid sequence is so fast that the time between one image moving out of place for the next is almost unnoticeable. As a result, the slightly varying images blend together on the screen, creating an illusion of movement.
The phenomenon of this movement—this semblance[5] to life—takes place, not on the screen, but within the eye. Its consideration, a subject proper for the science of physiology (and in some aspects psychology), has weight for us more particularly as a matter of physics.
The phenomenon of this movement—this appearance[5] of life—occurs, not on the screen, but inside the eye. Its analysis, a topic suitable for the science of physiology (and in some aspects psychology), is especially significant to us as a matter of physics.
Memory has been said to be an attribute of all organic matter. An instance of this seems to be the property of the eye to retain on its retina an after-image of anything just seen. That is to say, when an object impresses its image upon the retina and then moves away, or disappears, there still remains, for a measurable period, an image of this object within the eye. This singularity of the visual sense is spoken of as the persistence of vision or the formation of positive after-images. And it is referred to as a positive after-image in contradistinction to another visional phenomenon called the negative after-image. This latter kind is instanced in the well-known experiment of fixing the eyes for a few moments upon some design in a brilliant color and quickly turning away to gaze at a blank space of white where instantly the same design will be seen, but of a color complementary to that of the particular hue first gazed at.
Memory is said to be a feature of all living things. One example of this is the ability of the eye to keep an after-image on its retina of something just viewed. In other words, when an object leaves its mark on the retina and then moves away or disappears, a faint image of that object remains in the eye for a short period. This unique aspect of vision is known as persistence of vision or the creation of positive after-images. It's called a positive after-image to distinguish it from another visual phenomenon called a negative after-image. The latter is illustrated by the common experiment of staring at a bright colored design for a few moments and then quickly looking at a blank white space, where you will immediately see the same design, but in a color that complements the original hue you were looking at.
[6]
[6]
The art of the motion-picture began when physicists first noticed this peculiarity of the organ of sight in retaining after-images. The whole art is based on its verity. It is the special quality of the visual sense that makes possible the appreciation of living screen pictures.
The art of filmmaking began when physicists first observed the unique trait of the eye in holding onto after-images. The entire craft relies on this truth. It is the distinctive quality of our visual sense that allows us to enjoy moving images on screen.
An interesting matter to bear in mind is the circumstance that the first attempt at giving to a screen image the effect of life was by means of a progressive series of drawings. When photographs came later, drawings were forgotten and only when the cinematographic art had reached its great development and universality, were drawings again brought into use to be synthesized on the screen.
An interesting thing to keep in mind is that the first attempt to make a screen image look alive was through a series of sequential drawings. When photographs came along later, drawings were overlooked, and it wasn't until cinematography had developed and become widespread that drawings were used again to be combined on the screen.
To describe how these drawings are made, their use and application to the making of animated cartoons, is the purpose of this book.
To explain how these drawings are created, along with their use and application in making animated cartoons, is the goal of this book.
Before proceeding with a sketch of the development of the art of making these cartoons, it will make the matter more readily understood if we give, at first, in a few paragraphs, a brief description of the present-day method of throwing a living picture on the screen by the motion-picture projector.
Before moving on to a summary of the evolution of creating these cartoons, it will be easier to understand if we start with a brief description of how a living picture is projected onto the screen today using a motion-picture projector.
[7]
[7]
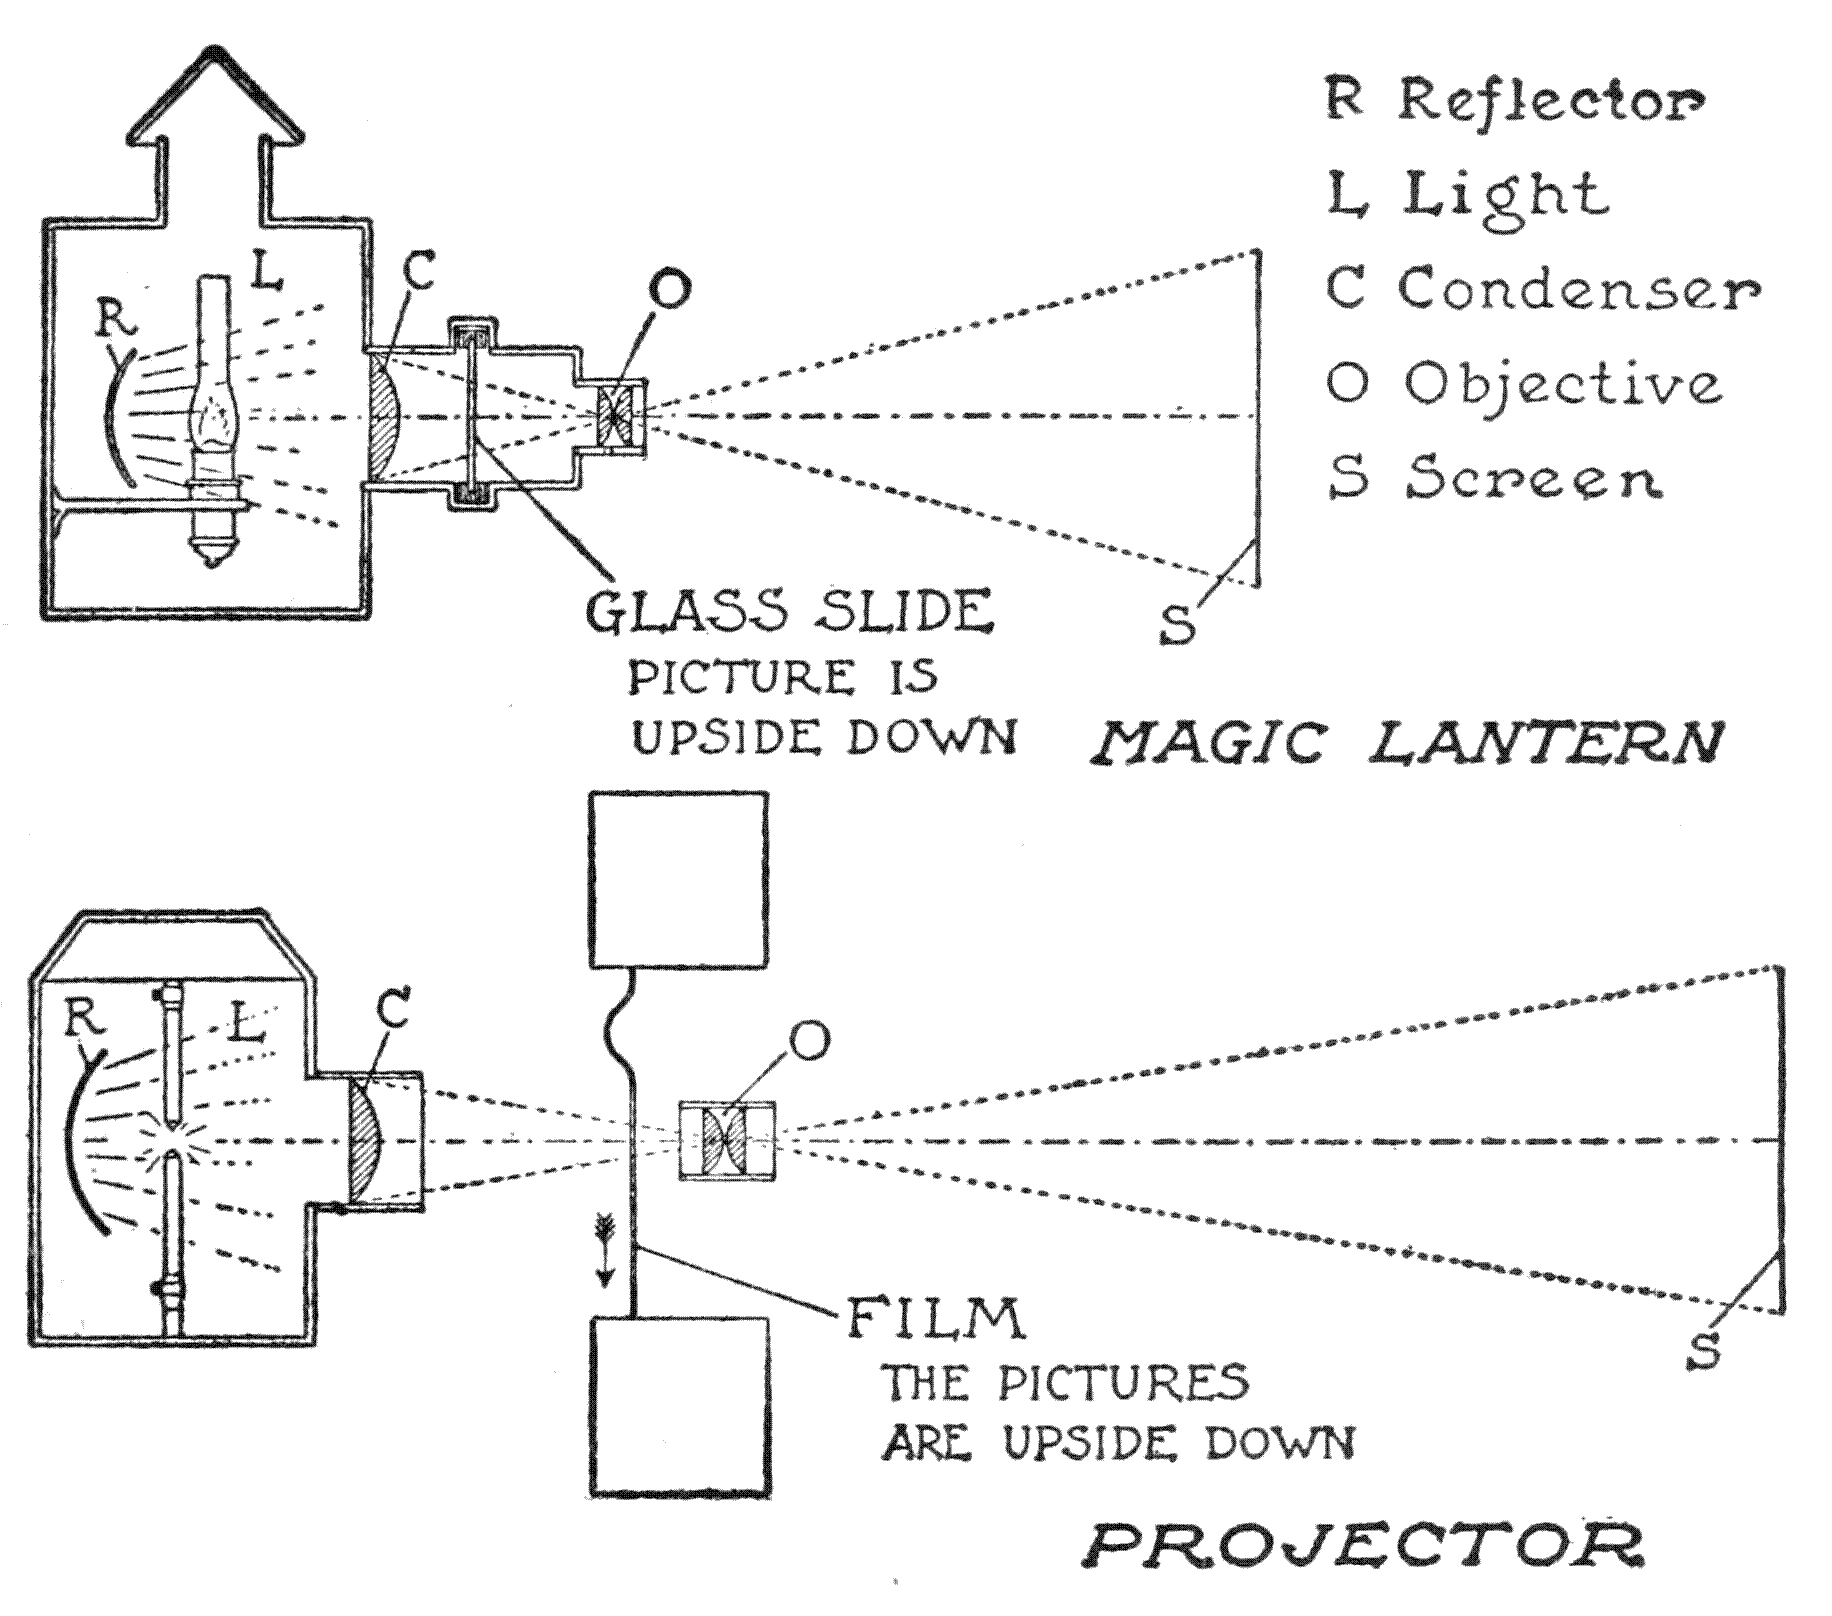
The projector for motion-pictures, like the magic-lantern, consists of an illuminant, reflector, condenser, and objective. This last part is the combination of lenses that gather and focus the light rays carrying the pencils of lights and shadows composing the picture and throwing them on the screen. There is, in the magic-lantern, immediately back of the objective, a narrow aperture[8] through which the glass slide holding a picture is thrust. In the motion-picture apparatus, the transparent surface containing the picture also passes back of the objective, but instead of the simple process of pushing one slide through to make way for another, there is a complicated mechanism to move a long ribbon containing the sequence of pictures that produces the image on the screen. Now this ribbon consists of a strip of transparent celluloid[1] each with a separate photograph of some one general scene but each with slight changes in the moving details—objects or figures. These changes record the movements from the beginning to the end of the particular story, action, or pantomime.
The projector for movies, like the magic lantern, has a light source, reflector, condenser, and lens. The lens is a set of lenses that gather and focus the light rays that create the highlights and shadows that make up the image and project them onto the screen. In the magic lantern, right behind the lens, there’s a narrow opening[8] where the glass slide with the picture is inserted. In the movie projector, the transparent film with the image also goes behind the lens, but instead of simply pushing one slide in and out for another, there’s a complex mechanism that moves a long strip of film that contains the sequence of images that forms the picture on the screen. This strip is made of transparent celluloid[1] each with a different photograph of the same general scene, but with slight variations in the moving details—objects or figures. These variations capture the movements from the beginning to the end of the specific story, action, or pantomime.
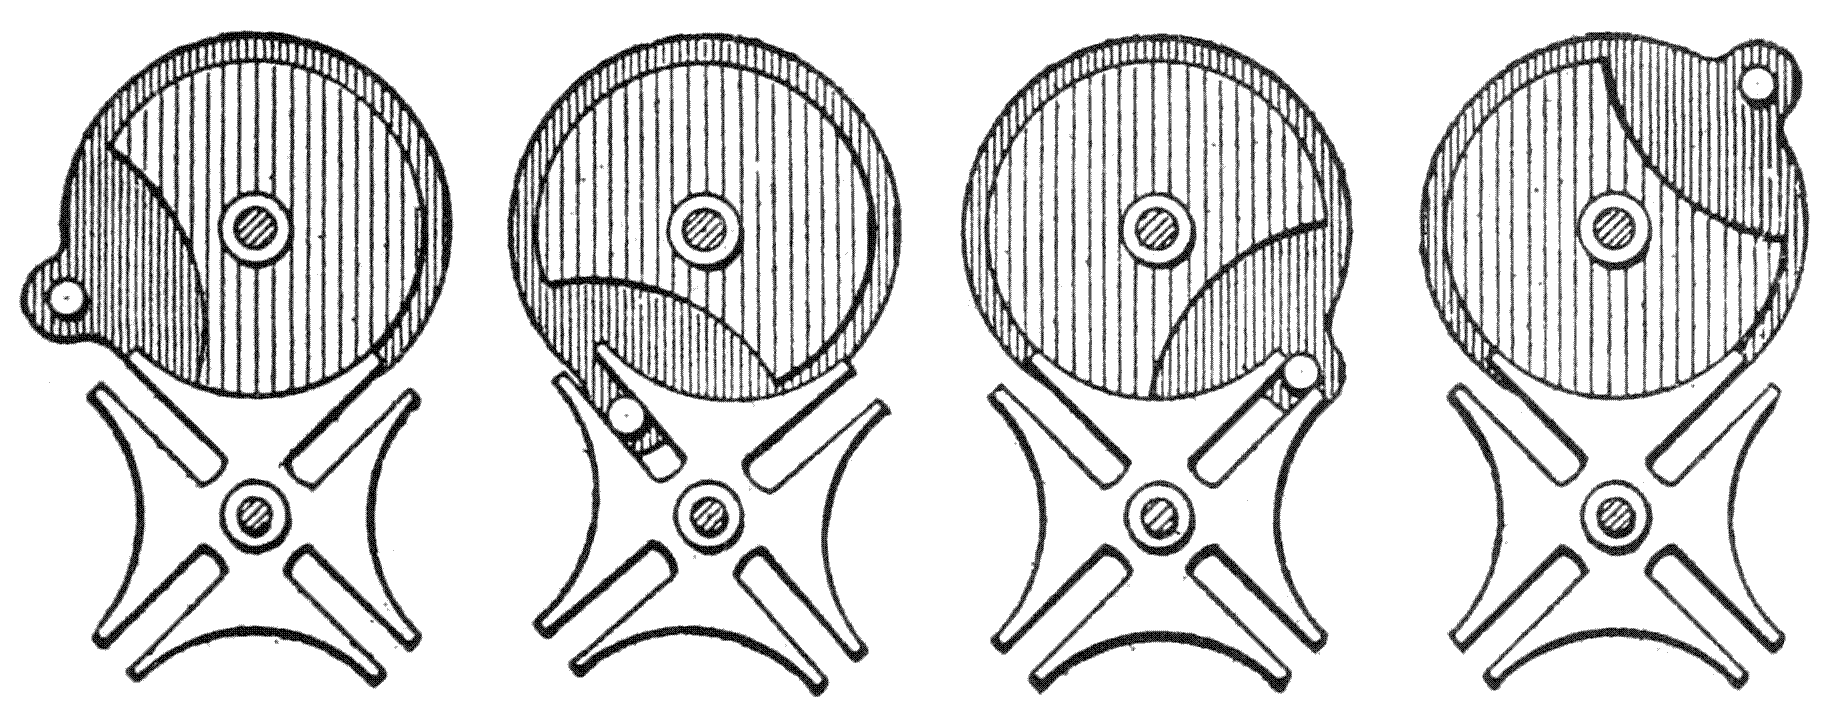
Along the edges of the ribbons are rows of perforations that are most accurately equalized with respect to their size and of the distances between them. It is by means of wheels with teeth that engage with the perforations and the movement of another toothed part of the mechanism[9] that the ribbon or film is carried across the path of light in the projecting machine. The device for moving the film, although not of a very intricate character, is nevertheless of an ingenious type. It is intermittent in action and operates so that one section of film, containing a picture, is held in the path of light for a fraction of a second, moved away and another section, with the next picture, brought into place to be projected in its turn. This way of working, in most of the projectors, is obtained by the use of a mechanical construction known as the Geneva movement. The pattern of its principal part is a wheel shaped somewhat like a Maltese cross. The form shown in the illustration is given as a type; not all are of this pattern, nor are they all four-parted.
Along the edges of the ribbons are rows of perforations that are equally sized and evenly spaced. Wheels with teeth engage with these perforations, along with the movement of another toothed part of the mechanism[9], which carries the ribbon or film across the light path in the projector. The film-moving device, while not very complex, is quite clever. It works intermittently, holding one section of film with an image in the light path for a fraction of a second before moving it away and bringing in the next section for projection. This process in most projectors is achieved using a mechanical setup known as the Geneva movement. Its main component is a wheel shaped like a Maltese cross. The pattern shown in the illustration is just a type; not all are designed this way, and they’re not all divided into four parts.
[10]
[10]
It is obvious that while one picture moves out of the way for the next, there would be a blur on the screen during such a movement if some means were not devised to prevent it. This is found by eclipsing the light during the time of the change from one picture to another. The detail of the projector that effects this is a revolving shutter with a solid part and an open section. (This is the old type of shutter. It is noticed here because the way in which the light rays project the picture is easily explained by using it as an example.) This shutter is so geared with the rest of the mechanism that (1) the solid part passes across the path of light while another picture is moving into place; and that (2) the open section passes across the path of light while a rectangular area containing a picture is at rest and its details are being projected on the screen.
It’s clear that as one image shifts out to make way for the next, there would be a blur on the screen during that transition if we didn't have a way to prevent it. This is accomplished by blocking the light during the switch from one image to another. The part of the projector that does this is a rotating shutter with a solid section and an open section. (This is an older type of shutter, but it’s mentioned here because it simplifies the explanation of how light rays project the image.) This shutter is connected to the rest of the mechanism so that (1) the solid section blocks the light while a new image is being positioned; and (2) the open section allows light to pass through while a rectangular area holding an image is stationary and its details are being shown on the screen.
It may be asked, at this point, why the eye is not aware on the screen of the passing shadow of the opaque part of the shutter as it eclipses the light. It would seem that there should be either a blur or a darkened period on the screen. But the mechanism moves so rapidly that the passing of the solid portion of the shutter is not ordinarily perceptible.
It might be questioned, at this stage, why the eye doesn't notice the shadow of the opaque part of the shutter on the screen as it blocks the light. One would expect to see either a blur or a dark interval on the screen. However, the mechanism operates so quickly that the movement of the solid part of the shutter is usually imperceptible.
[11]
[11]
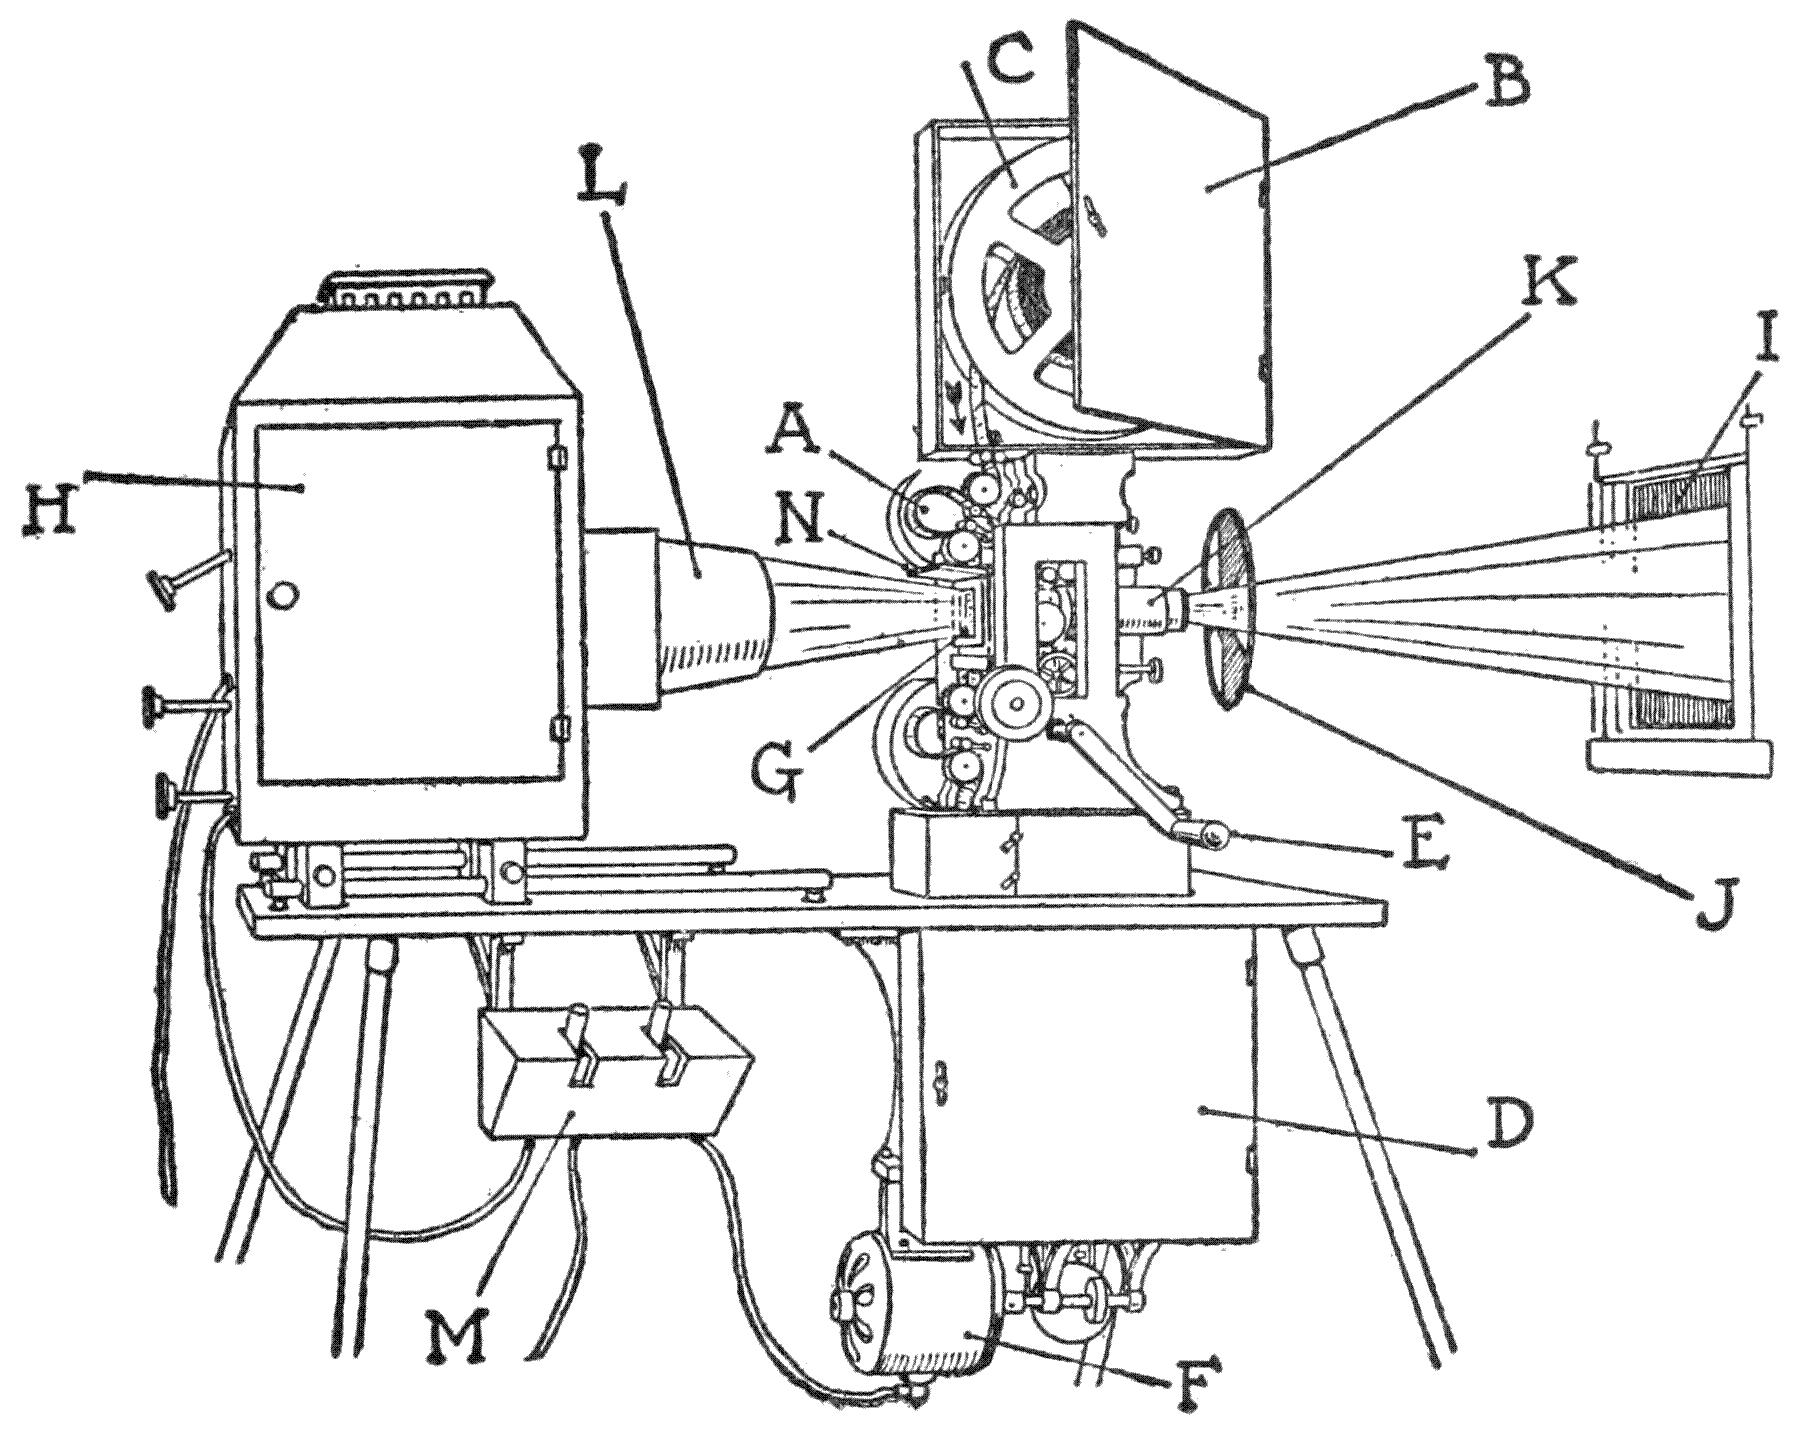
A. Film. B. Upper magazine. C. Feed reel. D. Lower magazine, containing the take-up reel. E. Crank to operate mechanism by hand. F. Motor. G. Where the film stops intermittently to be projected. H. Lamp-house. I. Port, or window in the fireproof projection booth. J. Rotating shutter. K. Lens. L. Condenser. M. Switches. N. Fire shutter; automatically drops when the film stops or goes too slowly.
A. Film. B. Upper magazine. C. Feed reel. D. Lower magazine, which holds the take-up reel. E. Hand crank for operating the mechanism. F. Motor. G. Area where the film pauses briefly to be projected. H. Lamp house. I. Port or window in the fireproof projection booth. J. Rotating shutter. K. Lens. L. Condenser. M. Switches. N. Fire shutter that automatically drops when the film stops or moves too slowly.
One foot of celluloid film contains sixteen separate pictures, and these pass in front of the light in one second. One single tiny picture of the film takes up then one-sixteenth of a second. But not all of this fraction of a second is given to the projection of the picture as some of the time is taken up with moving it into place immediately before projection. The relative apportionment[12] of this period of one-sixteenth of a second is so arranged that about five-sixths of it (five ninety-sixths of a second) is given to the holding of the film at rest and the projection of its picture, and the remaining one-sixth (one ninety-sixth of a second) is given to the movement of a section of the film and the shutting off of the light by the opaque part of the shutter.
One foot of celluloid film has sixteen separate images, and these pass in front of the light in one second. Each tiny image on the film takes up one-sixteenth of a second. But not all of this fraction of a second is used for showing the image, as some of the time is spent moving it into position just before projection. The distribution of this one-sixteenth of a second is set up so that about five-sixths of it (five ninety-sixths of a second) is used for holding the film still and projecting its image, while the remaining one-sixth (one ninety-sixth of a second) is used for moving a section of the film and blocking the light with the opaque part of the shutter.
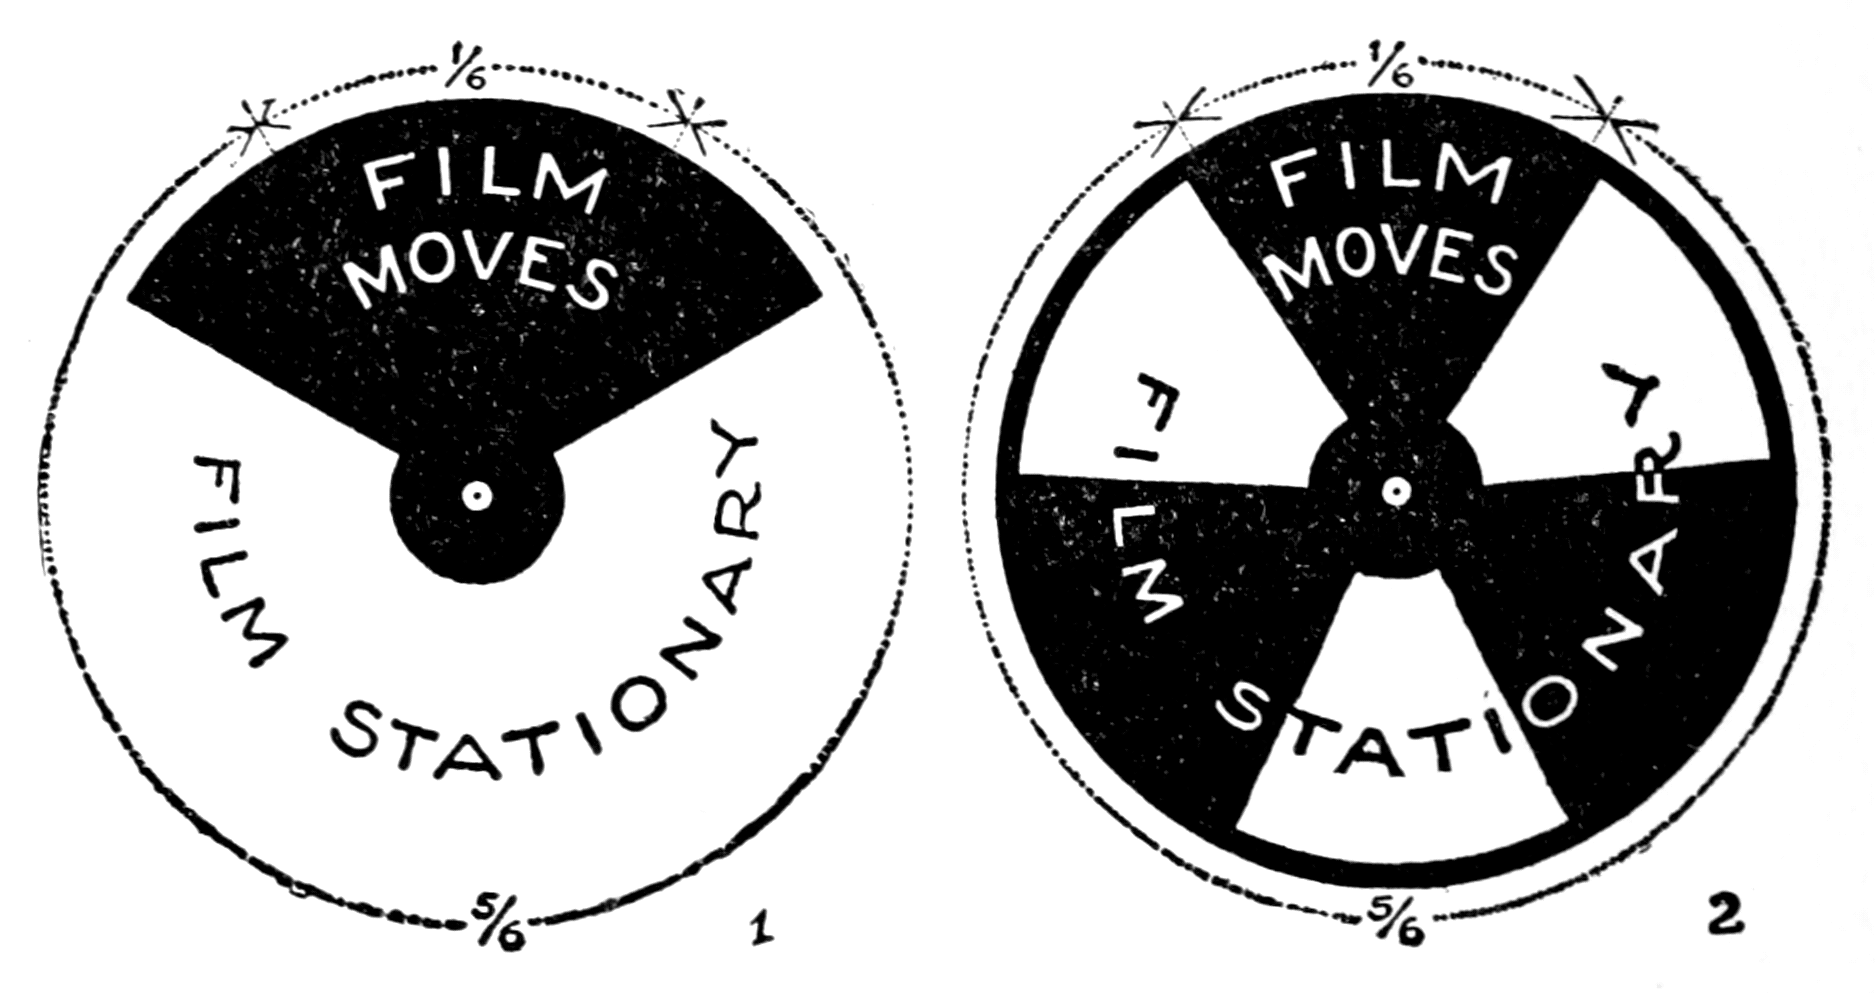
ILLUSTRATING THE PROPORTIONS OF LIGHT AND DARK PERIODS DURING PROJECTION IN TWO TYPES OF SHUTTERS.
ILLUSTRATING THE RATIOS OF LIGHT AND DARK PERIODS DURING PROJECTION IN TWO TYPES OF SHUTTERS.
1. Old single-blade type; caused a “flicker.”
1. Old single-blade type; caused a “flicker.”
2. Regular three-blade type; light evenly distributed. It is to be noted that while the picture is on the screen two opaque sections of the shutter eclipse the light.
2. Regular three-blade type; light is evenly distributed. It should be noted that while the image is on the screen, two opaque sections of the shutter block the light.
In the last few paragraphs we have referred to the old type of shutter which caused a flicker, or unsteadiness of light on the screen. Nowadays a three-bladed shutter that nearly[13] does away with an unsteady light is in general use. Its operation, approximately for the purposes of description is like this: It turns once in one-sixteenth of a second; one-sixth of this time is taken up with the moving of the film and the eclipsing of the light by one blade of the shutter. During the remainder of the time—five-sixths of it, the following takes place: the film is stationary and ready for projection, then two blades of the shutter and three of its open sections pass across the path of the light.
In the last few paragraphs, we've talked about the old type of shutter that caused flickering or uneven lighting on the screen. Nowadays, a three-bladed shutter that nearly eliminates the flicker is commonly used. Its operation, for the sake of description, works like this: It rotates once every one-sixteenth of a second; one-sixth of that time is spent moving the film and blocking the light with one blade of the shutter. For the remaining time—five-sixths of it—the following happens: the film stays still and is ready for projection, while two blades of the shutter and three of its open sections move across the light path.
From this it can be seen that when the picture is viewed on the screen, there are actually two short moments when the light rays are cut off. This is not perceived by the spectator on account of the speed of the revolving shutter and the strong illuminant. Instead, the use of a shutter of this pattern evens the screen lighting by making an equal apportioning of light flashes and dark periods. With the old shutter there was one long period of light and one short period of darkness. It was this unequal distribution that gave rise to the flicker. At times, under certain conditions, a two-bladed shutter is used also.
From this, it's clear that when the picture is shown on the screen, there are actually two brief moments when the light rays are cut off. The audience doesn't notice this because of the fast pace of the revolving shutter and the bright light source. Instead, using this type of shutter balances the screen's lighting by evenly distributing the bursts of light and dark periods. With the old shutter, there was a long period of light followed by a short period of darkness. It was this uneven distribution that caused the flicker. Sometimes, under certain conditions, a two-bladed shutter is also used.
A reel of film may vary in length for a short[14] subject of fifty feet (or even less), to a very long “feature” of a mile or so in length. In width, the strip of celluloid measures one and three-eighths inches. Between the two rows of perforations that engage with the teeth on the sprocket-wheels and by which a certain part of the intermittent mechanism pulls the film along, are little rectangular panels, already alluded to, containing the photographs. Sometimes these panels are called “frames,” generally though, in the parlance of the trade, they are simply designated as “pictures.” They measure one inch across and three-quarters of an inch in height.
A reel of film can vary in length from a short piece of fifty feet (or even less) to a much longer "feature" that can be about a mile long. The width of the strip of celluloid is one and three-eighths inches. Between the two rows of perforations that connect with the teeth on the sprocket wheels, which help move the film through the intermittent mechanism, are small rectangular panels that contain the photographs, as mentioned earlier. Sometimes these panels are called "frames," but in industry slang, they're usually just referred to as "pictures." They measure one inch wide and three-quarters of an inch tall.
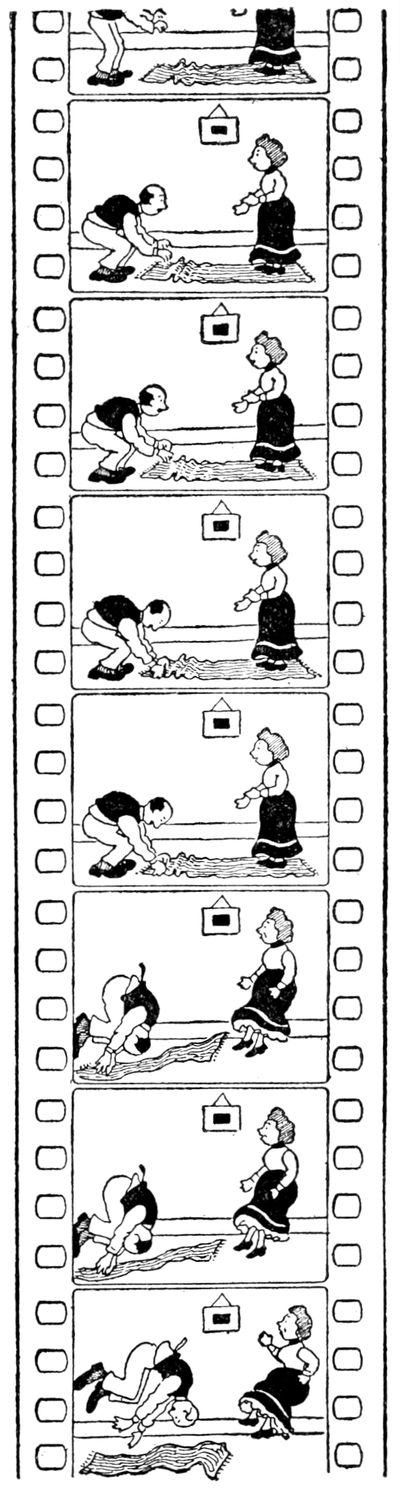
As noted above, these frames contain photographs of scenes that record, by changes in their action, the incidents and episodes of the story of any particular reel. In the case of animated cartoons, the frames on the film also contain photographs, but these photographs are made from sets of progressive drawings depicting the action of the characters of the animated cartoon.
As mentioned earlier, these frames hold photos of scenes that capture the events and moments of the story in any specific reel through changes in their action. For animated cartoons, the frames in the film also include photos, but these are made from collections of progressive drawings showing the characters' actions in the cartoon.
In concluding this brief account of the modern motion-picture, the attention is directed, as the subject is studied, to a few details of the mechanism and to the general procedure that are found to be[15] elementary features in nearly all apparatus used during the round of years that the art was developing. They are as follows: (1) A series of pictures—drawings or photographs—representing an action by progressive changes in their delineation. (2) Their presentation, one at a time, in rapid succession. (3) Their synthesis, directly upon the retina of the eye, or projected on a screen and then viewed by the eye. (4) Some means by which light—or the vision—is shut off while the change from one picture to another is taking place. (Projecting machines have been[16] made, however, in which the film is moved so rapidly, and in a particular way, that a shutter to eclipse the light is not needed.)
In wrapping up this brief overview of modern filmmaking, we focus on a few key details of the mechanics and general process that are basic features found in almost all equipment used throughout the years as the art has evolved. They include: (1) A series of images—either drawings or photographs—showing an action through gradual changes in their depiction. (2) Their display, one after another, in quick succession. (3) Their combination, either directly on the retina or projected onto a screen for viewing. (4) Some method to block light—or vision—while the transition from one image to the next occurs. (There are, however, projector machines where the film is moved so quickly and in a specific manner that a shutter to block the light is unnecessary.)
Now, as stated before, the phenomenon of the persistence of vision is the fundamental physiological fact upon which the whole possibility of seeing screen pictures rests. One of the first devices made that depended upon it, and that very simply demonstrated this faculty of the retina for holding a visional image for a time, was an optical toy called the thaumatrope. It dates from about 1826. It was a cardboard disk with two holes close to the edge at opposite points. Strings were passed through these holes and fastened and the dangling ends held and rolled between the thumbs and fingers so that the disk was made to twirl rapidly. Each side of the disk had a picture printed or drawn upon it. These two pictures when viewed together while the disk was twirled appeared as one complete picture. A favorite design for depiction was an empty bird-cage on one side and a bird on the other. The designs were placed with respect to each other in the same way as the marks and insignia of the two sides of most coins. (The coins of Great Britain are[17] an exception, on them the designs are placed differently. In reading their marks or looking at the images of the two sides, we turn the coin over like the page of a book.)
Now, as mentioned earlier, the phenomenon of persistence of vision is the basic physiological fact on which the entire possibility of seeing images on screens depends. One of the earliest devices that relied on it and clearly demonstrated the retina’s ability to hold a visual image for a moment was an optical toy called the thaumatrope. It dates back to around 1826. It was a cardboard disk with two holes near the edge at opposite points. Strings were threaded through these holes and secured, with the dangling ends held and rolled between the thumbs and fingers to make the disk spin quickly. Each side of the disk had a picture printed or drawn on it. When these two pictures were viewed together while the disk was spinning, they appeared as one complete image. A popular design featured an empty birdcage on one side and a bird on the other. The designs were arranged in a way similar to the markings and insignias on the two sides of most coins. (British coins are an exception; their designs are placed differently. When reading their markings or looking at the images on both sides, we flip the coin like a page in a book.)
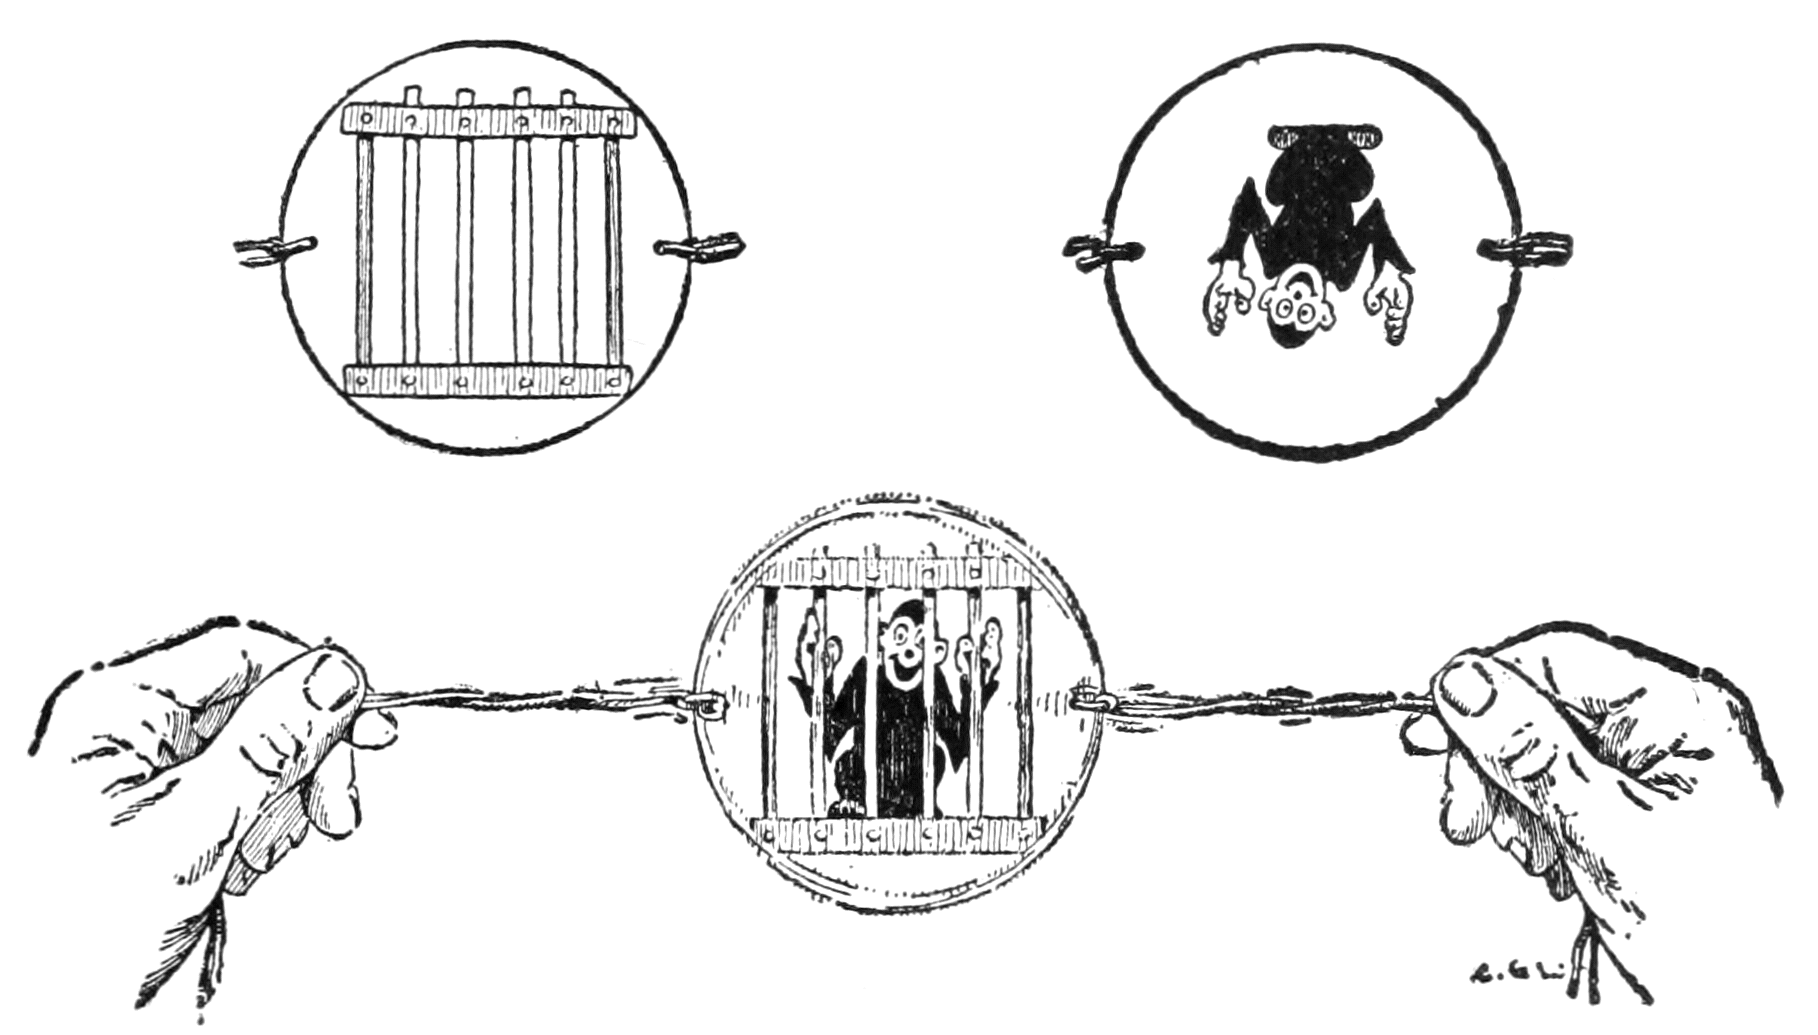
Above: How the designs of the two sides are placed with respect to each other.
Above: How the designs of the two sides are positioned in relation to each other.
Below: The combined image when the thaumatrope is twirled.
Below: The combined image when the thaumatrope is spun.
The thaumatrope illustrates the persistence of vision in a very elementary way. Simply explained, the face of one side of the disk with its design is before the eye, the design impresses its true image upon the retina, the disk turns away and the picture disappears, but its after-image remains on the retina. The disk having turned, brings the other picture into view. Its true image is impressed upon the retina to blend with the[18] after-image of the first picture. In rapid sequence this turning continues and the two images commingle to give the fantasy of a perfect design.
The thaumatrope shows how our vision lingers in a very simple way. To explain it simply, when one side of the disk with its design is in front of our eyes, the design leaves its image on the retina. When the disk spins away, the image disappears, but its after-image stays on the retina. As the disk turns, the other image comes into view. Its image also gets imprinted on the retina, merging with the after-image of the first picture. This quick spinning keeps going, and the two images mix together, creating the illusion of a flawless design.
A limited number of subjects only were suitable for demonstration by a toy of this character. Two other subjects were those showing designs to give the effect of a rider on a horse and a tight-rope dancer balanced on a rope.
A limited number of subjects were suitable for demonstration by a toy like this. Two other subjects included designs to create the effect of a rider on a horse and a tightrope dancer balancing on a rope.
TWO INSTRUMENTS USED IN EARLY INVESTIGATIONS OF OPTICAL PHENOMENA.
From The Saturday Magazine of 1837 and 1841.
From The Saturday Magazine of 1837 and 1841.
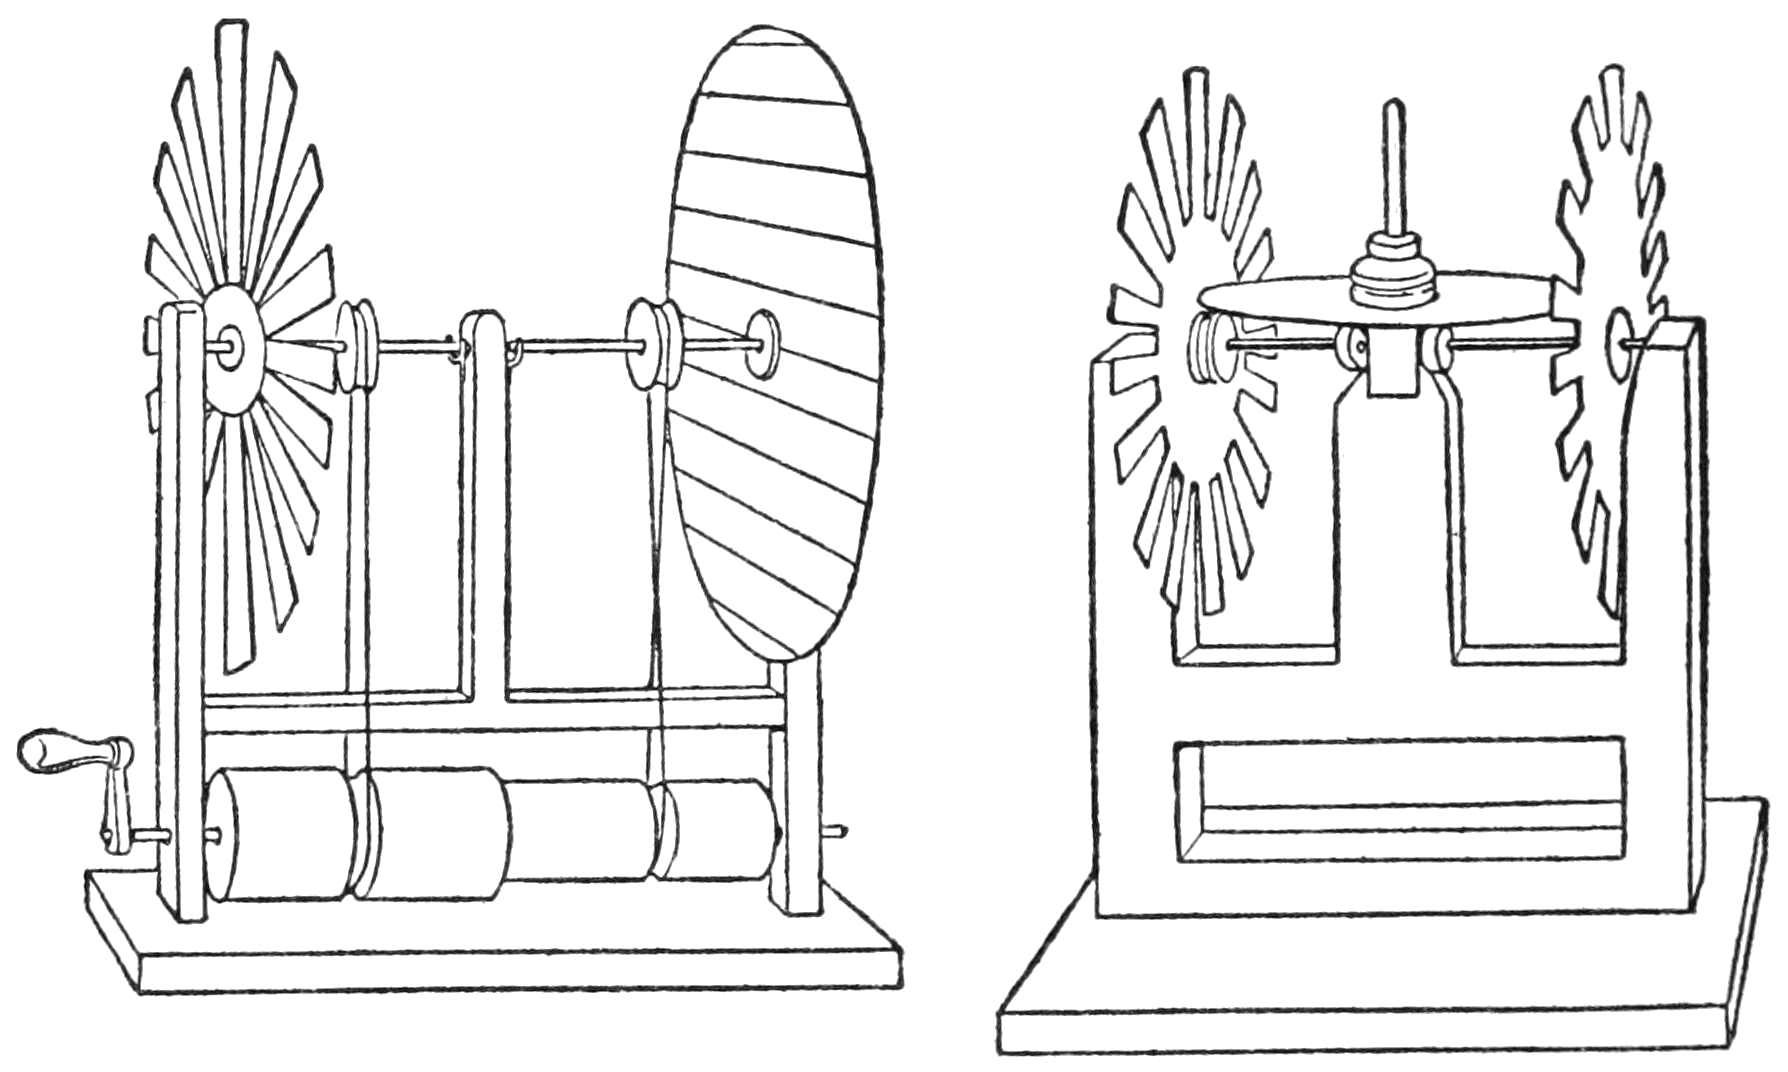
Later when scientific investigators were busy inquiring into the phenomena of visual distortions exhibited by the spokes and teeth of turning wheels[19] when seen in contrast with certain intervening objects, a curious apparatus was contrived by Faraday the English scientist (1791-1867). This apparatus was so constructed that two disks were made to travel, by cogged gearing, in opposite directions, but at the same speed. Around the circumferences of the disks were cut narrow slots at equal distances apart and so making the solid portions between them like teeth, or spokes of a wheel.
Later, when scientists were busy investigating the visual distortions seen in the spokes and teeth of spinning wheels[19] when contrasted with certain objects in between, a fascinating device was created by Faraday, the English scientist (1791-1867). This device was designed so that two disks rotated in opposite directions but at the same speed, using cogged gears. Narrow slots were cut around the edges of the disks at equal intervals, forming solid sections between them that resembled the teeth or spokes of a wheel.
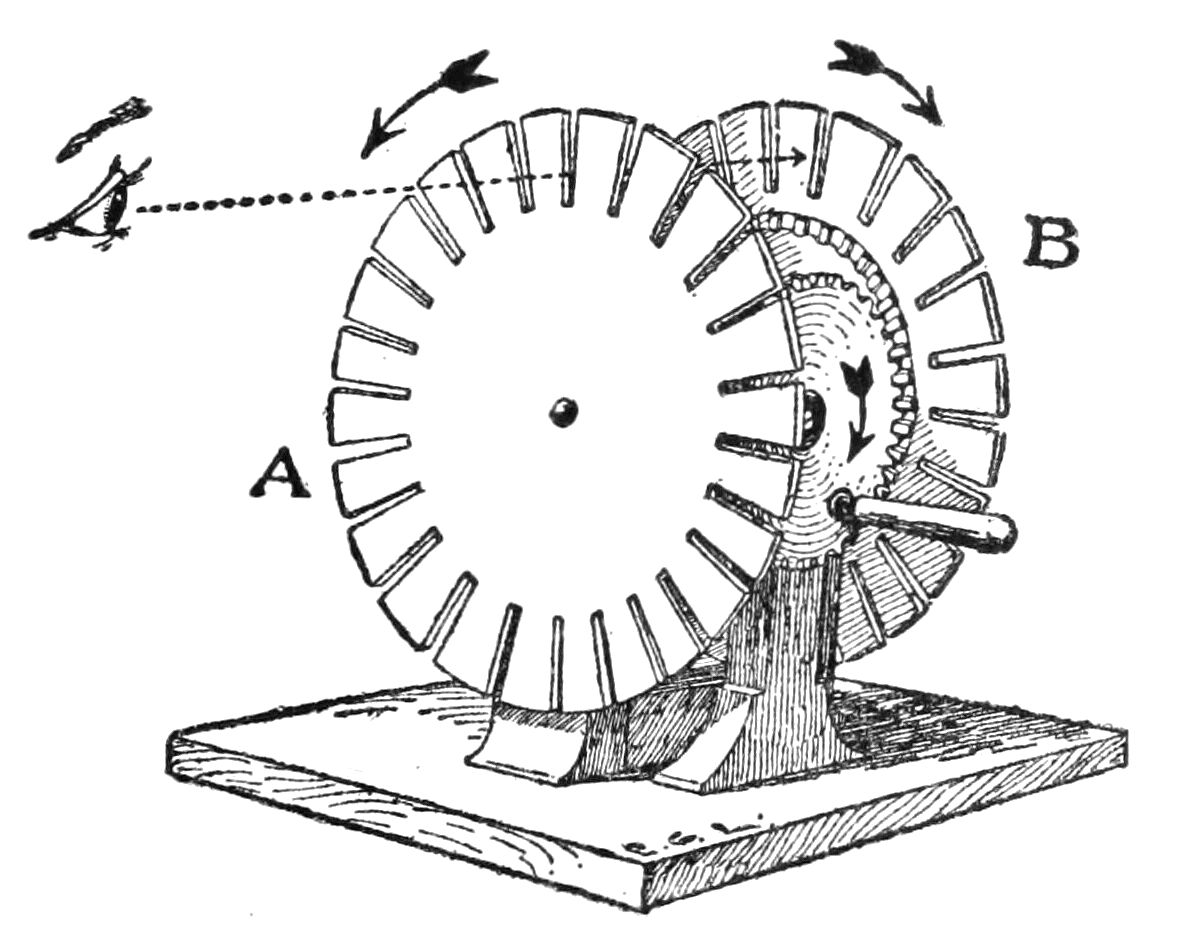
With the disks moving as marked, the disk B will appear to be motionless when viewed through the passing slots of disk A.
With the disks moving as indicated, disk B will seem stationary when looked at through the gaps of disk A.
When this machine was set in motion and the eye directed through the moving and blurred teeth of the front disk toward the far disk, this far disk appeared to be stationary. Its outline—the[20] teeth, slots, and circumference—were distinctly seen and not blurred.
When this machine was turned on and you looked through the moving and blurred teeth of the front disk toward the distant disk, that far disk seemed to stay still. Its outline—the[20] teeth, slots, and edge—were clearly visible and not blurred.
Then it was found that the same effect could be obtained with the use of one slotted disk by simply holding it in front of a mirror and viewing the reflected image through the moving slots of the disk. The reflection answered for the second disk of the instrument of the first experiment.
Then it was discovered that the same effect could be achieved using just one slotted disk by holding it in front of a mirror and looking at the reflected image through the moving slots of the disk. The reflection served as the second disk of the instrument from the first experiment.
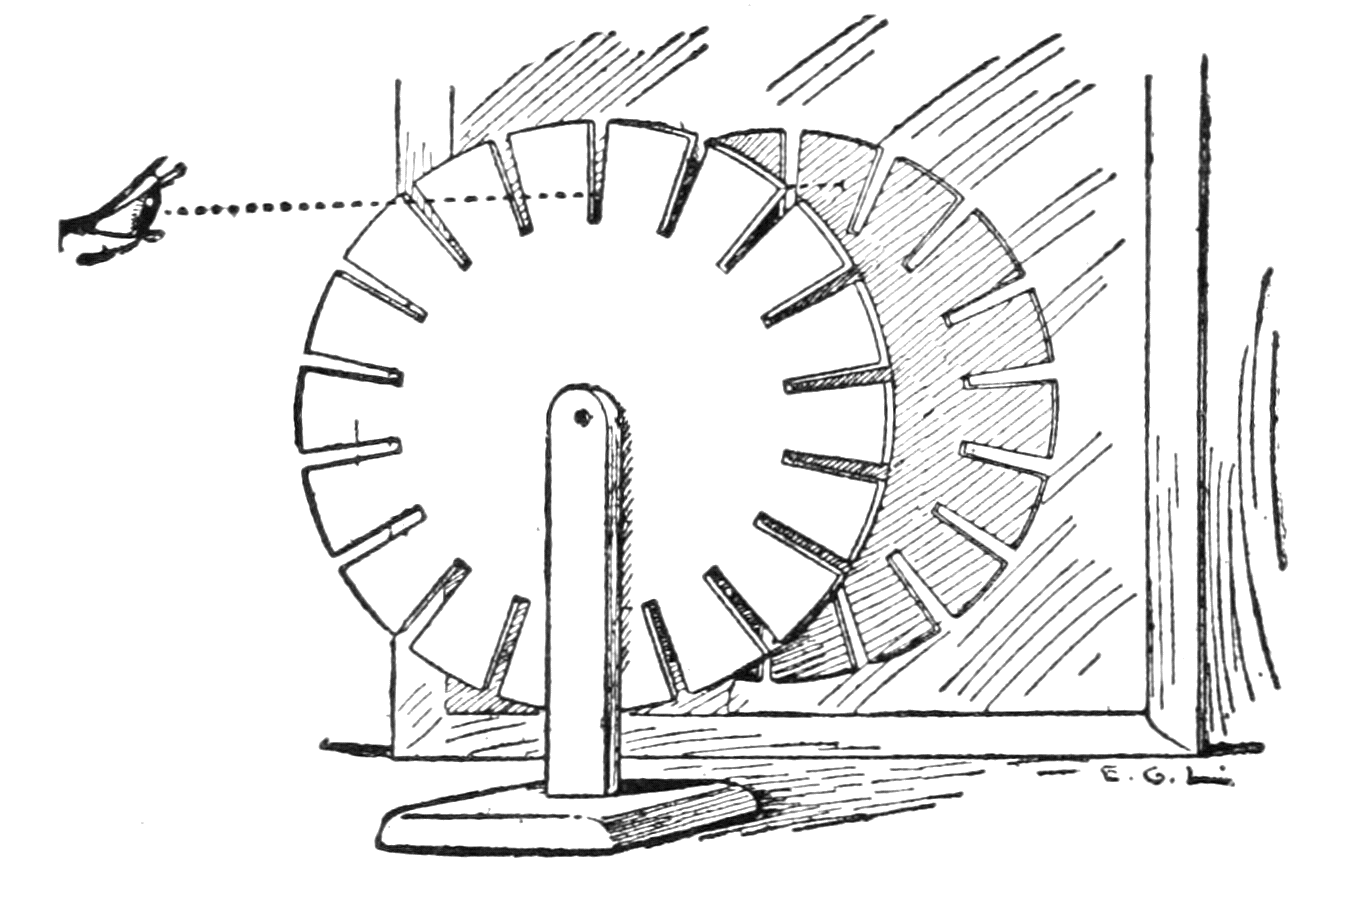
When the disk is twirled the reflections of its spokes appear stationary when viewed through the moving slots.
When the disk is spun, the reflections of its spokes look like they’re not moving when seen through the moving slots.
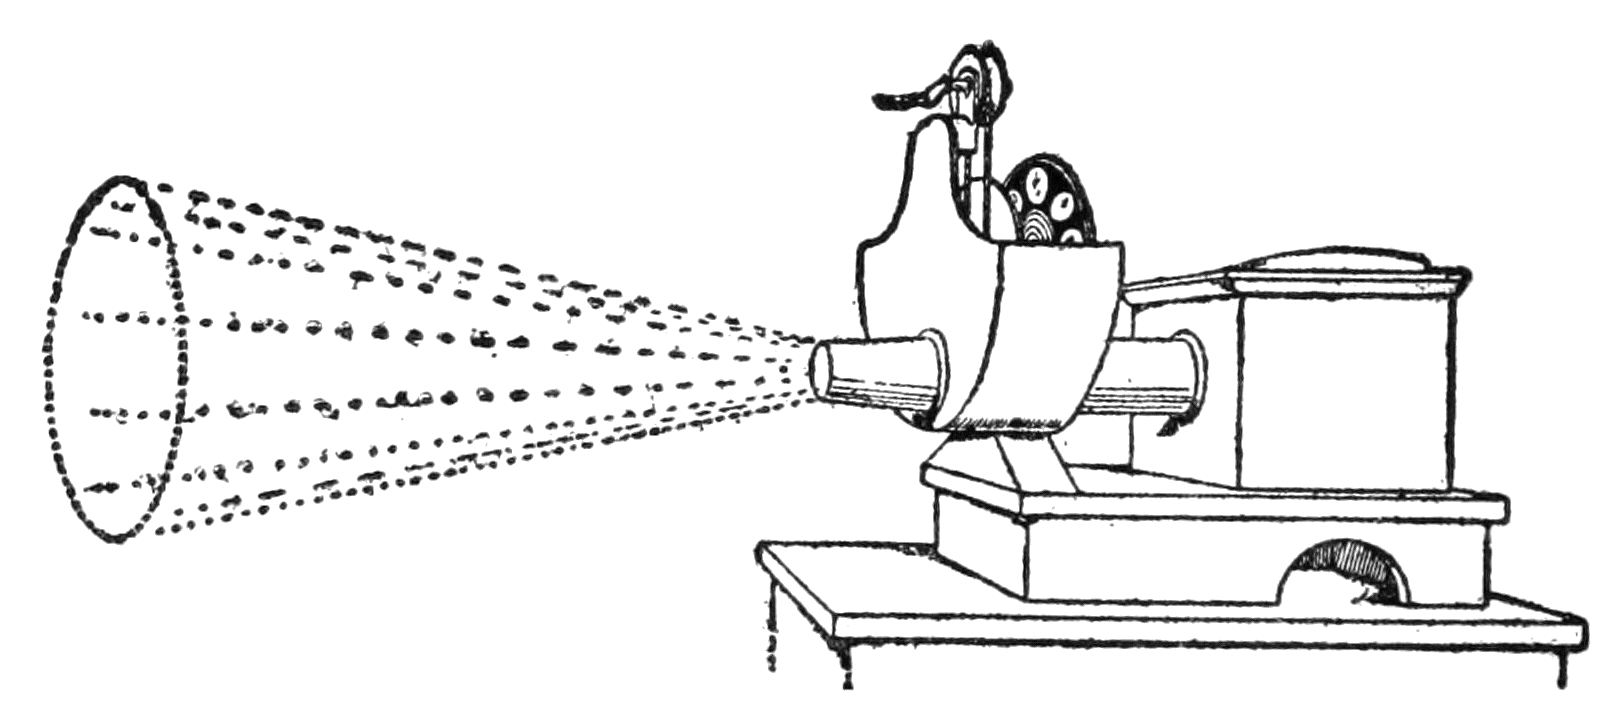
From this type of optical toy it was but a step to the contriving of various types of instruments constructed on the pattern of a slotted disk, or some sort of a turning mechanism with a series of apertures, to use in giving the illusion of movement in connection with drawings or photographs.[21] The best-known was the phenakistoscope, the invention of which has been credited to the Belgian physicist, Plateau (1801-1883). This toy was a large cardboard disk with pictures on one side that were to be viewed by their reflections through slots in the disk while it was held before a mirror. The pictures drawn in sequence represented some action, as a horse running, an acrobat, a juggler, or some amusing subject that could be drawn easily in a cycle of actions and that would lend itself to repetition.
From this kind of optical toy, it was just a small leap to create various types of instruments designed like a slotted disk or some kind of rotating mechanism with a series of openings to give the illusion of movement in connection with drawings or photographs.[21] The most well-known was the phenakistoscope, which has been credited to the Belgian physicist Plateau (1801-1883). This toy was a large cardboard disk with pictures on one side that were meant to be viewed through reflections in the slots of the disk while it was held in front of a mirror. The pictures drawn in sequence showed some kind of action, like a horse running, an acrobat, a juggler, or some funny subject that could easily be illustrated in a cycle of actions suitable for repetition.

The phenakistoscope has some rough resemblance in its plan to a motion-picture projector—the cycle of slightly different drawings represents the film with its sequence of tiny pictures; the slots in the disk by which the drawings are viewed in the mirror correspond to the open sections of the revolving shutter; while the solid portions of the disk answer to the opaque parts of the shutter.
The phenakistoscope is somewhat similar in design to a movie projector—the series of slightly different drawings represents the film with its sequence of small images; the slots in the disk that allow the drawings to be seen in the mirror correspond to the openings in the rotating shutter; while the solid parts of the disk match the opaque sections of the shutter.
[22]
[22]
As it only was possible in the phenakistoscope that one person at a time could view conveniently the reflected pictures, the attempt was made to arrange it for projection. A lens was added with a light and mirrors so that a number of people could see its operation at the same time. In another form the pictures were placed on a glass disk which was made to rotate back of a magic-lantern objective.
As it was only possible with the phenakistoscope for one person to conveniently view the reflected images, an attempt was made to set it up for projection. A lens was added along with a light and mirrors so that several people could watch it at the same time. In another version, the images were placed on a glass disk that was made to spin behind a magic lantern lens.
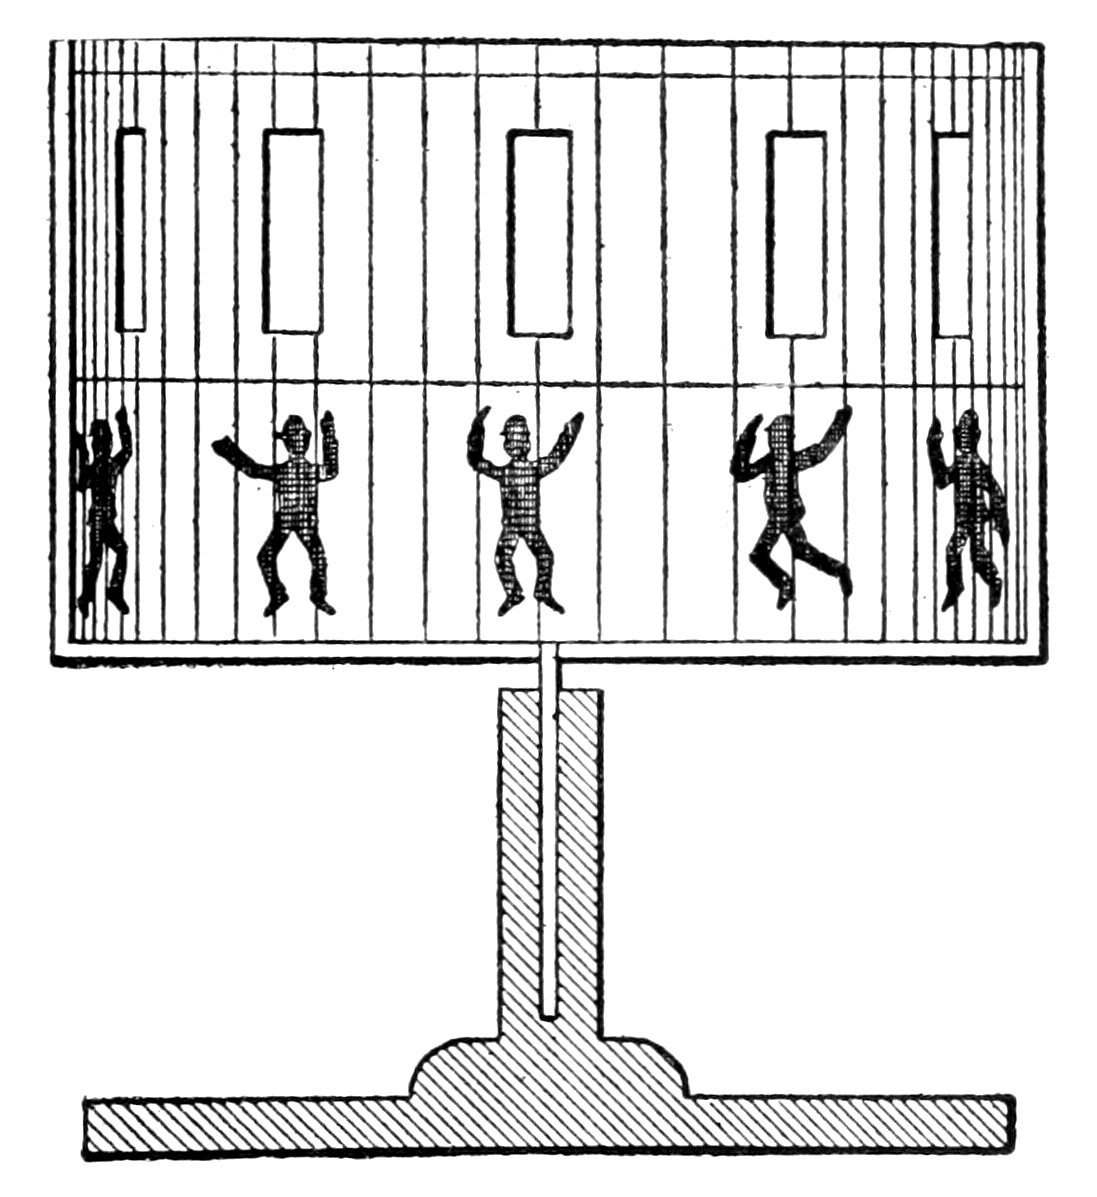
When the number of slots in a phenakistoscope correspond to the number of drawings in the cycle, the different figures of the cycle are in action but they do not move from the place where they are depicted. Only their limbs, if it is an action in which these parts are brought into play, are in movement. But if there is one slot more and the disk turned in the proper direction, the row of drawings will appear to be going around a circle.[23] This is particularly adapted to series of running animals.
When the number of slots in a phenakistoscope matches the number of images in the sequence, the different figures in the cycle are animated, but they stay in the same spot where they're shown. Only their limbs move, if the action involves those parts. However, if there’s one extra slot and the disk is turned in the right direction, the series of images will seem to rotate in a circle.[23] This works especially well for sequences of running animals.

Another method of giving the semblance of motion to a series of progressive drawings, soon devised after the invention of the phenakistoscope, was the zootrope, or wheel of life. It embodied the idea, too, of a rapidly moving opaque[24] flat portion with a row of slots passing between the eye and the drawings.
Another way to create the illusion of movement in a series of progressive drawings, developed shortly after the phenakistoscope was invented, was the zoetrope, or wheel of life. It also included the concept of a quickly spinning opaque[24] flat section with a line of slots that allowed the viewer to see the drawings.
In form the zootrope was like a cylindrical lidless box of cardboard. It was pivoted and balanced on a vertical rod so that it could be made to turn easily and very rapidly. The slots were cut around the upper rim of the box. Long strips of paper holding pictures fitted into the box. When one of these strips was put in place, it was so adjusted that any particular drawing of the series could be viewed through a slot of the opposite side. These drawings appeared to be in motion when the zootrope was made to twirl.
In structure, the zoetrope was similar to a cylindrical box made of cardboard without a lid. It was mounted on a vertical rod, allowing it to spin easily and quickly. Slots were cut around the top edge of the box. Long strips of paper with images were placed inside the box. When one of these strips was positioned, it was aligned so that any specific drawing in the series could be seen through a slot on the opposite side. These drawings seemed to move when the zoetrope was spun.

This type of optical curiosity, as a matter of priority, is associated with the name of Desvignes,[25] as he obtained a patent for it in England in 1860. Later in 1867, a United States patent was issued for a similar instrument to William Lincoln, of Providence, R. I. He called his device the zoetrope.
This kind of visual curiosity is primarily linked to Desvignes,[25] who received a patent for it in England in 1860. Then, in 1867, a similar device was patented in the United States to William Lincoln from Providence, R.I. He named his invention the zoetrope.
U.S. Pat. No. 64117, Apr. 23 1867
This cylindrical synthesizing apparatus was sold as a toy for many years. Bands of paper with cycles of drawings of a variety of humorous and entertaining subjects thereon were prepared for use with it.
This cylindrical synthesizing device was marketed as a toy for many years. Strips of paper featuring cycles of drawings on a variety of funny and entertaining topics were created for use with it.
But the busy inventors were not satisfied with the simple form in which it was first fabricated. Very soon from the zootrope was evolved another[26] optical curiosity that preserved the general cylindrical plan, but made use of the reflective property of a mirror to aid the illusion. This was the praxinoscope of M. Reynaud, of France. He perfected it and adapted its principles to create other forms of rotating mechanisms harmonizing progressive drawings to show movement.
But the busy inventors weren’t content with the basic version it was initially created in. Soon, they developed another[26] optical novelty that kept the general cylindrical shape but used a mirror’s reflective properties to enhance the illusion. This was the praxinoscope created by M. Reynaud from France. He improved it and adjusted its principles to create other types of rotating devices that aligned sequential drawings to depict movement.

B. PLAN OF THE PRAXINOSCOPE.
[27]
[27]
The praxinoscope held to the idea of a box, cylindrical and lidless, and pivoted in the centre so that it turned. The strip of drawings, and the plan of placing them inside of the box—two features of the zootrope—were both retained. But instead of looking at the drawings through apertures in the box rim, they were observed by their reflections in mirrors placed on an inner section or drum. The mirrors were the same in number as the drawings and turned with the rest of the apparatus. The mirrors were placed on the drum—the all-important point in the construction of the praxinoscope—half-way between the centre and the inner side of the rim of the box. As the drawings were placed here, the eye, looking over the rim of the box, viewed their reflections in the mirrors. But the actual place of a reflection was the same distance back of the surface of a mirror that a drawing was in front of it; namely, at the dead centre of the rotating cylinder. It was here, at this quiet point, that it was possible to see the changing images of the succession of graduated drawings blending to give the illusion of motion.
The praxinoscope was designed as a cylindrical box without a lid that rotated around a central pivot. It kept two key features from the zoetrope: a strip of drawings and the setup for placing them inside the box. However, instead of viewing the drawings through openings in the rim of the box, they were seen as reflections in mirrors placed on an inner drum. There were as many mirrors as drawings, and they turned along with the rest of the device. The mirrors were positioned on the drum—an essential aspect of the praxinoscope's design—halfway between the center and the inner side of the box's rim. As the drawings were set there, a viewer could look over the rim of the box to see their reflections in the mirrors. The actual position of a reflection was the same distance behind the surface of a mirror as a drawing was in front of it, located right at the center of the rotating cylinder. It was at this still point that one could see the changing images of the series of graduated drawings merging together to create the illusion of motion.
Reynaud next fixed his praxinoscope with improvements[28] that made the characters in his drawings appear to be going through a performance on a miniature stage. He called his new contrivance the theatre praxinoscope. This new mechanism, was fixed in a box before which was placed a mask-like section to represent a proscenium. Another addition in front of this had a rectangular peep-hole and small cut-out units of stage scenery that were reflected on the surface of a glass inserted into the proscenium opening.
Reynaud then upgraded his praxinoscope with enhancements[28] that made the characters in his drawings seem to perform on a tiny stage. He called his new invention the theatre praxinoscope. This new mechanism was housed in a box, complete with a mask-like section to represent a proscenium. Another addition in front featured a rectangular peep-hole and small cut-out pieces of stage scenery that were reflected on a glass panel placed in the proscenium opening.
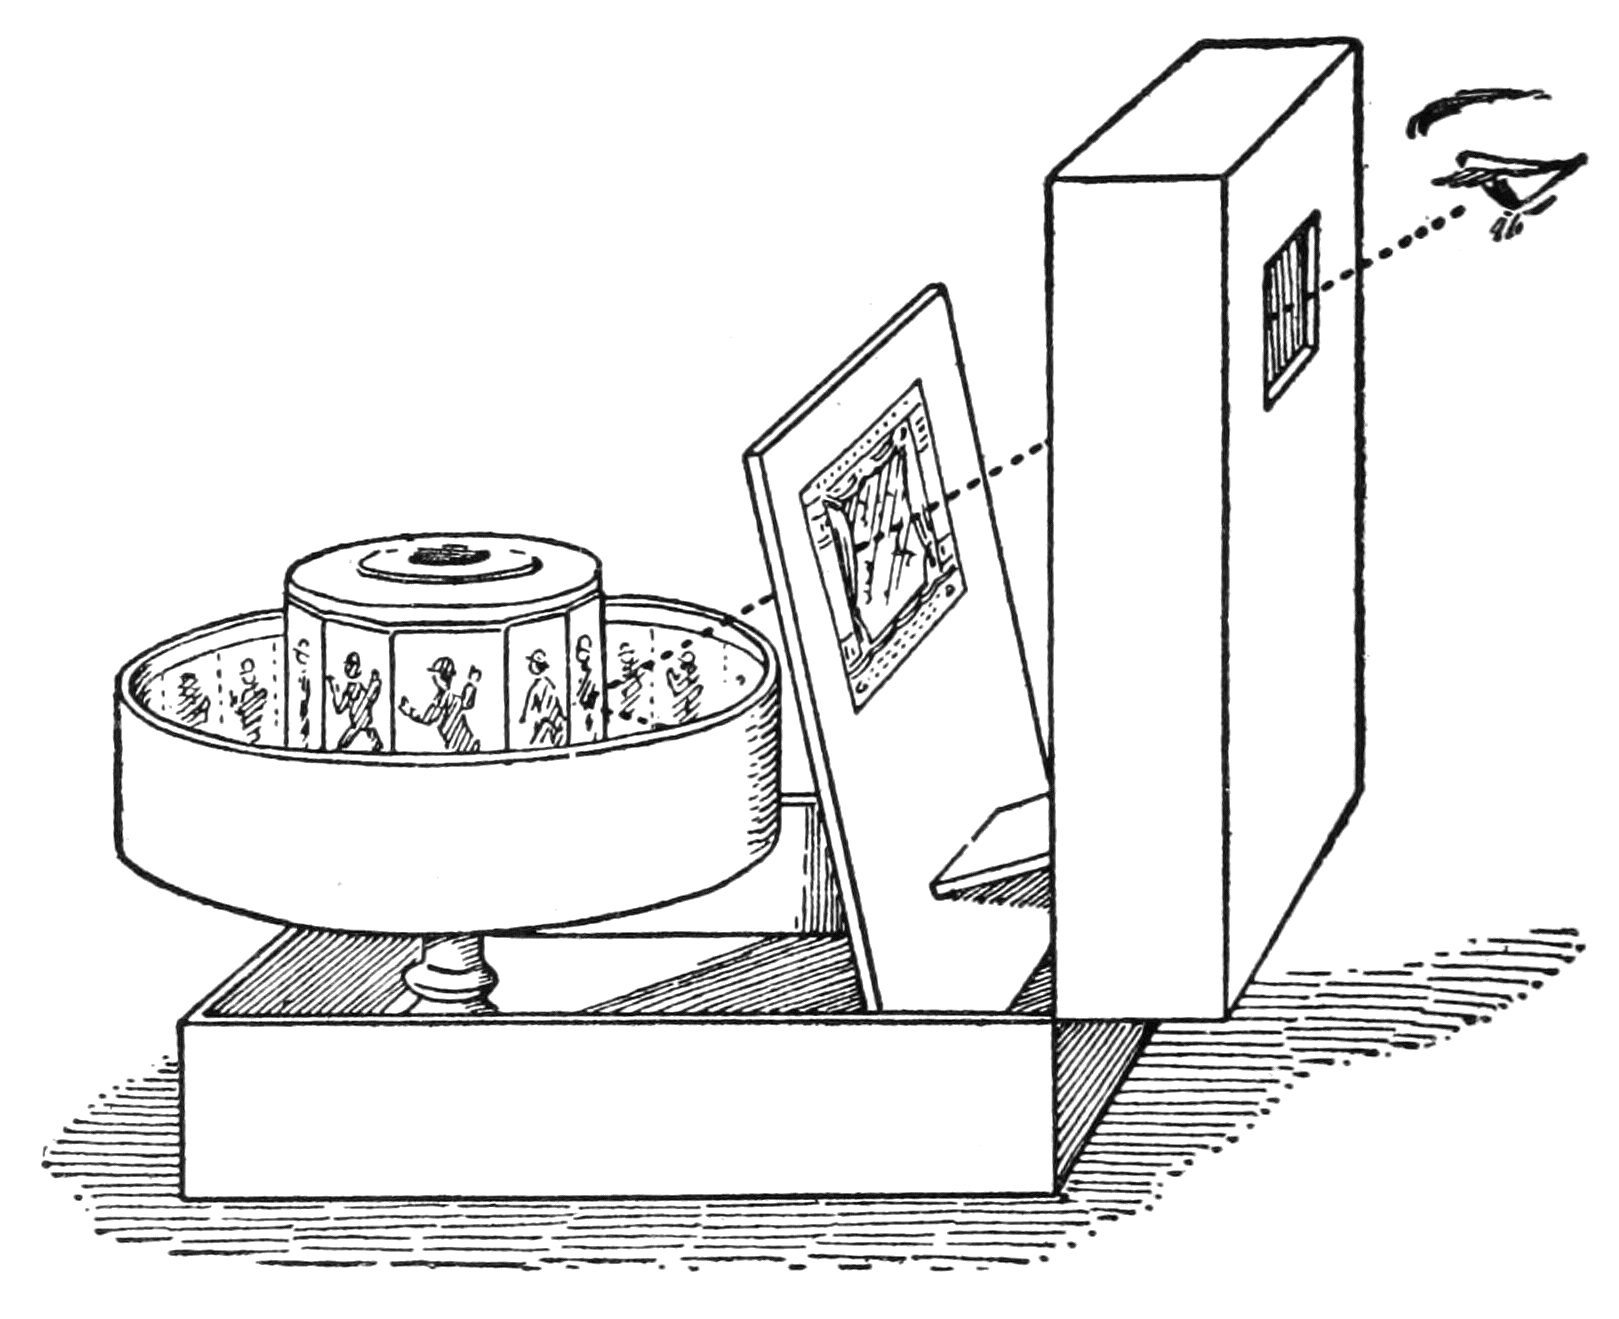
Not satisfied with this toy theatre, Reynaud’s[29] next step was to combine with the praxinoscope, condensers, lenses, and an illuminant with which to project the images on a screen, so that spectators in an auditorium could see the illusion. A more intricate mechanism, again, was later devised by Reynaud. This was his optical theatre in which there was used an endless band of graduated drawings depicting a rather long pantomimic story. It, of course, was an enlargement of the idea of the simple early form of praxinoscope with its strip of paper containing the drawings. But this optical theatre had such a complication of mirrors and lenses that the projected light reached the screen somewhat diminished in illuminating power, and the pictures were consequently dimmed.
Not happy with this toy theater, Reynaud's[29] next move was to combine it with the praxinoscope, condensers, lenses, and a light source to project the images onto a screen, so that audiences in a theater could see the illusion. Reynaud later created an even more complex mechanism. This was his optical theater, which used an endless strip of graduated drawings depicting a rather lengthy pantomime story. It was essentially an expansion of the basic early design of the praxinoscope with its paper strip containing the drawings. However, this optical theater had such a complicated arrangement of mirrors and lenses that the projected light reaching the screen was slightly reduced in brightness, causing the images to appear dim.

(After picture in La Nature, 1882.)
(After picture in La Nature, 1882.)
[30]
[30]
From the time of the invention of the thaumatrope in 1826, and throughout the period when the few typical machines noted above were in use, drawings only in graduated and related series, were applied in the production of the illusion of movement.
From the time the thaumatrope was invented in 1826 and throughout the period when the few typical machines mentioned earlier were in use, only drawings in graduated and related series were used to create the illusion of movement.
(After picture in La Nature, 1892.)
(After image in La Nature, 1892.)

Drawings, too, were first employed for a little optical novelty in book-form, introduced about 1868, called the kineograph. It consisted of a number of leaves, with drawings on one side, firmly bound along an edge. The manner of its manipulation was to cause the leaves to flip from[31] under the thumb while the book was held in the hands. The pictures, all of a series depicting some action of an entertaining subject, passed quickly before the vision as they slipped from under the thumb and gave a continuous action of the particular subject of the kineograph.
Drawings were also first used for a fun optical effect in book form, introduced around 1868, called the kineograph. It was made up of several leaves, with drawings on one side, firmly bound along one edge. To use it, you would flip the leaves with your thumb while holding the book in your hands. The images, all part of a series showing some action of an entertaining subject, quickly flashed by your eyes as they slipped from under your thumb, creating a continuous action of the particular subject of the kineograph.
Now when the camera began to be employed in taking pictures of figures in action, one of the first uses made of such pictures was to put a series of them into the book-form so as to give, by this simple method of allowing the leaves to flip from under the thumb, the visional deception of animated photographs.
Now when the camera started being used to take pictures of people in action, one of the first things done with these pictures was to compile a series of them into book form. This simple method of flipping through the pages created the visual illusion of moving photographs.
FOOTNOTES:
[1] Celluloid is at this date the most serviceable material for these ribbons. But as it is inflammable a substitute is sought—one that has the advantages possessed by celluloid but of a non-combustible material.
[1] Celluloid is currently the most useful material for these ribbons. However, since it is flammable, a substitute is being sought—one that has the benefits of celluloid but is made from a non-combustible material.
THE GENESIS OF MOTION-PICTURES
The Birth of Movies
CHAPTER II
THE GENESIS OF MOTION-PICTURES
Although the possibilities of taking pictures photographically was known as early as the third decade of the nineteenth century, drawings only were used in the many devices for rendering the illusion of movement. In the preceding chapter in which we have given a brief history of the early efforts of synthesizing related pictures, typical examples of such instruments have been given. But the pictorial elements used in them were always drawings.
Although the ability to take photographs was known as early as the 1830s, only drawings were used in various devices to create the illusion of movement. In the previous chapter, where we provided a brief history of early attempts at combining related images, typical examples of such instruments were presented. However, the visual elements used in them were always drawings.
It was not until 1861 that photographic prints were utilized in a machine to give an appearance of life to mere pictures. This machine was that of Mr. Coleman Sellers, of Philadelphia. His instrument brought stereoscopic pictures into the line of vision in turn where they were viewed by stereoscopic lenses. Not only did this arrangement show movement by a blending of related pictures but procured an effect of relief.
It wasn't until 1861 that photographic prints were used in a machine to make pictures look lifelike. This machine belonged to Mr. Coleman Sellers of Philadelphia. His device alternated stereoscopic pictures in view through stereoscopic lenses. This setup not only created the illusion of movement by blending related images but also produced a three-dimensional effect.
[36]
[36]
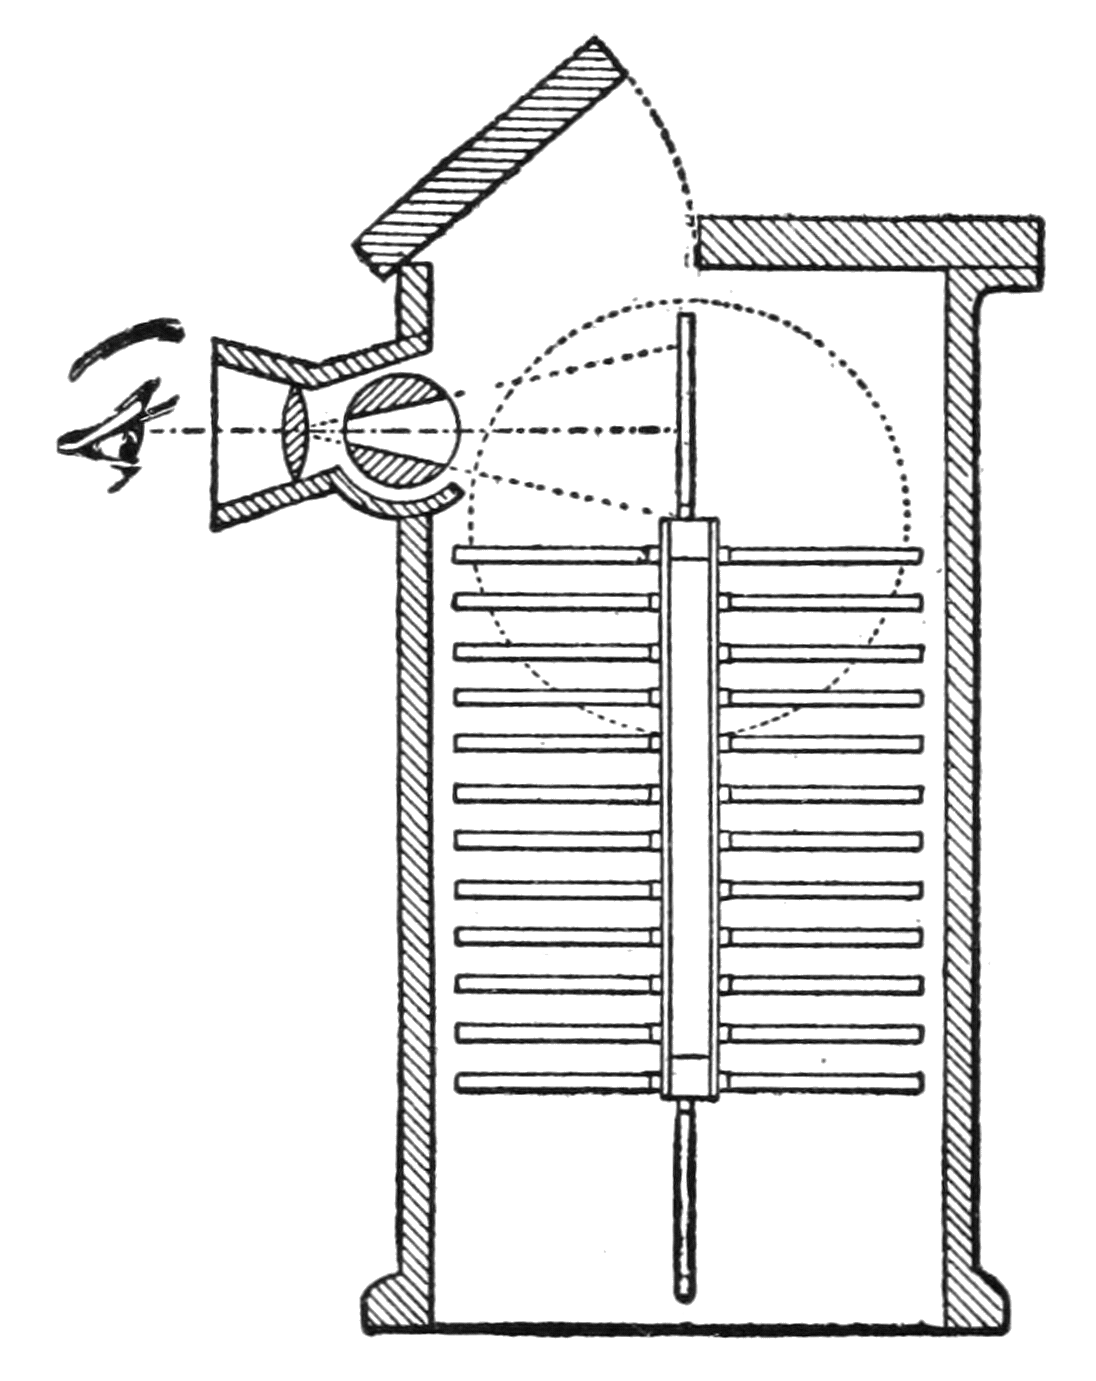
U.S. Pat. No. 31357, Feb. 5. 1861
It is to be remembered that in the days of Mr. Sellers, photography did not have among its means any method of taking a series of pictures on a length of film, but the separate phases of a movement had to be taken one at a time on plates. The ribbon of sensitized film, practical and dependable, did not come until more than twenty-five years later. Its introduction into the craft was coincident with the growth of instantaneous photography.
It’s important to note that back in Mr. Sellers' time, photography didn’t have a way to capture a sequence of images on a single length of film. Instead, each stage of a movement had to be photographed separately on plates. The roll of sensitized film, which was practical and reliable, didn't arrive until over twenty-five years later. Its introduction to the field happened alongside the rise of instant photography.
[37]
[37]
When scientists began to study movement with the aid of instantaneous photographs, they quite naturally cared less for synthesizing the pictorial results of their investigations than they did for merely observing and recording exactly how movement takes place.
When scientists started studying movement using instant photographs, they were more focused on observing and accurately recording how movement occurs than on creating a cohesive visual representation of their findings.
At first diagrams and drawings were used by students of movement to fix in an understandable way the facts gained by their inquiries. In England, for instance, Mr. J. Bell Pettigrew (1834-1908) illustrated his works with a lot of carefully made diagrammatic pictures. He made many interesting observations on locomotion and gave much attention to the movement of flying creatures, adding some comment, too, on the possibility of artificial flight.
At first, students studying movement used diagrams and drawings to clearly present the facts they discovered. In England, for example, Mr. J. Bell Pettigrew (1834-1908) enhanced his works with numerous carefully crafted diagrams. He made many fascinating observations about locomotion and focused significantly on the movement of flying creatures, also commenting on the potential for artificial flight.
Again in Paris, M. E. J. Marey (whose work is to be considered a little farther on) embellished his writings with charts and diagrams that were made with the aid of elaborate apparatus for the timing of animals in action and the marking of their footprints on the ground. Then he traced, too, by methods that involved much labor and patience, the trajectory of a bird’s wing. And in his continued searching out of the principles[38] of flight registered by ingenious instruments the wing-movements in several kinds of insects.
Once again in Paris, M. E. J. Marey (whose work will be discussed a bit later) enhanced his writings with charts and diagrams created using advanced equipment that timed animals in motion and marked their footprints on the ground. He also painstakingly traced the path of a bird’s wing with methods that required a lot of effort and patience. In his ongoing pursuit of understanding the principles of flight, he recorded the wing movements of various types of insects using clever instruments.
In our first chapter no instructions were given as to how animated cartoons are made. And although this is the specific purpose of the book, we must again in this chapter refer but slightly to the matter, as there is need that we first devote some time to chronicling the early efforts in solving animal movements by the aid of photography. Then we must touch, too, upon the modes of the synthesis of analytic photographs for the purpose of screen projection.
In the first chapter, we didn't provide any instructions on how animated cartoons are created. While that's the main goal of this book, we need to briefly mention it again in this chapter because we first have to spend some time discussing the early attempts to capture animal movements using photography. We also need to touch on the methods used to combine analytic photographs for screen projection.
Both these matters are pertinent to our theme: the animated screen artist makes use of instantaneous photographs for the study of movement, and the same machine that projects the photographic film is also used for the animated cartoon film made from his drawings.
Both these matters are relevant to our theme: the animated screen artist uses instant photographs to study movement, and the same machine that projects the photographic film is also used for the animated cartoon film created from his drawings.
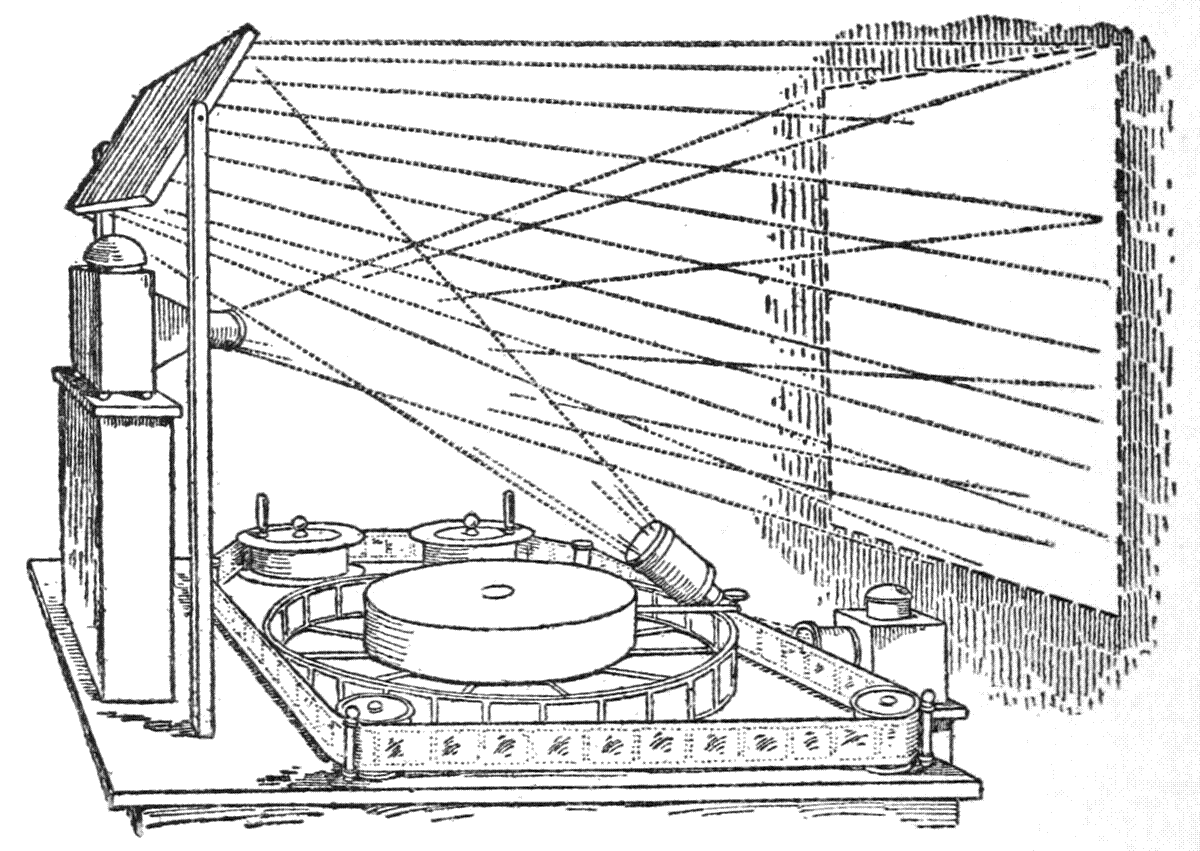
What appears to have been the first use of photographs to give a screen synthesis in an auditorium, was that on an evening in February, 1870, at the Academy of Music, in Philadelphia. It was an exhibition given by Mr. Henry R. Heyl, of his phasmatrope. He showed on a screen, life-sized figures of dancers and acrobats in motion.[39] The pictures were projected, with the aid of a magic-lantern, from photographs on thin glass plates that were placed around a wheel which was made to rotate. A “vibrating shutter” cut off the light while one photograph moved out of the way, and another came in to take its place. The wheel had spaces for eighteen photographs. It was so planned that those of one set could be taken out and those of another slipped in to change a subject for projection.
What seems to be the first use of photographs for a screen presentation in an auditorium happened on a February evening in 1870 at the Academy of Music in Philadelphia. Mr. Henry R. Heyl presented his phasmatrope, displaying life-sized images of dancers and acrobats in motion on a screen. The images were projected using a magic lantern, featuring photographs on thin glass plates arranged around a rotating wheel. A “vibrating shutter” temporarily blocked the light while one photograph moved out of view and another moved in to replace it. The wheel had space for eighteen photographs, designed so one set could be swapped out for another to change the projection subject.[39]
The photographs used in the phasmatrope were from posed models; a certain number of which were selected to form a cycle so that the series could be repeated and a continuous performance be given by keeping the wheel going. At this period there were no pliant sensitized ribbons to take a sequence of photographs of a movement, and Heyl had to take them one at a time on glass plates by the wet collodion process.
The pictures used in the phasmatrope were taken from posed models; a selection of them was made to create a cycle so that the series could be repeated, allowing for a continuous performance as long as the wheel kept turning. At that time, there weren't flexible sensitized ribbons to capture a sequence of photos of a movement, so Heyl had to take them one at a time on glass plates using the wet collodion process.
A notable point about this early motion-picture show was that it was quite like one of our day, for according to Heyl, in his letter to the Journal of the Franklin Institute, he had the orchestra play appropriate music to suit the action of[40] the dancers and the grotesqueries of the acrobats.
A key point about this early movie show was that it was very similar to one of today's shows, because, according to Heyl in his letter to the Journal of the Franklin Institute, he had the orchestra play suitable music to match the movements of[40] the dancers and the antics of the acrobats.
Better known in the fields of the study of movement and that of instantaneous photography and pictorial synthesis are M. Marey, already mentioned (1830-1904), and his contemporary, Mr. E. Muybridge (1830-1904). While Marey conducted his inquiries in Paris, Muybridge pursued his studies in San Francisco and Philadelphia.
Better known in the fields of studying movement and instantaneous photography are M. Marey, who was previously mentioned (1830-1904), and his contemporary, E. Muybridge (1830-1904). While Marey conducted his research in Paris, Muybridge carried out his studies in San Francisco and Philadelphia.
Marey, who in the beginning recorded the changes and modification of attitudes in movement by diagrams and charts, later used diagrams made from photographs and then photographs themselves. He studied the phases of movement from a strictly scientific standpoint, in human beings, four-footed beasts, birds, and nearly all forms of life. And he did not neglect to note the speed and manner of moving of inorganic bodies, such as falling objects, agitated and whirling threads.
Marey, who initially tracked changes in movement and attitudes using diagrams and charts, later created diagrams from photographs and eventually used photographs themselves. He examined the stages of movement from a purely scientific perspective, looking at humans, four-legged animals, birds, and almost all forms of life. He also made sure to observe the speed and way inorganic objects moved, like falling items and spinning threads.
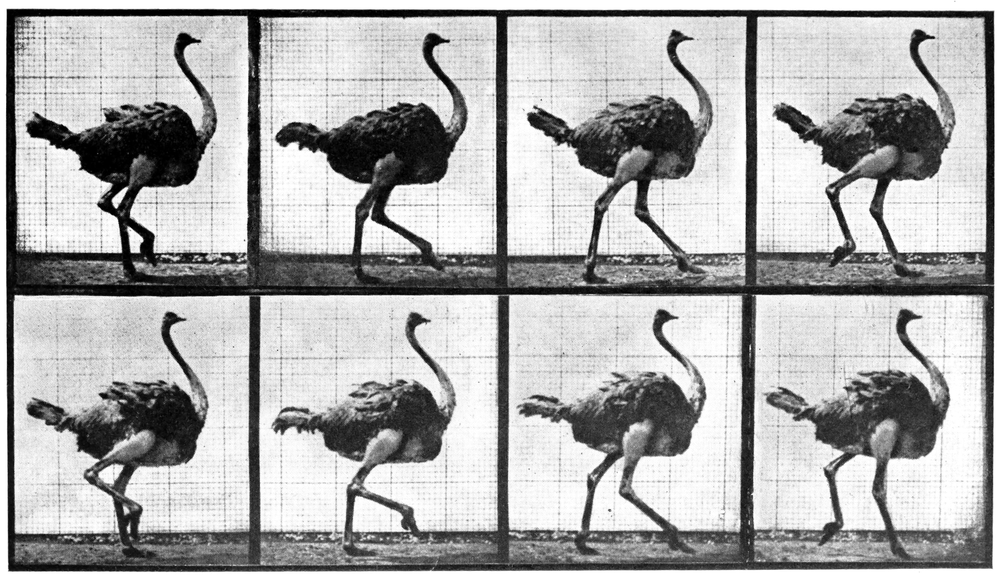
Part of a plate in Muybridge’s “Animal Locomotion.” Published and copyrighted by him in 1887.
Part of a plate in Muybridge’s “Animal Locomotion.” Published and copyrighted by him in 1887.
An imposing work, made under the auspices of the University of Pennsylvania, of more than 700 large plates. It was the first comprehensive analytical study of movement in human figures and animals.
An impressive project, created with the support of the University of Pennsylvania, featuring over 700 large plates. It was the first thorough analytical study of movement in human and animal figures.
Muybridge, on the other hand, seemed to have a trend toward the educational, in a popular sense of the word; and had a faculty of giving his works a pictorial quality. He showed this in the choice of his subjects and the devising of machines [41]that combined his photographs somewhat successfully in screen projection.
Muybridge, on the other hand, appeared to lean towards the educational, in a way that resonated with the general public; he had a knack for giving his works a visual appeal. He demonstrated this through his choice of subjects and the creation of machines that somewhat successfully combined his photographs for screen projection. [41]
In Muybridge’s first work in which he photographed a horse in motion, he used a row of cameras in front of which the horse proceeded. The horse in passing before them, and coming before each particular camera, broke a string connected with its shutter. This in opening exposed the plate and so pictured the horse at that moment, and in the particular attitude of that moment. This breaking of a string, opening of a shutter, and so on, took place before each camera. Muybridge in his early work used the collodion wet plate, a serious disadvantage. Later he had the convenience of the sensitized dry plate and was also able to operate the cameras by motors.
In Muybridge’s first project where he photographed a horse in motion, he set up a line of cameras in front of which the horse ran. As the horse moved past and came in front of each camera, it broke a string connected to its shutter. When the string snapped, the shutter opened, exposing the plate and capturing the horse at that exact moment and in that specific position. This string-breaking and shutter-opening happened for each camera. In his early work, Muybridge used collodion wet plates, which was a significant disadvantage. Later on, he used the more convenient sensitized dry plates and was also able to operate the cameras with motors.
When Marey began to employ a camera in his researches he registered the movements of an entire action on one plate; while Muybridge’s way was to take but one phase of an action on one plate. The two men differed greatly in their objects and methods. Marey in his early experiments, at least, traced on one plate or chart the successive changes in attitudes of limbs or parts, or the positions of certain fixed points on his[42] models. But Muybridge procured single but related pictures of attitudes assumed by his subjects in a connected and orderly sequence. The latter method lent itself more readily to adaptation for the projecting lantern and so became popularly appreciated. Perhaps it is for this reason that Muybridge has been referred to as the father of the motion-picture.
When Marey started using a camera in his research, he captured the movements of an entire action on one plate, while Muybridge focused on taking just one phase of an action on each plate. The two men had very different goals and methods. In his early experiments, Marey tracked the successive changes in the positions of limbs or parts on one plate or chart, or noted the positions of specific fixed points on his models. In contrast, Muybridge captured single but related images of the poses taken by his subjects in a connected and organized sequence. This latter method was more easily adapted for the projector, which led to its widespread popularity. Perhaps that's why Muybridge is often called the father of motion pictures.
The photographic gun was Marey’s most novel camera. With this he caught on a glass plate the movements of flying birds. This instrument was suggested by a similar one used by M. Janssen, the astronomer, in 1874, to make a photographic record of the transit of a planet across the sun’s disk.
The photographic gun was Marey’s most innovative camera. With it, he captured the movements of flying birds on a glass plate. This device was inspired by a similar one used by M. Janssen, the astronomer, in 1874 to create a photographic record of a planet passing in front of the sun’s disk.
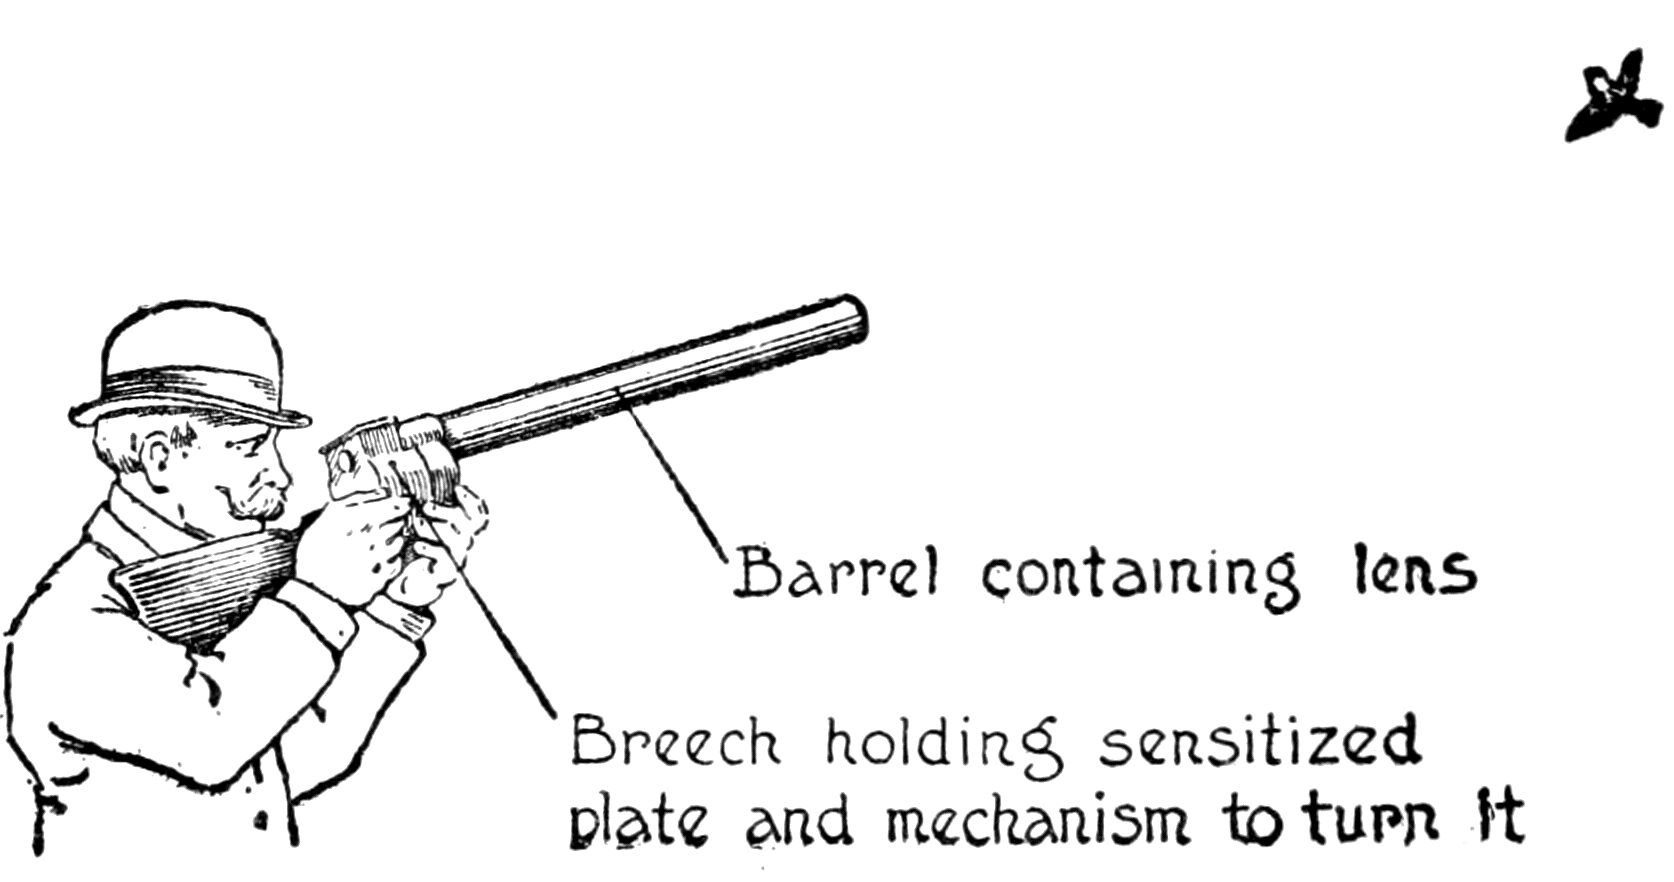
The kineograph, mentioned at the beginning[43] of this chapter, by which the illusion of motion was given to a series of pictures arranged like a book, formed the basic idea for a number of other popular contrivances. One of these was the mutoscope, in which the leaves were fastened by one edge to an axis in such a way that they stood out like spokes. The machine in operation brought one leaf for a moment at rest under the gaze of the eye and then allowed it to snap away to expose another picture in its place. When this was viewed in its turn, it also disappeared to make way for the next in order.
The kineograph, mentioned at the beginning[43] of this chapter, created the illusion of motion by showing a series of pictures arranged like a book. This concept inspired many other popular devices. One of these was the mutoscope, where the leaves were attached by one edge to an axis, making them stand out like spokes. When the machine was in use, it briefly presented one leaf for the viewer to see before it snapped away to reveal another picture in its place. Once this picture was viewed, it disappeared to make room for the next one.
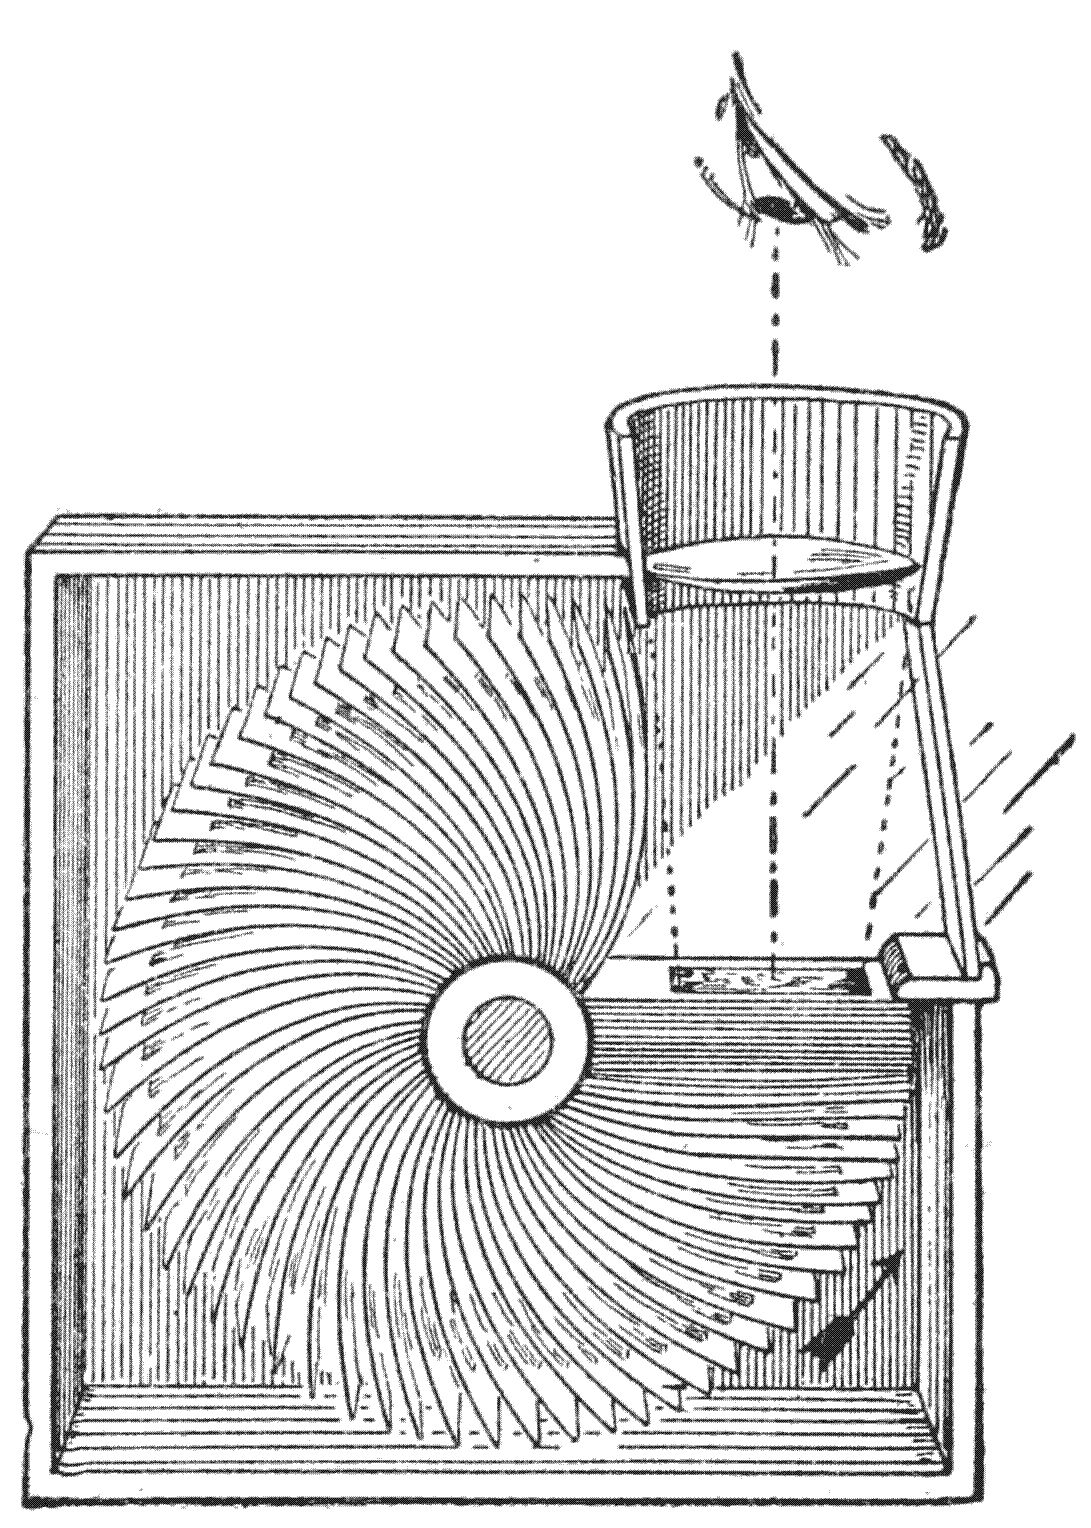
An apparatus similar in principle to the mutoscope.
An device similar in principle to the mutoscope.
As yet experimenters were not altogether sure in what particular way to combine a series of graduated pictures so as to produce one living image. Besides the ways that have been exemplified[44] in the apparatus so far enumerated, some experimenters tried to put photographs around the circumference of a large glass disk somewhat on the order of the phenakistoscope. Heyl’s phasmatrope, of 1870, was on this order.
Experimenters weren't completely certain about the best way to combine a series of graduated images to create a single living picture. In addition to the methods already shown[44] in the apparatus mentioned so far, some experimenters attempted to arrange photographs around the edge of a large glass disk, similar to the phenakistoscope. Heyl’s phasmatrope, introduced in 1870, was along these lines.
On this plan of a rotating disk, Muybridge constructed his zoöpraxiscope by which he projected some of his animal photographs. Another expedient tried by some one was that of putting a string of minute pictures spirally on a drum which was made to turn in a helix-like fashion. The pictures were enlarged by a lens and brought into view back of a shutter that worked intermittently.
On this design of a rotating disk, Muybridge built his zoöpraxiscope to project some of his animal photographs. Another method someone tried was to arrange a series of tiny pictures in a spiral on a drum that rotated in a helical manner. The images were enlarged by a lens and displayed behind a shutter that operated intermittently.
Although the dry plate assuredly was a great improvement over the slow and troublesome old-fashioned wet plate, there was felt the need of some pliant material that could be sensitized for photography and that could furthermore be made in the form of a ribbon. The suitableness of the paper strips for use in the zootrope and the praxinoscope obviously demonstrated the advantages of an elongated form on which to put a series of related pictures.
Although the dry plate was definitely a significant improvement over the slow and problematic old-fashioned wet plate, there was a need for a flexible material that could be sensitized for photography and also made into a ribbon shape. The suitability of paper strips for use in the zoetrope and the praxinoscope clearly showed the benefits of an elongated format for displaying a series of related images.
Experiments were made to obtain a pliant[45] ribbon for the use. Transparent paper was at one time tried but found unadaptable. Eventually the celluloid film came into use, and it is this material that is now generally in use to make both the ordinary snap-shot film and the “film stock” for the motion-picture industry.
Experiments were conducted to find a flexible[45] ribbon for this purpose. Transparent paper was once tested but proved unsuitable. Eventually, celluloid film became the standard, and this material is now commonly used to produce both regular snapshot film and the “film stock” for the movie industry.
Edison’s kinetoscope of 1890, or more particularly its improved form of 1893, that found immediate recognition on its exhibition at the World’s Fair at Chicago, was the first utilization on a large scale of the celluloid film for motion-pictures. It is to be remarked, however, that in the kinetoscope the pictures were viewed, not on a screen in an auditorium by a number of people, but by one person at a time peering through a sight opening in the apparatus. It was the kinetoscope, it appears, that set others to work devising ways of using celluloid bands for projecting pictures on a screen.
Edison’s kinetoscope from 1890, especially its improved version from 1893, gained instant recognition when it was showcased at the World’s Fair in Chicago. It was the first major use of celluloid film for motion pictures. However, it's worth noting that with the kinetoscope, the images were not viewed on a screen in a theater by a crowd, but by one person at a time looking through a viewing slot in the device. It seems that the kinetoscope inspired others to create methods for projecting images onto a screen using celluloid strips.
While some inventors were busy in their efforts to construct workable apparatus both for photography and projection, others were endeavoring to better the material for the film and improve the photographic emulsion covering it.
While some inventors were focused on creating functional equipment for both photography and projection, others were working to enhance the film material and improve the photographic emulsion on it.
There is no need in this book, in which we shall[46] try to explain the making of animated screen drawings, to recount the whole story of the progressive improvements of the machines used in the motion-picture industry. But a short notice of the present-day appliances will not be out of place.
There’s no need in this book, where we will[46] try to explain how animated screen drawings are made, to go through the entire history of the advancements in the machines used in the motion-picture industry. However, a brief overview of the current equipment will be appropriate.
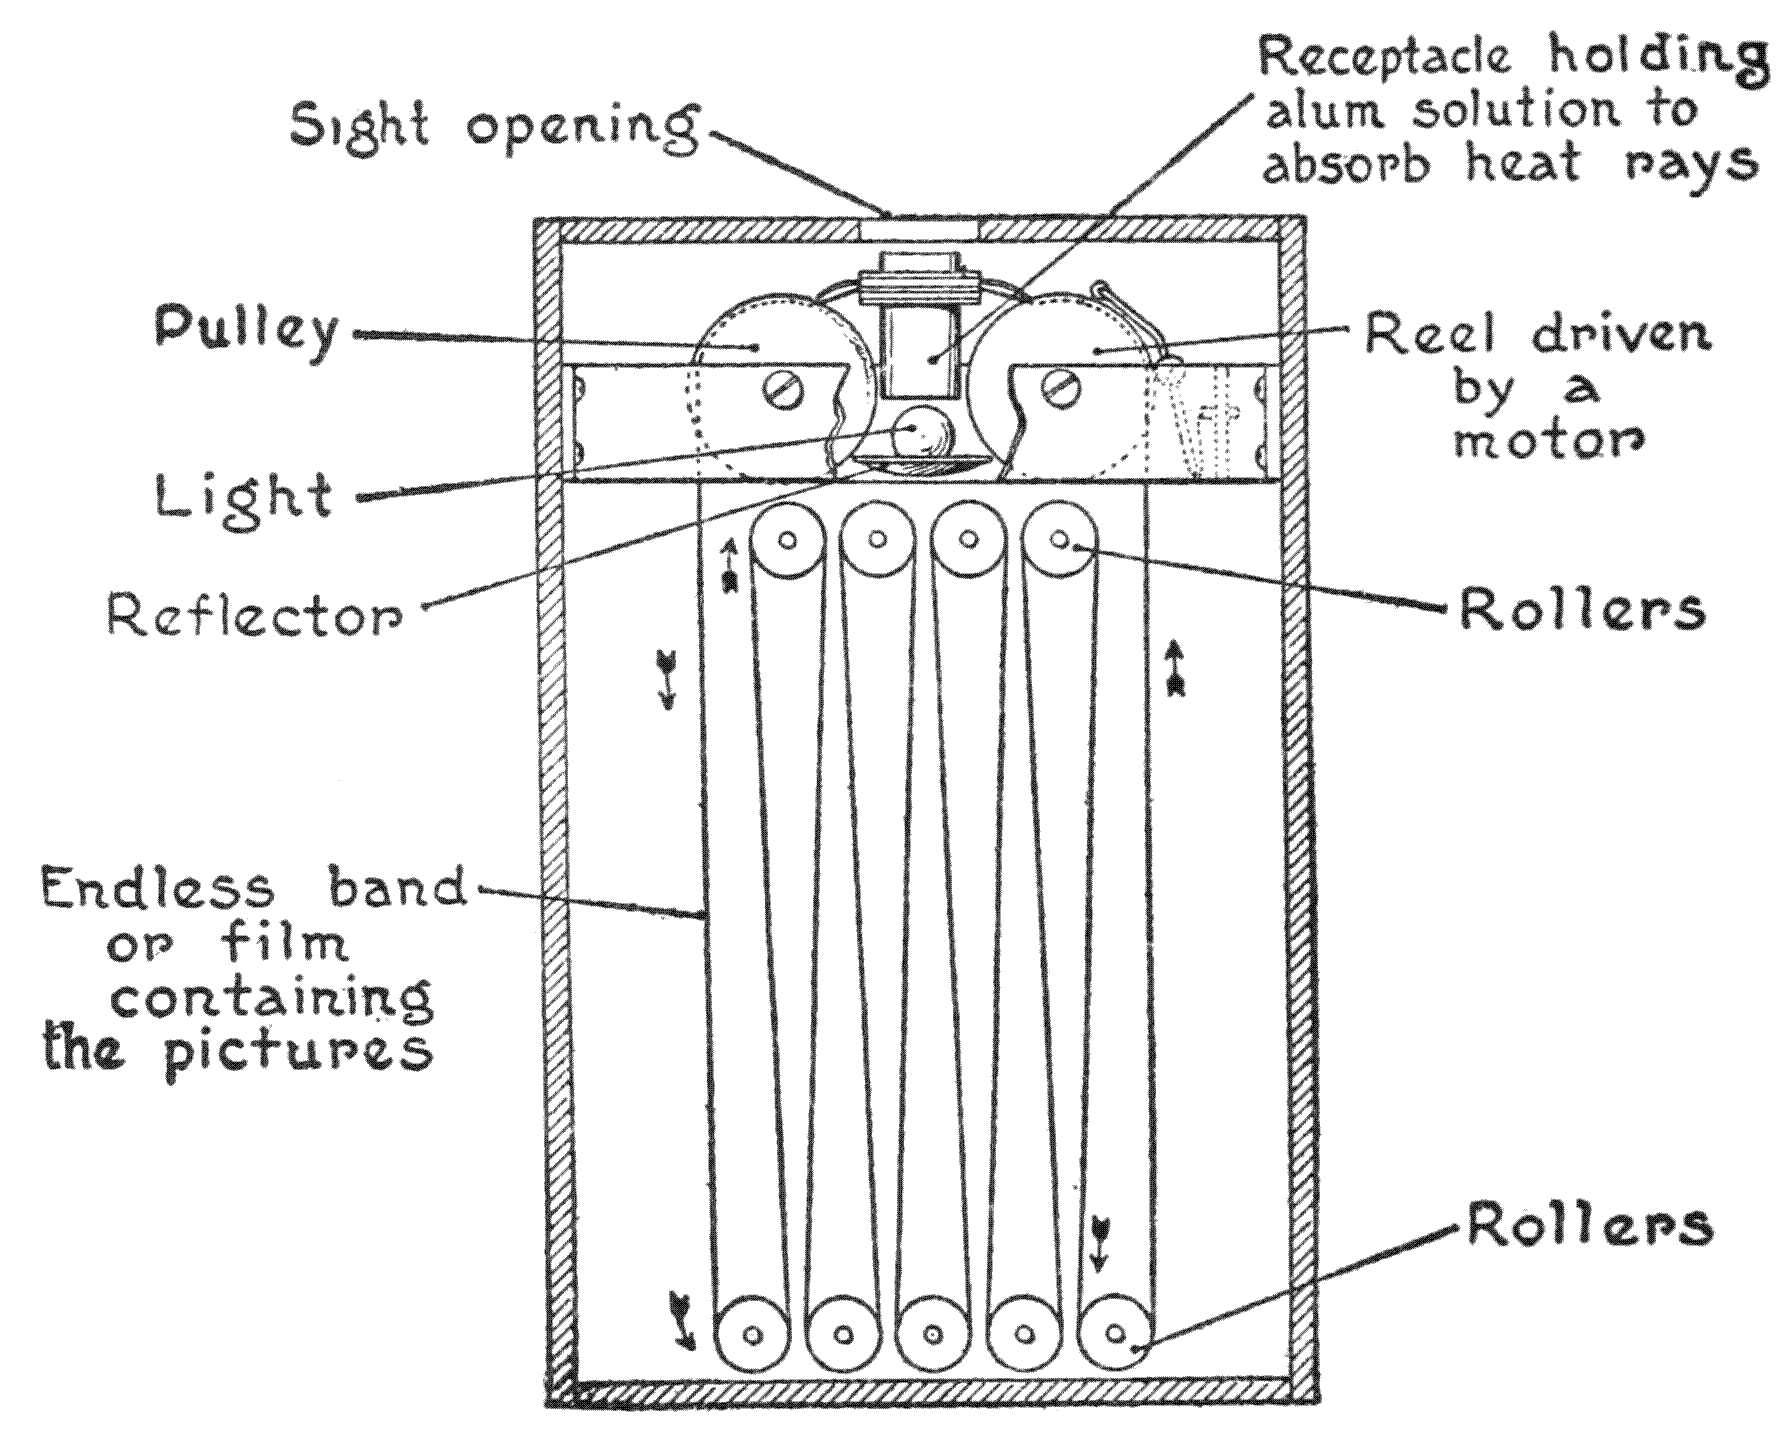
Modified from the Patent Office drawing.
Modified from the Patent Office drawing.
The three indispensable pieces of mechanism are the camera, the projector, and the printer, or apparatus that prints pictures photographically. All three in certain parts of their construction[47] are similar in working principles. The mechanical arrangements of the camera and projector especially are so much alike that some of the first apparatus fabricated were used both for photography and projection. A few early types of cameras served even for printers as well.
The three essential components are the camera, the projector, and the printer, or the device that produces photographic images. All three share similar working principles in certain parts of their design[47]. The mechanical setups of the camera and projector are so similar that some of the earliest devices were used for both photography and projection. A few early types of cameras even worked as printers too.
The essential details of the three machines named above can be described briefly as follows: (1) A camera has a light-tight compartment within which a fresh strip of film passes and stops intermittently back of a lens that is focussed on a subject, a rotating shutter with an open and an opaque section makes the exposure. (When the strip of film is developed it is known as the negative.) (2) A printer pulls the negative, together with a fresh strip of film in contact with it, into place by an intermittent mechanism before a strong light. A rotating shutter flashes the light on and off. (The new piece of film, when it is developed and the pictures are brought out, is known as the positive.) (3) The projector moves the positive film by an intermittent mechanism between a light and a lens; a rotating shutter, with open and opaque sections, alternately shuts the light off and on. When the light rays are[48] allowed to pass the pictures contained on the positive film are projected on the screen.
The key details of the three machines mentioned above can be briefly described as follows: (1) A camera has a light-tight compartment where a fresh strip of film moves intermittently behind a lens focused on a subject, and a rotating shutter with both open and opaque sections makes the exposure. (When the film is developed, it's called the negative.) (2) A printer pulls the negative, along with a fresh strip of film in contact with it, into place using an intermittent mechanism in front of a strong light. A rotating shutter turns the light on and off. (The new piece of film, once developed and the pictures revealed, is called the positive.) (3) The projector moves the positive film using an intermittent mechanism between a light and a lens; a rotating shutter, with open and opaque sections, alternates shutting the light off and on. When the light rays are[48] allowed to pass, the images on the positive film are projected onto the screen.

It seems unnecessary, perhaps, in these days of the ubiquity of snap-shot cameras, and the fact that nearly every one becomes acquainted with their manipulation, to mention that a photographic negative records the light and shade of nature negatively, and that a positive print is[49] one that gives a positive representation of such light and shade.
It might seem unnecessary today, with everyone having access to cameras and being familiar with how to use them, to point out that a photographic negative captures the light and shade of nature in a reversed way, while a positive print provides a direct representation of that light and shade.[49]
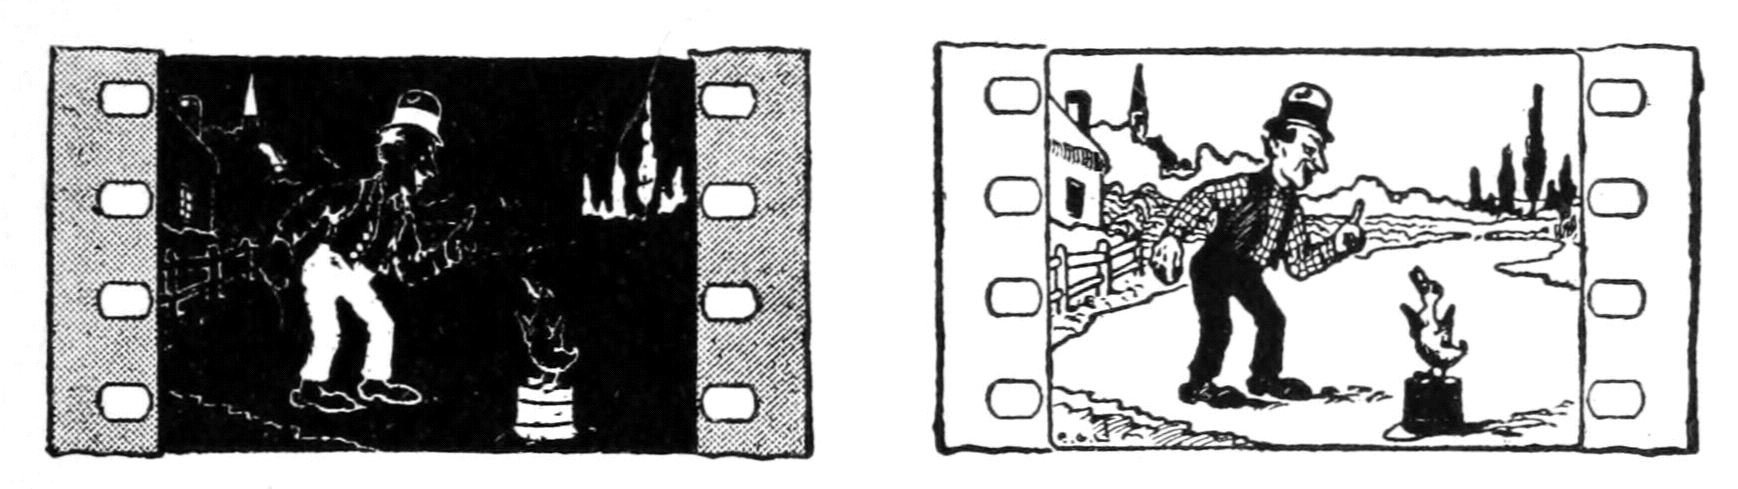
A motion-picture camera of the most approved pattern is an exceedingly complicated and finely adjusted instrument. Its principle of operation can be understood easily if it is remembered that it is practically a snap-shot camera with the addition of a mechanism that turns a revolving shutter and moves a length of film across the exposure field, holds it there for an interval while the photographic impression is made, and then moves it away to continue the process until the desired length of film has been taken. This movement, driven by a hand-crank, is the same as that of a projector—previously explained—namely, an intermittent one.
A modern movie camera is a highly sophisticated and precisely calibrated device. Its operation can be easily grasped when you think of it as a regular camera with an added mechanism that spins a shutter and moves a strip of film across the area where the image is captured. It holds the film in place for a moment to create the photo, then moves it away to keep recording until the required amount of film has been exposed. This movement, powered by a hand-crank, functions just like a projector, as explained earlier—specifically, it's an intermittent movement.
This is effected in a variety of ways. The method in many instruments is an alternate one of the going back and forth of a pair of claw-levers[50] that during one such motion draw the film into place by engaging the claws into perforations on the margins of the film.
This is done in several ways. In many instruments, the method involves the back-and-forth motion of a pair of claw levers[50] that, during one of these movements, pull the film into position by hooking the claws into the holes along the edges of the film.
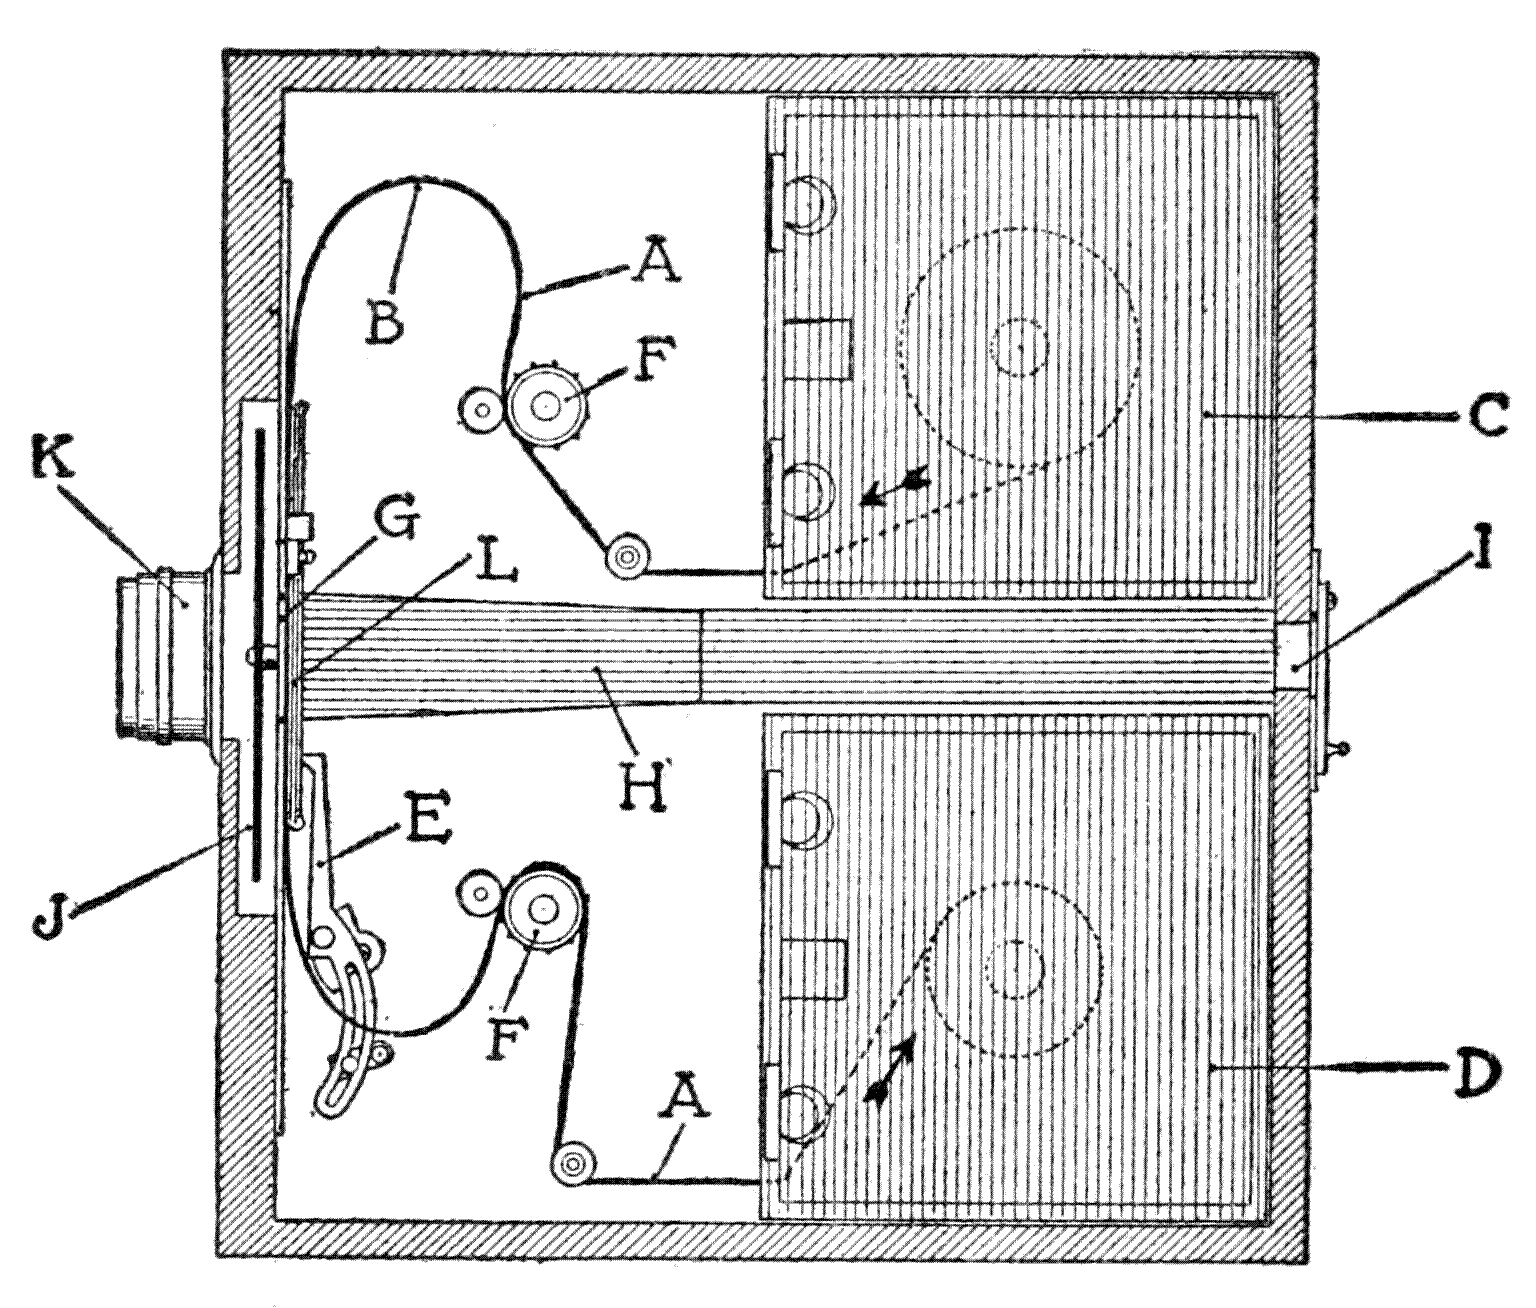
A. Film. B. Top loop to allow for the pulling down of the film during the intermittent movement. C. Magazine to hold the blank film. D. Magazine to hold the exposed film. E. Claw device which pulls down the film three-quarters of an inch for each picture. F. Sprocket-wheels. G. Exposure field. H. Focusing-tube. I. Eye-piece for focusing. J. Shutter. K. Lens. L. Film gate.
A. Film. B. Top loop to pull down the film during the intermittent movement. C. Magazine to hold the unexposed film. D. Magazine to hold the exposed film. E. Claw device that pulls down the film three-quarters of an inch for each shot. F. Sprocket wheels. G. Exposure area. H. Focusing tube. I. Eyepiece for focusing. J. Shutter. K. Lens. L. Film gate.
The patterns of the shutters in camera and projector differ. That of the projector is three or two parted, as stated in our observations previously made. A camera shutter is a disk with an open section. The area of this open section can be varied to fit the light conditions.
The patterns of the shutters in a camera and projector are different. The projector's shutter is usually divided into three or two parts, as mentioned in our earlier observations. A camera shutter is a disk with a gap. The size of this gap can be adjusted to match the lighting conditions.
[51]
[51]
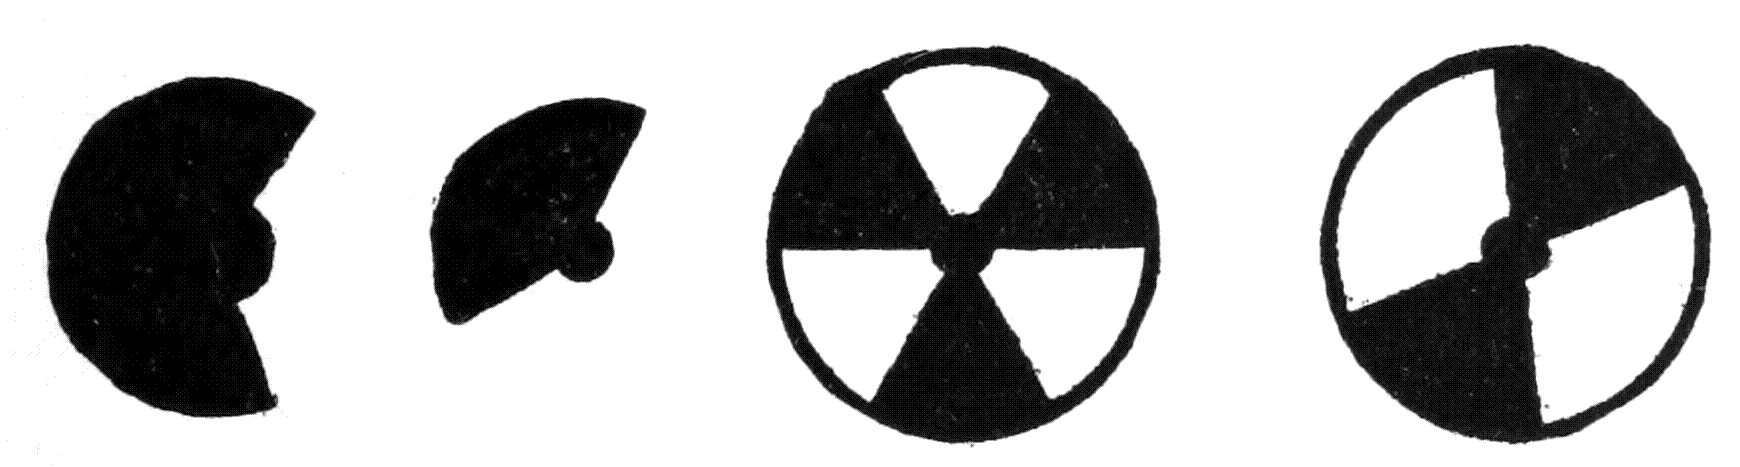
The general practice relative to taking motion-pictures is to have one-half foot of film move along for each turn of the camera handle. Eight separate pictures are made on this one-half foot of film. But in a camera that the animated cartoon artist uses, but one turn of the handle for each picture is the method. In most cameras the gearing can be changed to operate either way. To photograph drawings in making animated films a good reliable instrument is necessary, and requirements to the purpose should be thought of in selecting one. One important matter that may be mentioned here is that there should be an easy way of focussing the scene. Generally in taking topical pictures and views, an outside finder and a graduated scale for distance and other matters is made use of, but for[52] drawings it is essential to be able to focus on a suitable translucent surface within the exposure field in the camera.
The usual method for shooting movies is to have half a foot of film advance for each turn of the camera handle. Eight different frames are captured on that half foot of film. However, for the cameras used by animated cartoon artists, they take just one turn of the handle for each frame. In most cameras, the gearing can be adjusted to work either way. To photograph drawings for animated films, a good, reliable camera is crucial, and you should consider the specific requirements when choosing one. One key point to mention is that there should be an easy way to focus the scene. Typically, when taking various pictures and views, an external viewfinder and a scale for distance and other factors are used, but for drawings, it’s important to be able to focus on an appropriate translucent surface within the exposure area of the camera.
There are certain numerical formulas that those going into motion-picture work should learn at the start. It is well, too, for the general reader, even if he is interested only as a matter of information to take note of them. Their comprehension will help to a better understanding of how both the ordinary photographic film, and the film from animated drawings, are made, prepared, and shown on the screen.
There are some key numerical formulas that anyone entering the film industry should learn right away. It's also beneficial for the general reader, even if they're only looking for information, to pay attention to them. Understanding these formulas will lead to a better grasp of how both regular photographic film and animated films are created, processed, and presented on screen.
As the ordinary phrase goes, any single subject in film form is spoken of as a reel; but in strict trade usage the word means a length of one thousand feet. As it is generally reckoned, sixty feet of film pass through the projecting machine every minute. This means that a reel of one thousand feet will take about seventeen minutes. Now with sixty feet of film crossing the path of light in one minute, we see that one foot hurries across in one second. And as sixteen little pictures are contained in one foot of film, we get an idea of the great number of such separate pictures in a reel of ordinary length.[53] All these particulars—especially that regarding the speed at which the film moves—are vital matters for the animated cartoon artist to keep in mind as he plans his work.
As the common saying goes, any single topic in film is referred to as a reel; but in industry terms, it actually means a length of one thousand feet. Generally, it’s understood that sixty feet of film passes through the projector every minute. This means that a reel of one thousand feet will last about seventeen minutes. With sixty feet of film moving across the light path in one minute, we find that one foot travels in one second. Since there are sixteen individual frames in one foot of film, we can grasp the huge number of separate images in an average-length reel.[53] All these details—especially the speed at which the film moves—are essential for the animated cartoon artist to consider while planning their work.
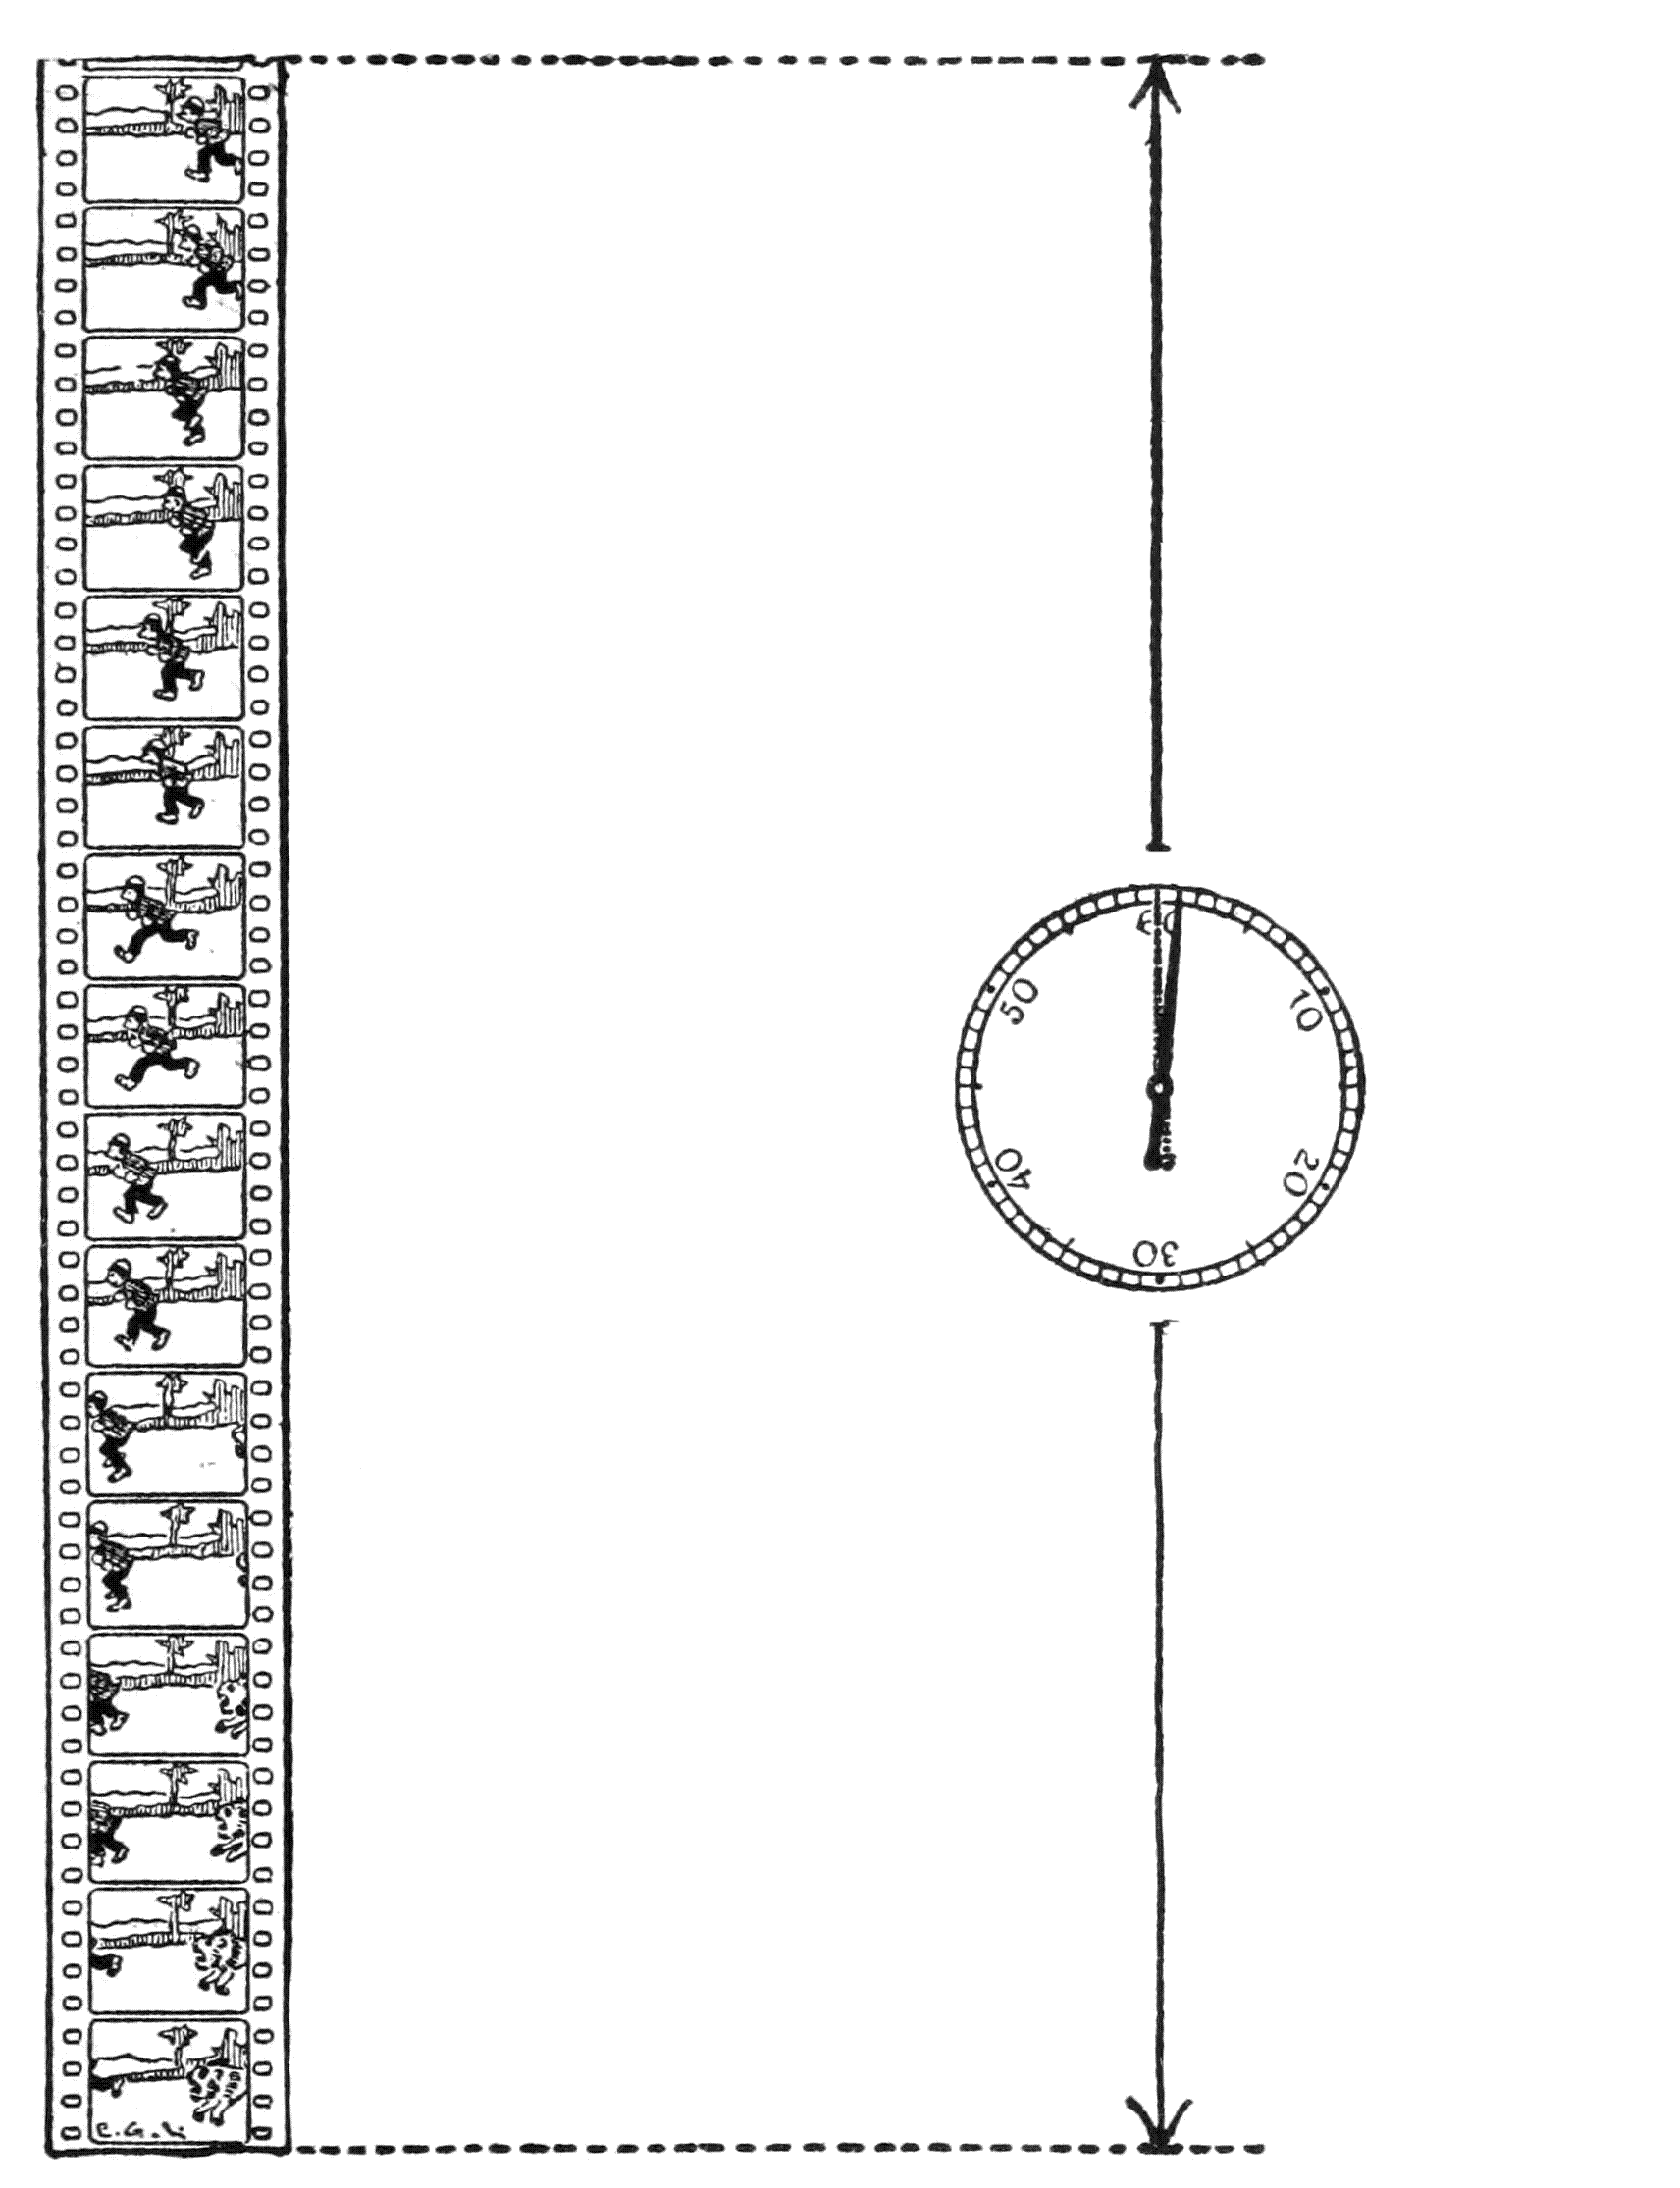
MAKING ANIMATED CARTOONS
Creating Animated Cartoons
CHAPTER III
MAKING ANIMATED CARTOONS
In the preceding chapter the attention was called to the fact that a foot of film passes through the projector in one second, and that in each foot there are sixteen pictures, or frames, within the outlines of which the photographic images are found. When a camera man sets up his apparatus before a scene and starts to operate the mechanism, the general way is to have the film move in the camera at this same rate of speed; to wit, one foot per second. As each single turn of the camera handle moves only one-half of a foot of film, the camera man must turn the handle twice in one second. And one of the things that he must learn is to appraise time durations so accurately that he will turn the handle at this speed.
In the previous chapter, we noted that a foot of film goes through the projector every second, and that each foot contains sixteen pictures, or frames, where the photographic images are captured. When a cameraman sets up his equipment in front of a scene and begins to operate it, he typically has the film move at the same speed—one foot per second. Since each full turn of the camera handle only moves half a foot of film, the cameraman has to turn the handle twice every second. One key skill he needs to develop is accurately estimating time so he can turn the handle at that pace.
The animated cartoon artist, instead of using real people, objects, or views to take on his film, must make a number of related drawings, on every one of which there must be a change in a proper,[58] progressive, and graduated order. These drawings are placed under a camera and photographed in their sequence, the film developed and the resultant negative used to make a positive film. This is used, as we know, for screen projection. All the technical and finishing processes are the same whether they are employed in making the usual reel in which people and scenes are used, or animated cartoon reels from drawings.
The cartoon animator, instead of using real people, objects, or scenes for their film, has to create a series of connected drawings, each of which has to show a change in a proper, progressive, and graduated order. These drawings are placed under a camera and filmed in sequence, the film gets developed, and the resulting negative is used to create a positive film. This is used, as we know, for screen projection. All the technical and finishing processes are the same whether they are used to make a regular film featuring people and scenes or animated cartoon films from drawings.[58]
When it is considered that there are in a half reel (five hundred feet, the customary length for a comic subject) exactly eight thousand pictures, with every one—theoretically—different, it seems like an appalling job to make that number of separate drawings for such a half reel. But an artist doesn’t make anywhere near as many drawings as that for a reel of this length, and of all the talents required by any one going into this branch of art, none is so important as that of the skill to plan the work so that the lowest possible number of drawings need be made for any particular scenario.
When you consider that a half reel (five hundred feet, the usual length for a comic subject) contains exactly eight thousand frames, with each one—theoretically—being different, it seems like a daunting task to create that many separate drawings for just a half reel. However, an artist doesn’t produce nearly that many drawings for a reel of this length, and of all the skills needed for anyone entering this field of art, none is as crucial as the ability to plan the work in a way that minimizes the number of drawings required for any given scenario.
“Animator” is the special term applied to the creative worker in this new branch of artistic endeavor. Besides the essential qualification of[59] bestowing life upon drawings, he must be a man of many accomplishments. First as a scenario is always written of any screen story no matter whether serious, educational, or humorous, he must have some notion of form; that is to say, he must know what good composition means in putting components together in an orderly and proportional arrangement.
“Animator” is the specific term used for the creative professional in this new area of artistic work. In addition to the key skill of bringing drawings to life, they need to be a person of many talents. Since every screen story, whether serious, educational, or humorous, always begins with a script, they should have some understanding of structure; this means they must know what good composition involves in arranging elements in a well-organized and balanced way.
If the subject is an educational one he must have a grasp of pedagogical principles, too, and if it is of a humorous nature, his appreciation of a comic situation must be keen.
If the subject is related to education, he must understand teaching principles as well, and if it’s humorous, he should have a good sense of what makes a situation funny.
And then with the terrifying prospect confronting him of having to make innumerable drawings and attending to other incidental artistic details before his film is completed, he must be an untiring and a courageous worker. His skill as a manager comes in when planning the whole work in the use of expedients and tricks, and an economy of labor in getting as much action with the use of as few drawings as possible.
And then, faced with the daunting task of having to create countless drawings and handle other minor artistic details before finishing his film, he has to be an incredibly hardworking and brave person. His management skills are essential for planning the entire project efficiently, using clever techniques, and maximizing output while minimizing the number of drawings needed.
Besides the chief animator, others, such as assistant animators, tracers, and photographers, are concerned in the production of an animated film from drawings.
Besides the main animator, others, like assistant animators, tracers, and photographers, are involved in creating an animated film from drawings.
[60]
[60]
Comments on the writing of the scenario we do not need to go into now. Often the artist himself writes it; but if he does not, he at least plans it, or has a share in its construction.
Comments on the writing of the script we do not need to get into right now. Often the artist himself writes it; but if he doesn’t, he at least plans it, or has a part in its creation.
Presuming, then, that the scenario has been written, the chief animator first of all decides on the portraiture of his characters. He will proceed to make sketches of them as they look not only in front and profile views, but also as they appear from the back and in three-quarter views. It is customary that these sketches—his models, and really the dramatis personæ, be drawn of the size they will have in the majority of the scenes. After the characters have been created, the next step is to lay out the scenes, in other words, plan the surroundings or settings for each of the different acts. The rectangular space of his drawings within which the composition is contained is about ten or eleven times larger than the little three-quarter-by-one-inch pictures of the films; namely, seven and one-half by ten inches, or eight and one-quarter by eleven inches. For some kinds of films—plain titles and “trick” titles—the making of which will be remarked upon further on—a larger field of about thirteen and one-half by eighteen inches is used.
Assuming the scenario has been written, the chief animator first decides on the appearance of his characters. He will sketch them from different angles, including front, profile, back, and three-quarter views. It's standard for these sketches—his models, really the characters—to be drawn at the size they will appear in most scenes. Once the characters are created, the next step is to plan the scenes, which means setting up the backgrounds for each act. The rectangular area for his drawings, where the composition is organized, is about ten or eleven times larger than the small three-quarter-by-one-inch images from the films; specifically, seven and a half by ten inches, or eight and a quarter by eleven inches. For certain types of films—like simple titles and “trick” titles, which will be discussed later—a larger size of about thirteen and a half by eighteen inches is used.
[61]
[61]
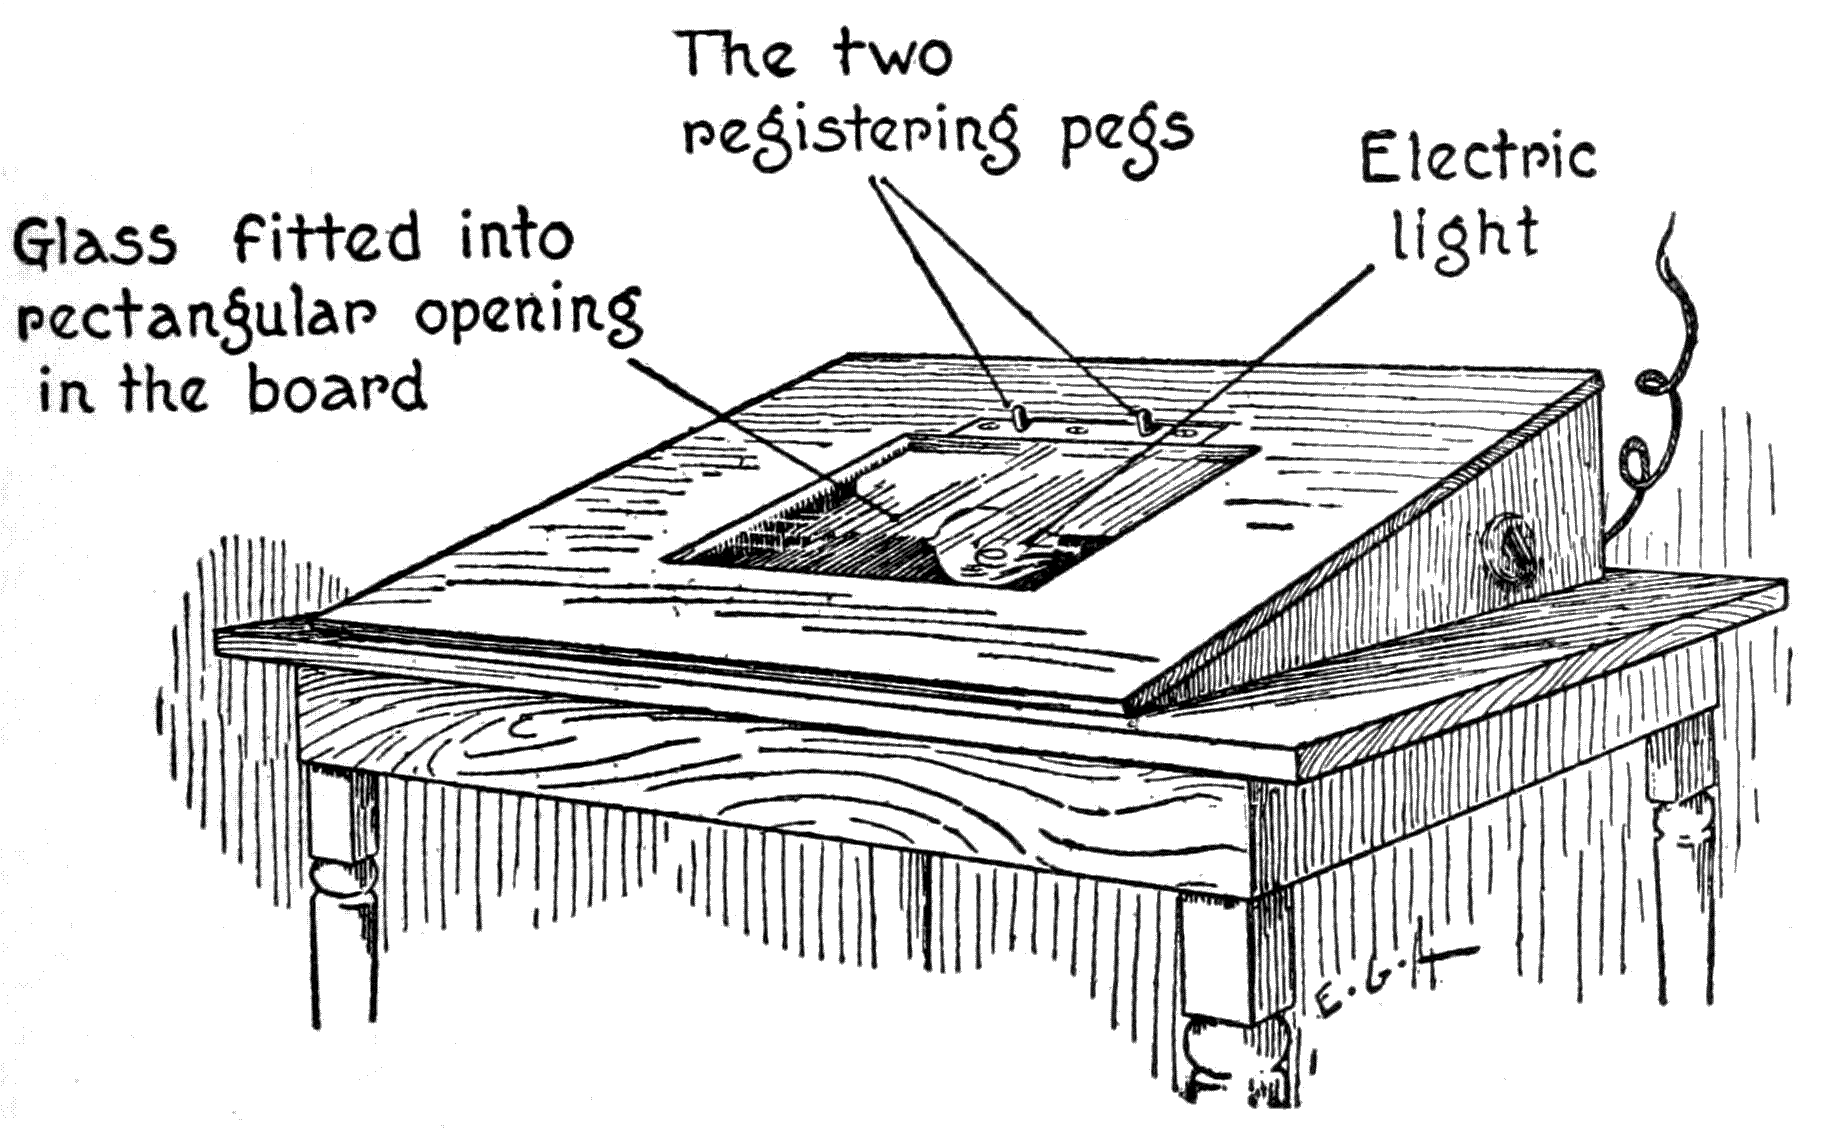
Now with a huge pile of white linen paper cut to a uniform size of about nine by twelve inches, the animator apportions the work to the several assistant animators. The most important scene or action, of course, falls to his share. There are several ways of going about making animated cartoons, and trick titles, and these methods will be touched upon subsequently. But in the particular method of making animated cartoons which we are describing now—that in which paper is the principal surface upon which the drawings are made in ink—all the workers make their drawings over a board that has a middle portion cut out and into which is fitted a sheet[62] of thick glass. Under this glass is fixed an electric light. On the board along the upper margin of the glass, there is fixed to the wood a bar of iron to which two pins or pegs are firmly fixed. These pegs are a little less than one-half inch high and distant from each other about five inches. It doesn’t matter much what this distance is, excepting this important point: all the boards in any one studio must be provided with sets of pegs that are uniform with respect to this distance between them. And all of them should be most accurately measured in their placing. Sometimes as an expedient, pegs are merely driven into the board at the required distance.
Now with a huge stack of white linen paper cut to a standard size of about nine by twelve inches, the animator distributes the work among the various assistant animators. Naturally, the most important scene or action is his responsibility. There are several ways to create animated cartoons and trick titles, and we will touch on these methods later. But in the specific method of making animated cartoons that we are discussing now—where paper is the main surface for the ink drawings—all the workers create their drawings over a board that has a cut-out section in the middle, into which a sheet of thick glass is fitted. An electric light is fixed under this glass. Along the upper edge of the glass, there is an iron bar attached to the wood, to which two pins or pegs are firmly secured. These pegs are a little less than half an inch high and are about five inches apart. The exact distance isn’t crucial, except for this important point: all the boards in any one studio must have peg sets that are uniform in this spacing. All of them should be measured accurately in their placement. Sometimes, as a workaround, pegs are simply driven into the board at the required distance.
These pegs are seven thirty-seconds of an inch in diameter. That the animator should use this particular size of pegs was determined, no doubt, by the fact that an article manufactured originally for perforating pages and sheets used in certain methods of bookkeeping was found available for his purposes. This perforator cuts holes exactly seven thirty-seconds of an inch in diameter. Each one of the sheets of paper from the huge pile spoken of above, before it is drawn upon, has two holes punched into one of its long edges at[63] the same distance apart as the distance between the two pegs fixed to the animator’s drawing-board.
These pegs are seven thirty-seconds of an inch in diameter. The animator probably chose this specific peg size because a tool originally made for punching holes in pages and sheets for bookkeeping was available for his needs. This hole punch makes holes that are exactly seven thirty-seconds of an inch in diameter. Each sheet of paper from the large pile mentioned earlier has two holes punched into one of its long edges, spaced the same distance apart as the two pegs attached to the animator's drawing board.
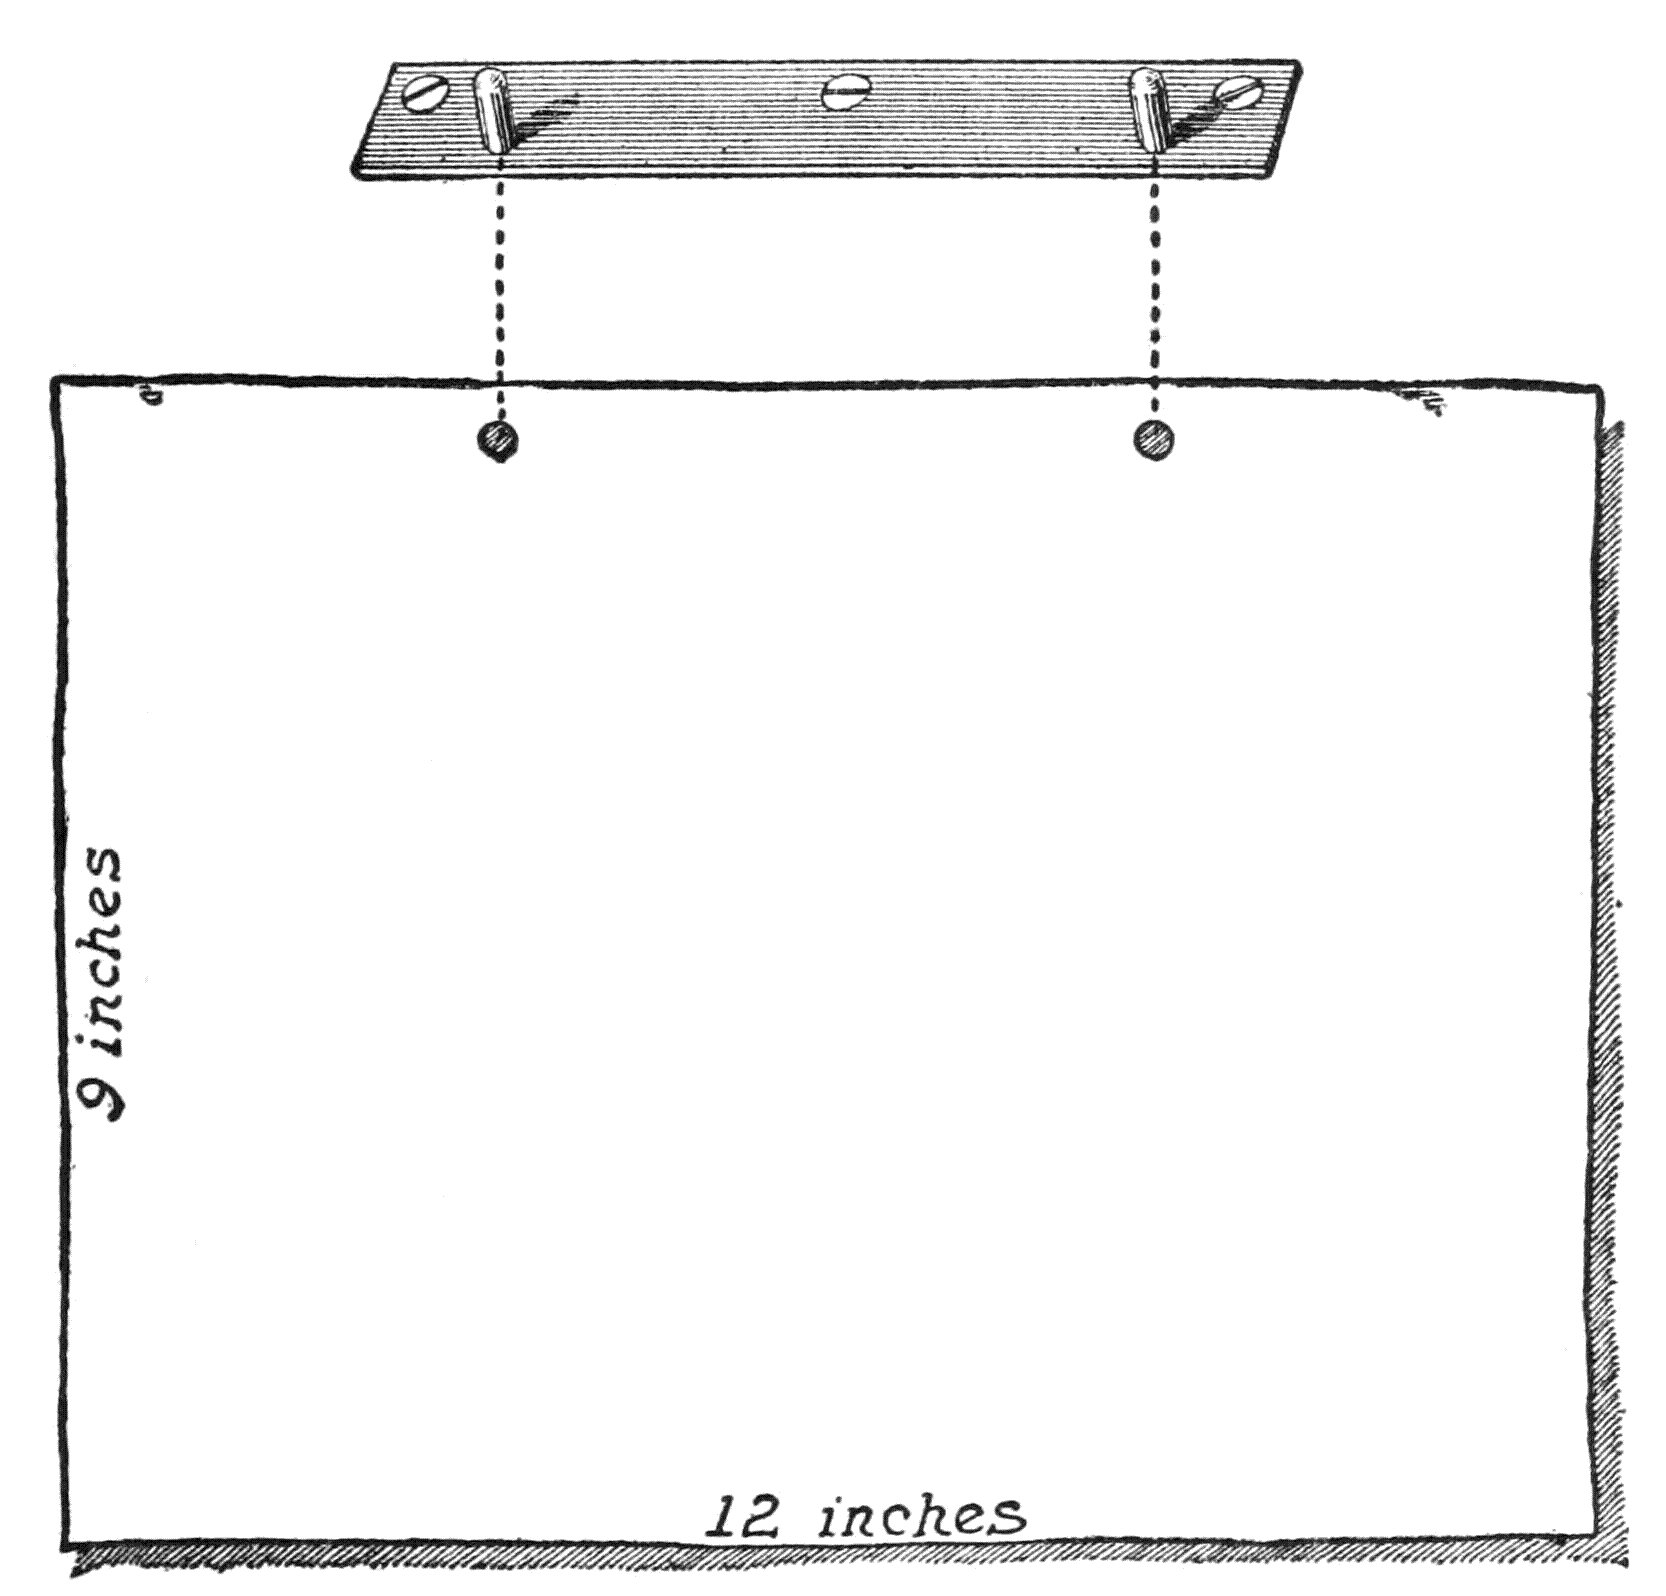
Fitting one of these sheets of paper over the pegs, the artist-animator is ready for work. As the paper lies flat over the glass set into the board, he can see the glare of the electric light underneath. This illumination from below is to enable him to trace lines on a top sheet of paper from[64] lines on a second sheet of paper underneath; and also to make the slight variations in the several drawings concerned in any action.
Fitting one of these sheets of paper over the pegs, the artist-animator is ready to start working. As the paper lies flat over the glass set into the board, he can see the glare of the electric light shining from below. This light is meant to help him trace lines on the top sheet of paper from the lines on the second sheet underneath, as well as to make the subtle variations in the various drawings involved in any action.
Now the reason for the pegs is this: as in an ordinary motion-picture film certain characters, as well as objects and other details are quiescent, and only one or a few characters are in action, so in an animated cartoon some of the figures, or details, are quiescent for a time. And as they stay for a length of time in the same place in the scene, their portrayal in this same place throughout the series of drawings is obtained by tracing them from one sheet to another. The sheets are held in place by the pegs and they insure the registering of identical details throughout a series.
Now, the reason for the pegs is this: just like in a regular movie, where certain characters, objects, and other details are still while one or a few characters are moving, in an animated cartoon, some figures or details remain still for a while. Since they occupy the same spot in the scene for a period of time, their depiction in that same position across the series of drawings is achieved by tracing them from one sheet to the next. The sheets are held in place by the pegs, which ensure that the same details are consistently aligned throughout the series.
When the animator designs his setting, the stage scenery of any particular animated play, he keeps in mind the area within which his figures are going to move. Reasons for this will become apparent as the technic of the art is further explained. The outline of his scene, say a background, simply drawn in ink on a sheet of paper is fitted over the pegs. The light under the glass, as explained immediately above, shows through[65] it. Next a fresh sheet of paper is placed over the one with the scene, and as the paper is selected for its transparent qualities, as well as its adaptability for pen-drawing, the ink lines of the scene underneath are visible.
When the animator creates their setting, the background scenery for any specific animated project, they consider the space where their characters will move. The reasons for this will become clear as the technique of the art is explained further. The outline of their scene, like a background, is simply drawn in ink on a sheet of paper and placed over the pegs. The light under the glass, as mentioned earlier, shines through it. Next, a new sheet of paper is placed over the one with the scene, and since the paper is chosen for its transparency as well as its suitability for pen drawing, the ink lines of the scene underneath are visible.
Let us presume now, that the composition is to represent two men standing and facing each other and talking. They are to gesticulate and move their lips slightly as if speaking. (In the following description we will ignore this movement of the mouth and have it assumed that the artist is drawing this action, also, as he proceeds with the work.) The two men are sketched in some passive position, and the animation of one of the figures is started. With the key sketch of the men in the passive position placed over the light, a sheet of paper is placed over it and the extreme position of a gesticulating arm is drawn, then on another sheet of paper placed over the light the other extreme position of this arm action is drawn. Now, with still another sheet of paper placed over the others, the intermediate position of the gesture is drawn. As the man was standing on the same spot all the time his feet would be the same in all the drawings and[66] other parts of his figure would occupy the same place. But the animator does not draw these parts himself but marks the several sheets where they occur with a number, or symbol, that will be understood by one of his helpers—a tracer—as instructions to trace them. The other man in the picture, who all this time has been motionless, is also represented in all the drawings line for line as he was first drawn in the preliminary key sketch. This again is a job for the tracer.
Let’s assume that the scene shows two men standing and facing each other, talking. They are supposed to gesture and move their lips slightly as if they’re speaking. (In the following description, we’ll ignore the mouth movement and assume the artist is capturing this action as he works.) The two men are drawn in a passive position, and then the animation of one of the figures begins. With the initial sketch of the men in their passive stance under the light, a sheet of paper is placed over it to draw the extreme position of a gesturing arm. Then, on another sheet of paper placed over the light, the other extreme position of this arm’s action is drawn. Next, with yet another sheet of paper over the others, the intermediate position of the gesture is drawn. Since the man stands in the same spot throughout, his feet remain the same in all the drawings, and other parts of his figure occupy the same places. However, the animator doesn’t draw these parts himself; he marks the different sheets with a number or symbol that his assistant—a tracer—will understand as instructions to trace them. The other man in the scene, who has been motionless, is also depicted in all the drawings exactly as he was originally drawn in the preliminary key sketch. This task is also for the tracer.
When the action of the second figure is made, the drawing of the three phases of movement in his arms is proceeded with in the same way, and the first figure is repeated in his passive position during the gesturing of the second man.
When the second figure begins to move, the drawing of the three phases of movement in his arms continues in the same manner, and the first figure is repeated in its passive position while the second man gestures.
It can be seen from this way of working in the division of labor between the animator and his helper that the actual toil of repeating monotonous details falls upon the tracer. The animator does the first planning and that part of the subsequent work requiring true artistic ability.
It’s clear from this approach to the division of labor between the animator and their assistant that the actual hard work of repeating tedious details is done by the tracer. The animator handles the initial planning and that part of the ongoing work that requires genuine artistic skill.
So that the artists can see to do the work described above—tracing from one sheet of paper to another and distinguishing ink lines through two or more sheets of paper while they are over the illuminated glass—the expedient is adopted of shading the work-table from the glare of strong daylight.
So that the artists can do the work described above—tracing from one sheet of paper to another and distinguishing ink lines through two or more sheets of paper while they are over the illuminated glass—a solution is used to block the strong sunlight from the work table.
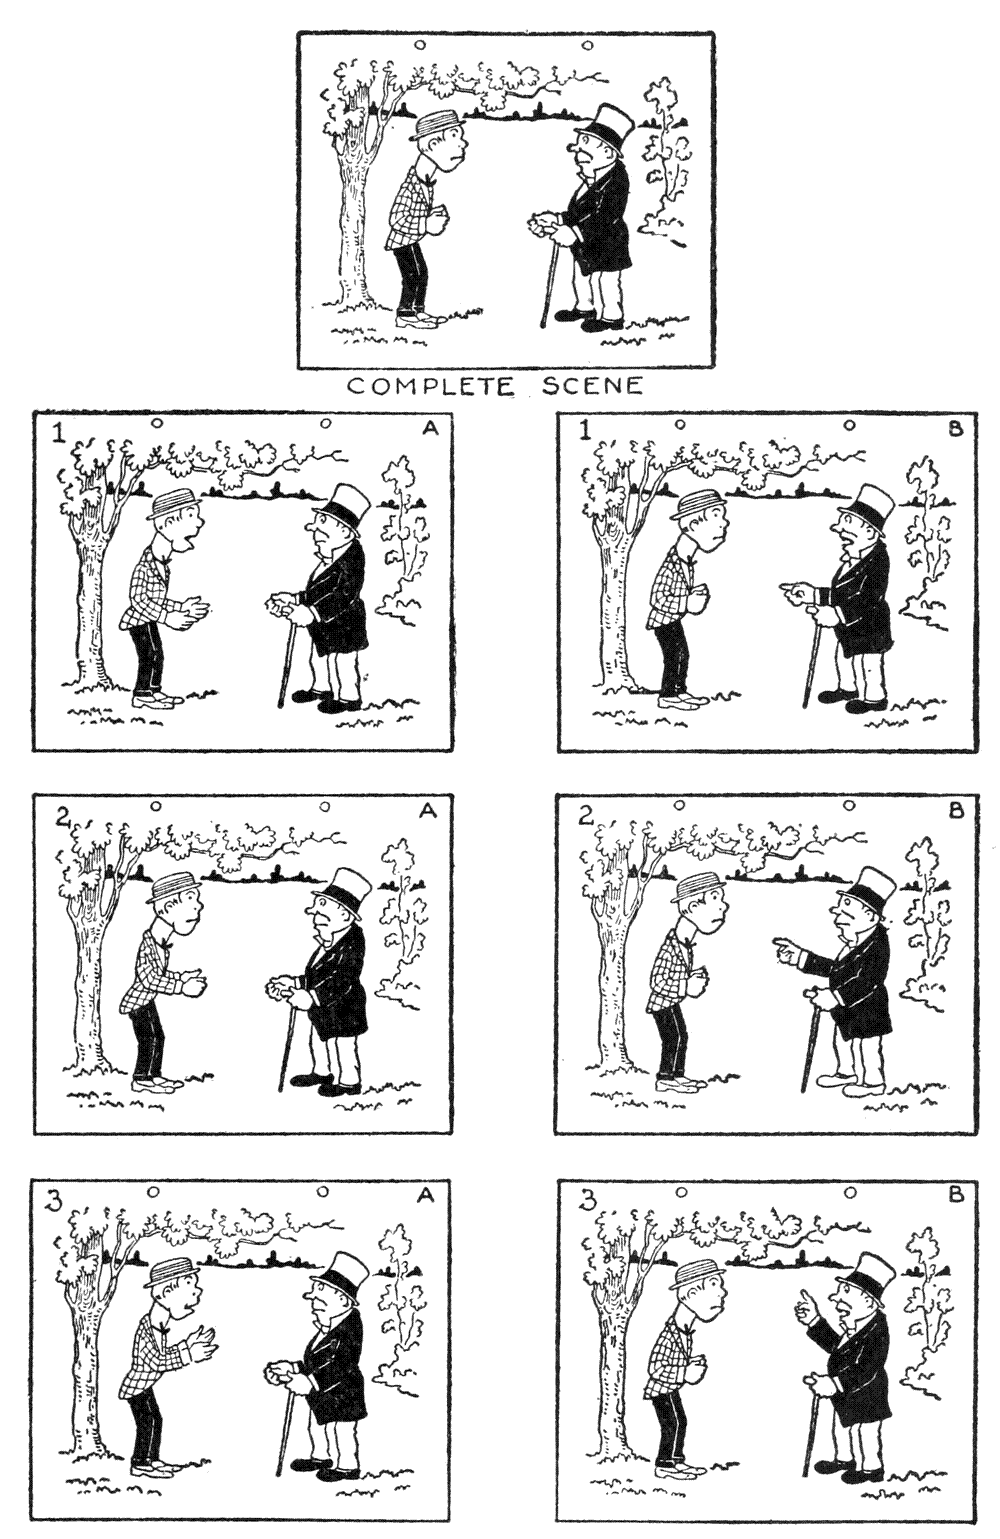
ILLUSTRATING THE GREAT AMOUNT OF DRAWING REQUIRED IN ANIMATING A SCENE WITHOUT THE HELP OF TRANSPARENT CELLULOID.
ILLUSTRATING THE SIGNIFICANT AMOUNT OF DRAWING NEEDED IN ANIMATING A SCENE WITHOUT THE ASSISTANCE OF TRANSPARENT CELLULOID.
In this typical process of depicting a simple action, or animating a figure, as it is called, we have left out specific explanations for drawing the details of the scenery—trees, foreground, or whatever is put into the composition as an accessory. They go into a finished composition, to be sure. One way would be to trace their outlines on each and every sheet of paper. It is a feasible way but not labor-saving. There is a much more convenient way than that.
In this usual process of showing a simple action, or animating a figure, as it’s referred to, we haven’t included specific instructions for drawing the details of the scenery—like trees, the foreground, or anything else added to the composition as an accessory. These elements definitely belong in a completed composition. One method would be to trace their outlines on every single sheet of paper. While that’s possible, it’s not efficient. There’s actually a much easier way to do it.
In beginning this exposition on animation it was noted that the artist in designing the scenery gave some thought to the area within which his figures were placed, or were to act. He planned when he did this, that no part of the components of the scenery should interfere by crossing lines with any portions of the figures. The reason for this will be apparent when it is explained that the scenery is drawn on a sheet of transparent celluloid. Then when the celluloid with its scenery is placed over one of the drawings it completes the picture. The celluloid sheet has also two[69] perforations that fit over the pegs, and it is by their agency that its details are made to correspond with the drawings on paper. And it can further be understood that this single celluloid sheet will complete, if it is designed properly, the pictorial composition of every one of the drawings. (A sheet of this substance that we are referring to now is known in the craft as “a celluloid” or shortened sometimes to “cell.”)
In starting this discussion on animation, it was mentioned that the artist took some time to consider the space where the characters would be placed or perform. He made sure that no part of the background would intersect with any parts of the characters. The reason for this becomes clear when it's explained that the background is drawn on a sheet of transparent celluloid. When this celluloid, with its background, is layered over one of the drawings, it completes the picture. The celluloid sheet also has two[69] holes that fit over the pegs, and it is through these that its details align with the drawings on paper. It's also important to note that if this single celluloid sheet is designed correctly, it will complete the visual composition of each of the drawings. (This type of sheet we’re discussing is referred to in the industry as “a celluloid” or simply “cell.”)
The employment of celluloid can be extended to save other work in tracing parts of figures that are in the same position, or that are not in action throughout several drawings. In this case a second celluloid will be used in conjunction with that holding the scenery. To exemplify: In giving an account of the drawing of the arm gestures in the instance above, it was noted that an animator drew the action only while he had a tracer complete on all the drawings the parts that did not move. Now, to save the monotony of all this, the tracer takes celluloid and draws the similarly placed quiet parts on it but once. This celluloid is used during the photography with the several action phases to complete the picture of the figure, or figures.
The use of celluloid can be expanded to streamline the process of tracing parts of figures that are in the same position or aren't moving in several drawings. In this case, a second piece of celluloid will be used along with the one that holds the scenery. For example, when discussing the drawing of arm gestures as mentioned earlier, it was observed that an animator only sketched the action while he had a tracer complete all the drawings for the parts that didn’t move. To avoid the repetition of this task, the tracer takes a piece of celluloid and draws the static parts in the same positions only once. This celluloid is then used during photography to combine with the various action phases and complete the image of the figure or figures.
[70]
[70]
A matter that the animator should guard against, however, in having several celluloids over his drawings, during the photography, is that they will impart a yellowish tinge to his white paper underneath if he uses more than two or three. This would necessitate care in timing the exposure correctly as a yellow tint has non-actinic qualities that make its photography an uncertain element.
A thing the animator should watch out for when placing several celluloids over their drawings during photography is that they can give a yellowish tint to the white paper underneath if they use more than two or three. This means they need to be careful with the timing of the exposure since a yellow tint has non-actinic properties that can make its photography unreliable.
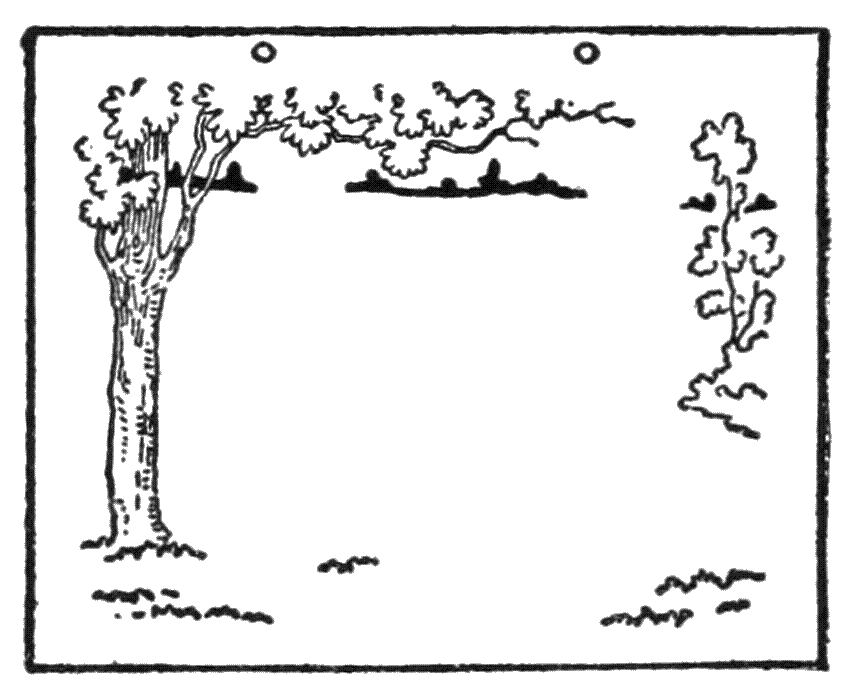
The methods so far described of making drawings for animated films are not complex and are easy to manage. For effective animated scenes, many more drawings are required and the adaptation of celluloids is not always such an easy matter as here described. For complete films of ordinary length, the drawings, celluloids, and other items—expedients or ingenious devices to help the work—number into the hundreds.
The methods described so far for creating drawings for animated films are straightforward and manageable. To create effective animated scenes, many more drawings are needed, and adapting celluloids can be more complicated than described here. For full-length films of average duration, the drawings, celluloids, and other elements—tools or clever devices to assist the process—can total in the hundreds.
[71]
[71]
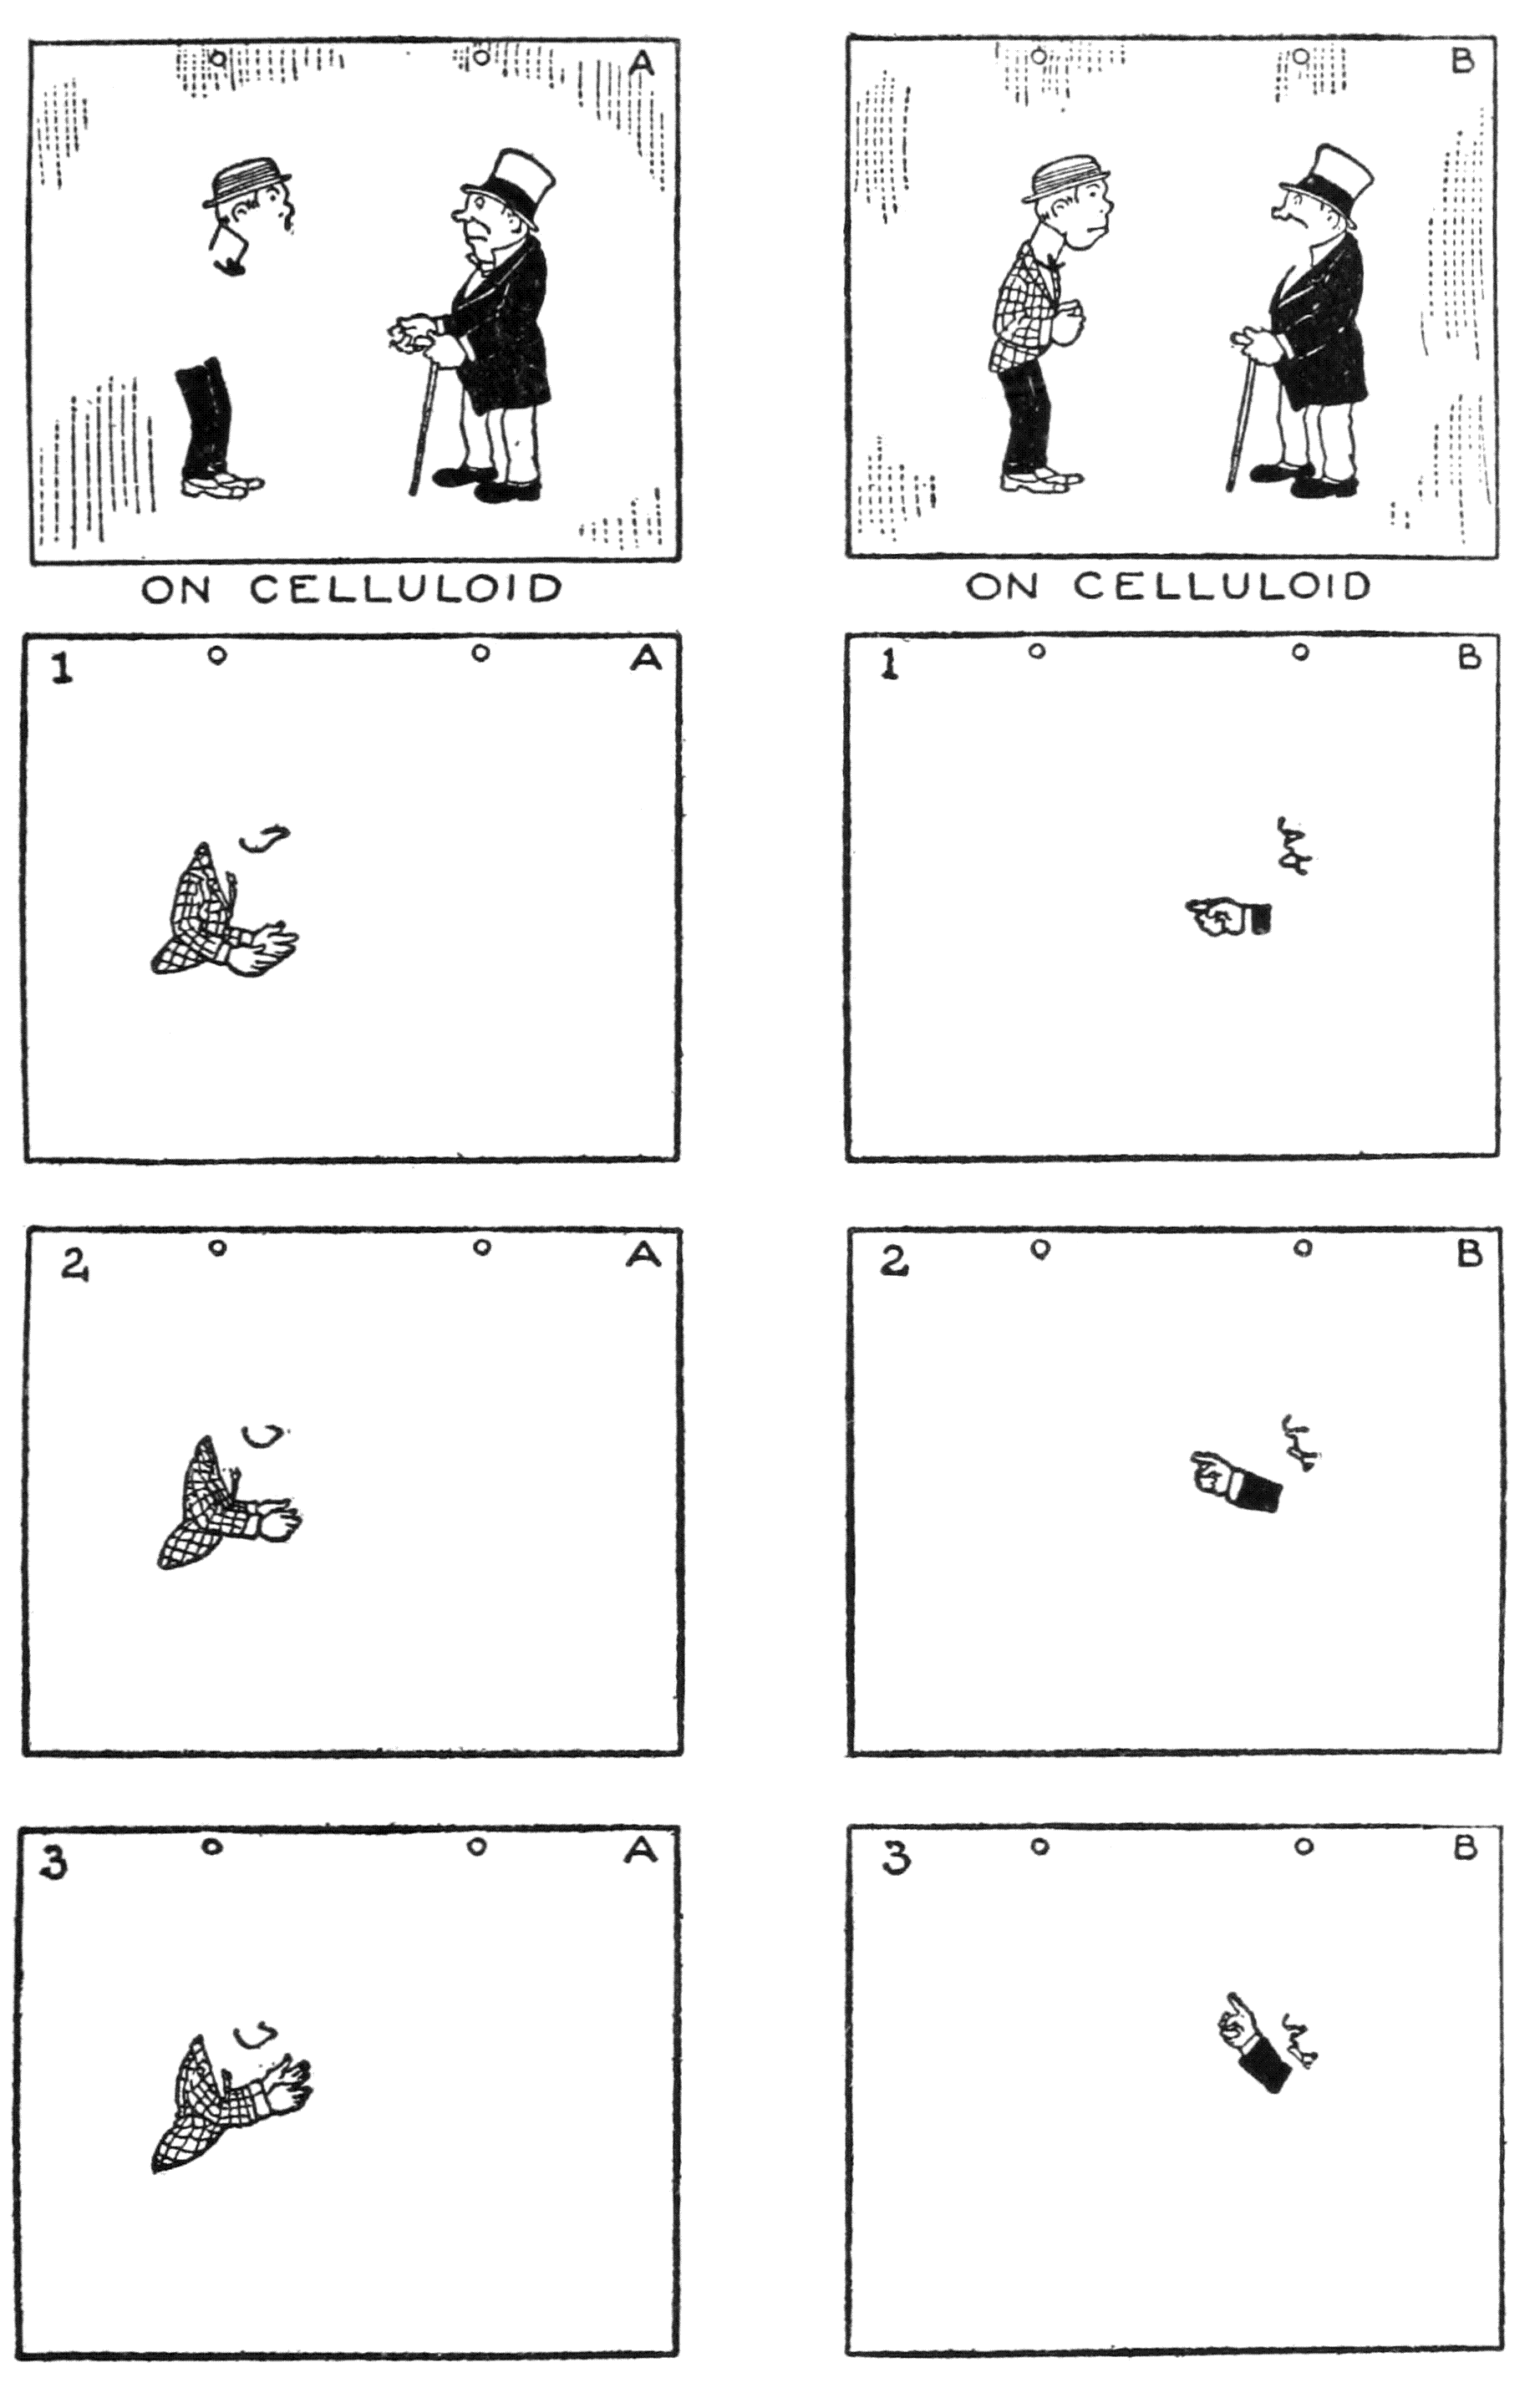
ILLUSTRATING THE SAVING OF TIME AND LABOR IN MAKING USE OF THE EXPEDIENT OF DRAWING THE STILL PARTS ON CELLULOID SHEETS.
ILLUSTRATING THE TIME AND LABOR SAVINGS BY USING CELLULOID SHEETS TO DRAW THE STATIC PARTS.
We will use, however, our few drawings and celluloids that we have completed to explain the subsequent procedure in the making of animated cartoons; namely, the photographic part of the process.
We will use our few completed drawings and celluloids to explain the next steps in creating animated cartoons, specifically the photographic aspect of the process.
A moving-picture camera is placed on a framework of wood, or iron, so that it is supported over a table top or some like piece of carpentry. It is placed so that it faces downward with the lens centred on the table. The camera is arranged for a “one picture one turn of the crank” movement, and a gearing of chain belts and pulleys, to effect this, is attached to the camera and framework. This gearing is put into motion by a turning-handle close to where the photographer is seated as he works before the table top where the drawings are placed.
A movie camera is mounted on a wooden or metal frame to support it above a tabletop or similar surface. It's positioned to look down with the lens centered on the table. The camera is set up for a “one picture per crank turn” movement, and a system of chains, belts, and pulleys is attached to the camera and frame to make this happen. This system is activated by a hand crank located near where the photographer sits while working at the tabletop where the drawings are laid out.
Each time the handle is turned but one picture, or one-sixteenth of a foot of film, is moved into the field back of the lens where the exposure is made. The view or studio camera, as we know, when a complete turn of the crank handle is made, moves eight pictures, or one-half of a foot of film, into position.
Each time the handle is turned, just one picture, or one-sixteenth of a foot of film, is moved into the area behind the lens where the exposure happens. The view or studio camera, as we understand it, moves eight pictures, or half a foot of film, into position with a full turn of the crank handle.
On the table directly under the lens and at[73] the proper distance for correct focussing, a field is marked out exactly that of the field that was used in making the drawings. Two registering pegs are also fastened relatively to the field as those on all the drawing-boards in the studio. Over the field, but hinged to the table top so that it can be moved up and down, a frame holding a clear sheet of glass is placed. The glass must be fitted closely and firmly in the frame, as it is intended to be pressed down on the drawings while they are being photographed. Wood serves the purpose very well for these frames. A metal frame would seem to be the most practical, but if there is in its construction the least inequality of surface where glass and metal touch, the pressure put upon the frame in holding the drawings down is liable to crack the glass. With wood, as there is a certain amount of give, this is not so likely to happen.
On the table directly under the lens and at[73] the right distance for proper focusing, a field is marked out exactly like the one used for the drawings. Two registration pegs are also attached relative to the field, just like those on all the drawing boards in the studio. Above the field, a frame holding a clear sheet of glass is mounted, hinged to the tabletop so it can move up and down. The glass needs to fit snugly and securely in the frame because it’s meant to be pressed down on the drawings while they’re being photographed. Wood works very well for these frames. While a metal frame might seem more practical, if there’s even a slight unevenness where the glass and metal meet, the pressure applied to hold the drawings down could crack the glass. With wood, since it has a bit of give, this is much less likely to happen.
Considering now that the camera has been filled with a suitable length of blank film and properly threaded in and out of the series of wheels that feed it to the intermittent mechanism, and then wind it up into its proper receptacle, we can proceed with the photography.
Considering now that the camera has been loaded with the right length of blank film and correctly threaded through the series of wheels that move it to the intermittent mechanism, and then wind it into its proper container, we can proceed with the photography.
[74]
[74]
The pioneers in the art who first tried to make animated cartoons and similar film novelties attempted the photography by daylight. Their results were not very good, for they were much handicapped by the uncertainty of the light. Nowadays the Cooper Hewitt mercury vapor light is used almost exclusively. The commonest method of lighting is to fix a tube of this illuminant on each side of the camera above the board, but so placed that light rays do not go slantingly into the lens, or are caught by any polished surface, and so cause reflected lights that interfere with the work. To get the exact position of the light for an even illumination over the field means a little preliminary experiment.
The pioneers in animation who first tried to create animated cartoons and similar film novelties worked with daylight photography. Their results weren't very good, mainly because they struggled with unreliable lighting. Today, the Cooper Hewitt mercury vapor light is almost exclusively used. The most common lighting method involves placing a tube of this light on each side of the camera above the board, positioned so that the light rays don’t hit the lens at an angle or reflect off any shiny surfaces, which could interfere with the work. Finding the right position for even illumination across the field requires some preliminary experimentation.
In looking over the material for our little film we find that we have but a few drawings and celluloids. Now, if we were to photograph them and give each drawing one exposure—one picture, or section on the film for each drawing—we should get a length of film not even a foot long, and the time on the screen not even lasting a second, but an insignificant result for so much work. Here at this stage of the work the able animator must exercise his talents in getting as[75] much film as possible, i. e., “footage,” out of his few drawings.
In reviewing the materials for our little film, we notice that we only have a few drawings and animations. If we were to photograph each one and give each drawing just one exposure—one frame or section on the film for each drawing—we'd end up with a film length of less than a foot, and the time it would show on screen would barely last a second. That’s a pretty underwhelming outcome for so much effort. At this point in the process, the skilled animator needs to get creative to maximize the amount of film, or “footage,” out of the limited drawings we have.
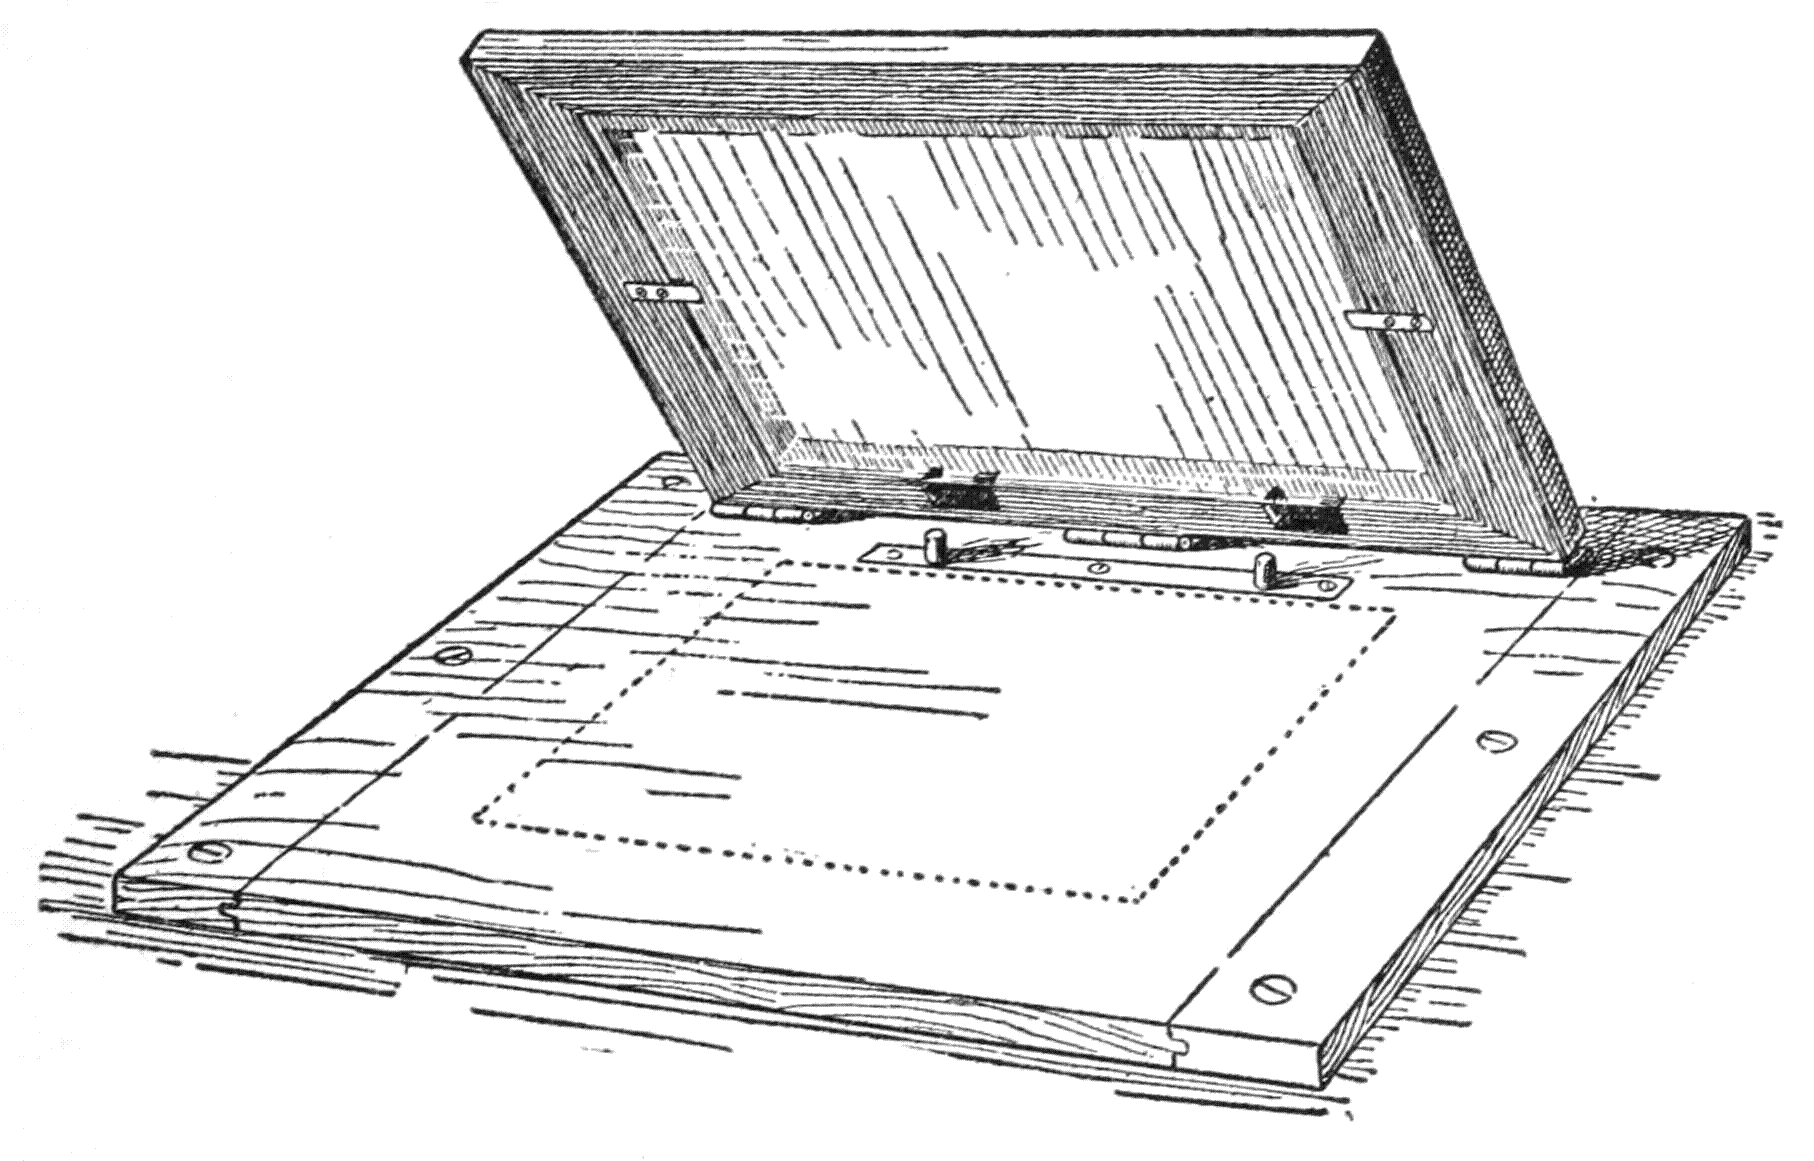
(For its position under the camera, see engraving on page 203.) A perforated sheet of paper holding a drawing is fitted over the pegs and the frame lowered.
(For its position under the camera, see engraving on page 203.) A perforated sheet of paper with a drawing is placed over the pegs and the frame is lowered.
To begin: The first drawing in which the men are quiescent is fitted over the pegs; but the picture is not complete until the celluloid with the scenery is also fitted over the pegs. When this is put in place and the frame with the glass is pressed down it is ready for photography. The first figures will not begin to gesticulate immediately—no, a certain time is necessary for the audience to appreciate—have enter into their consciousness—that[76] the picture on the screen represents two men facing each other and about to carry on a conversation. Therefore the drawing showing the men motionless is photographed on about two or three feet of film. This will give on the screen just so many seconds—two or three—for the mental grasping by the audience of the particulars of the pictorial composition. Next to show the first figure going through his movements we lift the framed glass and take off the celluloid with the scenery and the paper with the two men motionless. Now we put down over the pegs the sheet of paper with one of the extreme positions of the moving arms, and then as that is all there is on the paper we must, to complete the portrayal, place over it the celluloid with the rest of his figure. (This celluloid also holds the complete drawing of the other individual as he is motionless during the action of the first one.) Next the entire composition is completed by putting down the scenery celluloid. Then when the framed glass is lowered and pressed down so that everything presents an even surface, the picture is photographed. After two[77] turns of the handle—photographing it on two sections of the film—the frame is raised and the celluloids and the drawing are both taken off of the pegs. The photographing of the second or intermediate position is proceeded with in the same way. After this the third or other extreme phase of the action is photographed.
To start: The first drawing where the men are still is placed over the pegs, but the image isn’t finished until the celluloid with the background is also set over the pegs. Once that’s in place and the glass frame is pressed down, it’s ready for photography. The first figures won’t start moving right away—no, there’s a need for the audience to grasp— to become aware—that[76] the image on the screen shows two men facing each other, about to have a conversation. So, the drawing showing the men still is photographed on about two or three feet of film. This will display on the screen for a few seconds—two or three—allowing the audience to mentally take in the details of the scene. Next, to show the first figure moving, we lift the glass frame and remove the celluloid with the scenery along with the paper with the two men still. Now we place on the pegs the sheet of paper featuring one of the extreme positions of the moving arms, and since that’s all there is on the paper, we need to complete the portrayal by adding the celluloid that includes the rest of his figure. (This celluloid also has the complete drawing of the other person as he remains still during the action of the first one.) Next, we finish up the whole composition by laying down the scenery celluloid. Then, when the glass frame is lowered and pressed down to create a smooth surface, the image is photographed. After turning the handle twice—photographing it on two sections of film—the frame is lifted, and both the celluloids and the drawing are removed from the pegs. The photographing of the second or middle position is done in the same way. Following this, the third or other extreme phase of the action is photographed.
The photography is continued by taking the intermediate phase again, then the first position, then back to the intermediate one, and so on. The idea is to give a gesticulating action to the figure by using these three drawings back and forth in their order as long as the story seems to warrant it.
The photography continues by taking the intermediate phase again, then the first position, then returning to the intermediate one, and so on. The goal is to give a gesturing action to the figure by using these three drawings back and forth in their order for as long as the story seems to require it.
It is not to be forgotten that the celluloid with the scenery is used every time the different action phases are photographed.
It shouldn't be forgotten that the film with the scenery is used every time the different action scenes are filmed.
The same procedure will be followed with the celluloid and drawings of the other figure, only before beginning his action a little extra footage can be eked out by giving a slight dramatic pause between the ending of the first man’s gesticulating and the beginning of that of the other one. By this is meant that the first scene with the[78] men motionless is taken on a short length of film.
The same process will be used with the celluloid and drawings of the other figure, but before starting his action, a bit of extra footage can be created by adding a slight dramatic pause between the end of the first man's gestures and the start of the second man's. This means that the first scene with the[78] men standing still is filmed on a short length of film.
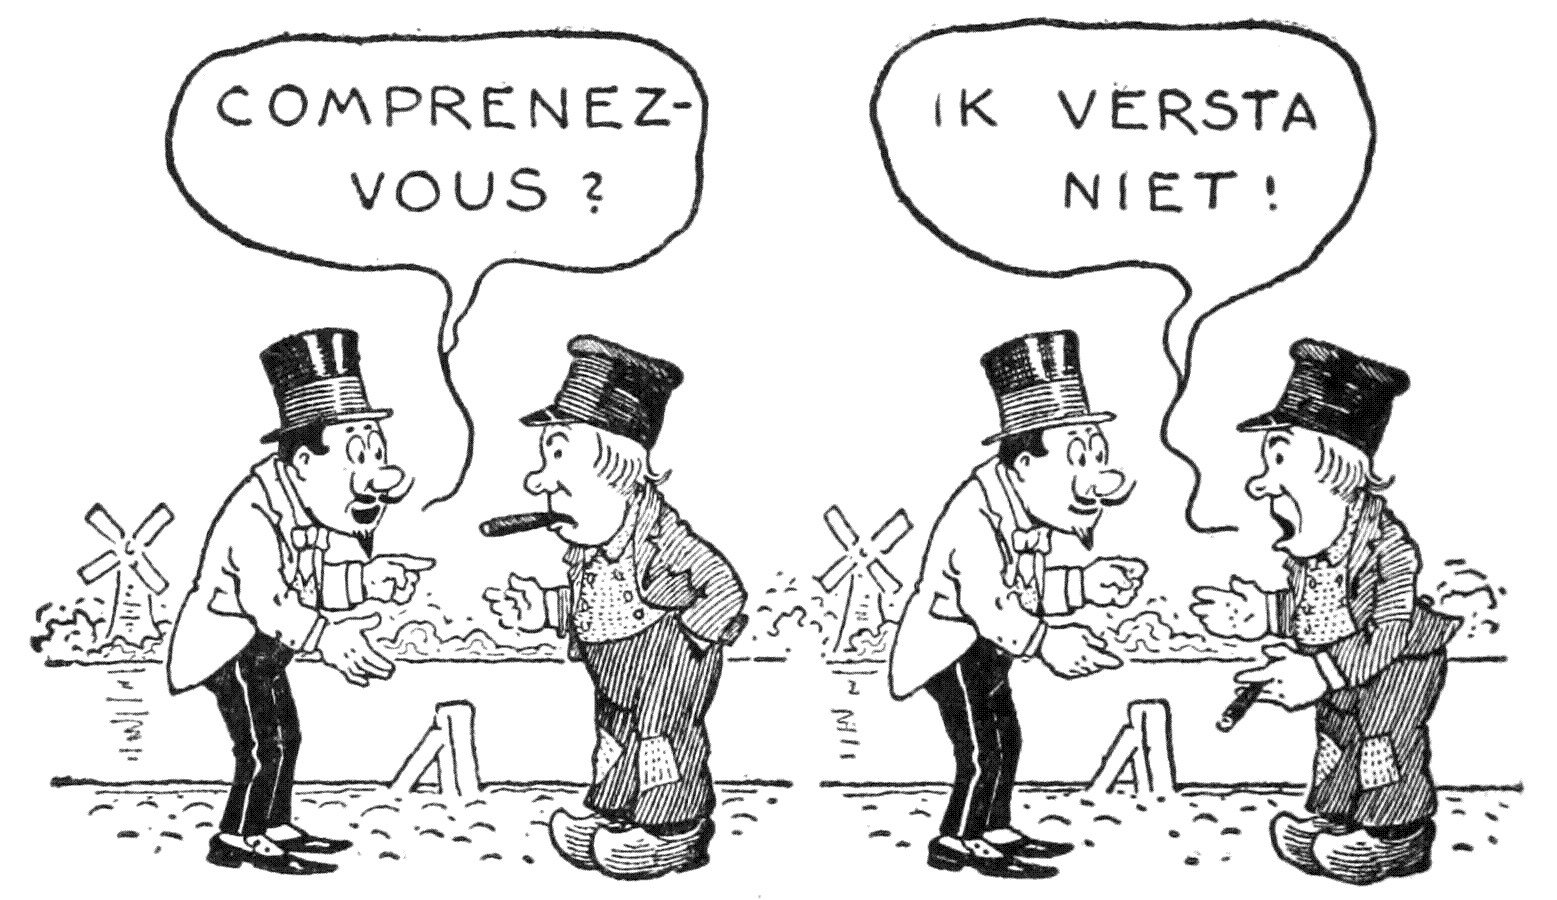
In a little incident of this sort, dialogue, of course, is required to help tell the point of the story. This is effected by putting the wording on a separate piece of paper—balloons, they are called—for each case and placing it over the design somewhere so that it will not cover any important part of the composition. The necessary amount of film for one of these balloons with its lettering is determined by the number of seconds that it takes the average spectator to read it. It is by the interjection of these balloons with their dialogue that an animator, in comic themes, can[79] get a considerable length of film from a very few drawings.
In a little incident like this, dialogue is obviously needed to convey the story's point. This is done by placing the text on a separate piece of paper—called balloons—for each instance and positioning it over the design somewhere that it won’t block any important part of the composition. The amount of film needed for one of these balloons with its text is based on how long it takes the average viewer to read it. By inserting these balloons with their dialogue, an animator can, in comedic themes, create a significant length of film from just a few drawings.
After the photography is finished the exposed film is taken out of the camera and sent to the laboratory for development.
After the photos are taken, the exposed film is removed from the camera and sent to the lab for processing.

[80]
[80]
FURTHER DETAILS ON MAKING ANIMATED CARTOONS
FURTHER DETAILS ON CREATING ANIMATED CARTOONS
CHAPTER IV
FURTHER DETAILS ON MAKING ANIMATED
CARTOONS
One of the inspiriting things about this new art of making drawings for animated cartoons is that it affords such opportunities for a versatile worker to exercise his talents. A true artist delights in encountering new problems in connection with his particular branch of work. The very fact that he selects as his vocation some art activity, rather than employment that is mechanical, evinces this.
One of the exciting aspects of this new art of creating drawings for animated cartoons is that it offers a versatile worker plenty of chances to showcase their talents. A true artist takes pleasure in facing new challenges related to their specific field of work. The very choice to pursue an artistic career instead of a mechanical job reflects this.
In making drawings for animated films and in following the whole process of their making, the artist will find plenty of scope for his ingenuity in the devising of expedients to advance and finish the work.
In creating drawings for animated films and throughout the entire production process, the artist will discover numerous opportunities to use their creativity in finding solutions to move the work forward and complete it.
The first animated screen drawings were made without the labor and time-saving resources of the celluloid sheet. As has been explained, it holds the still parts of a scene during the photography. The employment of this celluloid is now[84] in common usage in the art. It is found an expedient in various ways; sometimes to hold part only of a pictorial composition as in the method touched upon in the preceding chapter where ink drawings are made on paper; or, again, in another method to be used instead of paper, to hold practically all of the picture elements. By this latter method, in which a pigment is also put on the transparent material, the projected screen image is in graduated tones giving the appearance of a monochrome drawing.
The first animated drawings were created without the time-saving advantages of the celluloid sheet. As mentioned earlier, it holds the still parts of a scene during filming. Using this celluloid is now[84] common in the art. It serves various purposes; sometimes it holds only part of a visual composition, like in the method described in the previous chapter where ink drawings are made on paper. Or, in another method where it replaces paper completely, it holds almost all the visual elements. In this latter method, where pigment is also applied to the transparent material, the projected image appears in graduated tones, giving the look of a monochrome drawing.
Animators sometimes are released from the irksomeness of making the innumerable drawings for certain cases of movement, as that of an object crossing the picture field from one side to the other, by using little separate drawings cut out in silhouette.
Animators are sometimes freed from the annoyance of creating countless drawings for specific movements, like an object moving across the screen from one side to the other, by using small separate drawings cut out in silhouette.
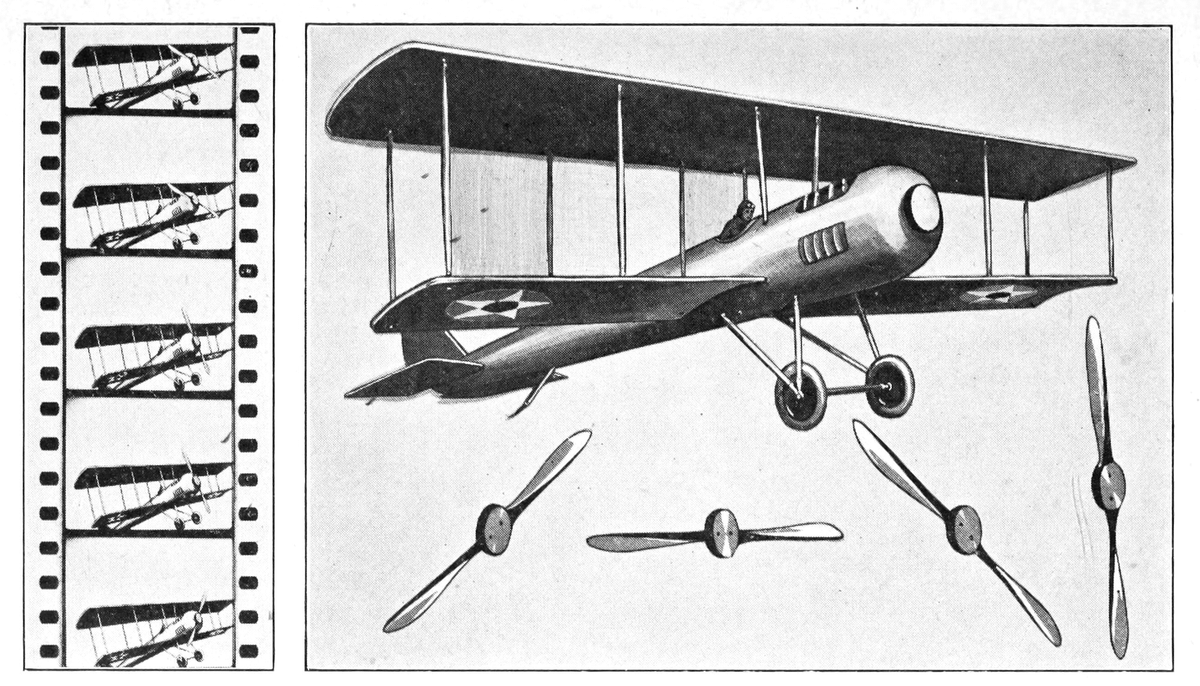
The propellers are placed in position on the front of the airplane in their order continuously while the model, under the camera, is moved across the sky.
The propellers are positioned at the front of the airplane in a continuous order while the model, under the camera, moves across the sky.
On the left: Part of film made from the cut-out model.
On the left: A section of the film created from the cut-out model.
It is an airplane, as an instance, we will say, that is to fly across the sky. For this, the airplane will be drawn but once on a piece of thin cardboard, finished in light and shade and then carefully cut out around its contour so that it will be like a flattened model. This model, specifically spoken of as a “cut-out,” is pushed over the background under the camera and photographed.[85] The manipulation of this airplane cut-out, to a chance observer, would be thought of as being child’s play. It is anything but that, however, as infinite patience is required to move it properly and have the distances between the various positions evenly spaced. If, too, there is a change of speed intended, the necessary ratio of spacing and timing must be relatively proportionate. Of course, it is understood that the airplane cut-out is, after each move, photographed. The distance that it is moved determines the speed that will show on the screen. If, for example, it is moved only one-sixteenth of an inch each time, the movement will be very slow.
It’s an airplane, as an example, that is meant to fly across the sky. For this, the airplane will be drawn just once on a piece of thin cardboard, detailed with light and shadow, and then carefully cut out along its edges so that it looks like a flattened model. This model, referred to as a “cut-out,” is placed against the background under the camera and photographed.[85] To a casual observer, moving this airplane cut-out might seem like child’s play. However, it’s far from easy, as it requires immense patience to move it correctly and ensure the distances between different positions are evenly spaced. If there’s a change of speed intended, the spacing and timing must also be proportionate. Naturally, it's understood that the airplane cut-out is photographed after each move. The distance it is moved dictates the speed that will appear on the screen. For instance, if it's moved just one-sixteenth of an inch each time, the movement will be very slow.
When an artist wishes to give a more natural effect in a moving object in which a cut-out is used, he makes some allowance for the laws of perspective by making several cut-outs in which the outlines defining the object observe these laws to some extent.
When an artist wants to create a more realistic effect in a moving object with a cut-out, they consider the perspective rules by creating several cut-outs where the outlines of the object somewhat follow these rules.
It is to be remembered that an object looks differently according to whether it is viewed on an extreme side or in the centre of the field. To be absolutely correct, there should be a separate drawing for each position. To explain: Beginning[86] with an extreme side position, the lines defining the thickness go off somewhat obtusely to the centre of vision; as the object moves and nears the middle, these lines keep their direction but change their angle. The direction is always toward the centre of vision, and the angle, with respect to a vertical, is always sharper. In the very centre, the object, if it is on a level with the eye, is in profile.
It's important to note that an object looks different depending on whether it's viewed from the extreme side or the center of the field. To be completely accurate, there should be a separate drawing for each position. To explain: Starting with an extreme side view, the lines defining the thickness angle slightly towards the center of vision; as the object moves closer to the middle, these lines maintain their direction but alter their angle. The direction always points toward the center of vision, and the angle, in relation to a vertical line, is always sharper. In the very center, if the object is at eye level, it appears in profile.
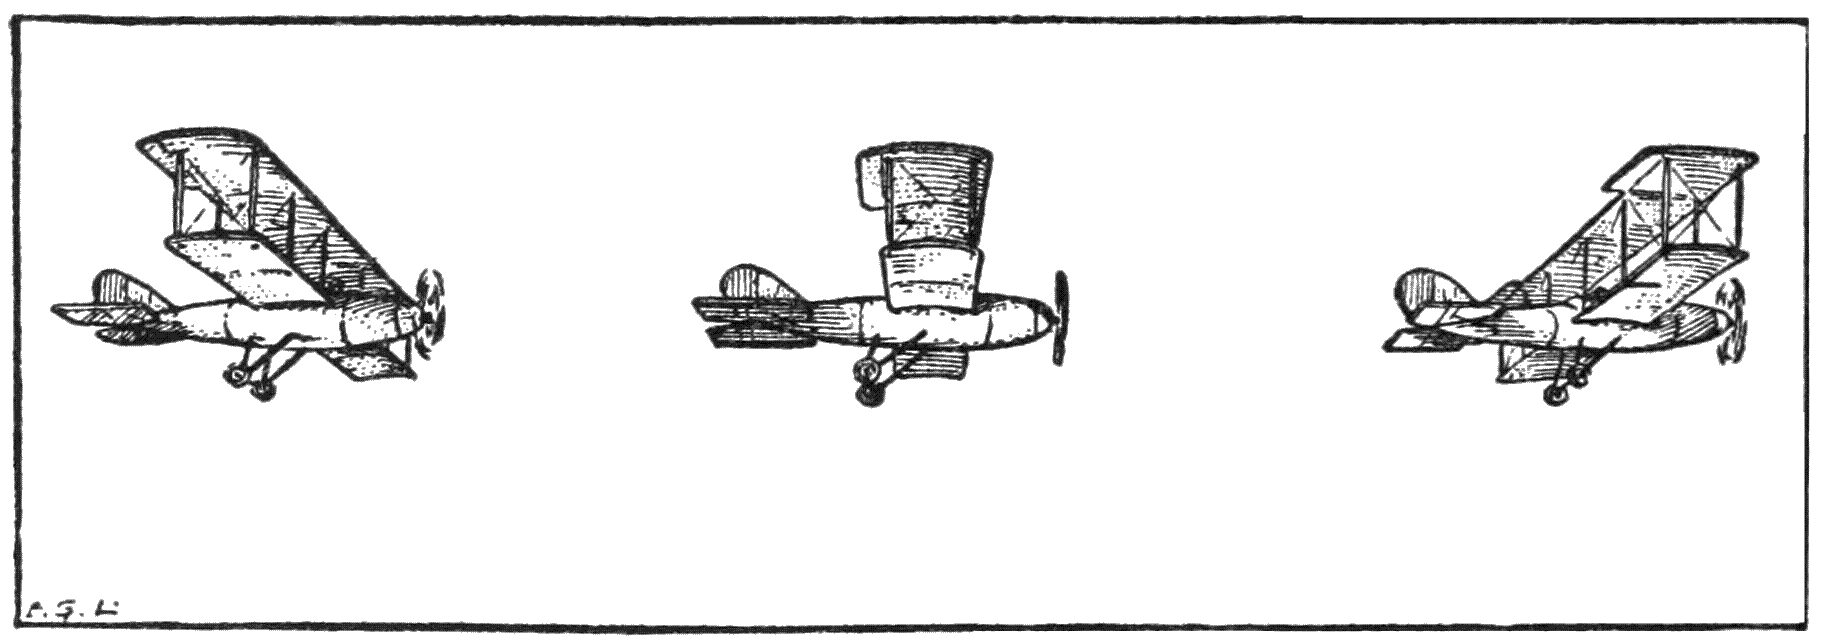
The entire matter is one of a different perspective drawing for each position. In the movement of the subject toward the other side a reverse change takes place in the direction of the lines. Generally only a few separate drawings—or cut-outs—are needed to render the screen illusion sufficiently resembling actuality to satisfy the eye.
The whole issue is about looking at things from a different angle for each viewpoint. As the subject shifts to the other side, the lines change direction. Usually, just a few distinct drawings—or cut-outs—are enough to make the screen illusion look close enough to reality to please the eye.
There is a form of animated cartoon in which[87] the objects, details of the view, and the figures are in white on a black ground. Usually this kind of film is of a comic subject. With the delineations of the characters in a burlesque style and the actions indubitably ludicrous, they provoke a great deal of laughter. Such screen stories, when the figures are well imagined and drawn in an exaggerated way, and the other parts are conformably incongruous and with a unity of ridiculousness and absurdity in story and action, are to be considered as true works of dramatic art.
There’s a type of animated cartoon where[87] the objects, background details, and characters are all in white against a black background. Typically, these films have a comedic theme. The characters are portrayed in a humorous style, and their actions are definitely silly, which leads to a lot of laughter. When these stories are well-conceived and the figures are drawn in an exaggerated manner, and the other elements align in their absurdity and ridiculousness in both story and action, they should be regarded as genuine works of dramatic art.
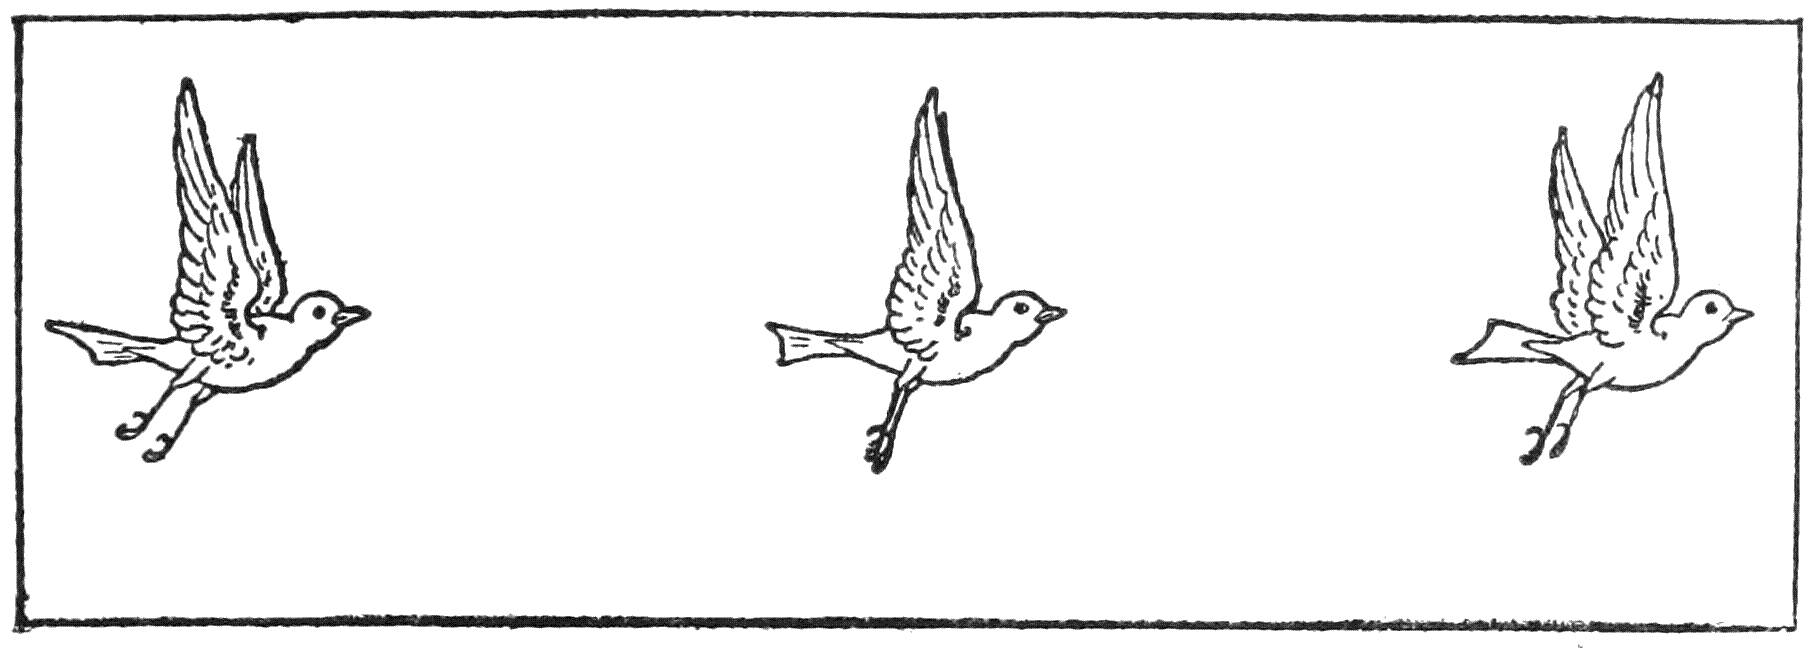
The mode, generally, of making these strong black-and-white effects is to have the figures and moving parts of separate units to be arranged under the camera in connection with a simple scene drawn in white, or gray, on a black ground. The figures of animals are made as dummies, with[88] jointed limbs. This makes it possible to put them into the various positions necessary for giving the illusion of life as they are moved about over the background.
The general approach to creating these striking black-and-white effects involves positioning the figures and moving parts of separate units under the camera in relation to a simple scene drawn in white or gray on a black background. The figures of animals are constructed as dummies with jointed limbs. This allows for their placement in various positions needed to create the illusion of life as they are moved across the background.
These dummies are designed with but little detail and are drawn on a carefully selected white surfaced cardboard or thick paper that gives in contrast with the background good white-and-black negatives. The joinings of these figures or animals, are made with the thinnest kind of wire fashioned into tiny pivoting pins. Sometimes in spite of the artist’s efforts to conceal these wire pivots by placing them where a hooked ink line indicates a fold of drapery, sharp-eyed individuals can detect them on the screen. Where such jointed dummies are used under the framed glass, the wire pivots will not do. Instead, the artist must find some way of fashioning cardboard rivets, or washers, to join the parts of the figures. A thin elastic tissue would do perhaps, as an expedient, to clothe these little dummies and hide the joinings of the cardboard segments.
These dummies are made with minimal detail and are drawn on specially chosen white cardboard or thick paper that contrasts well with the background, creating good black-and-white negatives. The joints of these figures or animals are made with the thinnest wire shaped into tiny pivoting pins. Sometimes, despite the artist’s efforts to hide these wire pivots by placing them where a curvy ink line suggests a fold in the fabric, sharp-eyed people can spot them on the screen. When jointed dummies are used under the framed glass, wire pivots won’t work. Instead, the artist needs to come up with a way to make cardboard rivets or washers to connect the parts of the figures. A thin elastic tissue might work as a quick fix to cover these little dummies and conceal the joints of the cardboard sections.

Here we may note the so-called “trick” titles that are shown in theatres for special occasions, or in connection with the regular films. They[89] add with their liveliness a little variety to the tedium of a long presentation of monotonously toned photographs. In them, the letters make their appearance one at a time, and in most cases they are white on a black ground. The production of these titles with their letters that merrily cut capers all over the background before they come into their orthographic order is a very simple[90] manœuvre. The separate letters, cut out of cardboard, are laid down to be photographed one at a time as they spell the words. Where they are first made to move about in an amusing manner, they are similarly manipulated on the background under the camera by being pushed about as desired and photographed at each change of position.
Here we can note the so-called “trick” titles that are shown in theaters for special occasions or alongside regular films. They[89] add a bit of variety to the monotony of a long presentation of similarly toned photographs with their liveliness. In these titles, the letters appear one at a time, and in most cases, they are white on a black background. Creating these titles, where the letters playfully dance around the background before they line up correctly, is a very simple[90] process. The individual letters, cut from cardboard, are arranged to be photographed one at a time as they spell out the words. When they first move around in a fun way, they are also manipulated on the background under the camera by being pushed around as needed and photographed at each change of position.
The best background for these titles, when it is to be solid black, is a piece of black velvet. This material is a serviceable article in motion-picture work as it gives an intense and certain black, and if wrinkles form in it they do not betray themselves by any lights or shadows in the photographic print.
The best background for these titles, when it's going to be solid black, is a piece of black velvet. This material is very useful in film work because it provides a deep and consistent black, and if any wrinkles appear, they won’t show up as lights or shadows in the photo print.
Sometimes in trick work it is intended that some part of the design is masked while another part is being photographed. This is a simple matter if the background is a dark one, as a piece of paper, or cardboard, of the same color is placed over it while the photography is taking place. A line of letters, for instance, that is already drawn on the dark ground is to appear letter by letter. A strip of this dark-colored paper covers the words at first, but is pulled away to[91] expose the letters one by one. Another way would be to clip off a section of the paper bit by bit. Blackening the edges of the paper will provide against these edges showing as light lines and so giving away the ruse.
Sometimes in trick work, it's planned for part of the design to be hidden while another part is being photographed. This is easy if the background is dark, as you can simply place a piece of paper or cardboard of the same color over it while taking the photo. For example, if you want to reveal a line of letters drawn on the dark background one by one, you start by covering the words with a strip of dark paper, then pull it away to expose the letters individually. Another method is to gradually peel off sections of the paper. Darkening the edges of the paper will prevent those edges from appearing as light lines, which could expose the trick.[91]
In selecting for working under the camera of dark-colored cardboards, it is advisable to pick out only those with dead mat surfaces and reject those with any enamelled or shiny surfaces.
In choosing to work under the camera with dark-colored cardboards, it's best to select only those with a matte finish and avoid any that have glossy or shiny surfaces.
As previously mentioned, for trick titles, a larger field is used than that for animated cartoons. It makes the manipulation of dummies and detached items much more convenient.
As mentioned earlier, a larger field is used for trick titles than for animated cartoons. This makes it much easier to handle dummies and detached items.
An amazing and wonderful screen illusion is that of animated sculpture. The audience first sees a shapeless mass of clay which of itself seems to assume in a few seconds a plastic composition. It is a portrait of a notable, perhaps, or it may take the form of a grotesque mask.
An amazing and fantastic visual illusion is that of animated sculpture. The audience initially sees a formless blob of clay that quickly takes on a three-dimensional shape. It could be a portrait of a famous person or it might turn into a bizarre mask.
The trick of animated sculpture is produced like this: A camera is centred on a rough mass of clay, which is first photographed in this shapeless form. A sculptor now pushes the clay around to a desired preliminary effect, then when he has stepped out of the picture, that is, gets out of[92] the range of the lens, the clay is photographed again. Once more the sculptor moulds the clay to a stage approaching the contemplated form, steps out of the picture and the camera brought into action again.
The technique of animated sculpture works like this: A camera is positioned on a rough lump of clay, which is first captured in its formless state. Then, a sculptor manipulates the clay to create a desired initial effect. Once he steps out of the frame, meaning he moves out of [92] the lens's view, the clay is photographed again. The sculptor shapes the clay further toward the intended design, steps out of the shot, and the camera is activated once more.
The proceeding is continued: modelling the clay, the sculptor getting out of the range of the lens, and the camera brought into action, until the clay has been fashioned in its complete form. The interruptions during which the sculptor was working will not be represented on the screen as the camera was not working then, and so no exposures were made. Instead, the effect will be a continuous one of a mass of clay miraculously forming itself into a plastic work.
The process continues: shaping the clay, the sculptor moving out of the frame, and the camera starts rolling until the clay is fully shaped. The breaks when the sculptor was working won’t be shown on screen since the camera wasn’t rolling at those times, so no footage was captured. Instead, the result will be a seamless display of a mass of clay magically transforming into a sculpture.
The way of working in making animated sculpture, like that of the process of using dummies that are moved, little by little, while the shutter is closed and then photographed after each time that they have been moved, is called the “stop-motion” method. The motion of the camera is stopped, in other words, while the particular object is placed in a new position each time before it is photographed.
The process of creating animated sculptures, similar to using models that are adjusted gradually while the camera shutter is closed and then captured after each adjustment, is known as the “stop-motion” technique. Essentially, the camera stays still while the specific object is repositioned each time before it's photographed.
When on the screen you see some thin black[93] line appearing on one side, crawling reptilian fashion, suddenly turning upward, twisting and soon beginning to outline the silhouette of a figure or part of a pictorial composition, there is exemplified another instance of this “stop-motion” photography.
When you see a thin black[93] line appearing on one side of the screen, moving like a creeping reptile, suddenly curving upward, twisting, and soon starting to outline the shape of a figure or part of a visual composition, this is another example of “stop-motion” photography.
This extraordinary performance of a plain line, to the average spectator seems wondrous, and its production a veritable mystery. But it is managed very easily.
This amazing performance of a simple line seems incredible to the average viewer, and its creation feels like a true mystery. But it's actually done quite easily.
For news picture reels it has been found judicious for variety’s sake, as well as for business reasons, to combine with them cartoons satirizing topics of the hour. When they are wanted, they are wanted in a hurry, and as the regular type of cartoon takes not a little time to make, the living line drawings adverted to above, as they are quickly made, are often used for the purpose. We shall try to give in the following few paragraphs an elucidation of the method of making a film like this.
For news picture reels, it's been found wise for the sake of variety, as well as for business reasons, to include cartoons that poke fun at current events. When these are needed, they need to be ready quickly, and because traditional cartoons take quite a bit of time to create, the quick sketches mentioned earlier are often used instead. In the next few paragraphs, we’ll explain how to make a film like this.
The general idea or composition of the drawing is sketched out first on a piece of ordinary paper, then its outlines are traced in blue markings to a sheet of Bristol board that has been fastened down[94] to the table beneath the camera within the photographic field. Light-blue marks do not take on the ordinary sensitized film. But the blue markings, it is to be remembered, must be of the faintest. The very cautious artist in beginning a work of this sort makes a preliminary test of his blue pencilling by photographing a short length of film and developing it to see if the marks show on the negative. If they show at all, it will be necessary to take a soft eraser and go over the drawing and make the blue marks less distinct, and only have them show enough to be able to follow the drawing in executing the pen work.
The general idea or composition of the drawing is first sketched out on a regular piece of paper, then its outlines are traced in blue markings onto a sheet of Bristol board that's secured to the table underneath the camera within the photographic area. Light blue marks won’t show up on the standard sensitized film. However, it’s important to remember that the blue markings need to be very faint. A careful artist starting a project like this will do a preliminary test of their blue pencil work by photographing a short section of film and developing it to see if the marks appear on the negative. If they do, the artist will need to use a soft eraser to go over the drawing and make the blue marks less prominent, ensuring they’re just noticeable enough to follow while doing the pen work.
The general scene is drawn on celluloid, while fifty or more sheets of paper hold a sequence of pictures of the mouse in attitudes of running.
When quite sure that the blue marks will not photograph, the artist begins his drawing. It is not a difficult task that he has before him—he merely inks his previously drawn lines little by little. Each stroke of the pen, after it has been made, is photographed. If the ink lines are short the movement on the screen will be very slow, and if they are long the movement will be very rapid. And, again, whether the artist turns the camera handle once, twice, or three times for each pen stroke has its effect upon the speed with which the lines grow on the screen. If somewhat[95] long pen strokes are made and the exposure is but one picture for each stroke the lines will run in and finish the design at a rapid rate. On the other hand, if they are very short strokes and[96] three pictures (about one-fifth of a foot of film) are given to each one, the lines will creep in on the screen at a snail’s pace.
When the artist is confident that the blue marks won’t show up in the photos, he starts his drawing. It’s not a difficult task—he just inks over his previously drawn lines little by little. Each pen stroke, once made, gets photographed. If the ink lines are short, the movement on the screen will be very slow, and if they are long, the movement will be quite fast. Additionally, how many times the artist turns the camera handle for each pen stroke also affects how quickly the lines appear on the screen. If he makes somewhat long pen strokes and only captures one picture for each stroke, the lines will quickly form the design. Conversely, if he uses very short strokes and takes three pictures (about one-fifth of a foot of film) for each one, the lines will slowly appear on the screen.
All this, making a line, a patch of tinting, a small detail of a picture, and photographing each item after it has been made, is continued until the entire pictorial design is completed.
All of this, creating a line, a splash of color, a small detail of a picture, and taking a photo of each item after it's made, continues until the whole design is finished.
Variety is produced by having the lines go slowly or fast according to the requirements of the idea to be expressed or the story to be told.
Variety is created by having the lines move slowly or quickly based on the needs of the idea being conveyed or the story being told.
ON MOVEMENT IN THE HUMAN FIGURE
ON MOVEMENT IN THE HUMAN FIGURE
CHAPTER V
ON MOVEMENT IN THE HUMAN FIGURE
Having now chronicled in a brief way the development of the cinematographic art, particularly in its relation to animated screen drawings, and having tried to give some notion of the fundamentals in their making with an account of their exhibition on the screen, it is in order now that we consider the matter of movement and its depiction by drawings that will give the visional synthesis of life.
Having now briefly outlined the development of film as an art form, especially in connection with animated drawings on screen, and having attempted to explain the basics of how they're created along with their presentation on screen, it's time to look at the concept of movement and how it's represented through drawings that capture the visual essence of life.
The very first thing that a tyro in the animating art must learn is to draw a walk; or in other words, to become skilled in sketching the successive phases of limb and trunk movements so that they give in their order the appearance of walking when projected as a film.
The first thing a beginner in animation needs to learn is how to draw a walk, or in other words, to become skilled in capturing the sequential movements of limbs and torso so that they create the illusion of walking when shown as a film.
Walking directly effected by the lower limbs calls into action the upper limbs too. The upper limbs act, as they swing from the shoulders, in concord with the legs, as counterpoises in maintaining[100] the equilibrium. An understanding of the principles underlying locomotion in man—walking or running—is an important matter to consider in this art. When an artist knows the basic facts of movement in the human figure, he will more readily comprehend animal locomotion and all other movements in general.
Walking, which directly uses the lower limbs, also engages the upper limbs. As the arms swing from the shoulders, they work together with the legs as counterbalances to maintain[100] balance. Understanding the principles of human movement—whether walking or running—is essential for this art. When an artist understands the fundamentals of movement in the human body, they will find it easier to grasp animal movement and all other types of motion.
All forms of motion are pertinent as studies for the animator, and the all-important study is that of the human organism.
All types of movement are relevant for animators, and the most essential study is that of the human body.
Although we observe at once, in considering a simple walking movement, that there is also a simultaneous activity of the arms accompanied by a harmony of exertion in the trunk, we will at the start dwell mainly upon the phases of action in the legs only.
Although we can see right away that when we walk, our arms also move and there's a coordinated effort in our torso, we will initially focus only on the movements of the legs.
Imagine now that the figure that is to serve us as a model is walking. The trunk in the air, some thirty inches above the ground, is moving forward. Attached to it are the nether limbs, alternately swinging pendently and alternately supporting the trunk in its position above the ground.
Imagine now that the figure we're using as a model is walking. The torso, about thirty inches off the ground, is moving forward. Connected to it are the legs, swinging back and forth and alternately supporting the torso in its position above the ground.
[101]
[101]
Above: Diagram to indicate the length of a stride and to show how the head describes a “wave.”
Above: Diagram showing the length of a stride and illustrating how the head creates a “wave.”
Further to simplify our study, we will, at first, consider the mechanism of one limb only. As[102] one foot swings forward and reaches a certain place, it seems to hesitate for an instant and then come down, heel first, on the ground. As the heel strikes, the body is slightly jarred and the oblique line of the limb, its axis, moves and approaches the vertical. In a moment, the limb is vertical as it supports the trunk and the sole of the foot bears on the ground. Then the axis of the leg changes its verticality and leans forward, carrying with it the body. Soon the heel leaves the ground and only the fore part of the foot—the region of the toes—remains on the ground. But before the foot is entirely lifted from the ground, there is a slight pause, almost immeasurable, coming immediately before the foot gives a push, leaves the ground, and projects the body forward.
To simplify our study, we will first look at the mechanics of just one limb. As one foot swings forward and reaches a certain spot, it seems to hesitate for a moment before coming down, heel first, onto the ground. When the heel strikes, the body is slightly jolted, and the angle of the limb, its axis, shifts closer to vertical. In a moment, the limb is vertical as it supports the body and the sole of the foot rests on the ground. Then, the leg’s axis changes from vertical and leans forward, moving the body with it. Soon, the heel lifts off the ground and only the front part of the foot—the toes—remains on the ground. But before the foot completely lifts off, there’s a slight pause, almost imperceptible, just before the foot pushes off, leaves the ground, and propels the body forward.
During the time of the phases of movement described above, the foot, in a sort of way, rolls over the ground from heel to toes.
During the phases of movement described above, the foot rolls over the ground from heel to toe.
Immediately after the toes leave the ground, the knee bends slightly and the limb swings pendulum-like forward, then, as it nears the point directly under the centre of the trunk, it bends a little more and lifts the foot to clear the ground. After the limb has passed this central[103] point under the trunk and is beginning to advance, it straightens out ready to plant its heel on the ground again. When it has done so it has completed the step, and the limb repeats the series of movement phases again for the next step.
As soon as the toes leave the ground, the knee bends slightly, and the leg swings forward like a pendulum. When it gets close to the point directly beneath the center of the body, it bends a little more and lifts the foot to clear the ground. After the leg passes this central[103] point under the body and starts to move forward, it straightens out, ready to plant its heel on the ground again. Once it does that, the step is complete, and the leg goes through the same series of movements for the next step.
Now, the limb of the other side has gone through the same movements, too, but the corresponding phases occurred alternately in point of time.
Now, the limb on the other side has gone through the same movements, but the corresponding phases happened alternately in time.
One of these positions of the leg, that when it is bent at the knee so as to clear the ground as it passes from the back to its advancing movement forward, is rarely represented by the graphic[104] artist in his pictures. The aspect of the limbs when they are at their extremes—spread out—one forward and one to the back, is his usual pictorial symbol for walking. But the position, immediately noted above, is an important phase of movement, as it is during its continuance that the other limb is supporting the trunk.
One of the leg positions, when it’s bent at the knee to lift off the ground while moving forward, is hardly ever shown by artists in their work. The way the limbs look when they’re fully extended—one forward and one back—is the standard way to depict walking. However, the position mentioned above is a crucial part of movement because it’s when the other leg is supporting the body.
A movement of the trunk in walking that is to be remarked is its turning from side to side as it swings in unison with the upper limbs while they alternately swing forward and backward. It is a movement that animators do not always regard, since only an accomplished figure draftsman can imagine movement clearly enough to reproduce it. To describe the movement better we will consider it visionally.
A noticeable movement of the body when walking is the way it turns side to side, swinging in sync with the arms as they move forward and backward alternately. This is a movement that animators don't always pay attention to, as only a skilled figure artist can visualize it clearly enough to recreate it. To describe this movement more effectively, we'll examine it visually.
[105]
[105]
We are looking at the walker from the side and see the trunk in profile—exactly in profile, of course, when the arms are at the middle position. As the near-side arm moves forward we see a slight three-quarter back view of the upper part of the trunk, then when the arm swings back we see the profile again, and with the arm moving still farther back, the corresponding side of the shoulder moves with it and the upper part of[106] the trunk is seen in three-quarter front view. If the artist shows, in a walk, these particulars: (1) A three-quarter view from the front; (2) profile; (3) a three-quarter view from the back, and then carries them back and forth, he will add to the effectiveness of the screen representation. It gives to a figure, when slightly exaggerated in a humorous picture, a very laughable swaggering gait.
We’re looking at the walker from the side and see the trunk in profile—exactly in profile, of course, when the arms are in the middle position. As the arm on the near side moves forward, we see a slight three-quarter back view of the upper part of the trunk. Then, when the arm swings back, we see the profile again, and with the arm moving even further back, the corresponding side of the shoulder moves with it, revealing the upper part of the trunk in a three-quarter front view. If the artist captures these details in a walk: (1) a three-quarter view from the front; (2) profile; (3) a three-quarter view from the back, and then alternates between them, it will enhance the effectiveness of the screen representation. This gives the figure, when slightly exaggerated in a humorous illustration, a very funny swaggering walk.
The arms were mentioned as swinging in a walk so as to help maintain the equilibrium. It will not be difficult to understand the phases through which they go if it is remembered that an arm moves in unison with the lower limb of the opposite side. This can be observed if one looks from an upper window down on the passers-by. It will then be noted how one arm as it hinges and oscillates from the shoulder-joint, follows the lower limb of the opposite side as it hinges and swings from the hip-joint.
The arms are described as swinging during a walk to help keep balance. It’s easy to understand the stages they go through if you remember that an arm moves in sync with the opposite leg. You can see this by looking out of an upper window at people walking by. You’ll notice how one arm hinges and swings from the shoulder joint, following the movement of the opposite leg as it hinges and swings from the hip joint.
[107]
[107]
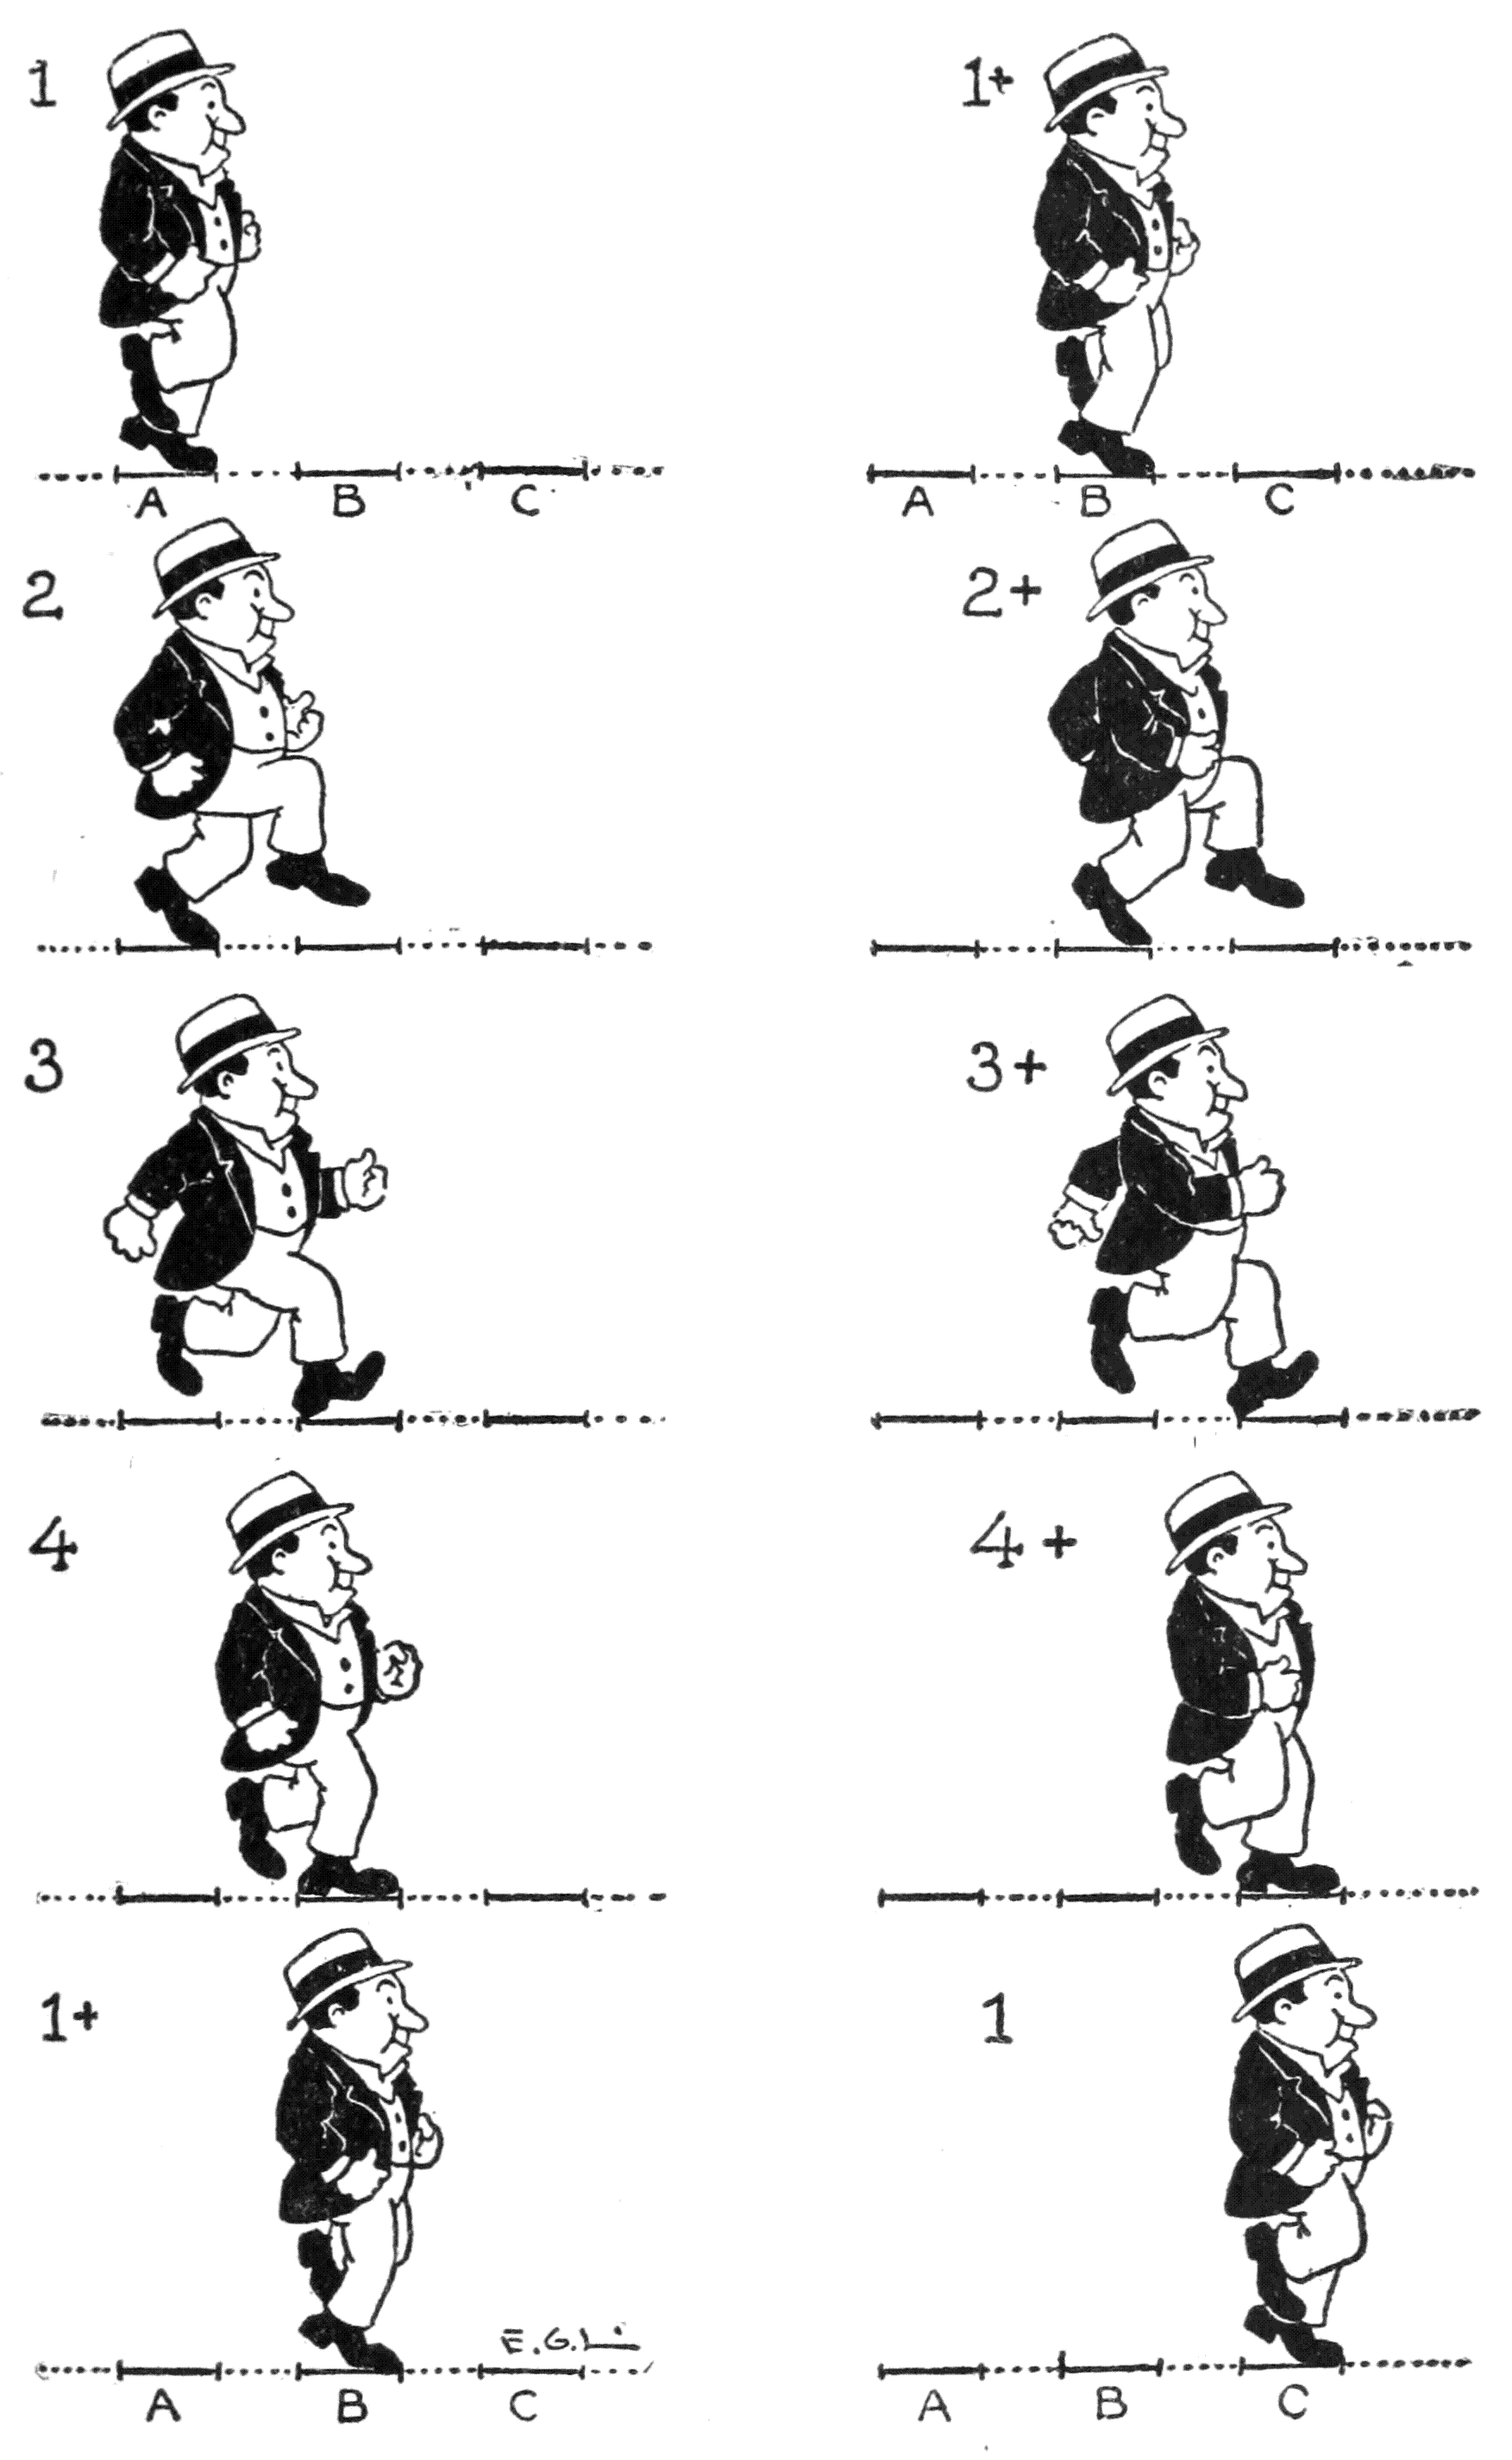
Four phases complete a step.
Four phases complete a step.
Contemplating the arms only, it will be perceived that they keep up a constant alternate swinging back and forth. The point where they pass each other will be when they both have approached their respective sides of the trunk. This[108] particular moment when the arms are opposite one another and close to the trunk, or at least near the vertical line of the body, is coincident with the phases of the lower limb movements when one is nearly rigid as it supports the body and the other is at its median phase of the swinging movement.
Contemplating the arms alone, you'll notice that they constantly swing back and forth. They cross each other when they’re both close to their respective sides of the body. This[108] specific moment, when the arms are opposite each other and close to the trunk— or at least near the vertical line of the body— coincides with the phases of the leg movements, where one leg is almost rigid as it supports the body, while the other is in the middle phase of its swinging motion.
These middle positions of the four limbs—the lower near to each other, and the upper close to the body—is a characteristic that should be taken note of by the artist. It illustrates, in connection with the extreme positions, certain peculiarities of motion in living things, in general. This is a sort of opening movement following by a closing one. These reciprocal changes, expansion and retraction in organic forms, symbolize the activity of life.
These middle positions of the four limbs—the lower ones close together and the upper ones near the body—are important for the artist to consider. They demonstrate, along with the extreme positions, some unique features of movement in living beings overall. This represents an opening movement followed by a closing one. These alternating changes, expansion and contraction in organic forms, symbolize the essence of life.
In the human body, for instance, during action, there are certain times when the limbs are close to the trunk and at other times when they are stretched out or extended. This is adequately made plain in jumping. Specifically: in the preliminary position before the actual jump, the appendicular members bend and lie close to the trunk. The entire body is compact and repressed[109] like a spring. Then when the jump takes place, there is a sudden opening as the limbs fling themselves outward.
In the human body, for example, during movement, there are times when the arms and legs are close to the torso and other times when they are stretched out. This is clearly illustrated in jumping. Specifically, in the initial position before the jump, the limbs bend and are drawn close to the body. The whole body is compact and tense like a spring. Then, when the jump happens, there’s a sudden release as the limbs shoot outwards.[109]
A rower in a shell plying his sculls exemplifies this phenomenon of a spring-like closing and expansion. In this case there is also a typical example of reciprocal compensating movements in the two pairs of limbs. When the rower leans forward and the arms are extended ready to pull on his sculls, the lower limbs are flexed and in contact with the front of his trunk. Then when the sculls have been pulled back and he has reached the other extreme position, the arms are flexed and close to his chest, while the lower limbs are stretched out straight.
A rower in a boat using his oars shows this spring-like process of closing and expanding. Here, you can also see a classic example of compensating movements in the two pairs of limbs. When the rower leans forward and extends his arms to pull on the oars, his legs are bent and in contact with the front of his torso. Then, when he pulls the oars back and reaches the opposite extreme position, his arms are bent and close to his chest, while his legs are stretched out straight.
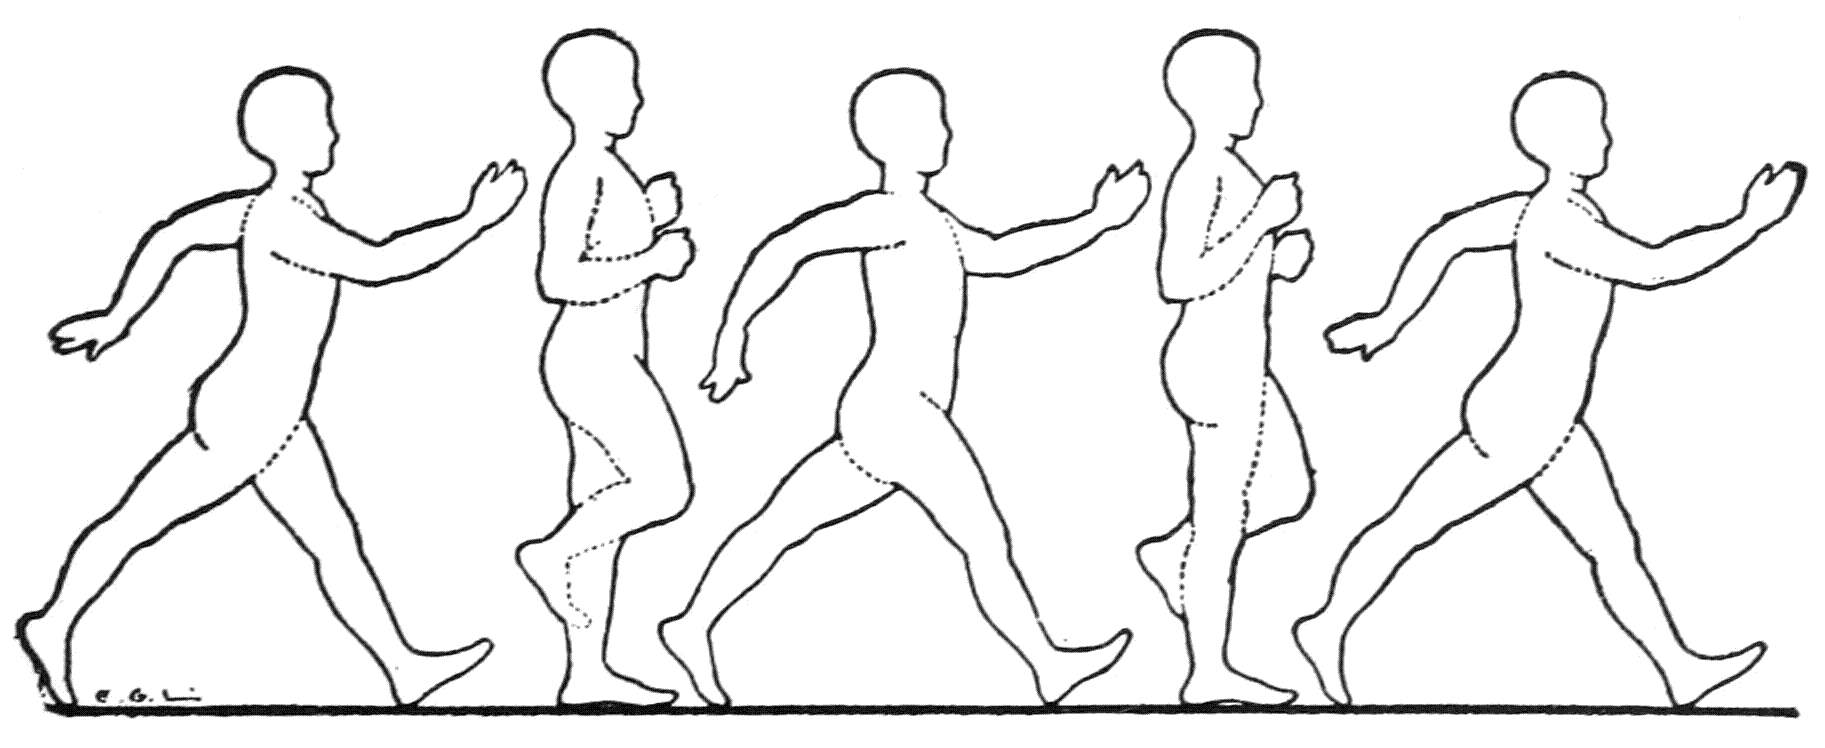
If the animator is planning to walk a figure[110] across the field of the screen, there is one matter in the representation that he punctiliously takes heed of. It is this: to have the trunk rise as it is in turn supported upon one rigid leg and then upon the other, and to show that it falls slightly when the two limbs are outstretched at their extreme positions. In this alternating rise and fall of the trunk in walking, the head can be observed as describing a wave. The highest point of the wave is when the trunk is supported on the rigid leg and the lowest point when both limbs are stretched out as if flying from the vertical of the body.
If the animator is planning to walk a figure[110] across the screen, there’s one detail he pays careful attention to. It’s this: the trunk should lift as it shifts weight from one rigid leg to the other, and it should drop slightly when both limbs are fully extended. In this back-and-forth movement of the trunk while walking, you can see the head moving in a wave-like pattern. The highest point of the wave occurs when the trunk is on the stiff leg, and the lowest point happens when both legs stretch out, almost as if they are flying away from the body’s vertical line.
(For the following few paragraphs, see illustrations below.)
(For the next few paragraphs, see illustrations below.)
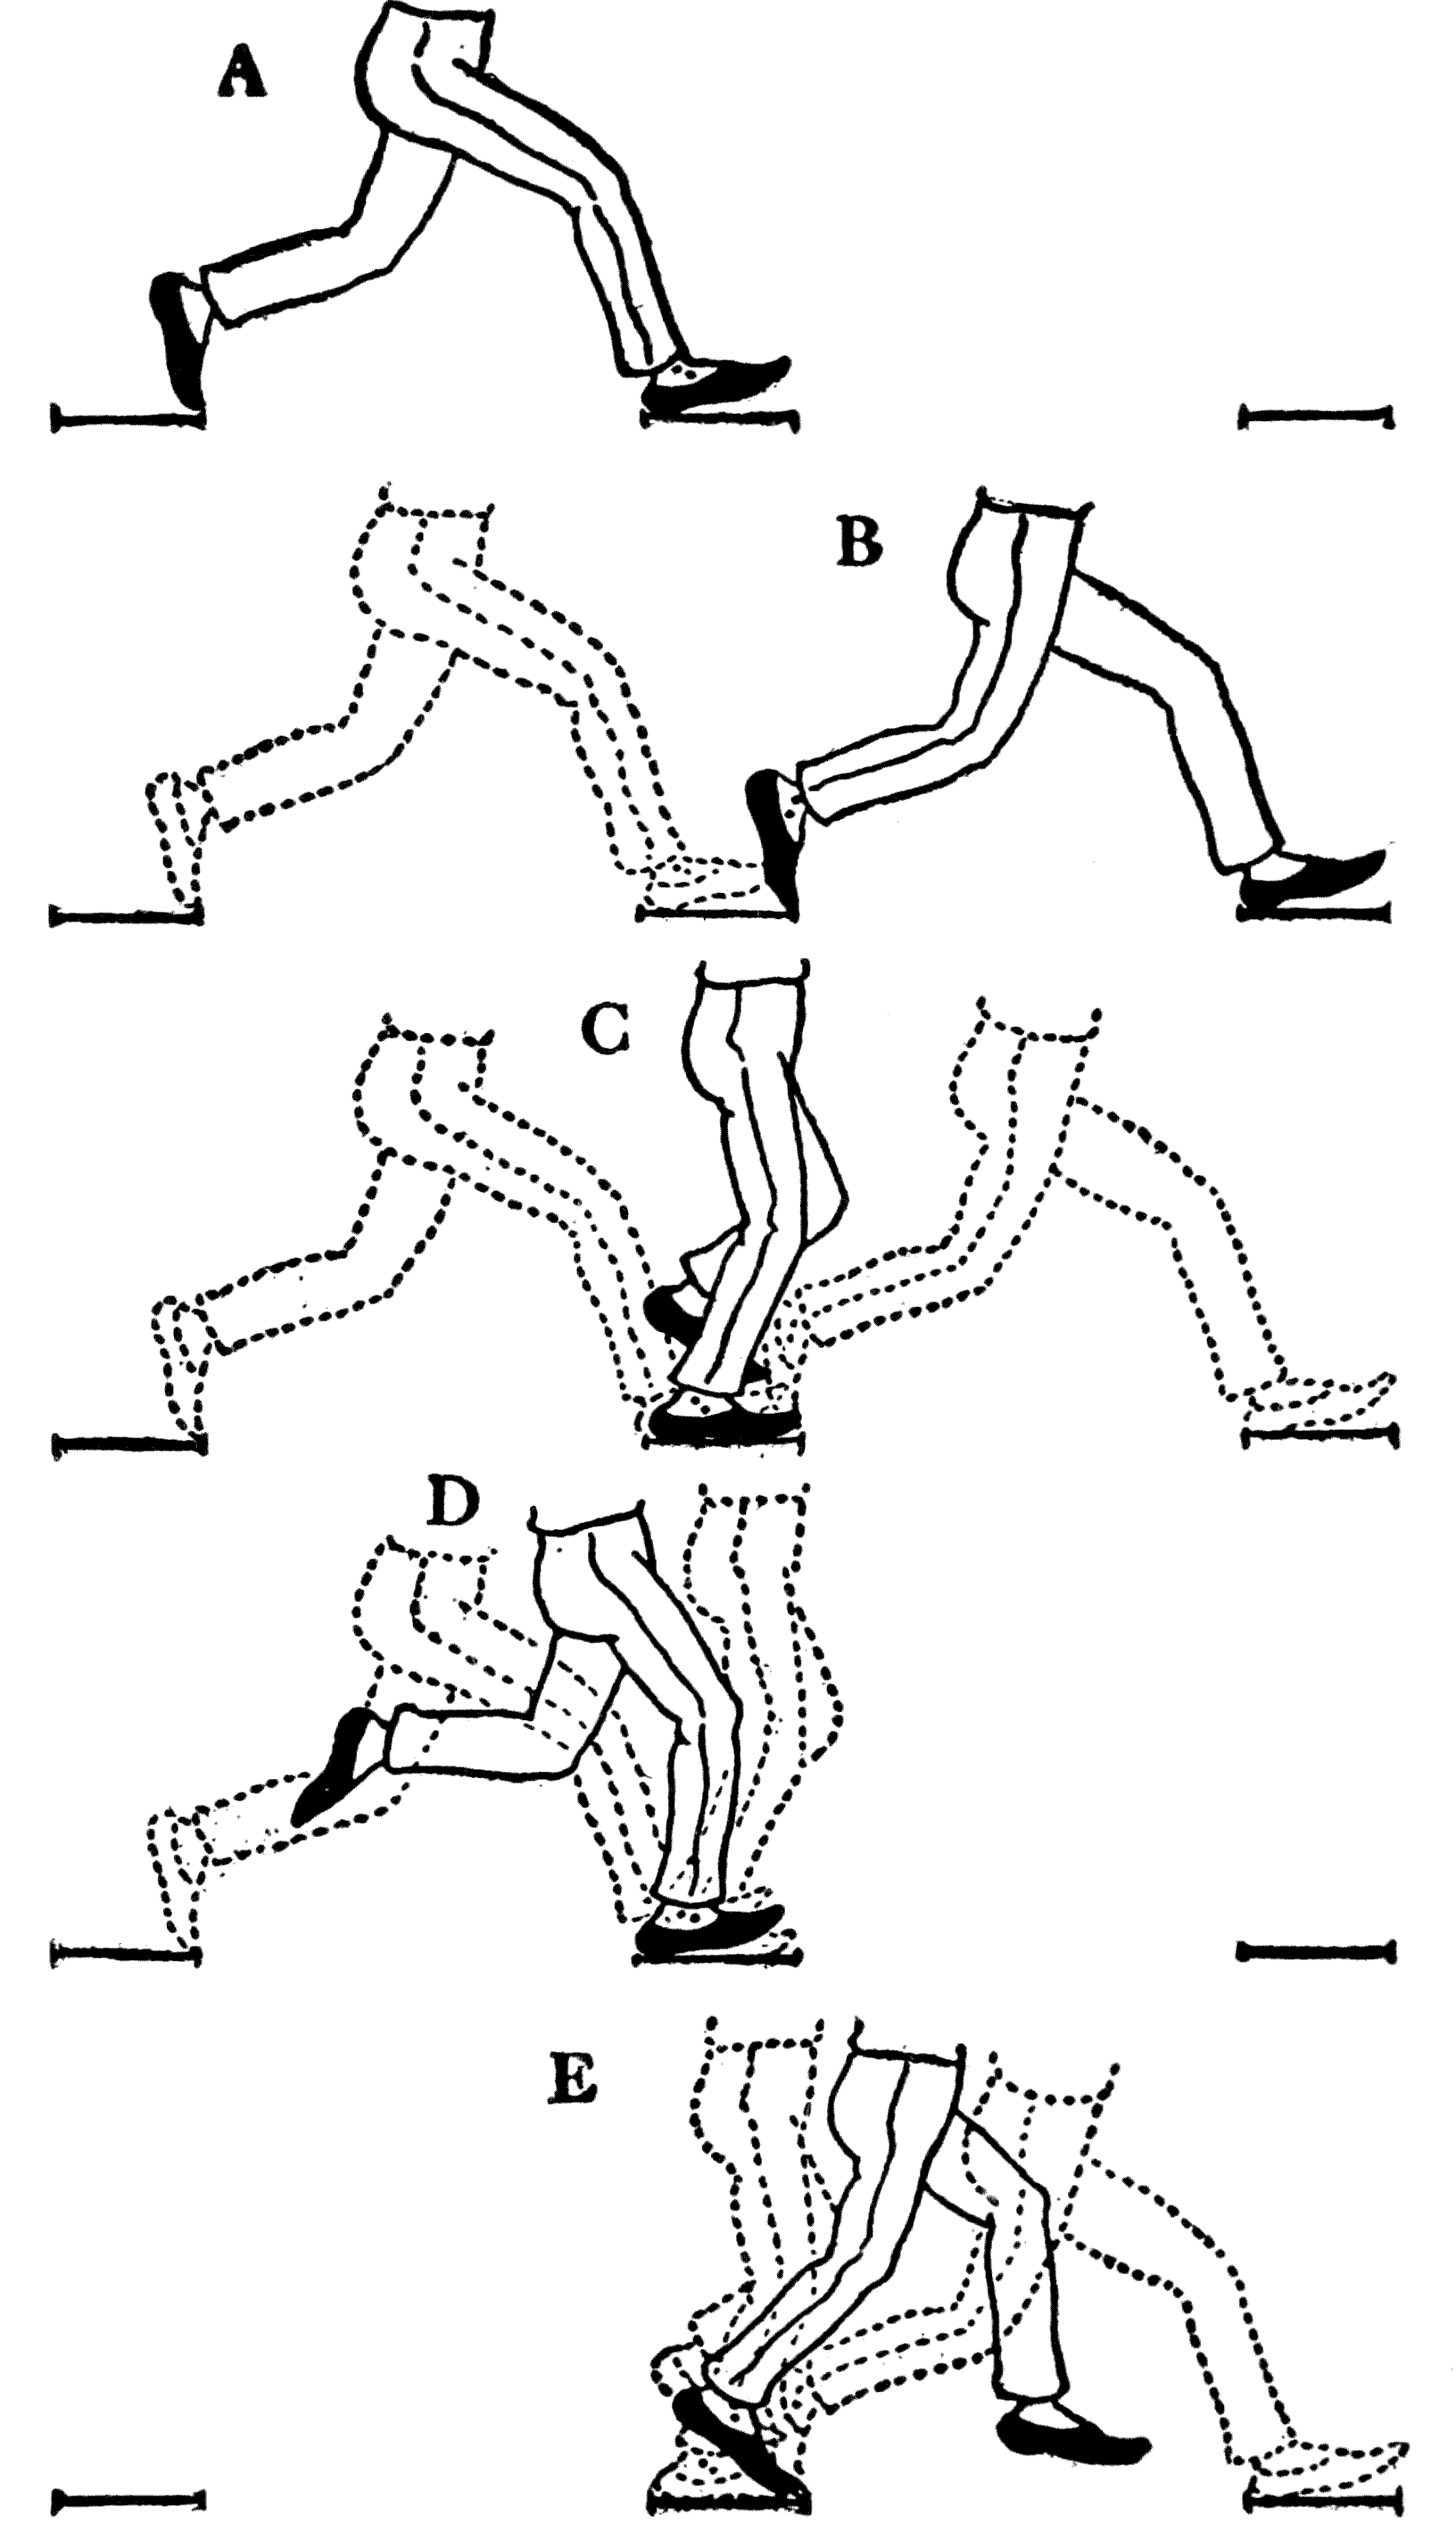
In scheming out the positions for a walk, the artist first draws one of the extreme outstretched positions (A). (It is supposed that we are drawing a figure that is going from left to right.) Then on another sheet of paper the following outstretched position (B), but placed one step in advance. These drawings are now placed over the tracing glass of the drawing-board. All the following drawings of this walk are to be traced over this glass, and they will be kept in register[111] by the two pegs in the board. As now placed, the two drawings (A and B) cover the distance of two steps. A foot that is about to fall on the ground and one that is about to leave it meet at a central point. Here a mark is made to indicate a footprint. A similar mark for a footprint is made on each side to indicate the limits of the two steps.
In planning out the positions for a walk, the artist first sketches one of the extreme outstretched positions (A). (We’re assuming we’re drawing a figure that’s moving from left to right.) Then, on another sheet of paper, the next outstretched position (B) is drawn, but placed one step ahead. These drawings are now positioned over the tracing glass on the drawing board. All subsequent drawings of this walk will be traced over this glass, and they will stay aligned[111] by the two pegs in the board. As positioned now, the two drawings (A and B) cover the distance of two steps. A foot that’s about to hit the ground and one that’s about to lift off meet at a central point. A mark is made here to represent a footprint. A similar mark for a footprint is made on each side to show the limits of the two steps.
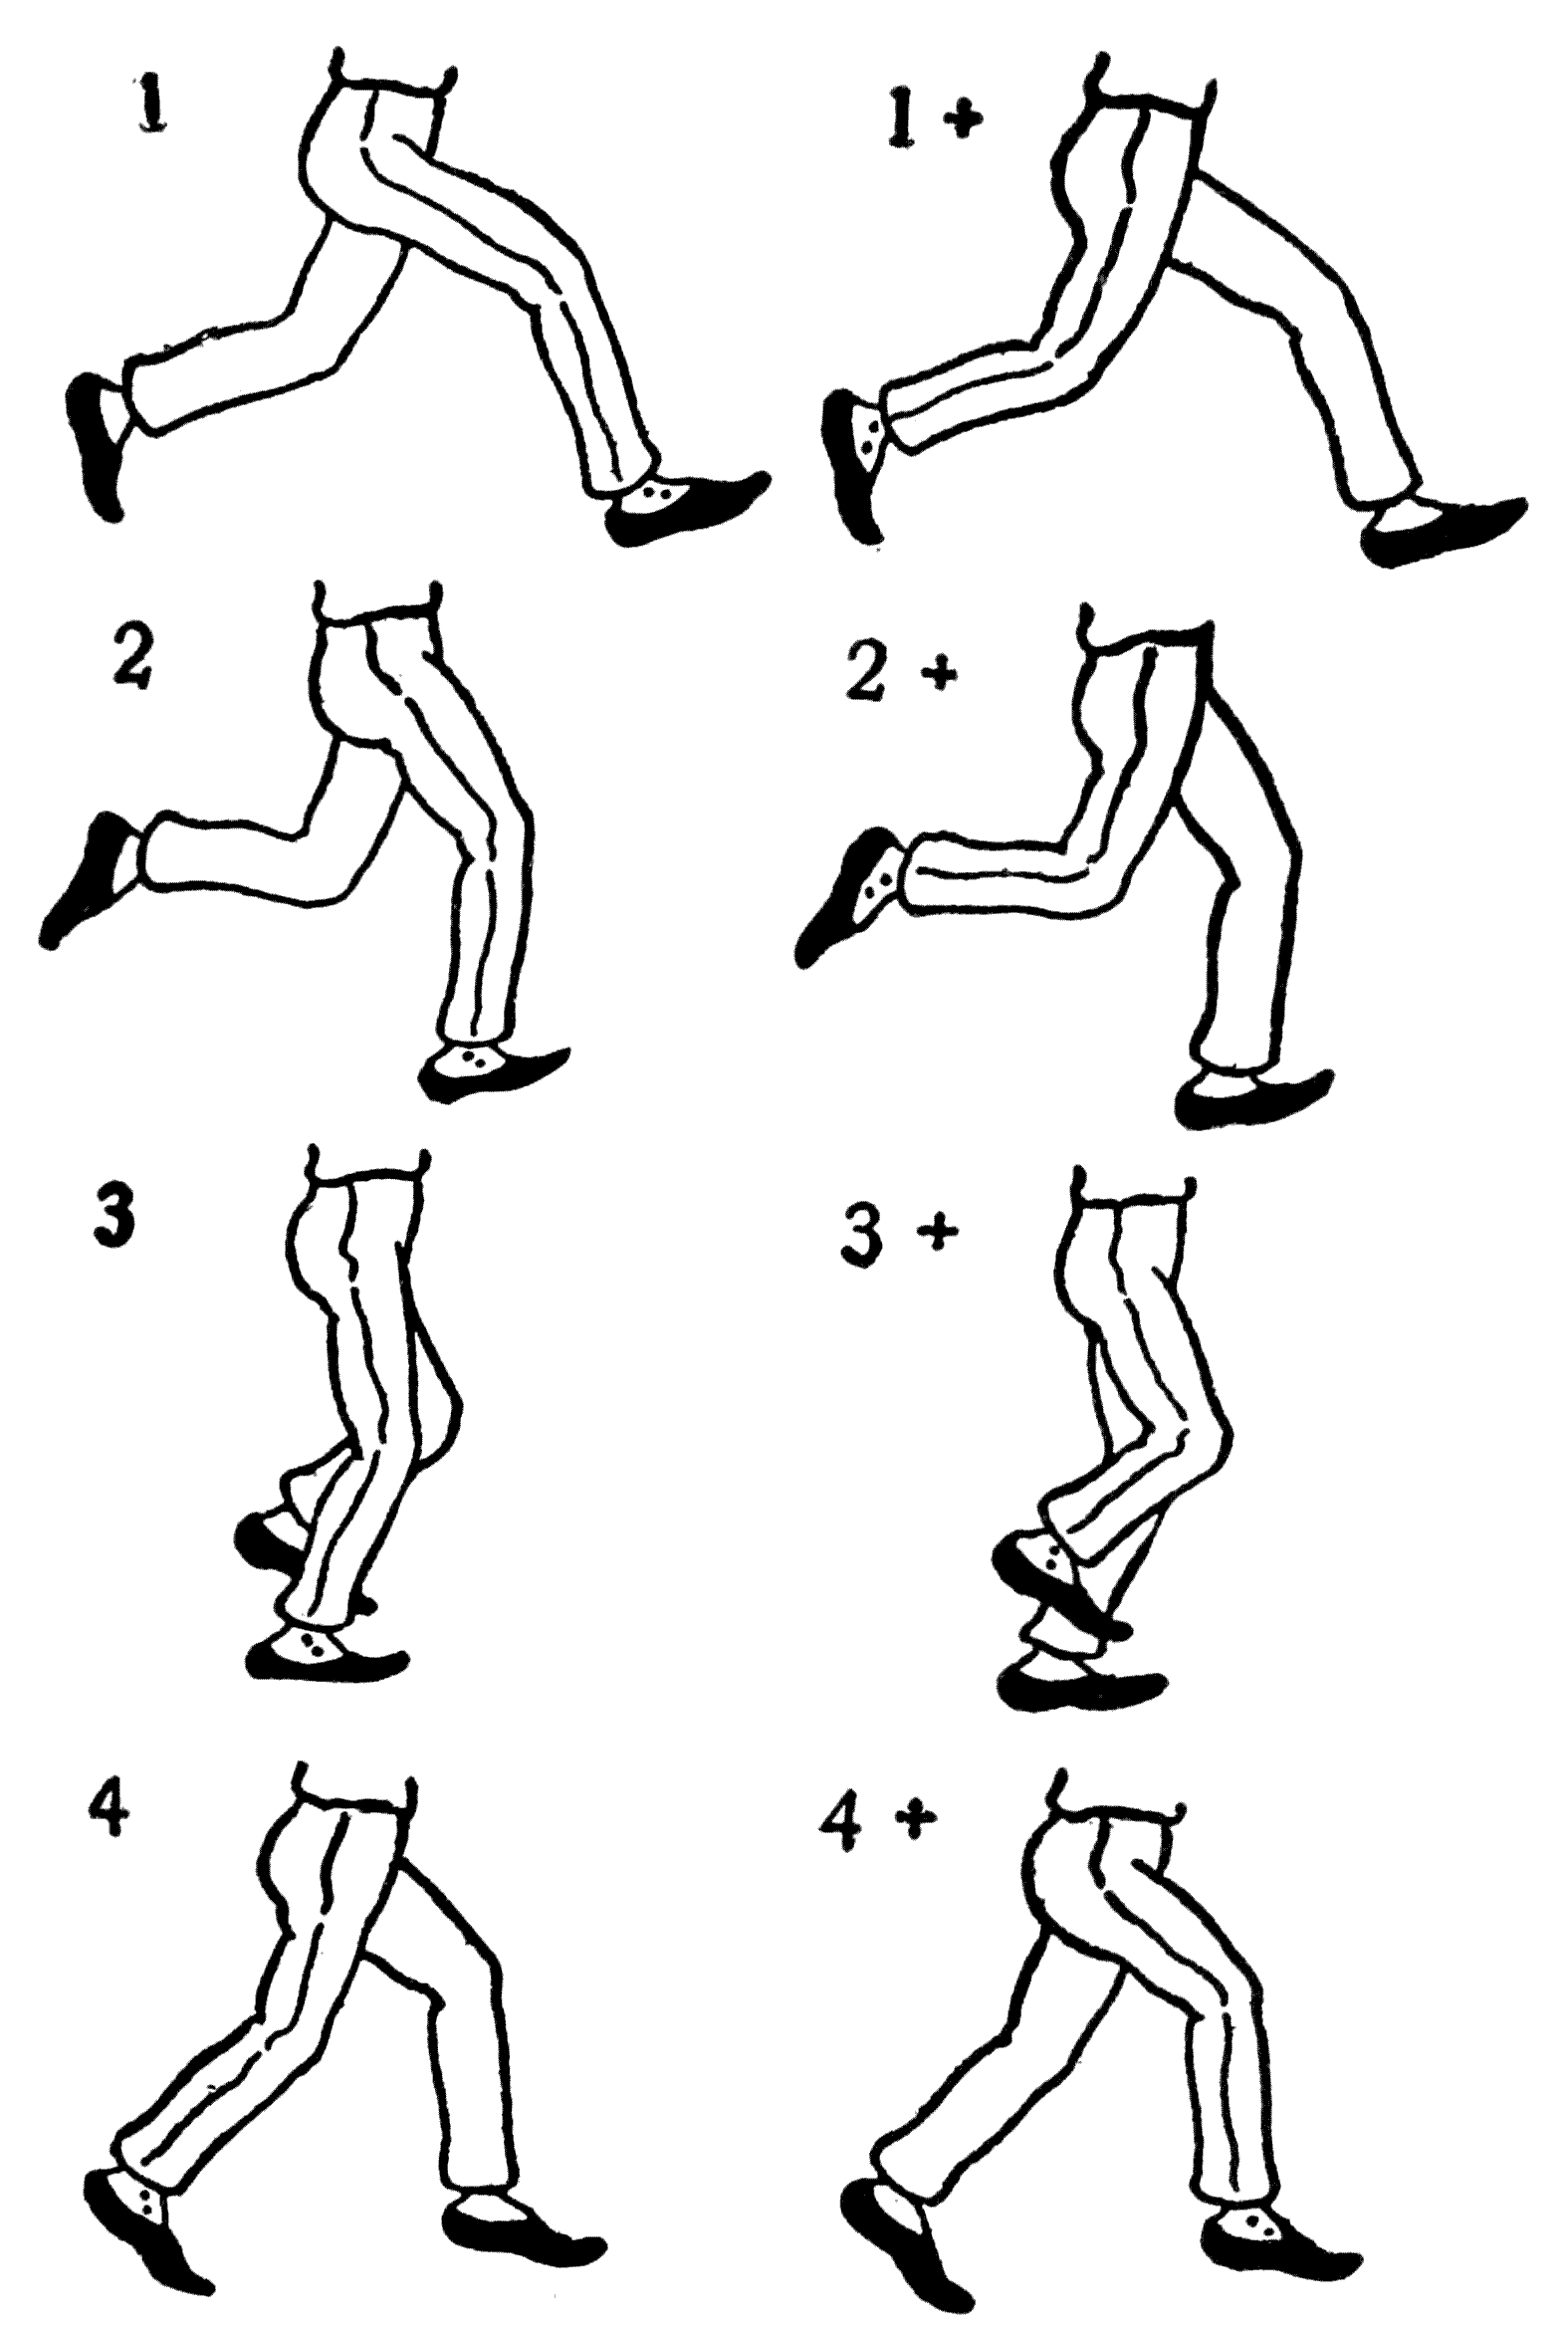
Illustrating how alternating series of positions are the same in outline, differing only with respect to whether the near or the far limb is moving forward.
Illustrating how alternating series of positions have the same outline, only differing in whether the near or the far limb is moving forward.
[113]
[113]
A sheet of paper is next placed over the two drawings (A and B), and on the central footprint the middle position (C) of the legs is drawn. In this the right limb is nearly straight and supporting the body, while the other limb, the left, is bent at the knee and has the foot raised to clear the ground. The next stage will be to make the first in-between position (D) between the first extreme and the middle position. It is made on a fresh sheet of paper placed over those containing the positions just mentioned. The attitude of the right limb in this new position would be that in which it is about to plant its foot on the ground and the left limb is depicted as if ready to swing into the position that it has in the middle one (C).
A sheet of paper is then placed over the two drawings (A and B), and the middle position of the legs (C) is drawn on the central footprint. In this position, the right leg is nearly straight and supporting the body, while the left leg is bent at the knee with the foot raised to lift it off the ground. The next step is to create the first in-between position (D) between the first extreme and the middle position. This is done on a new sheet of paper placed over the ones containing the previously mentioned positions. In this new position, the right leg is depicted as if it's about to place its foot on the ground, while the left leg is shown as ready to swing into the position it has in the middle one (C).
Then with the middle position (C) and the last extreme one (B) over the glass, on another sheet of paper, the next in-between one (E) is drawn. This shows the right foot leaving the ground and the left leg somewhat forward ready to plant its heel on the ground. We have now secured five phases or positions of a walking movement.
Then, with the middle position (C) and the last extreme one (B) over the glass, on another piece of paper, the next in-between one (E) is drawn. This shows the right foot lifting off the ground while the left leg is slightly forward, ready to plant its heel down. We now have five phases or positions of a walking movement documented.
The two extremes (A and B) spoken of as the outstretched ones have the same contours but differ in that in one the right limb is forward, and the left is directed obliquely backward, while in the other it is the left limb that projects forward and the right has an obliquity backward.
The two extremes (A and B) referred to as the outstretched ones have the same shape but differ in that in one, the right arm is extended forward, and the left is angled backward, while in the other, it's the left arm that extends forward and the right that angles backward.
Now, if we make tracings, copying the outlines only, of the three other positions (C, D, and E), but reversing the particular aspects of the right and the left limbs, we shall have obtained enough drawings to complete two steps of a walk.
Now, if we create tracings that only copy the outlines of the three other positions (C, D, and E), but switch the specific features of the right and left limbs, we will have enough drawings to complete two steps of a walk.
[115]
[115]
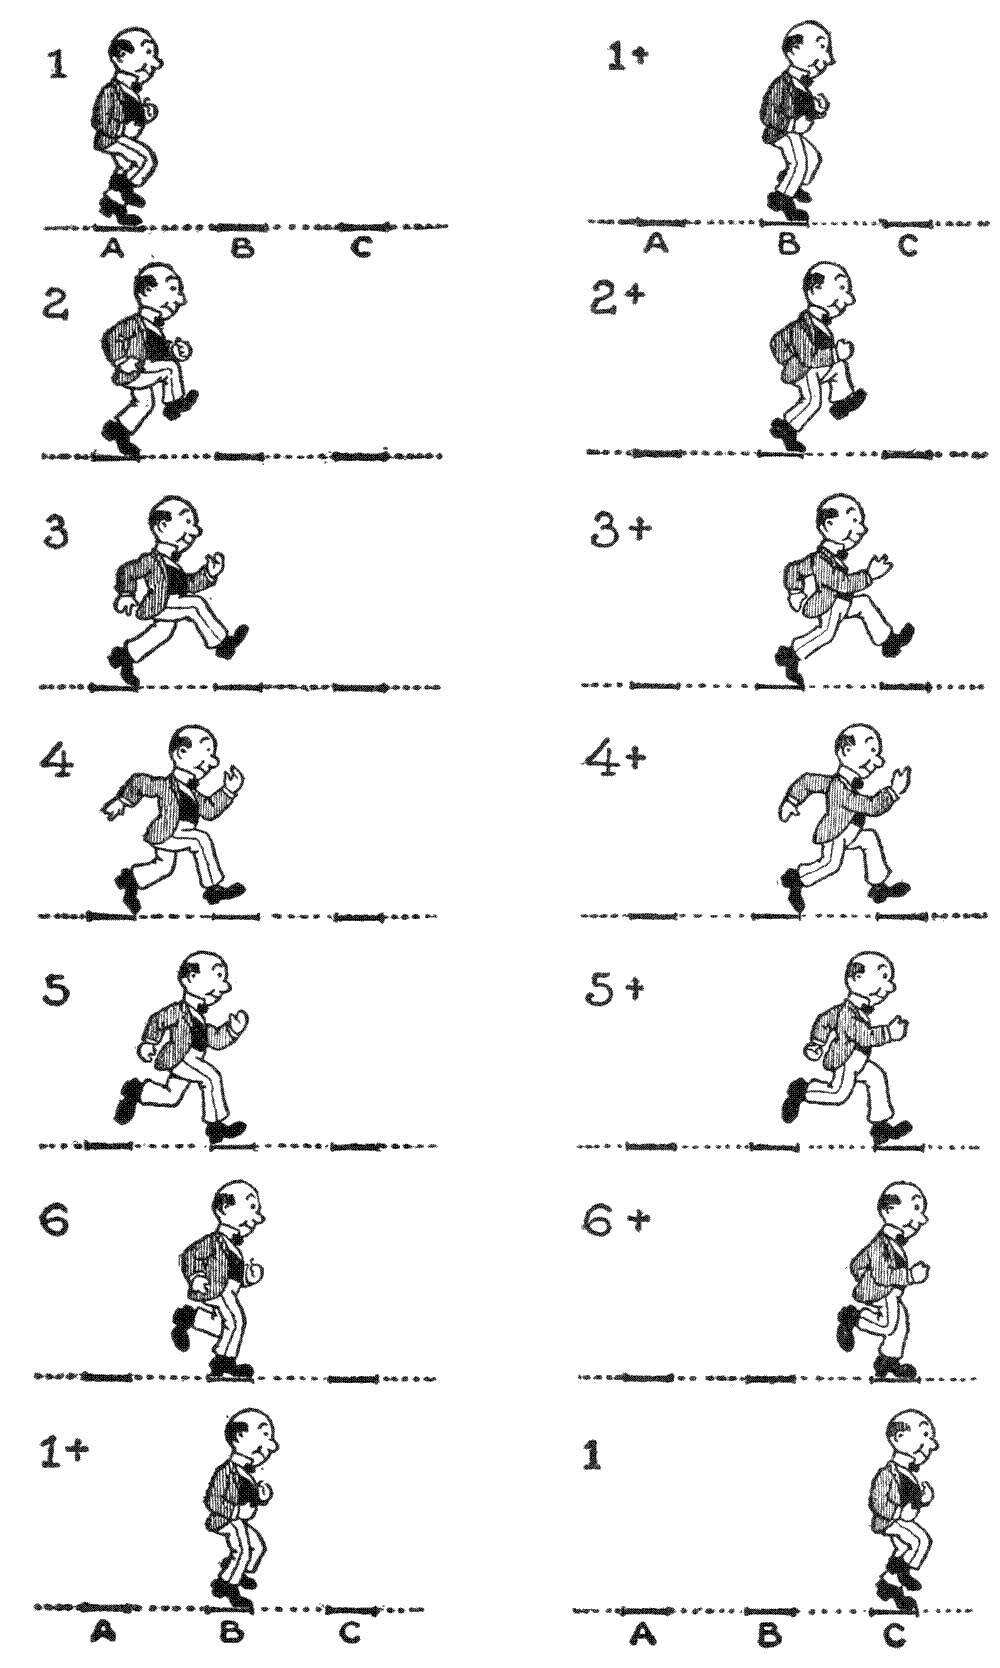
Six phases complete a step.
Six phases complete a stage.
As a better understanding of the preceding the fact should be grasped that while one limb, the right we will say, is assuming a certain position during a step, in the next step it is the turn of the other limb, the left, to assume this particular position. And again in this second step, the right limb takes the corresponding position that the other limb had in the first step. There are always, in a[116] walk, two sets of drawings, used alternately. Any particular silhouette in one set has its identical silhouette in the other set, but the attitudes of the limbs are reversed. To explain by an example: In the drawing of one middle position, the right leg supports the body and the left is flexed, in its coincidental drawing, it is the left that supports the body and the right is flexed. (See 2 and 3+, of engraving on page 113.)
To better understand the previous points, it's important to recognize that while one leg, let’s say the right, takes on a certain position during a step, in the next step, it's the left leg's turn to take that same position. Similarly, in that second step, the right leg assumes the position that the left leg held in the first step. There are always, in a[116] walk, two sets of positions that are used alternately. Any specific shape in one set has a matching shape in the other set, but the positions of the limbs are flipped. For example: In one drawing of a middle position, the right leg is supporting the body while the left is bent; in its corresponding drawing, the left leg supports the body while the right is bent. (See 2 and 3+, of engraving on page 113.)
From this it can be seen that the two sets of drawings differ only in the details within their general contours. These details will be such markings as drapery folds, stripes on trousers, indications of the right and the left foot by little items like buttons on boots. Heeding and taking the trouble to mark little details like these add to the value of a screen image.
From this, it's clear that the two sets of drawings only differ in the details within their overall shapes. These details include markings like drapery folds, stripes on pants, and indicators of the right and left foot, such as small buttons on boots. Paying attention to and taking the time to mark little details like these enhances the value of a screen image.
One of the most difficult actions to depict in this art is that which the animator calls a perspective walk. By this term he means a walk in which the figure is either coming diagonally, more or less, toward the front of the picture or going away from it toward the horizon. It is obvious that according to the rules of perspective, in coming forward the figure gets larger and[117] larger, and in travelling in the opposite direction it gets smaller and smaller. To do this successfully is not easy. Only after a worker has had a great deal of experience in the art is he able to draw such a movement easily.
One of the hardest actions to illustrate in this art is what animators refer to as a perspective walk. This term describes a walk where the figure is either approaching diagonally toward the front of the image or moving away toward the horizon. It's clear that, according to the rules of perspective, as the figure comes forward, it appears larger and larger, while moving in the opposite direction, it becomes smaller and smaller. Successfully achieving this is challenging. Only after gaining significant experience in the art can an artist draw such movement with ease.
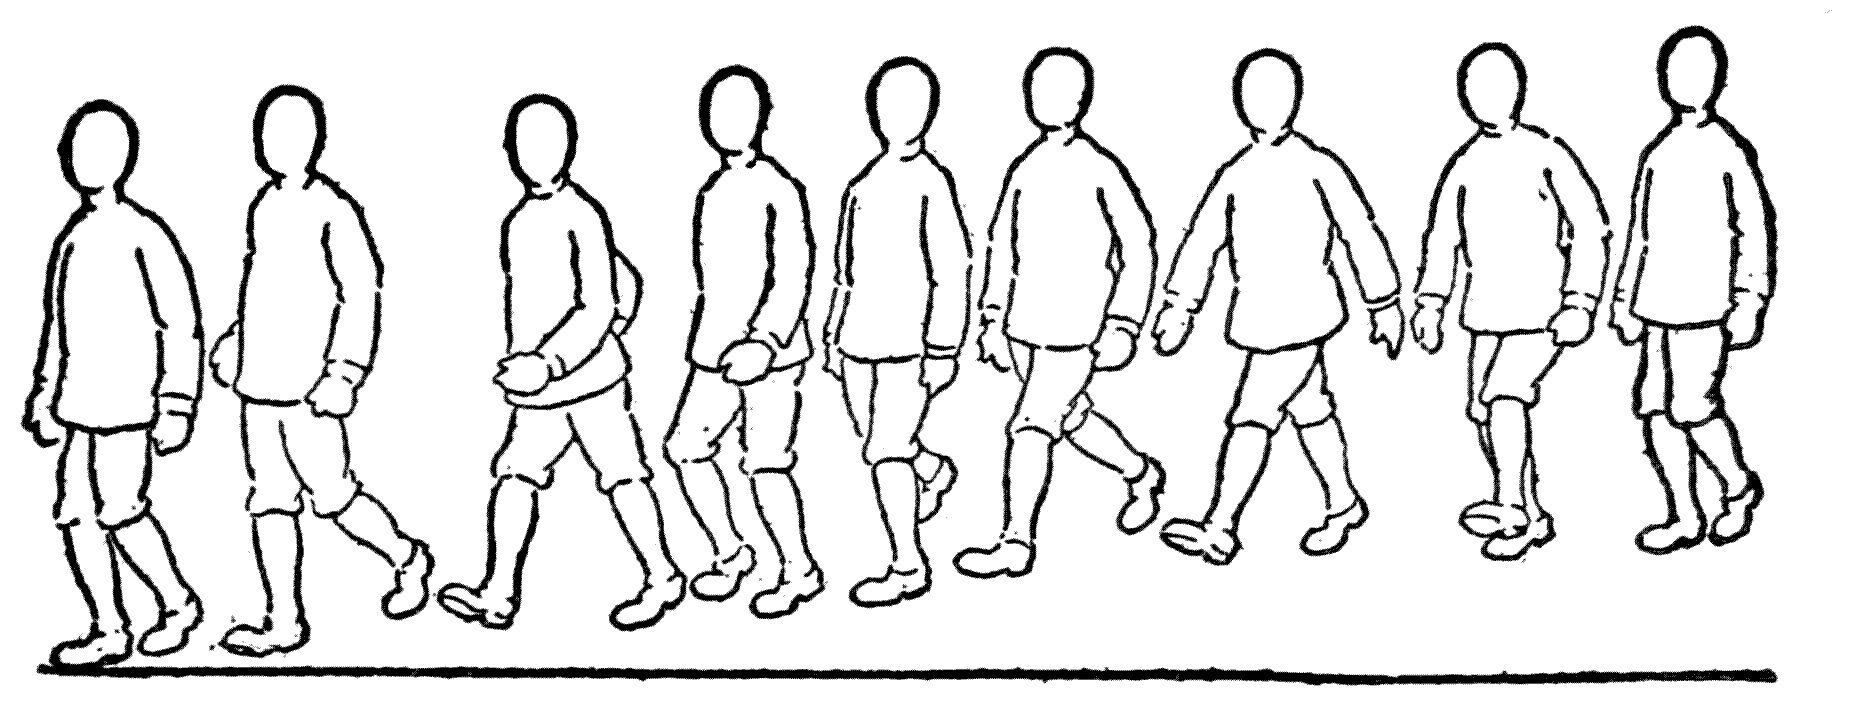
The constant changing sizes of the figures and getting them within the perspective lines in a graduated series are perplexing enough matters. But this is not all. There is the problem of the foreshortened views as the limbs are beheld perspectively. Imagine, for instance, an arm pointing toward the spectator in a foreshortened view. Every artist would have his own individual way of drawing this. Those with a natural feeling for form and understanding anatomy solve problems of this kind by methods for which it is impossible to give any recipe. Some would start[118] with preliminary construction lines that have the appearance of columnar solids in perspective, while others scribble and fumble around until they find the outlines that they want.
The constantly changing sizes of the figures and fitting them within the perspective lines in a graduated series are challenging enough. But that's not all. There's also the issue of foreshortening when the limbs are viewed in perspective. For example, think of an arm pointing toward the viewer in a foreshortened perspective. Every artist has their own unique way of drawing this. Those with a natural sense of form and an understanding of anatomy tackle these kinds of challenges using methods that can't be easily described. Some might begin with basic construction lines that resemble columnar shapes in perspective, while others just doodle and experiment until they discover the outlines they need.
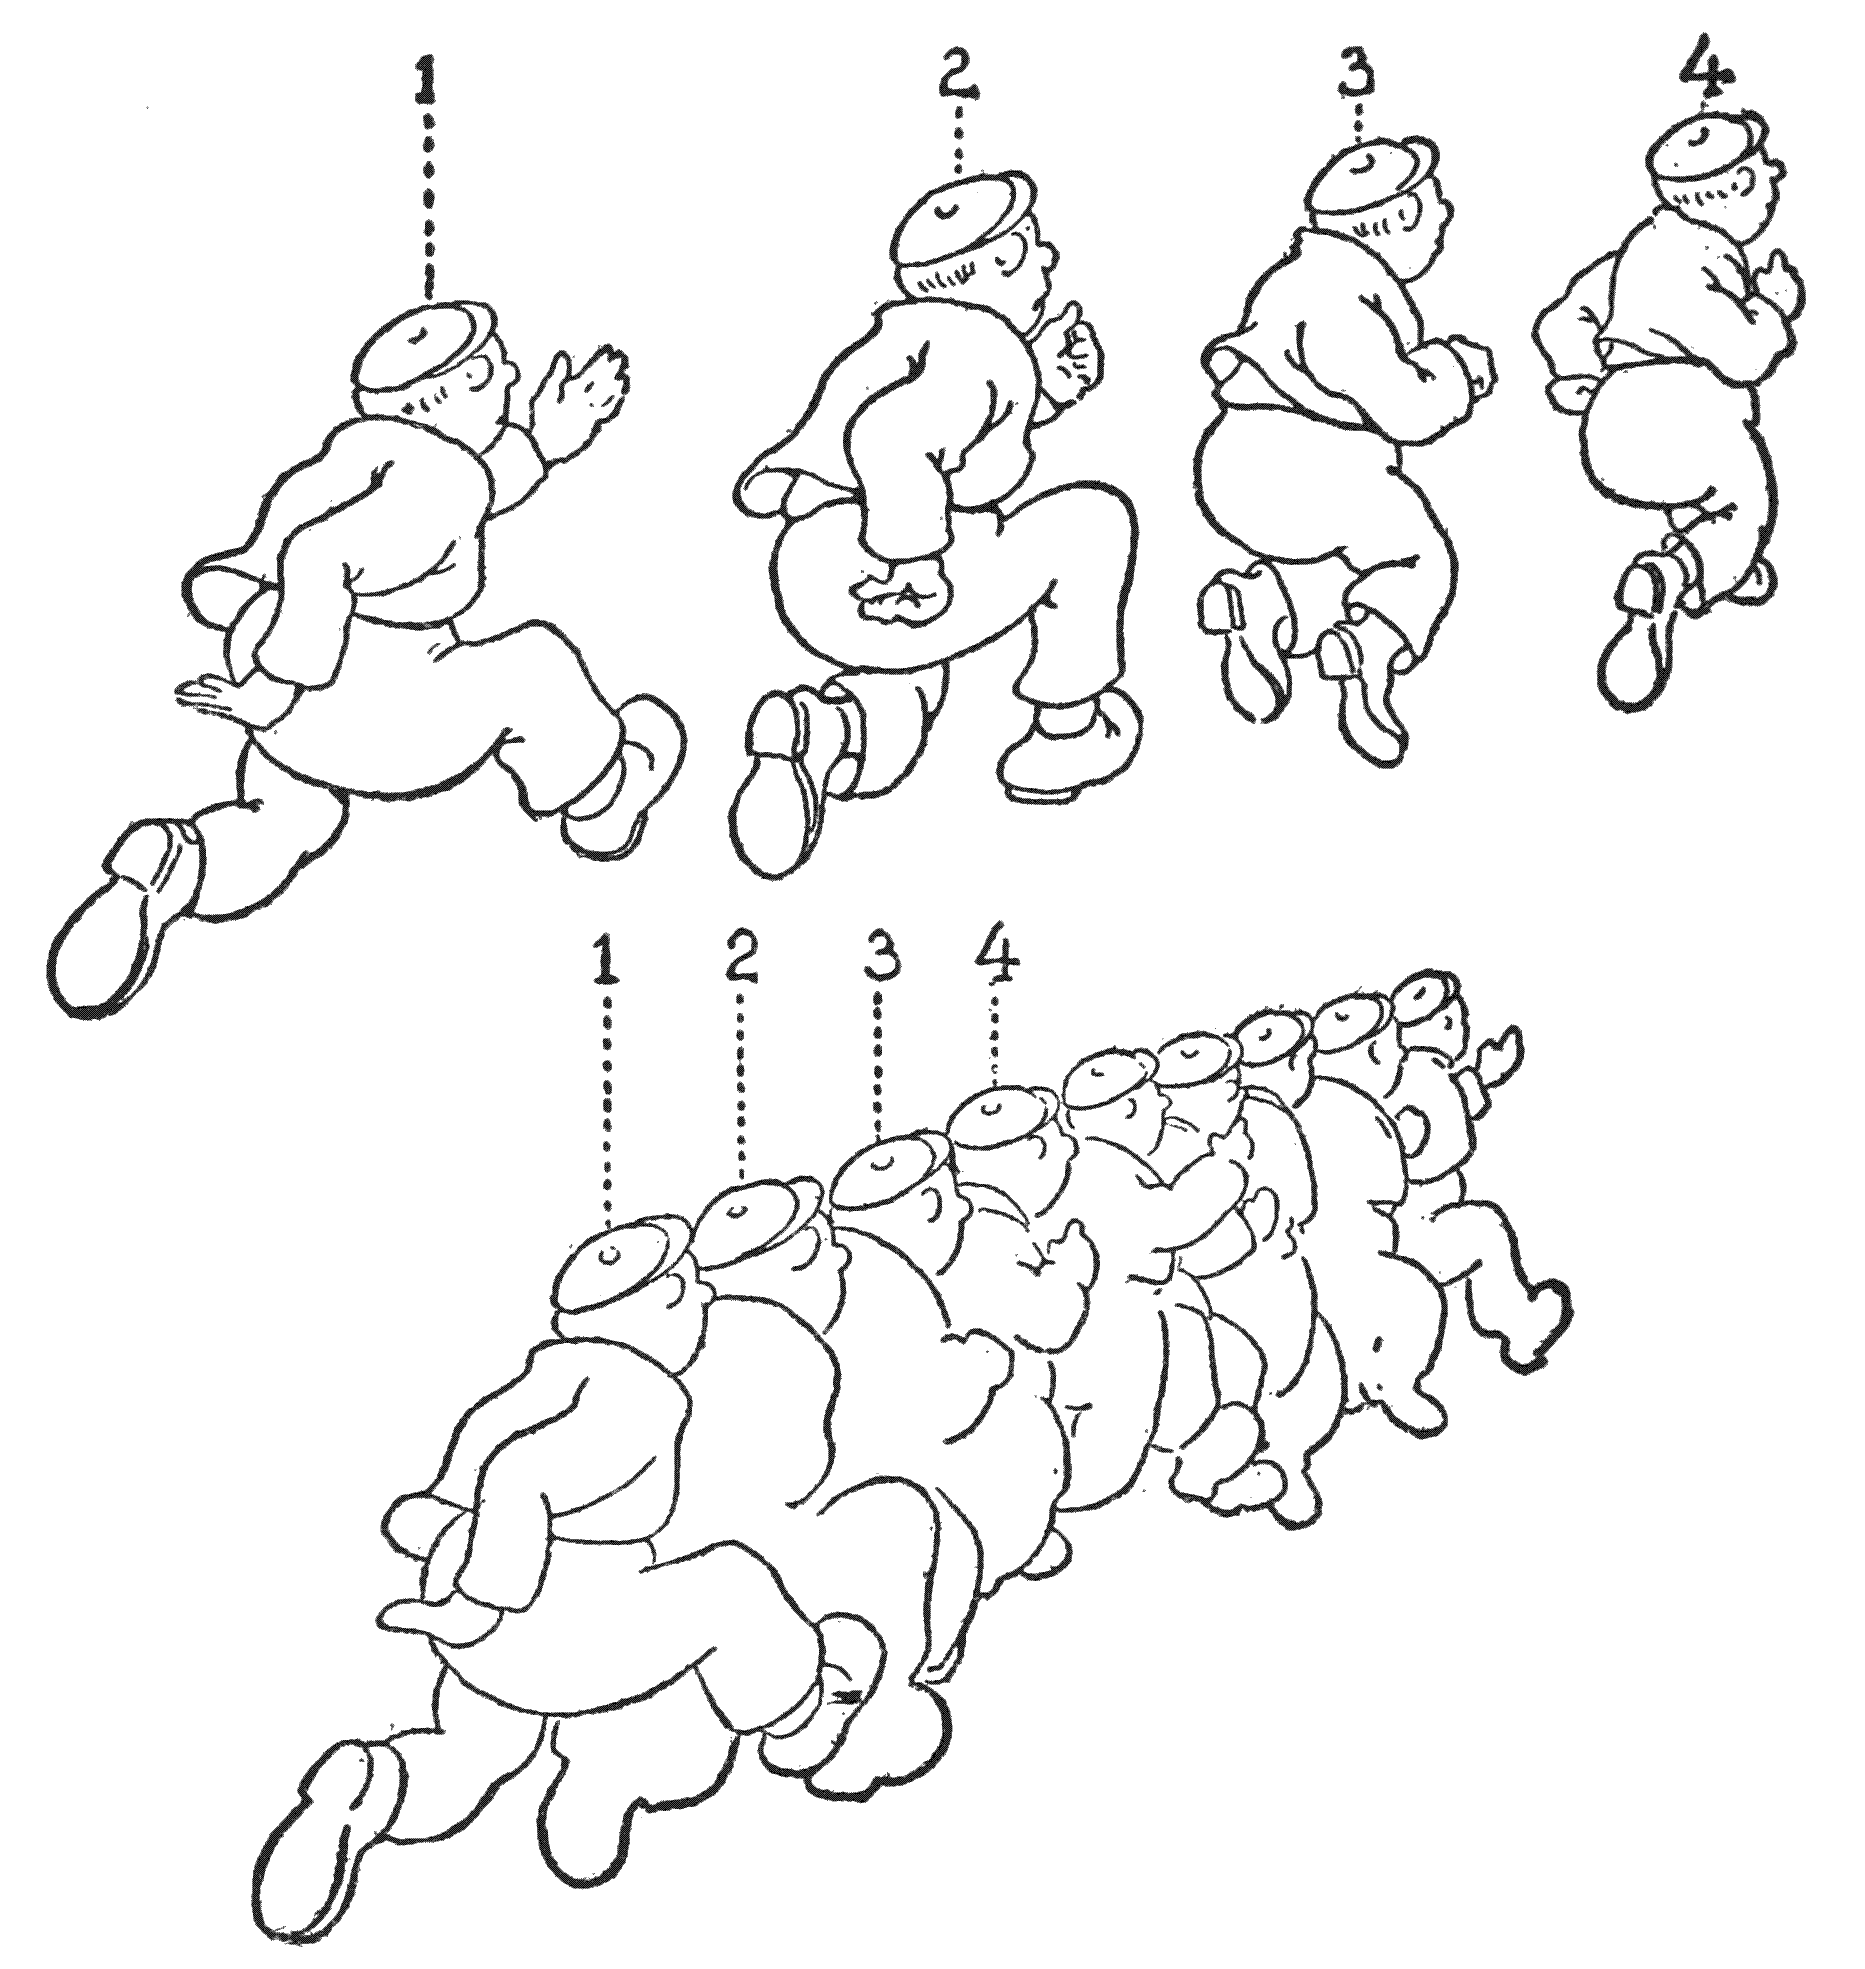
[119]
[119]
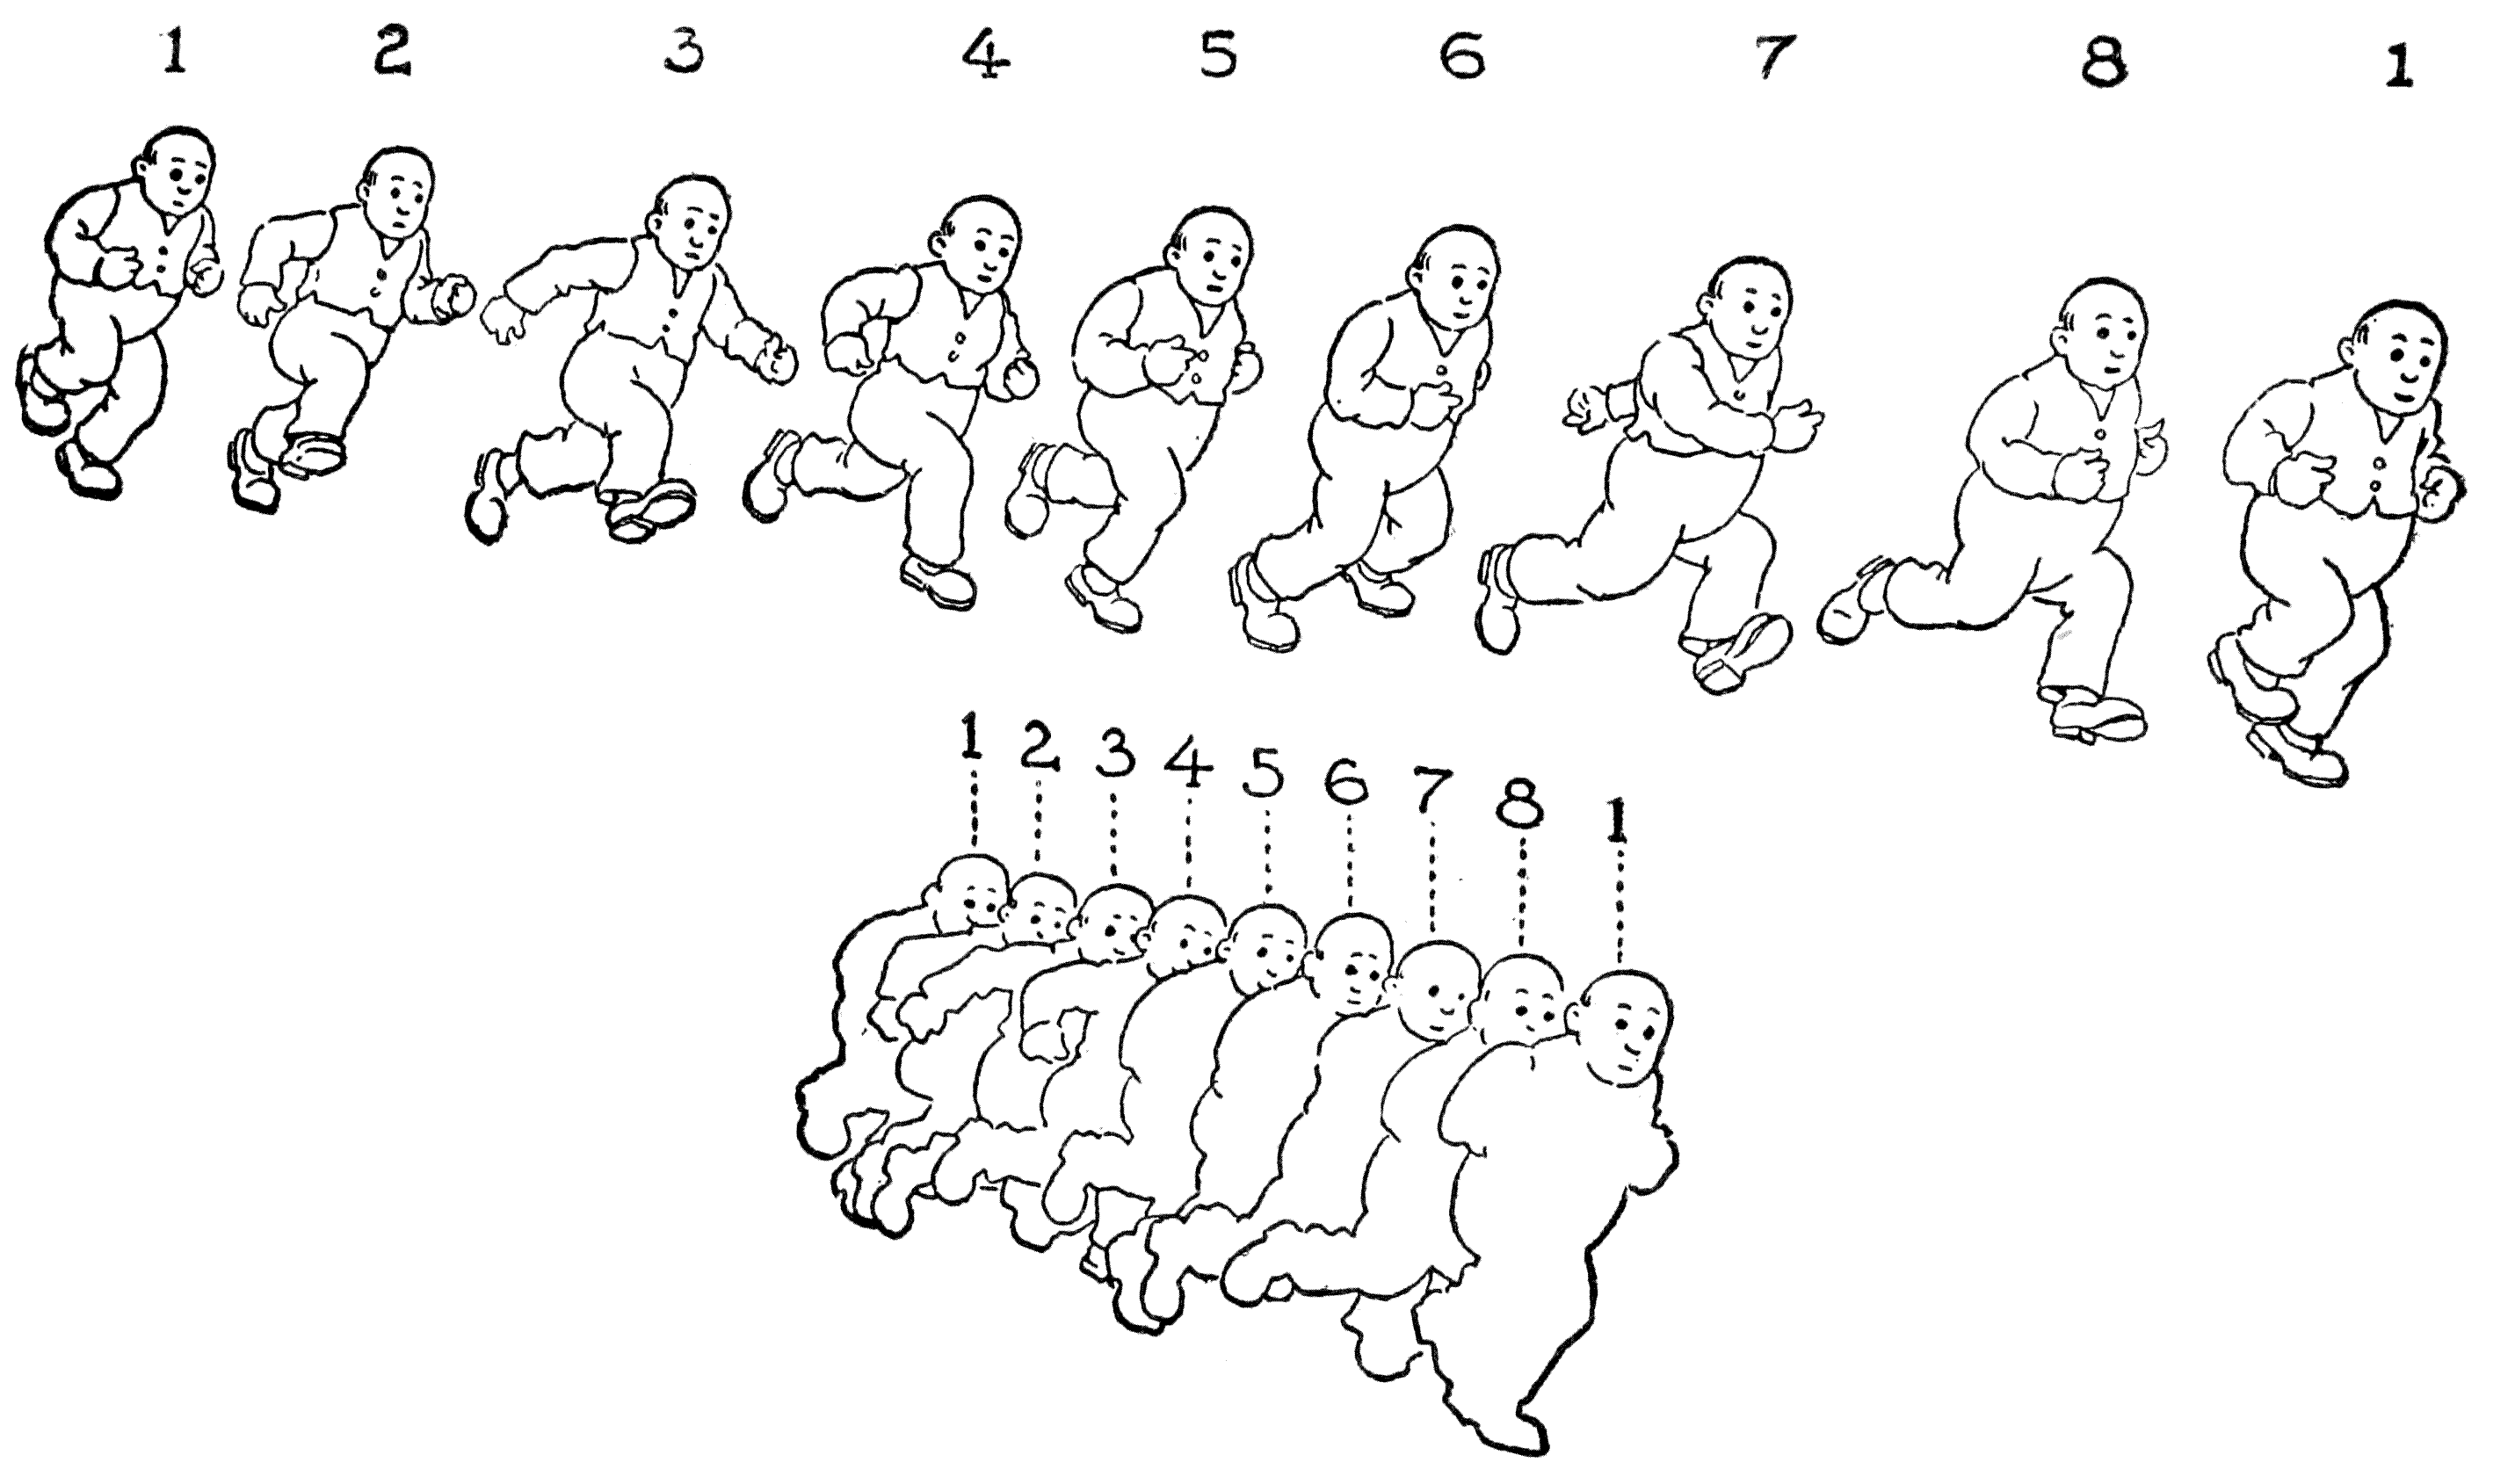
Above: In the last of the series—on the right—the figure has taken a position nearly that of the first of the series.
Above: In the last of the series—on the right—the figure is in a position almost identical to that of the first in the series.
Below: How the figures are placed with respect to each other when drawn on separate sheets of paper.
Below: How the figures are arranged in relation to one another when drawn on separate sheets of paper.
Happily in most of the occasions when a perspective walk is required in a story it is for some humorous incident. This signifies that it can be[120] made into a speedy action, and that but a few drawings are needed to complete a step.
Happily, on most occasions when a flashback is needed in a story, it's for some funny incident. This means it can be made into a quick action, and only a few scenes are needed to wrap it up.
Artists when they begin to make drawings for screen pictures find a new interest in studying movement. In the study of art the student gives some attention, of course, to this question of movement. Usually, though, the study is not discriminating, nor thorough. But to become skilled in animating involves a thoughtful and analytic inquiry into the subject. If the artist is a real student of the subject its consideration will be more engrossing than the more or less slight study given to the planning of the single isolated phases, or attitudes, of action in ordinary pictorial work.
Artists who start creating drawings for movies discover a new fascination with studying movement. In art education, students pay some attention to movement, but usually, their study is not detailed or in-depth. However, becoming skilled at animation requires thoughtful and analytical exploration of the topic. If the artist truly immerses themselves in the subject, they will find it more engaging than the somewhat superficial focus typically placed on planning individual moments or poses in regular visual art.
A great help in comprehending the nature of movement and grasping the character of the attitudes of active figures are the so-called “analysis of motion” screen pictures. In these the model, generally a muscular person going through the motions of some gymnastic or athletic activity, is shown moving very much slower than the movement is in actuality. This is effected by taking the pictures with a camera so constructed that it moves its mechanism many times faster than the normal speed.
A huge aid in understanding how movement works and recognizing the stances of active figures is the so-called “analysis of motion” screen pictures. In these, the model, usually a muscular person performing some gymnastic or athletic activity, is shown moving much slower than in real life. This is done by using a camera designed to operate its mechanism at a speed much faster than normal.
[121]
[121]
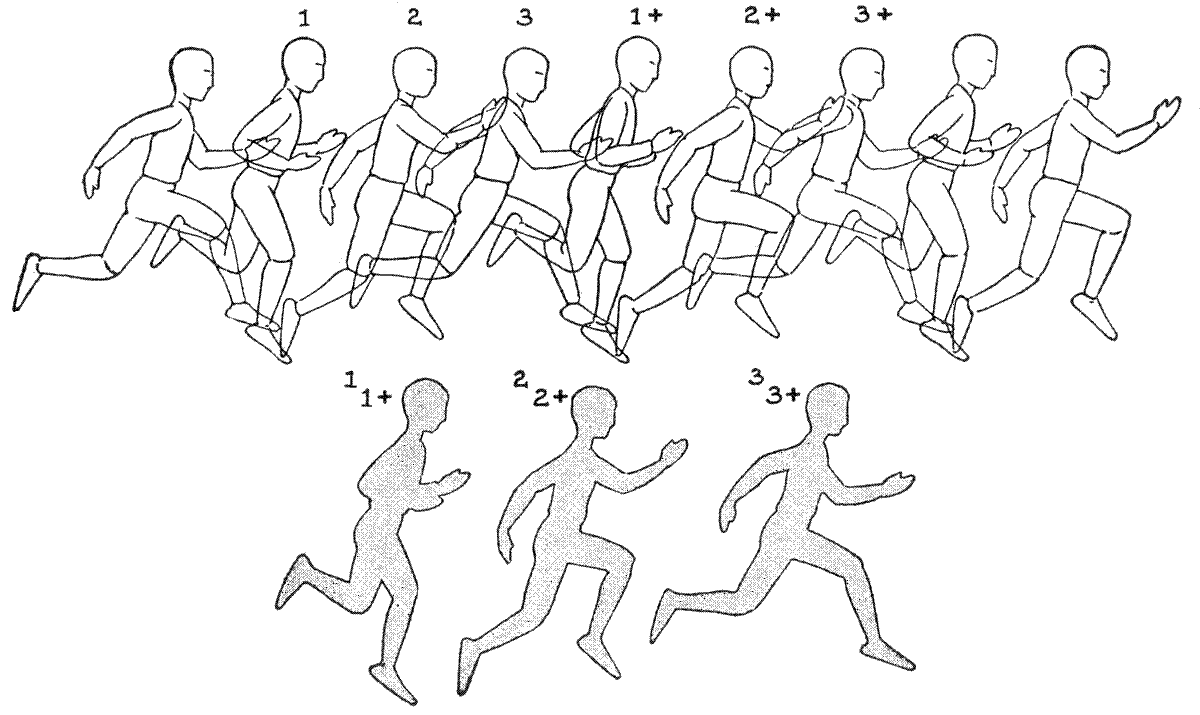
Above: Six positions complete two steps.
Above: Six positions complete two steps.
Below: Diagram to show that, considered as outlines, the six positions resolve themselves into three silhouettes.
Below: Diagram to show that, when viewed as outlines, the six positions come together to form three silhouettes.
[122]
[122]
The speed of the ordinary camera, as we know, moves during every second but one foot of film and on which sixteen separate photographs are made. Now, in one type of camera for analysis of motion photography, eight times more film is moved with a corresponding increase in the number of separate pictures taken on it during this same time of one second. To take a specific movement of a model lasting one second: the ordinary camera catches sixteen phases of it, but the extra-rapid camera takes about one hundred and twenty-eight separate pictures of as many corresponding separate phases. In other words, the ordinary camera takes about as much as our eyes appreciate, while the fast camera records on a length of film many more attitudes during the course of the given activity than the unaided eye can ever hope to see. When this long film of the extra-rapid camera is run through the projecting machine at the normal speed it shows us on the screen, in a period of eight seconds, that which took place in reality in but one second.
The speed of a regular camera, as we know, captures one foot of film every second, which results in sixteen separate photographs. However, with one type of motion analysis camera, eight times more film is advanced, leading to a corresponding increase in the number of photos taken during that same one-second interval. For example, if we look at a specific movement of a model lasting one second: the regular camera captures sixteen phases of it, while the high-speed camera takes about one hundred and twenty-eight separate pictures of the same number of corresponding phases. In other words, the regular camera captures about as much as our eyes can perceive, while the fast camera records many more positions during the activity than the naked eye can ever hope to see. When this long film from the high-speed camera is played through a projector at normal speed, it shows us on the screen, in eight seconds, what actually happened in just one second.
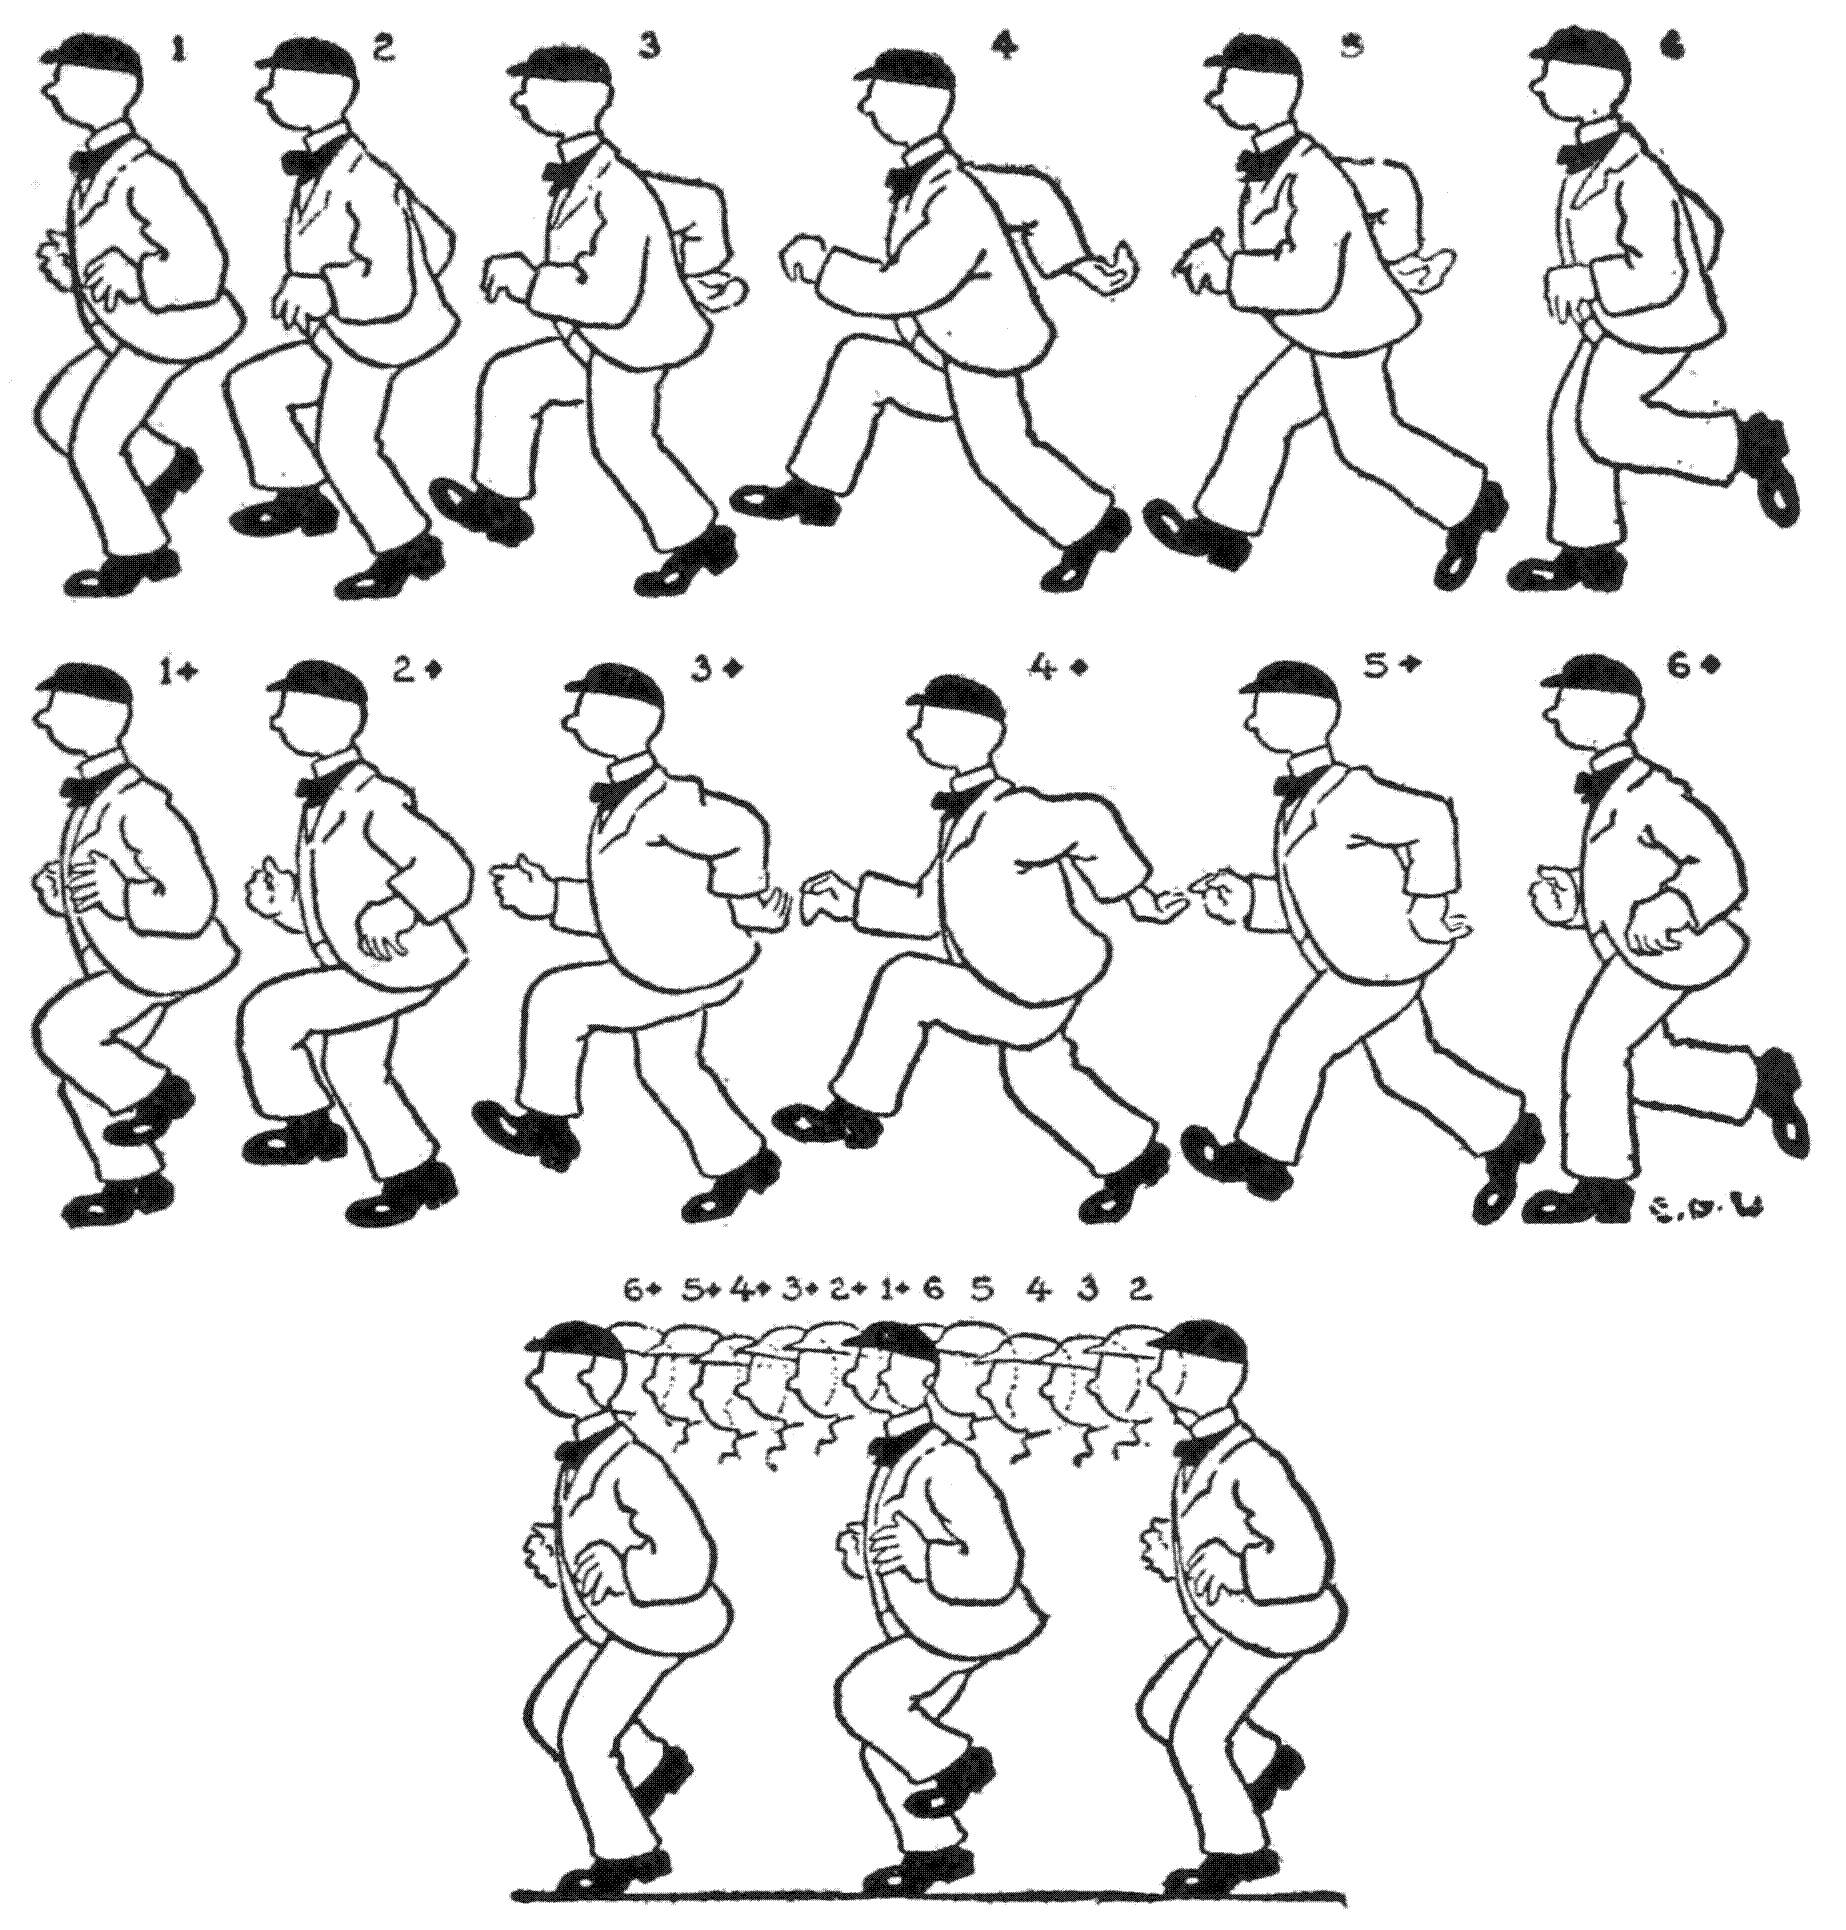
The lower diagram illustrates how the different drawings, each on its own sheet of paper, are arranged in a staggered manner.
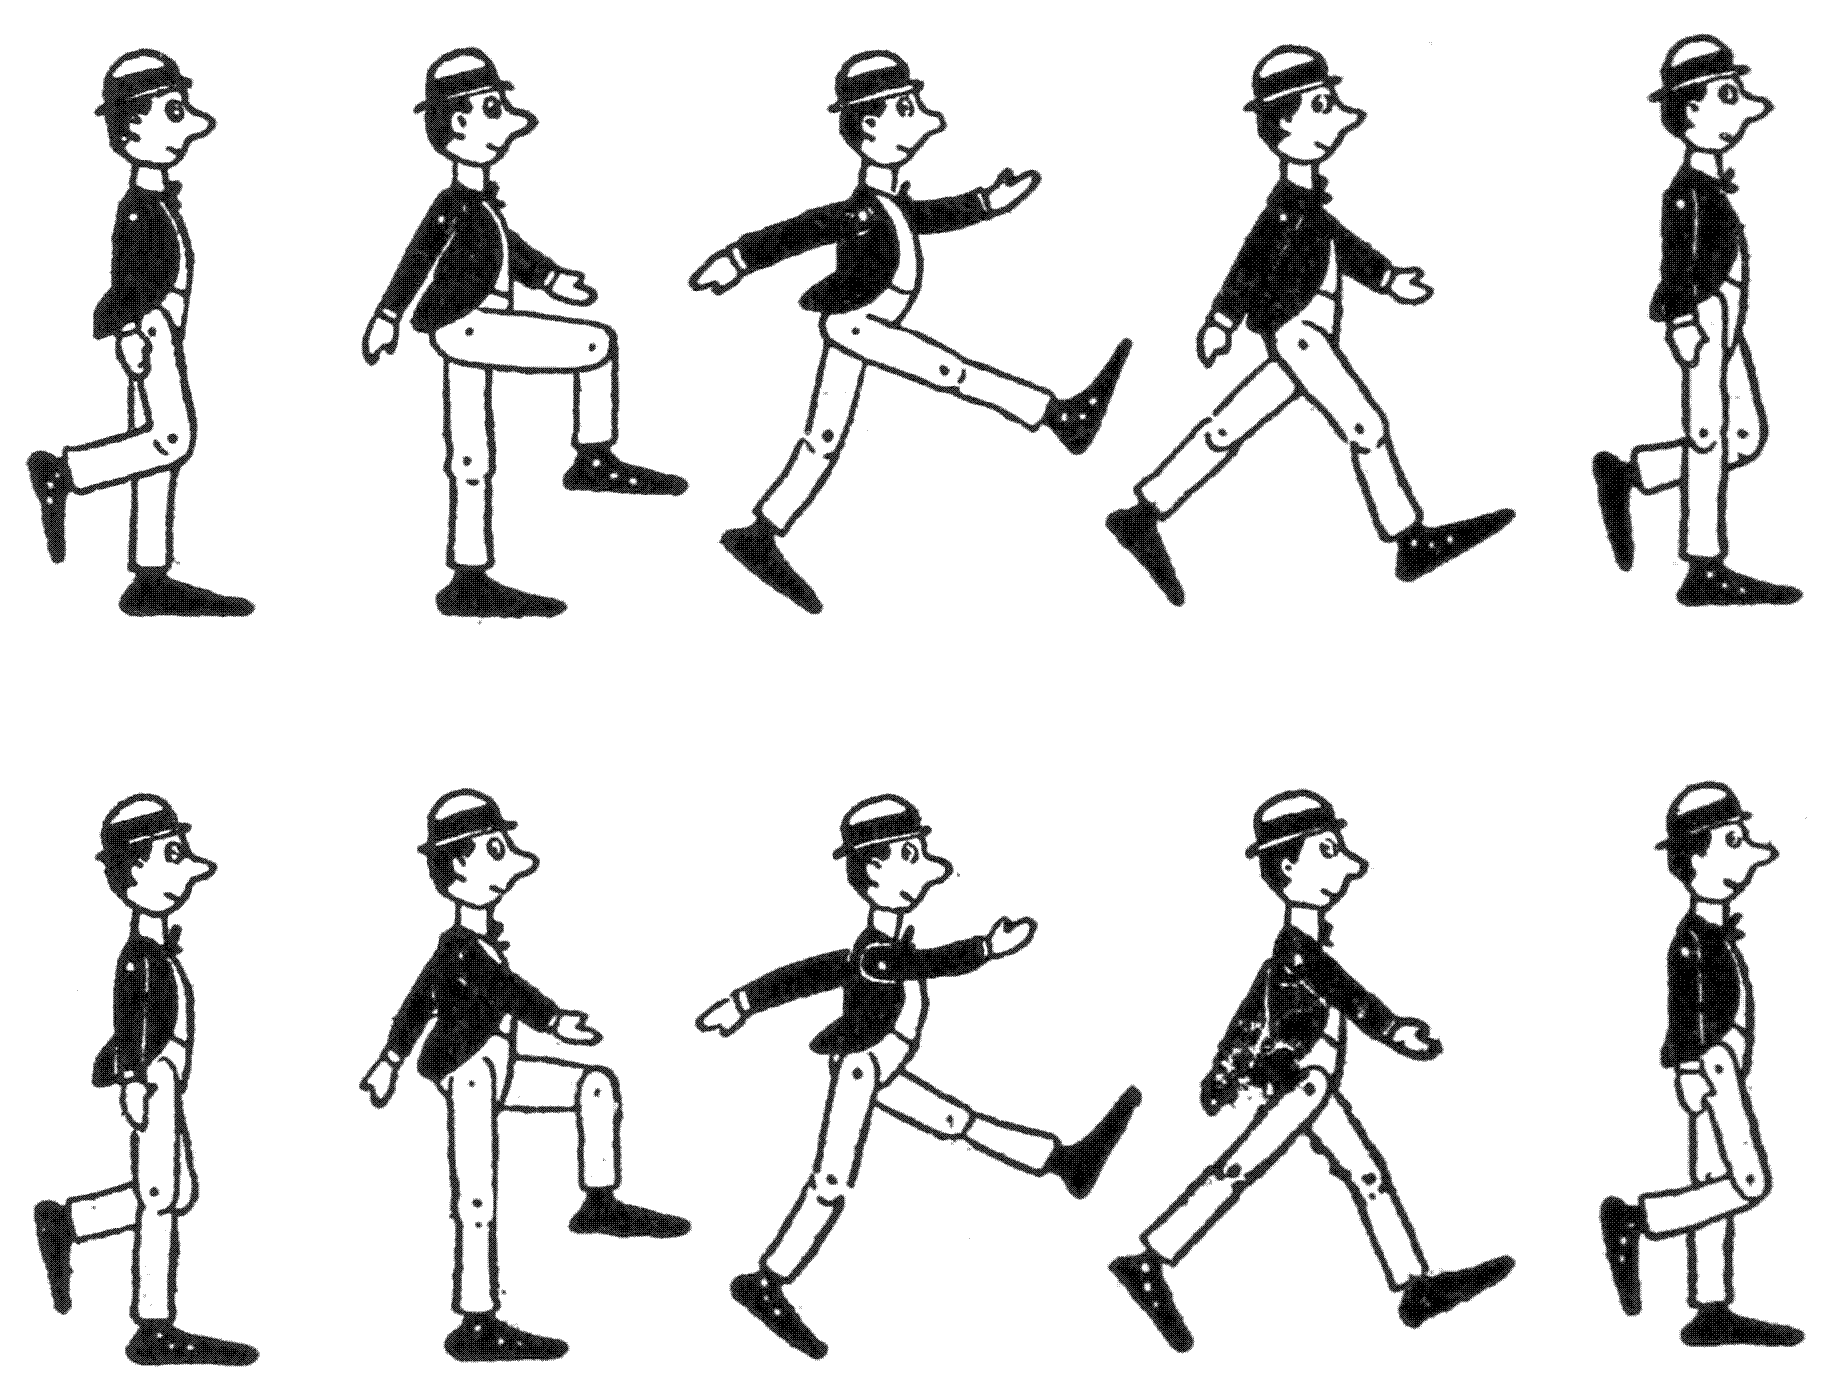
Great for a humorous theme.
The animated drawing artist becomes, through the training of his eye to quick observation and the studying of films of the nature immediately[123] noted above, an expert in depicting the varied and connected attitudes of figures in action. Examples for study on account of the clear-cut definitions of the actions, are the acrobats with their tumbling and the clowns with their antics.[124] Then in the performances of the jugglers and in the pranks of the knock-about comedians, the animator finds much to spur him on to creative imagery. The pictorial artist for graphic or easel work, in any of these cases, intending to make an illustration, is content with some representative position that he can grasp visually, or, which is more likely to be the case, the one that is easiest for him to draw. But the animator must have sharp and quickly observing eyes and be able[125] to comprehend and remember the whole series of phases of a movement.
The animated drawing artist develops their skills by training their eyes for quick observation and studying the films mentioned earlier, becoming an expert at capturing the various and interconnected poses of figures in motion. For clear examples of actions, acrobats with their flips and clowns with their antics are great subjects. The performances of jugglers and the antics of physical comedians provide plenty of inspiration for the animator's creativity. In contrast, a pictorial artist focused on graphic or easel work, when creating an illustration, is satisfied with a single representative pose that is easy to visualize or, more likely, the one that's easiest for them to draw. On the other hand, the animator must have sharp, observant eyes and the ability to understand and remember the entire sequence of movement phases.
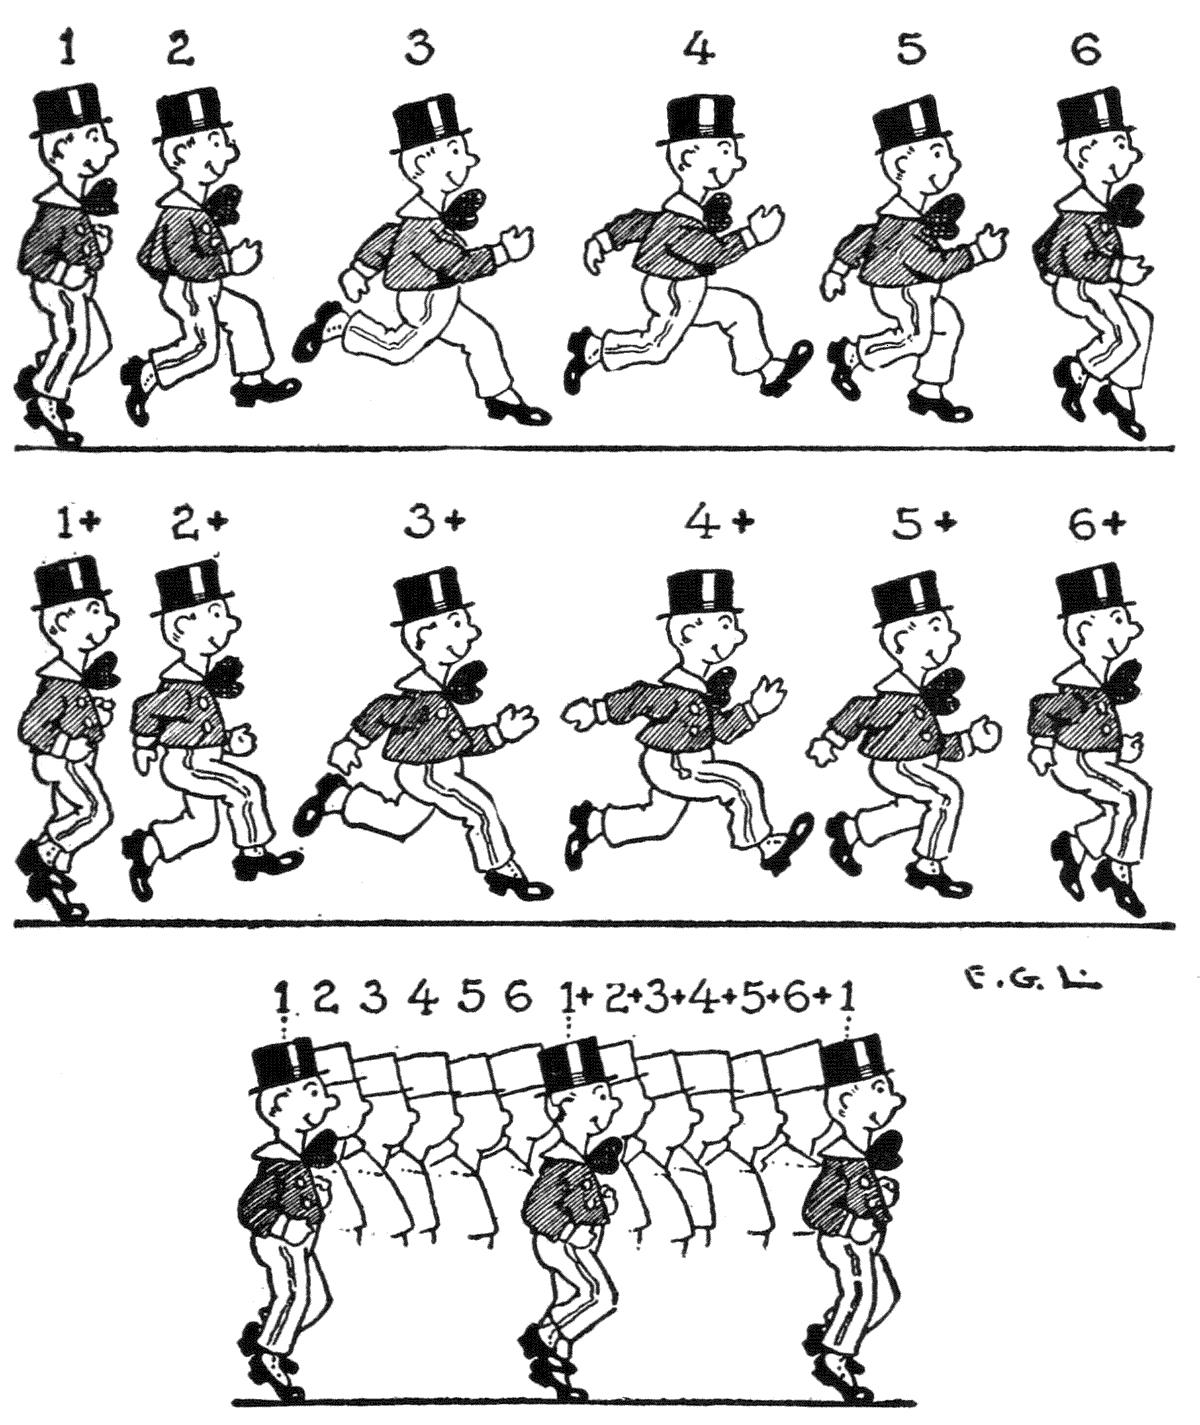
Lower diagram shows how the drawings, on separate sheets of paper, are placed with respect to each other to continue the figure across the scene.
A fancy dancer, especially, is a rich study. To follow the dancer with his supple joints bending[126] so easily and assuming unexpected poses of body and limbs, requires attentive eyes and a lively mental photography. The limbs do not seem to bend merely at the articulations and there seems to be a most unnatural twisting of arms, lower limbs, and trunk. But it is all natural. It simply means that there is co-ordination of movement in all parts of the jointed skeletal frame. This co-ordination—and reciprocal action—follows definite laws of motion, and it is the business of the animator to grasp their signification. It is, in the main, the matter already spoken of above; namely, the alternate action of flexion or a closing, and that of extension or an opening.
A fancy dancer, in particular, is a fascinating study. Watching the dancer with his flexible joints bending so easily and taking unexpected poses of body and limbs requires focused attention and a quick mental snapshot. The limbs don’t just bend at the joints; there seems to be an unusual twisting of arms, legs, and torso. But it’s all natural. It simply means there is coordination of movement throughout the entire skeletal frame. This coordination—and reciprocal action—follows specific laws of motion, and it’s up to the animator to understand their significance. Essentially, it’s about the alternating actions of flexion, or closing, and extension, or opening.
With these characteristics there is also observable in the generality of dancing posturing a tendency of an upper limb to follow a lower limb of the opposite side as in the cases of walking and running.
With these characteristics, there is also a noticeable tendency in most dance movements for the upper limb to follow the lower limb on the opposite side, similar to what happens when walking and running.
Very strongly is this to be noticed in the nimbleness of an eccentric dancer as he cuts bizarre figures and falls into exaggerated poses. For instance, when a lower limb swings in any particular direction, the opposite arm oscillates in the same direction and brings its hand close[127] enough to touch this concurrently swinging lower limb.
This is very noticeable in the agility of an eccentric dancer as he makes odd shapes and strikes dramatic poses. For example, when one leg swings in a specific direction, the opposite arm moves in the same direction, bringing its hand close enough to touch the swinging leg.[127]
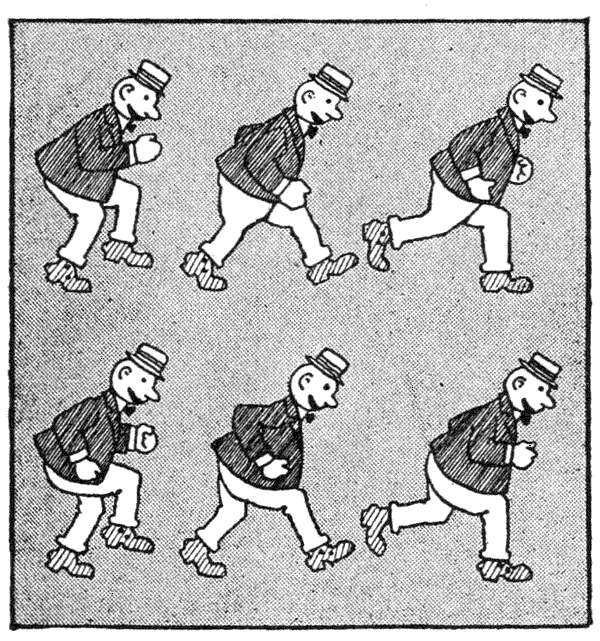
This symbolical phenomenon of the activity of living things—the negative quality of a closing or flexion, and the positive one of an opening or extension—is not a feature entirely confined to human beings and animals, but is a characteristic showing in the mechanics of many non-living things.
This symbolic phenomenon of the activity of living things—the negative aspect of closing or bending, and the positive one of opening or extending—is not something that applies only to humans and animals; it’s a trait that can also be seen in the mechanics of many non-living things.
[128]
[128]
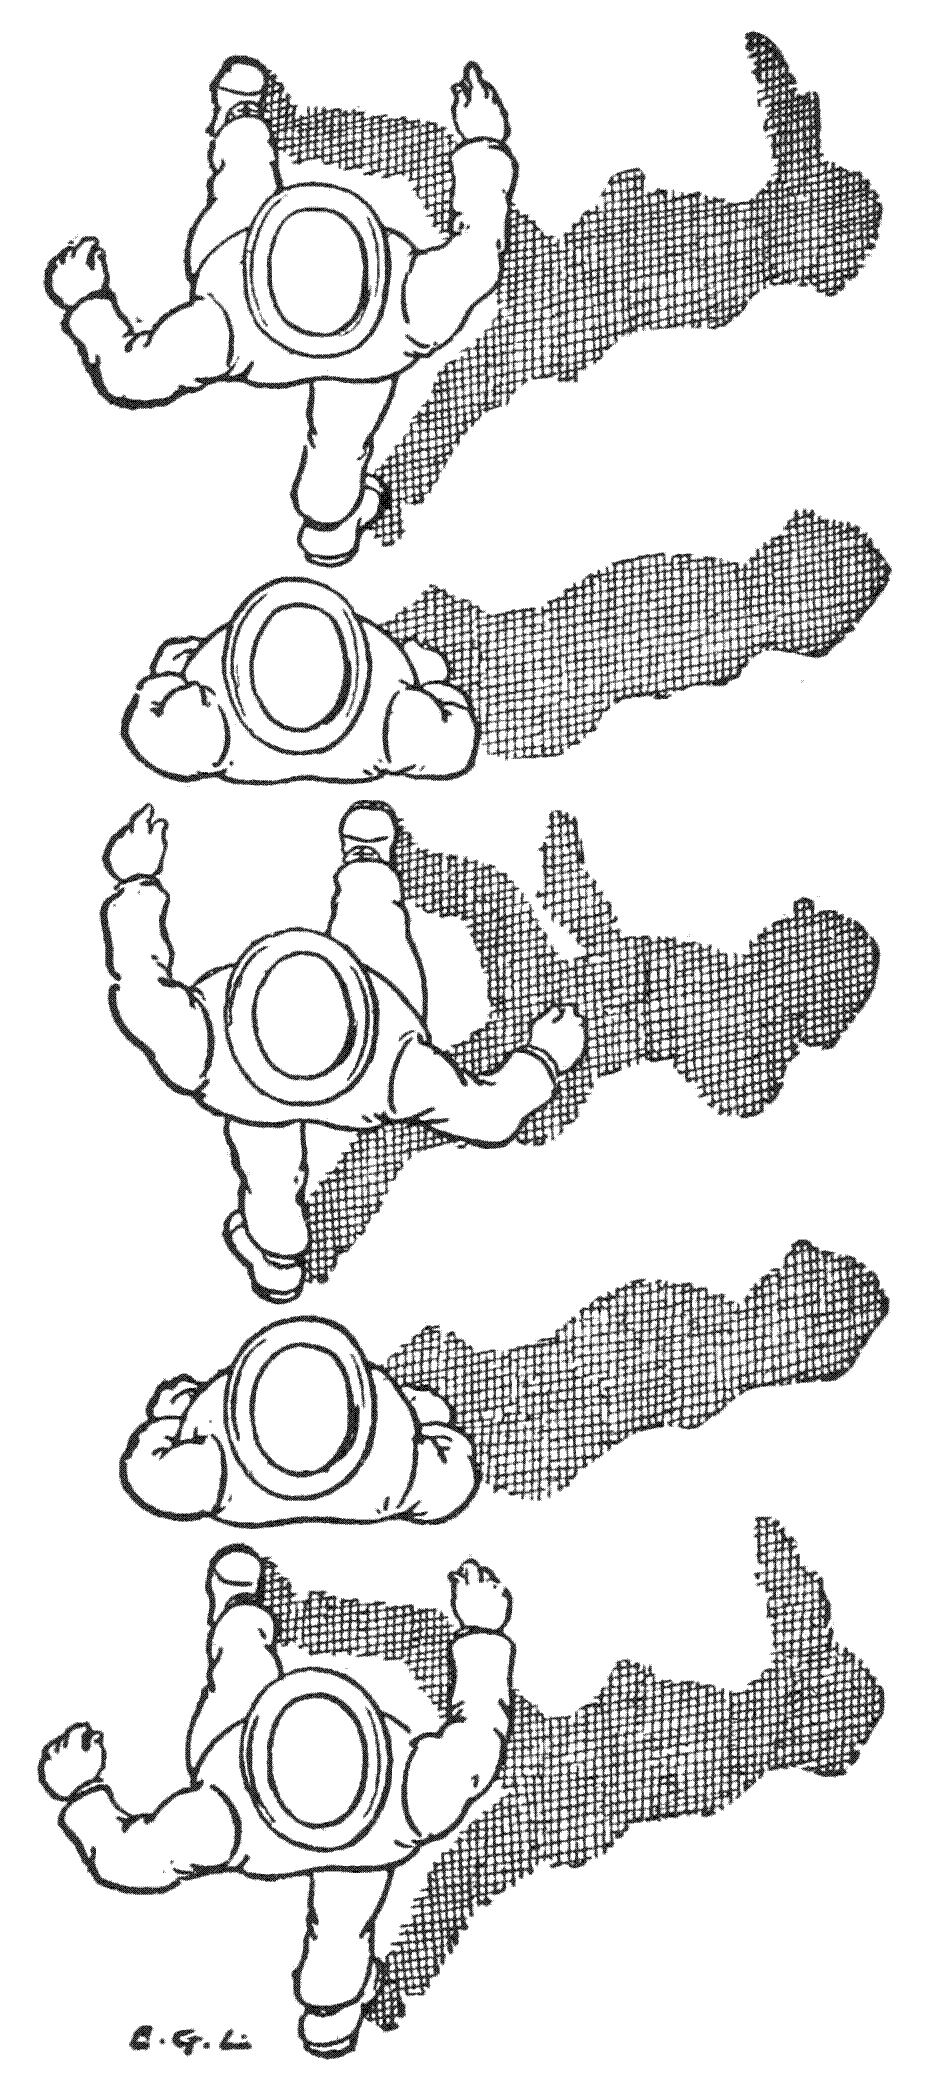
NOTES ON ANIMAL LOCOMOTION
Notes on Animal Movement
CHAPTER VI
NOTES ON ANIMAL LOCOMOTION
In the usual manner of locomotory progress in the four-footed beasts, with but a few exceptions, the actions of the limbs with respect to the reciprocal movement of the two pairs, is the same as that of man. When, for instance, a fore limb moves, corresponding to the human arm, the diagonally opposite hind limb, corresponding to the human lower limb, moves also.
In the typical way that quadrupeds move, with just a few exceptions, the actions of their limbs regarding the coordinated movement of the two pairs are the same as in humans. For example, when a front limb moves, similar to a human arm, the diagonally opposite back limb, which is like a human leg, moves as well.
To explain this matter, again, we shall find it helpful to give a somewhat humorous, but at the same time a very practical example. An artist intends to draw the picture of a man crawling on his hands and knees. Before beginning to work, the artist will visualize the movement if he can, if not, try it by personal experiment. Then he will see that when the right hand, we will say, is lifted to go forward, immediately the left knee leaves the floor and the two limbs—the right arm and the left leg—advance at the same time.
To explain this issue, let's use a somewhat funny but also very practical example. An artist wants to draw a picture of a man crawling on his hands and knees. Before starting, the artist will visualize the movement, or if that's not possible, he might try it out himself. He'll notice that when the right hand lifts to move forward, the left knee rises off the ground at the same time, and the two limbs—the right arm and the left leg—move forward together.
[132]
[132]
On the completion of this advancing action, the hand and the knee touch the floor nearly at the same instant. (Exactly, though, the hand is carried forward more rapidly and anticipates the knee in reaching the floor.) After this action, which has just been described, is concluded, it is the turn of the other arm and leg to go through the same movements. This is the manner, in a general way, that the four-footed animals walk, successively moving together the diagonally opposite limbs.
On completing this forward movement, the hand and knee hit the ground almost at the same time. (Actually, the hand moves forward faster and touches the ground before the knee.) After this action is finished, it's the other arm and leg's turn to perform the same movements. This is generally how four-legged animals walk, alternating their diagonally opposite limbs.
An understanding of this locomotory principle—the reciprocal actions of the two pairs of limbs—in the generality of quadrupeds, will help an artist to animate the various types of animals that he will from time to time wish to put into his cartoons. Naturally, they will be in most cases combined with a comical screen story. Their depiction, then, can be represented in a humorous way and the artist merely needs to show in his drawings the essentials of animal locomotion.
An understanding of this movement principle—the reciprocal actions of the two pairs of limbs—in most quadrupeds will help an artist bring to life the different types of animals they will occasionally want to include in their cartoons. Naturally, these animals will often be part of a funny storyline. Their portrayal can then be depicted humorously, and the artist just needs to capture the essentials of how animals move in their drawings.
Instantaneous photographs of moving animals, especially those of Muybridge, are helpful in studying the movements of the dumb creatures. The mindful examination of such photographs[133] gives hints as to the particular phases of movement adaptable to animation.
Instant photos of moving animals, especially those by Muybridge, are useful for studying the movements of these creatures. Careful analysis of such photos[133] provides insights into the specific phases of movement that can be used in animation.
Besides photographs, an ingenious auxiliary, as a help in study, would be a little cardboard jointed model of an animal. Say it is one to represent a horse, it can be employed by moving the limbs about in their order as they successively make the steps while the artist selects from a series of photographs a cycle of positions for a movement. In making a jointed cut-out model, however, and fastening the limbs by pivoting pins, it is well to remember that the model can be approximate only. Take the fore limbs, for instance. In your model you will probably fasten them to the trunk at some fixed place. That is not the way that they are joined in the bony framework. The joining of the fore limbs is not by a hard articulation as in the arms of man which are joined, through the intermediary collar-bone, to the breast-bone. In the horse and in quadrupeds, generally, the joining to the main bulk of the body is by soft tissues. That is, by layers and bands of muscle.
Besides photographs, a clever aid for studying would be a small cardboard jointed model of an animal. For example, if it's a horse, you can move the limbs in order as they take steps while the artist picks a series of photos that show different positions for a movement. However, when creating a jointed cut-out model and attaching the limbs with pivot pins, it's important to keep in mind that the model can only be an approximation. Take the front limbs, for instance. In your model, you will likely attach them to the body at a fixed point. That’s not how they are connected in the bony structure. The connection of the front limbs isn’t through a hard joint like in human arms, which are linked to the breastbone by the collarbone. In horses and quadrupeds in general, the connection to the main part of the body is through soft tissues, specifically layers and bands of muscle.
[134]
[134]

The horse in the first series moves from A B to C D. The drawings in the second series, on the next page, with plus marks are the same in silhouette as the correspondingly numbered ones of the first series.
The horse in the first series moves from A B to C D. The drawings in the second series, on the next page, with plus marks are the same in shape as the corresponding numbered ones from the first series.
[135]
[135]
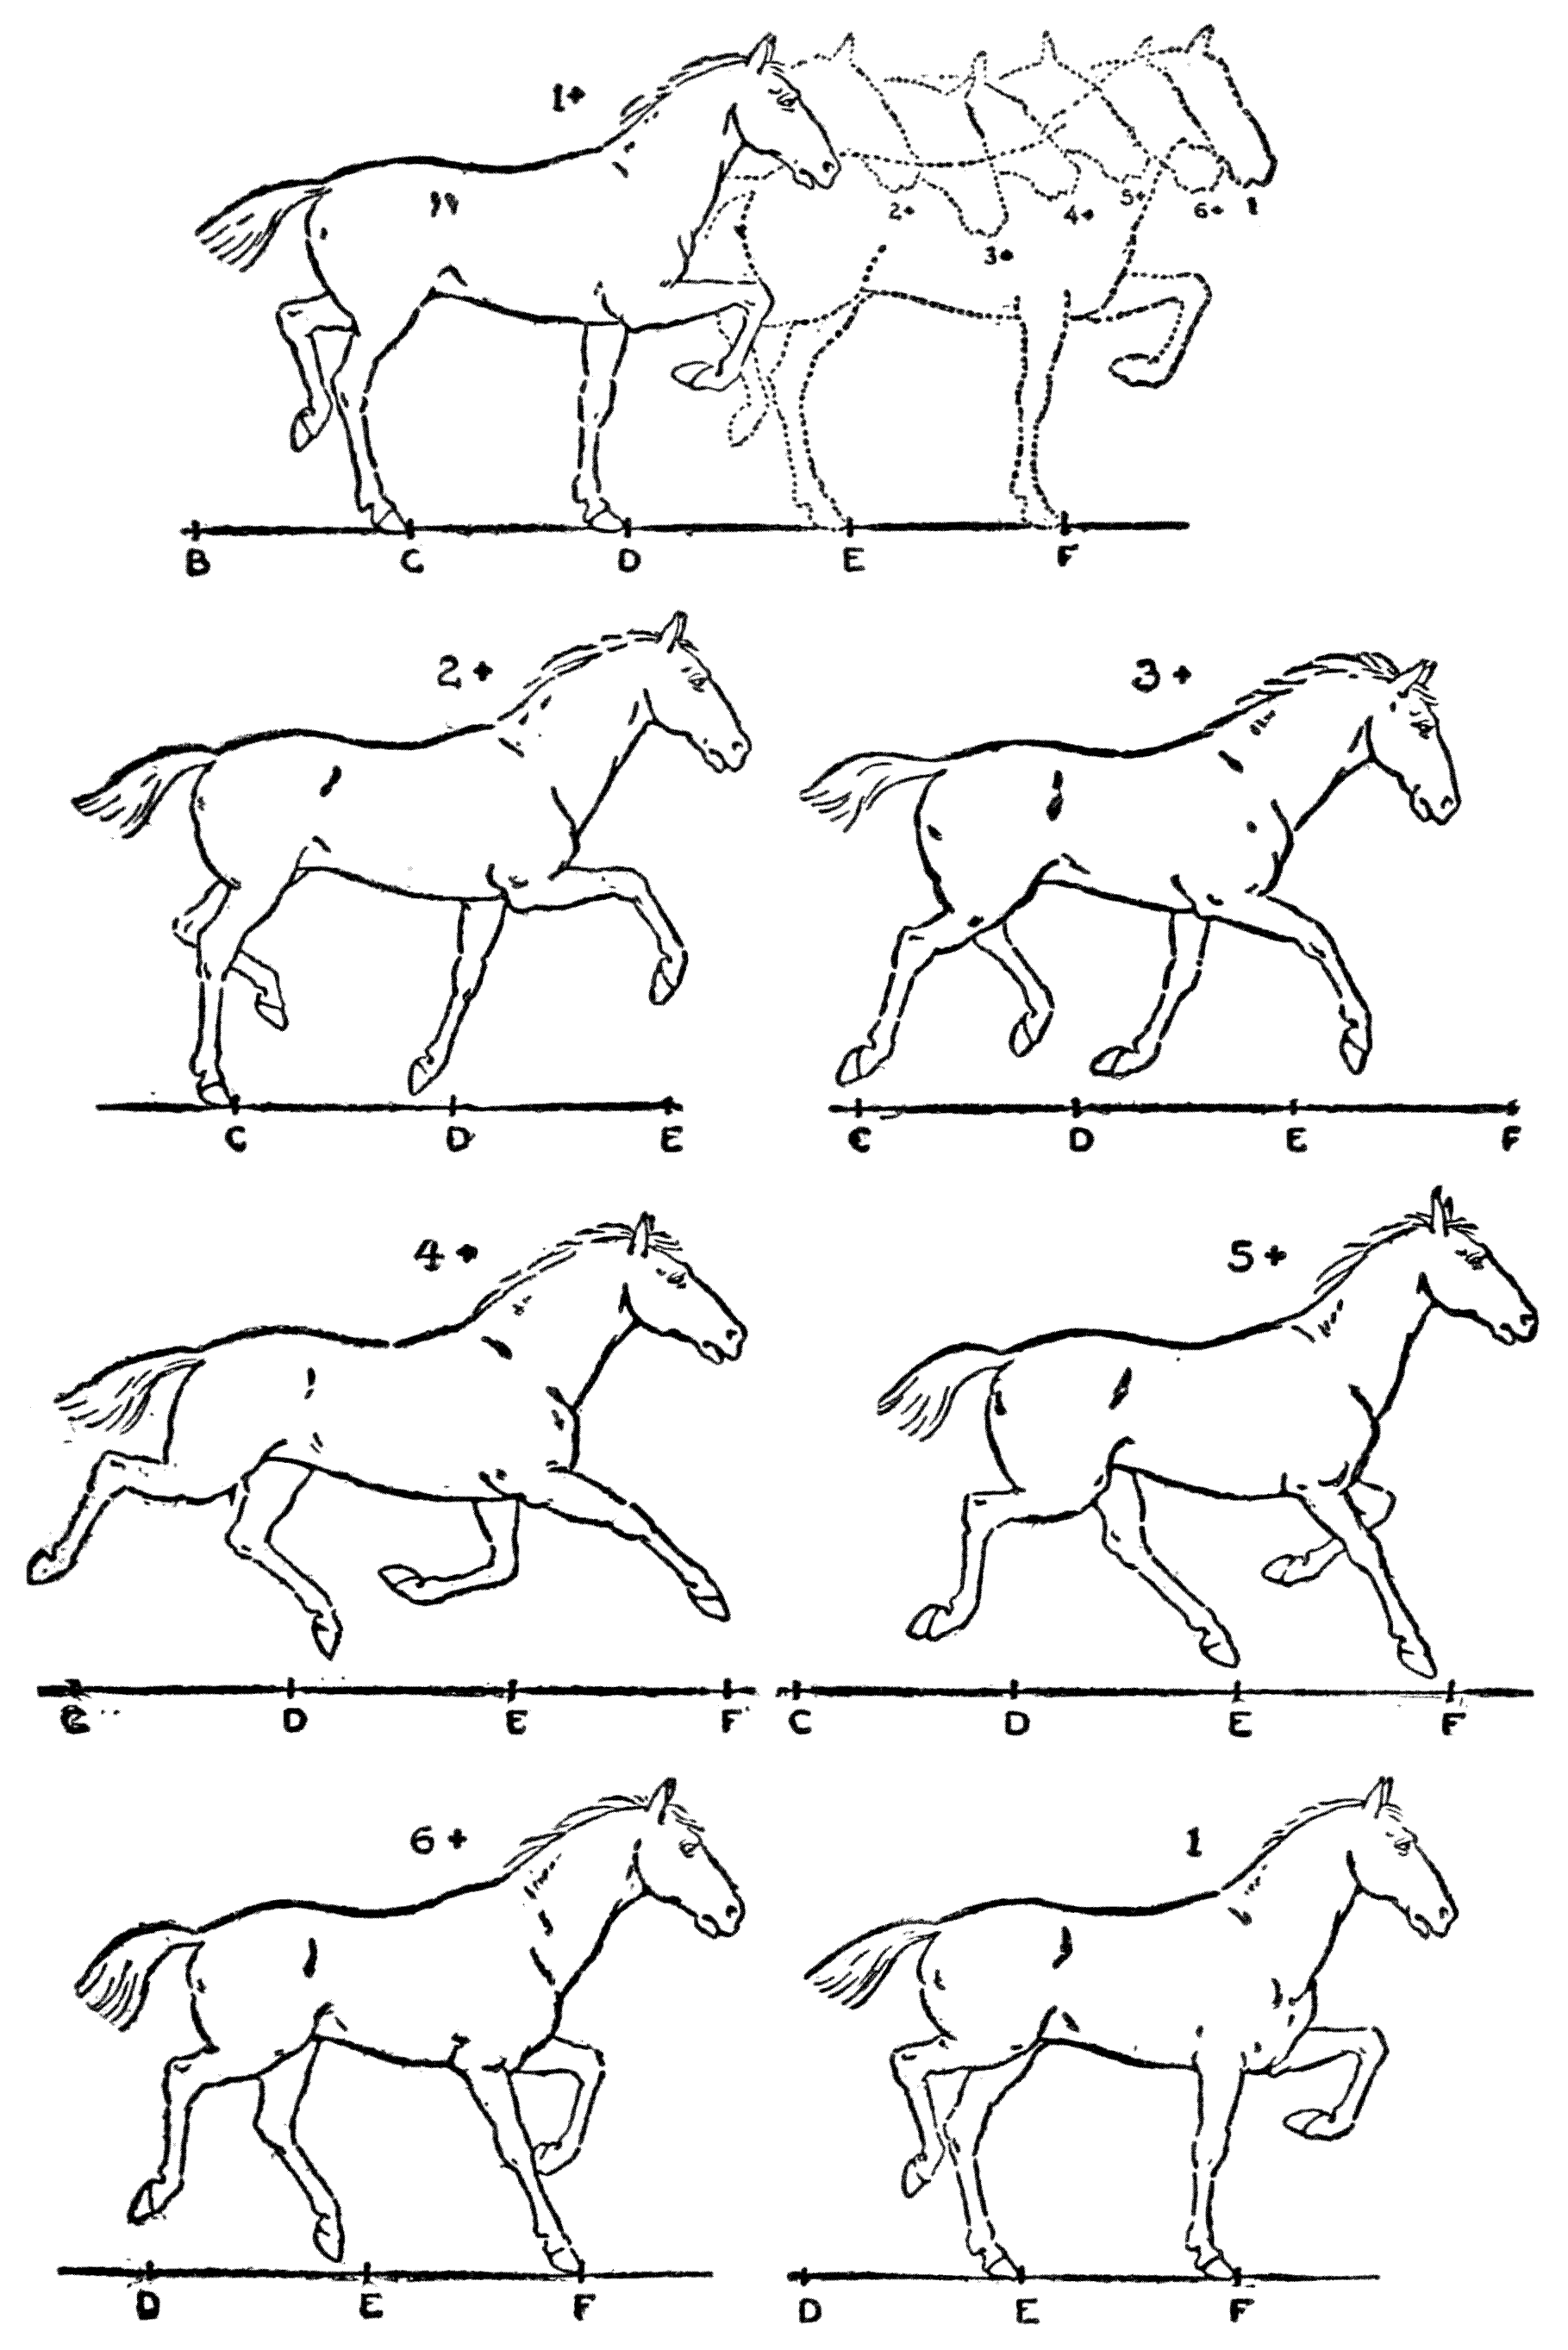
In the second series the horse moves from C D to E F, where he takes the same attitude as that of number 1 of the first series.
In the second series, the horse moves from C D to E F, where he assumes the same posture as number 1 from the first series.
[136]
[136]
In studying the actions of animals it will be observed, especially in the antelope and deer kind, that in leaping they land on their forefeet. Any hard articulations of the fore limbs with the rest of the skeleton could not submit to the shock of these landings. When they land, it is the soft yielding and elastic muscular parts of the shoulders and adjacent regions that absorb the force of the jolts.
In studying the behavior of animals, especially antelopes and deer, we notice that when they leap, they land on their front legs. If the joints in their front limbs were rigidly connected to the rest of their skeleton, they couldn't handle the impact of these landings. Instead, it's the soft, flexible, and elastic muscles in their shoulders and nearby areas that absorb the shock from the falls.
The characteristic of life activity, flexion and extension, is exemplified clearly in the actions of an animal’s hind limbs as they double up in the preparation for a leap; and then suddenly spread out during the first part of the leap.
The key feature of living activity, bending and straightening, is clearly demonstrated in how an animal's hind legs fold up as they get ready to jump; then they quickly spread out during the initial phase of the jump.
Taking it as a whole, in fleet-footed animals, the function of the hind limbs is to furnish the forward propelling force while that of the fore limbs is to land on the ground at an advanced position. This observation, of course, applies to certain rapid methods of progression, and it will do as a general statement only, as it has been shown by photographs that the fore limbs have a share in giving an impulse in locomotion. For example, photographs of the horse in action show the quick springing action of the fetlock and the pastern joints as they bend in the hoof’s impact, and its subsequent extension when the foot leaves the ground.
Overall, in fast animals, the hind limbs are used to provide the forward driving force, while the fore limbs help to touch down ahead. This observation generally applies to certain fast modes of movement and is only a broad statement, as photos have shown that the fore limbs also contribute to the push in movement. For instance, photos of a horse in motion capture the rapid springing action of the fetlock and pastern joints as they bend upon the hoof's impact and then extend when the foot lifts off the ground.
[137]
[137]
In a rapid walk of a horse a phase of movement that is apprehended by the eye is the lifting of a forefoot and then the immediate impact of the hind limb of the same side as it nearly falls into the impression left by the fore foot. There are speeds in which the footprints coincide. In a more rapid pace than a walk, the imprint of the hind foot is farther forward than that of the forefoot. As the speed increases the stride lengthens and the footprints are much farther in advance.
In a fast walk of a horse, one noticeable aspect of movement is the lifting of a front foot followed quickly by the back leg on the same side, which almost lands in the spot made by the front foot. There are speeds where the footprints line up perfectly. At a pace faster than a walk, the back foot leaves its mark farther ahead than the front foot. As the speed picks up, the length of the stride increases, and the footprints are much farther apart.
In a certain type of humorous animation—the panorama—to be explained in a succeeding chapter, the artist is quite satisfied with his animation of a quadruped if a lively bewildering effect of agitated limbs is produced on the screen. This bewildering blur has after all a resemblance to that which the eye sees in rapidly running animals; namely, a confused disturbance of limbs. This effect on the screen always causes laughter and the artist considers that as a proof of the success of his work.
In a specific kind of funny animation—the panorama—explained in a later chapter, the artist is happy with their animation of an animal on four legs if it creates a lively, confusing effect of flailing limbs on the screen. This disorienting blur looks similar to what we see when fast-running animals move; that is, a chaotic flurry of limbs. This effect on screen always makes people laugh, and the artist views that as proof that their work is successful.
To produce this effect, the animator selects from his studies three or five consecutive positions of a gallop, or trot, that will animate well. This means, specifically, that any particular drawing[138] should, with the next in order, give an appearance of movement when they are synthesized. The drawings are made in a cycle so that when used continuously in their order they will give the illusion desired.
To create this effect, the animator chooses three to five consecutive frames of a gallop or trot that will animate smoothly. This means that each specific drawing[138] should, when placed next to the following one, create a sense of movement when combined. The drawings are organized in a cycle so that when played in sequence, they produce the intended illusion.
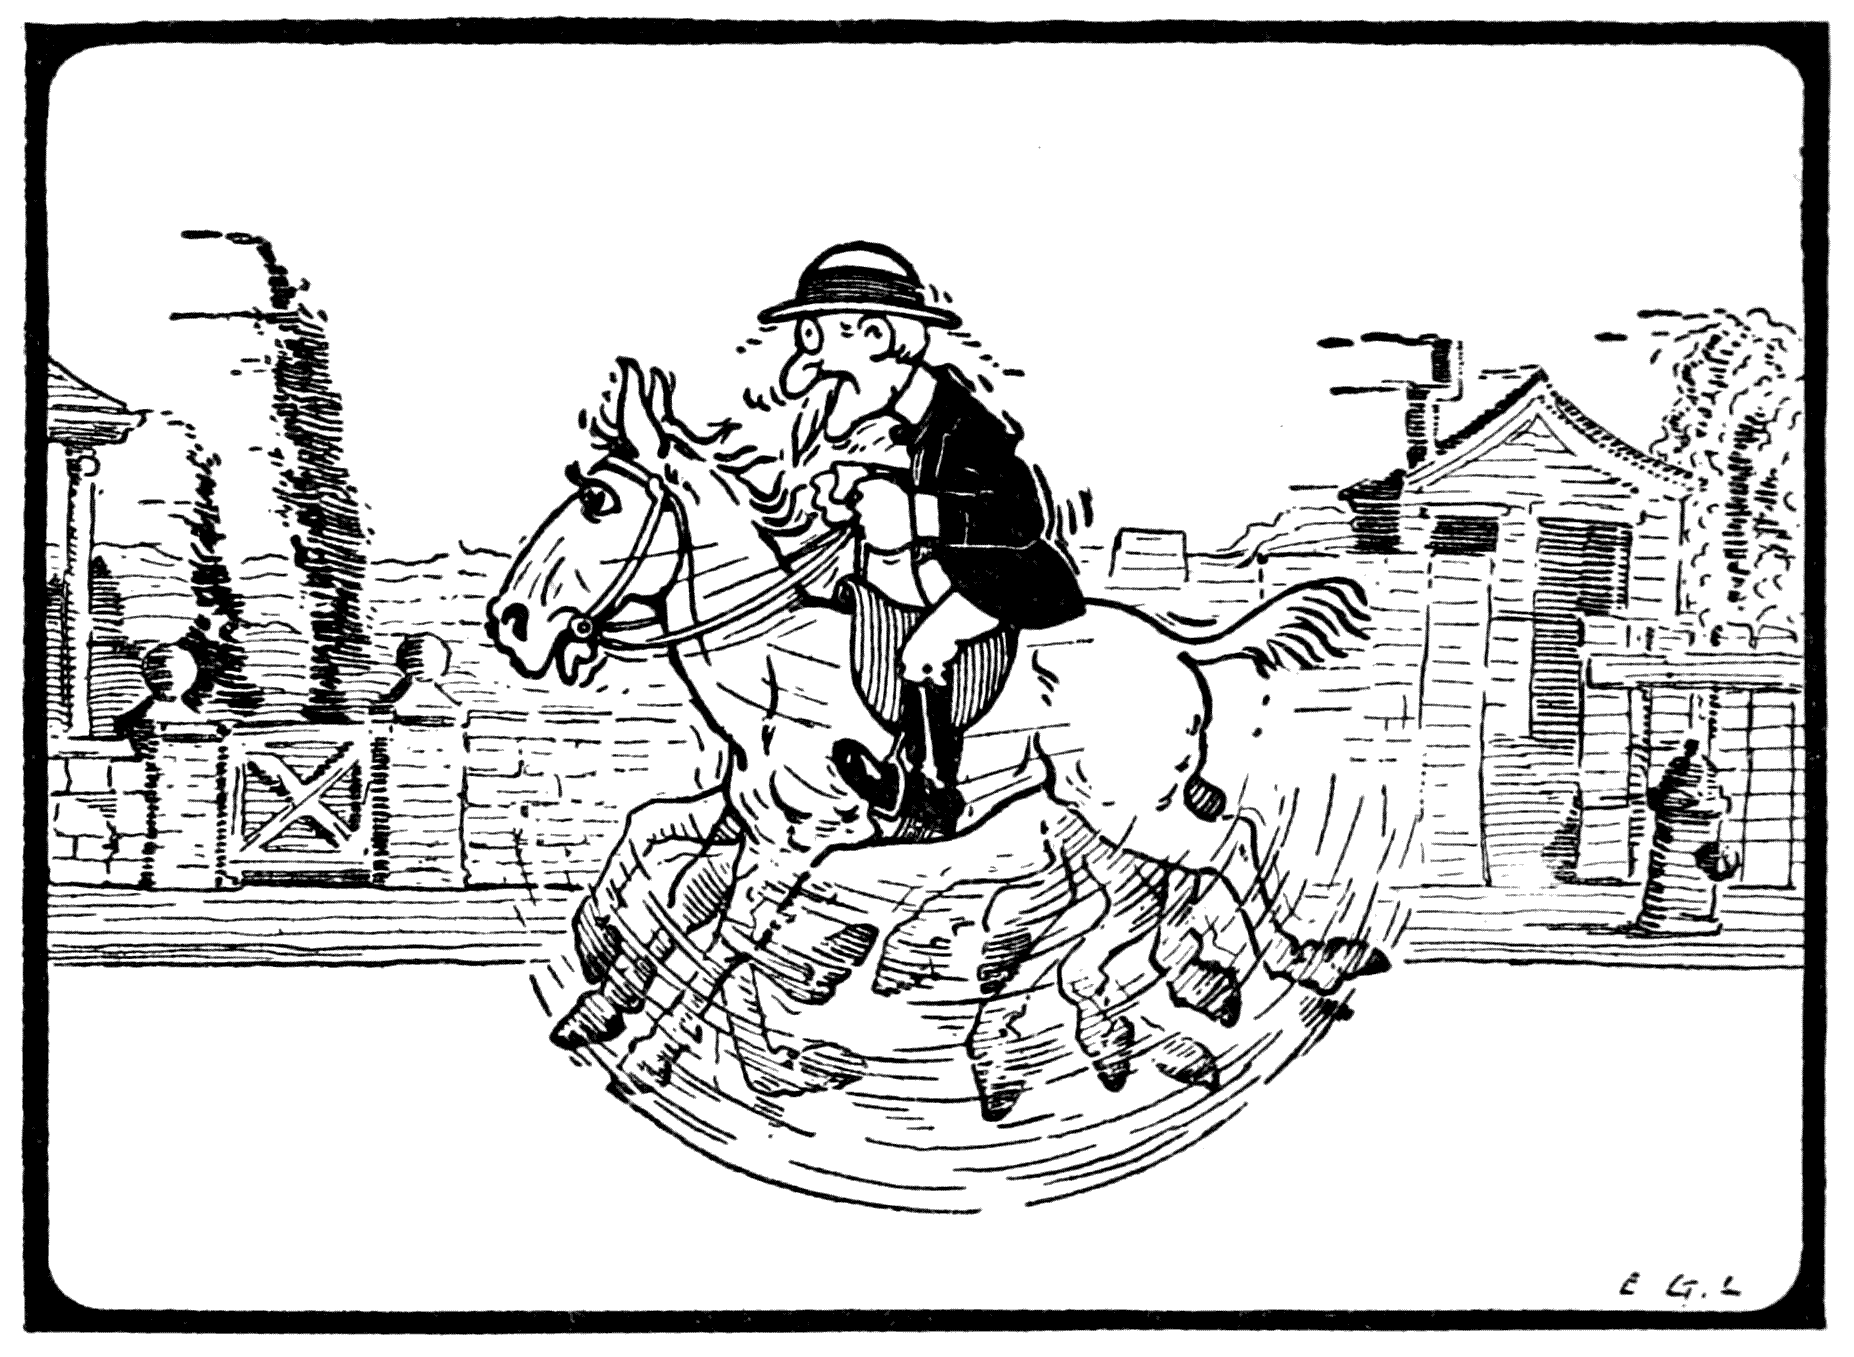
In a panorama it is not necessary to trouble about a matter that in other forms of screen representation of locomotion are highly important. This is to have the feet register, by which is meant that in any several succeeding drawings[139] where a foot is represented as touching, bearing down, and leaving the ground, it should do all this on a footprint that coincides in all of the series. Tracing over the illuminated glass, while making the drawings, is the only way to get footprints accurately placed.
In a panorama, there's no need to worry about a detail that's really important in other forms of motion depiction. This detail involves tracking the feet, meaning that in each subsequent drawing[139] where a foot is shown touching, pressing down, and lifting off the ground, it should all align with a consistent footprint throughout the series. The only way to accurately position the footprints while making the drawings is by tracing over the illuminated glass.
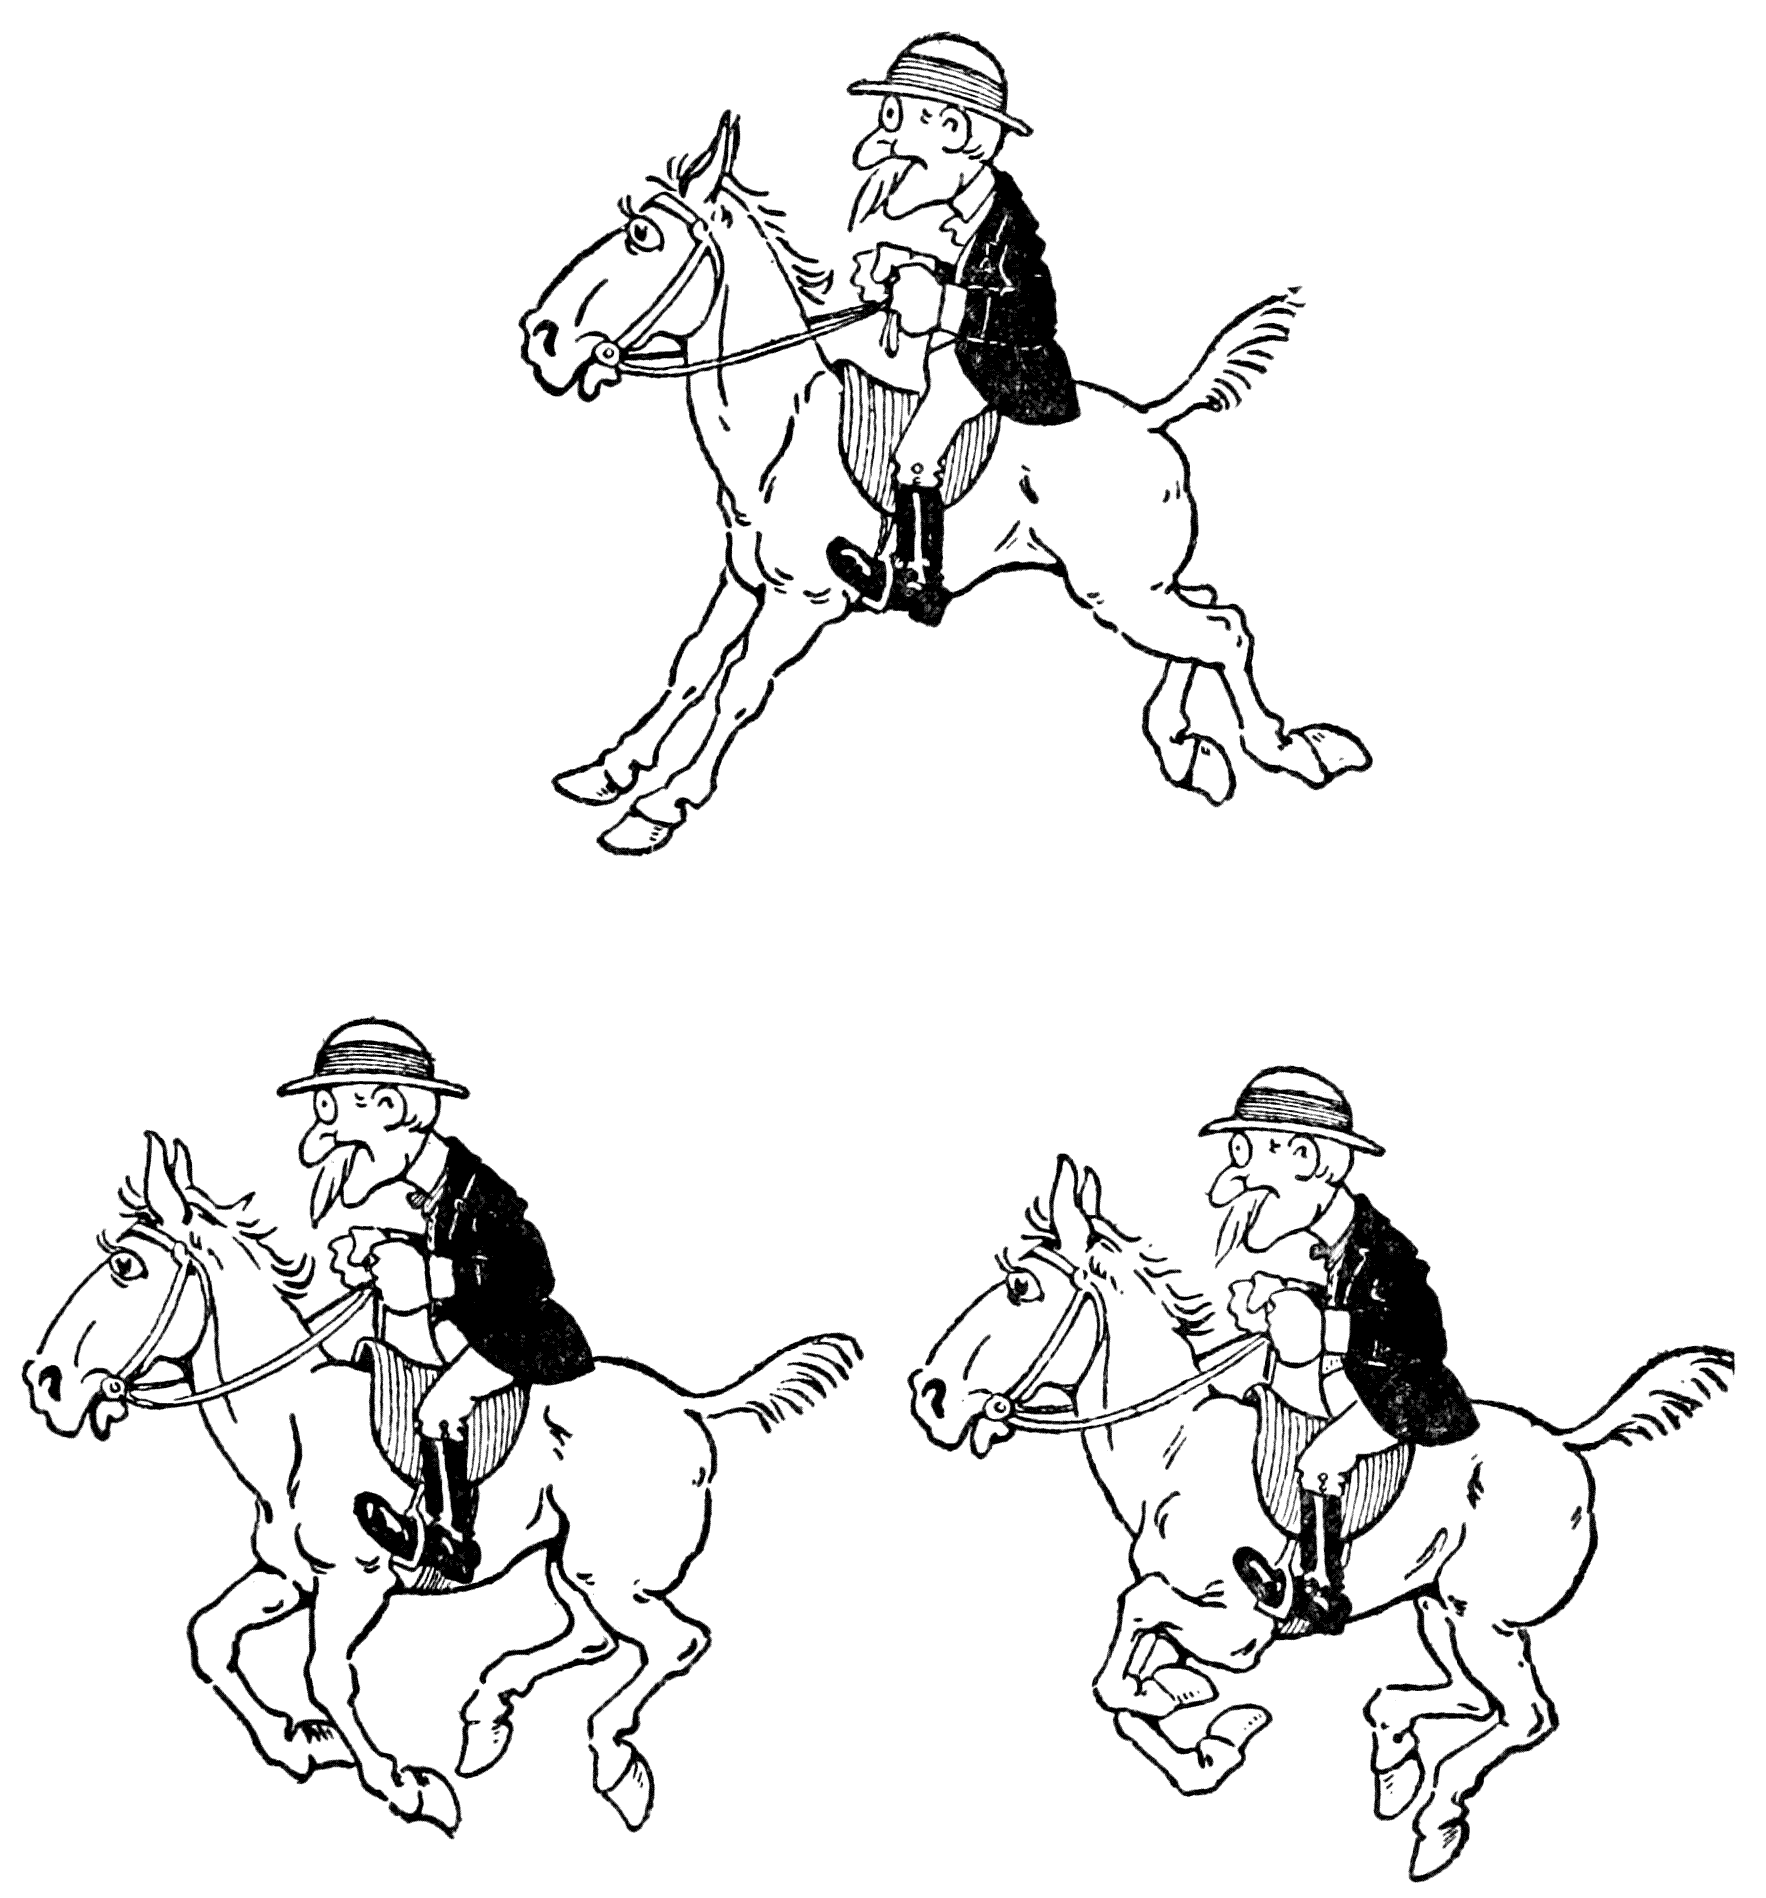
Three phases of the action for panorama effects.
Three stages of the action for panoramic effects.
The droll-looking giraffe, with his awkwardly[140] set limbs, has a different sort of movement, in some of his paces, from that remarked as natural to quadrupeds. In the giraffe, the two limbs of the same side move at the same time and in the same direction. The camel is also noted as going this way, and the elephant has a pace that seems to be a combination of the amble and the typical four-footed way of walking.
The amusing-looking giraffe, with its awkwardly[140] positioned limbs, has a unique style of movement that differs from what we usually see in other four-legged animals. In the giraffe, the two legs on the same side move together and in the same direction. The camel also moves this way, and the elephant has a gait that appears to blend the amble with the usual four-footed method of walking.
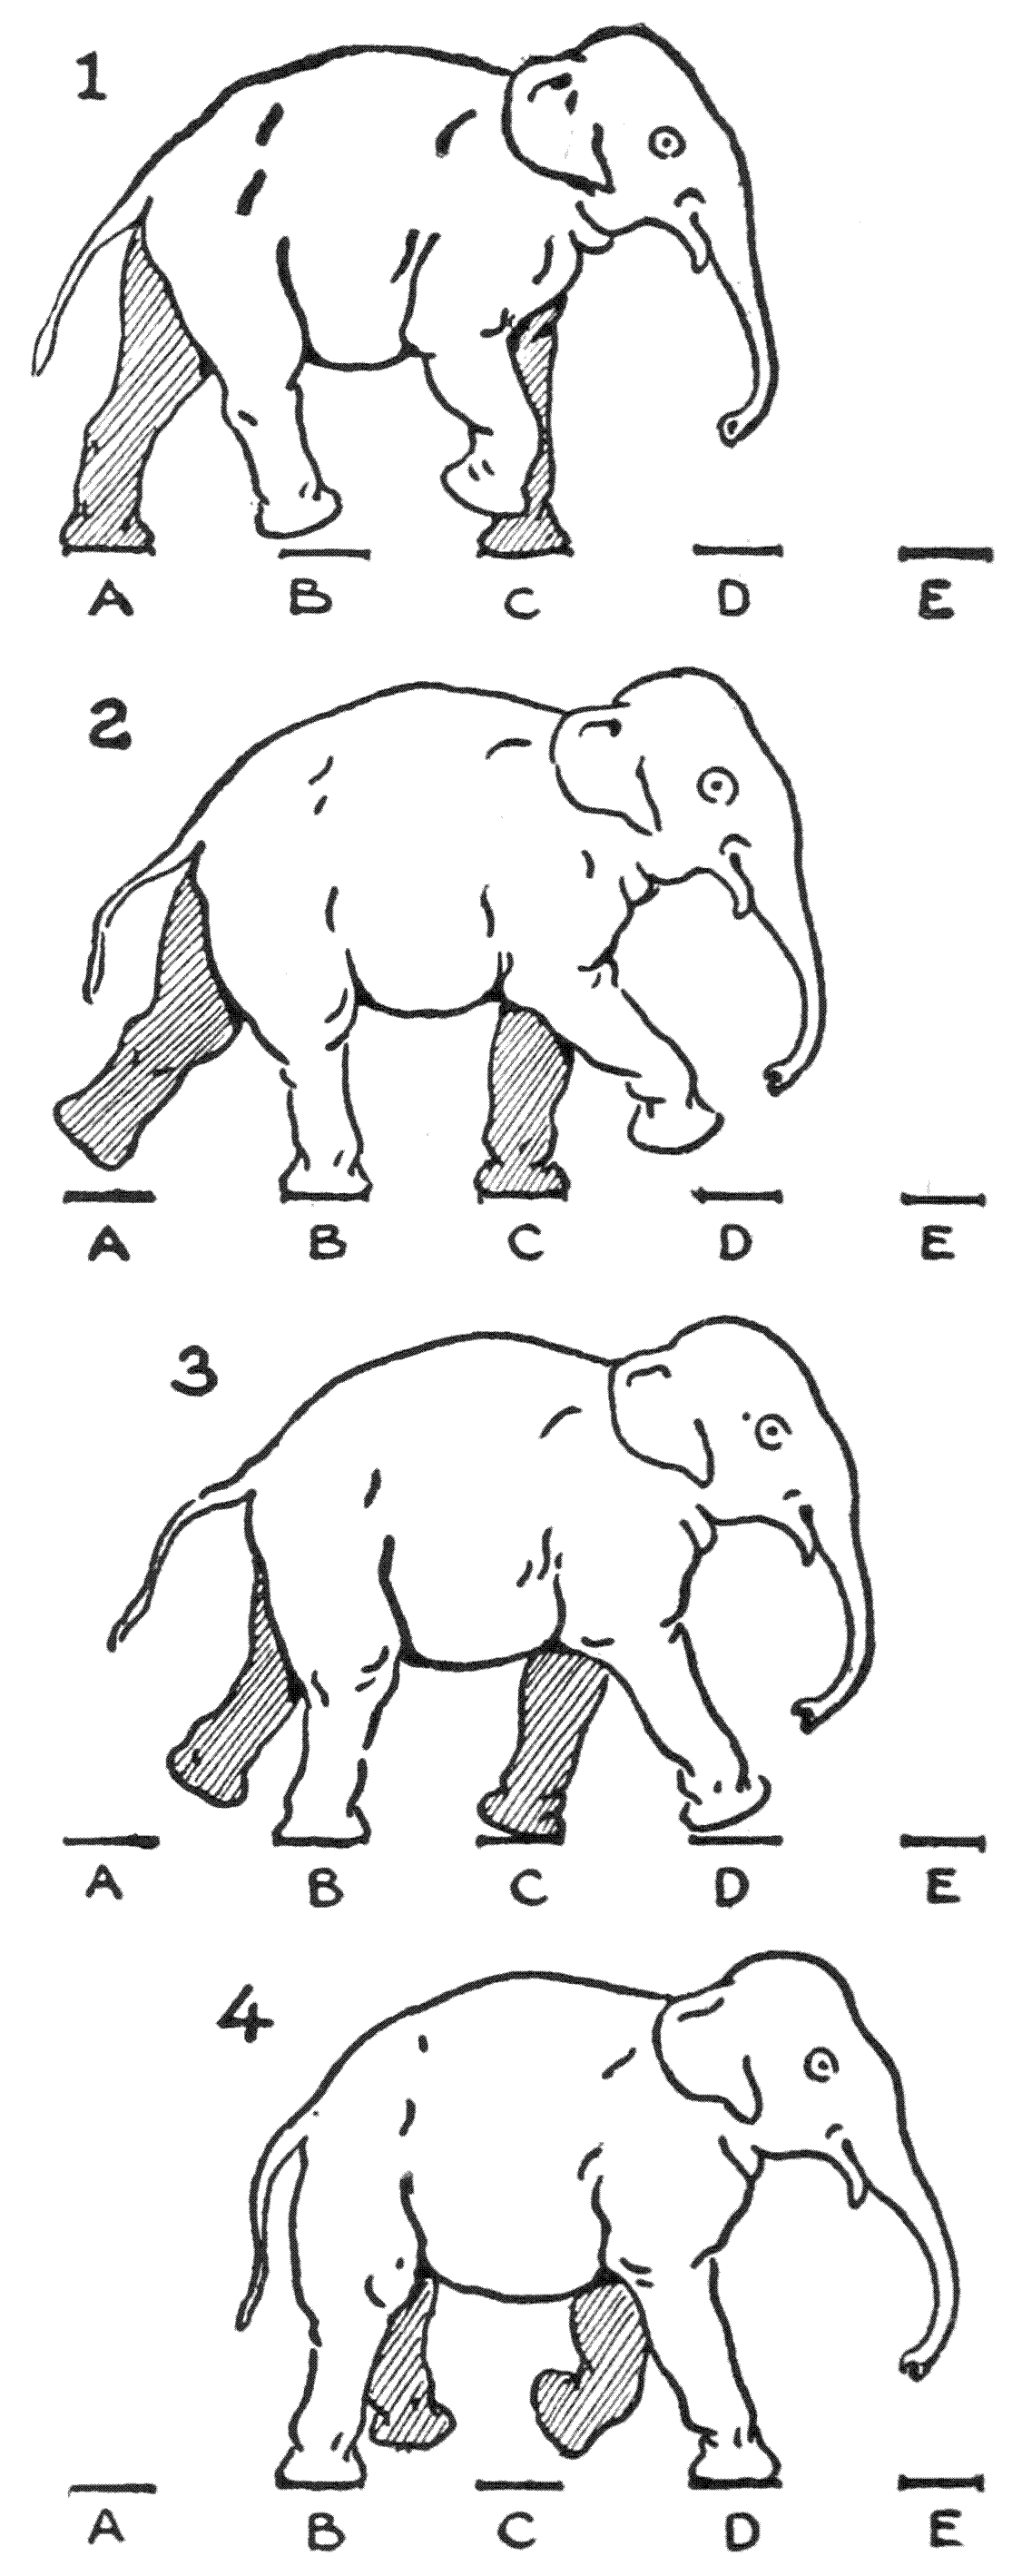
Now and then the animator has as one of his characters[141] a walking bird; an ungainly ostrich is a good example, or a droll duck, perhaps. Here he will have plenty of scope in applying his skill as a humorous draftsman. A nodding of the head and a bobbing of the body from side to side in the duck, and in the case of the ostrich a wiggling of the neck, are appropriate adjuncts to such animation.
Now and then, the animator features a walking bird as one of his characters[141]. An awkward ostrich serves as a great example, or maybe a funny duck. Here, he has plenty of opportunities to showcase his talent as a humorous artist. The duck's head nodding and its body bobbing from side to side, along with the ostrich’s neck wiggling, are perfect additions to such animation.
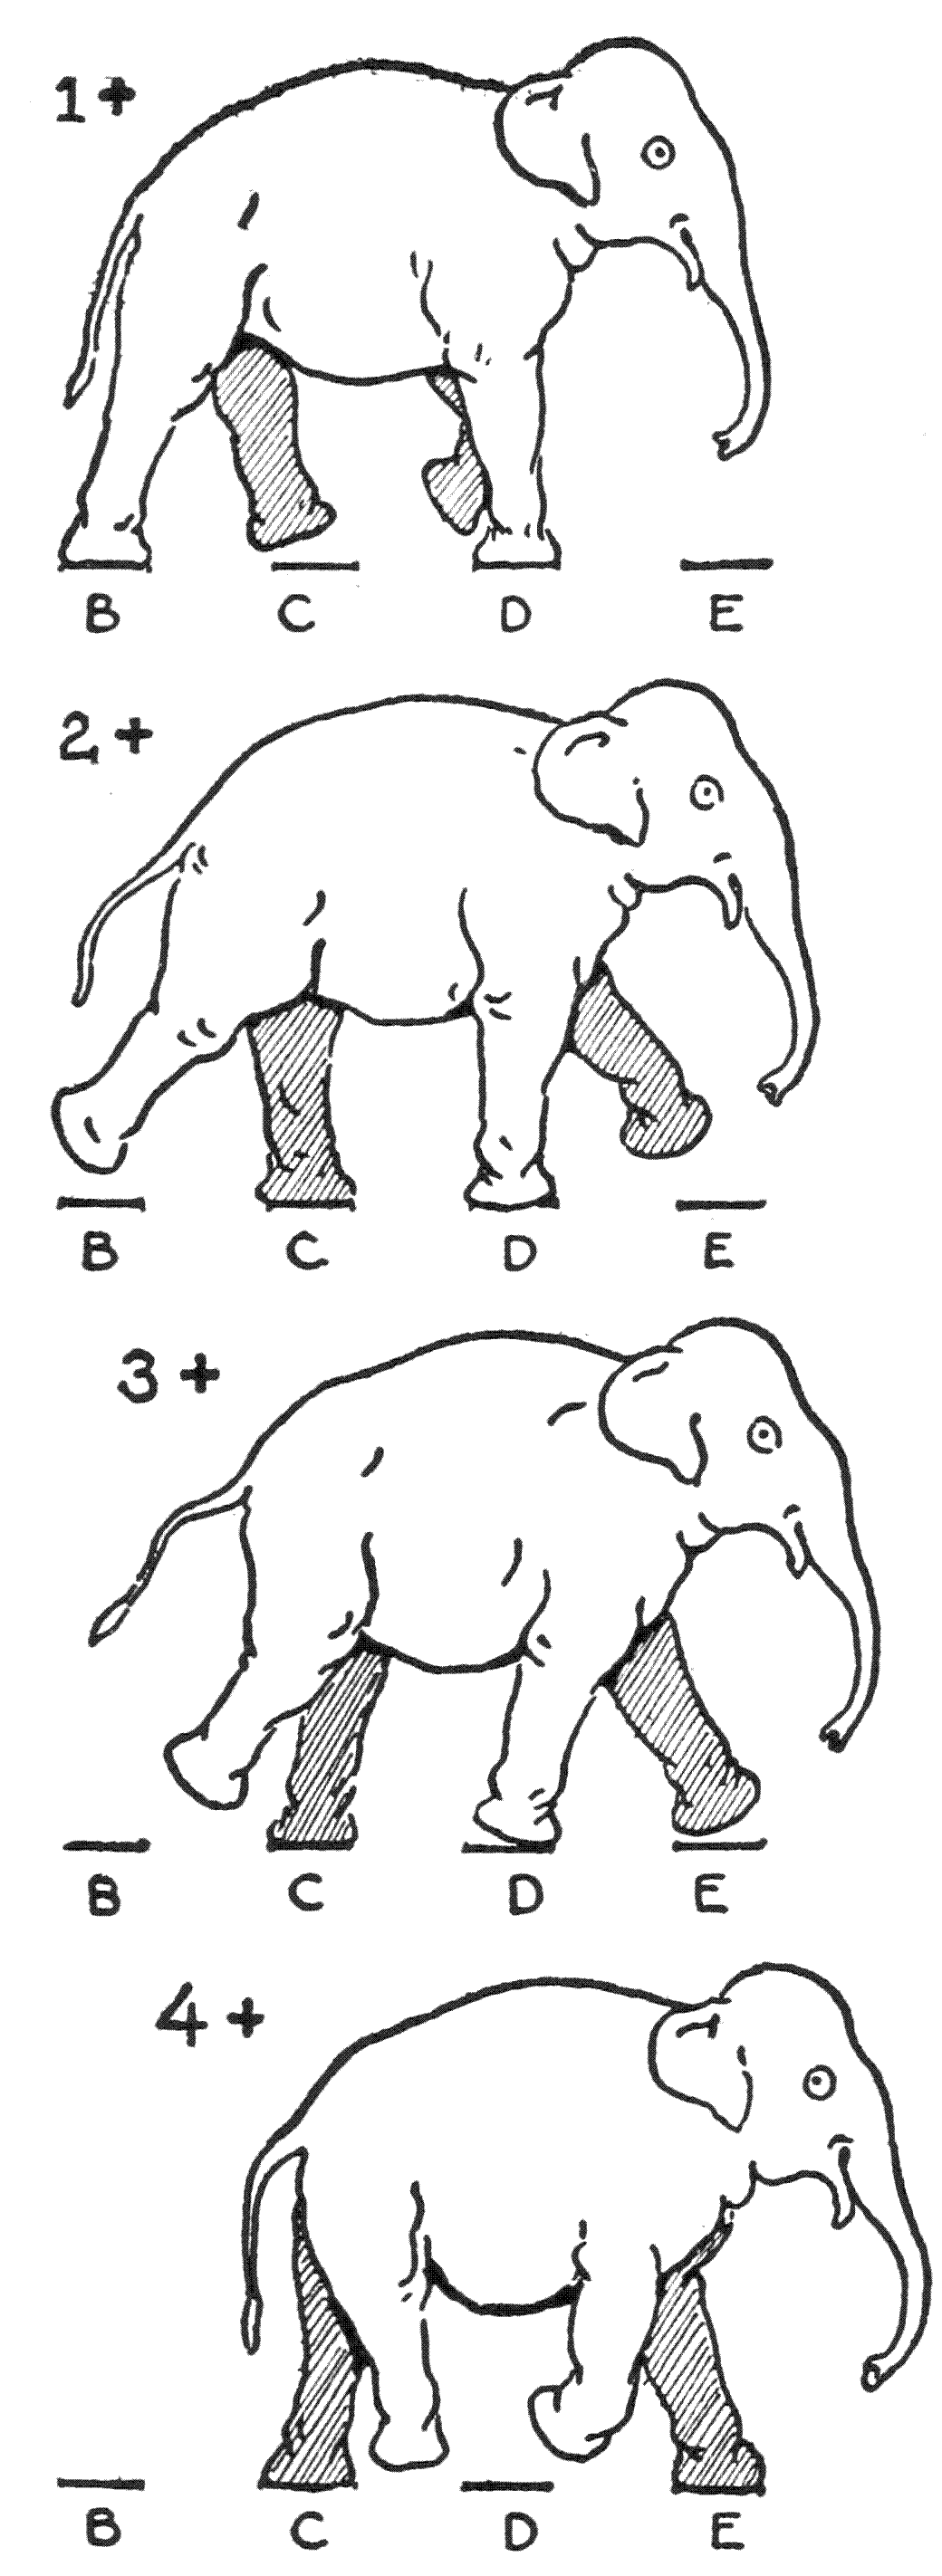
In the walking movement of a bird the method of getting the different phases will be the same as that of planning a walk for the human figure. Particularly, too, must[142] the artist observe in the bird’s walk, the middle phases in which one leg crosses the vertical of the body to go forward for the implanting of its foot upon the ground.
In the way a bird moves while walking, the approach to capturing the different stages is similar to planning a walk for a human figure. Additionally, the artist should pay close attention to the bird's walk, especially the moments when one leg crosses the body's vertical line to step forward and place its foot on the ground. [142]
With respect to the study of wing movement in flying birds, it is interesting to note that the Japanese artist apprehended the various positions that wings took in flying before the fact was demonstrated by photography. The Occidental artist, before the days of the instantaneous snap-shot camera, had but one or two stereotyped positions for picturing flying birds. Generally one of these positions had the wings pointing upward, and another with them outspread, more or less, horizontally. But the Japanese artist anticipated the snap-shot picture; he often had his flying birds with the wings drawn below the level of the bird’s body and pointing downward.
With regard to the study of wing movement in flying birds, it's interesting to point out that the Japanese artist understood the different positions wings could take while flying before it was captured by photography. The Western artist, before the era of the instant snapshot camera, had only one or two standard postures for depicting flying birds. Typically, one of these showed the wings pointing upward, and another had them spread out, more or less, horizontally. However, the Japanese artist anticipated the snapshot; he often depicted flying birds with their wings pulled below the level of the bird's body and pointing downward.
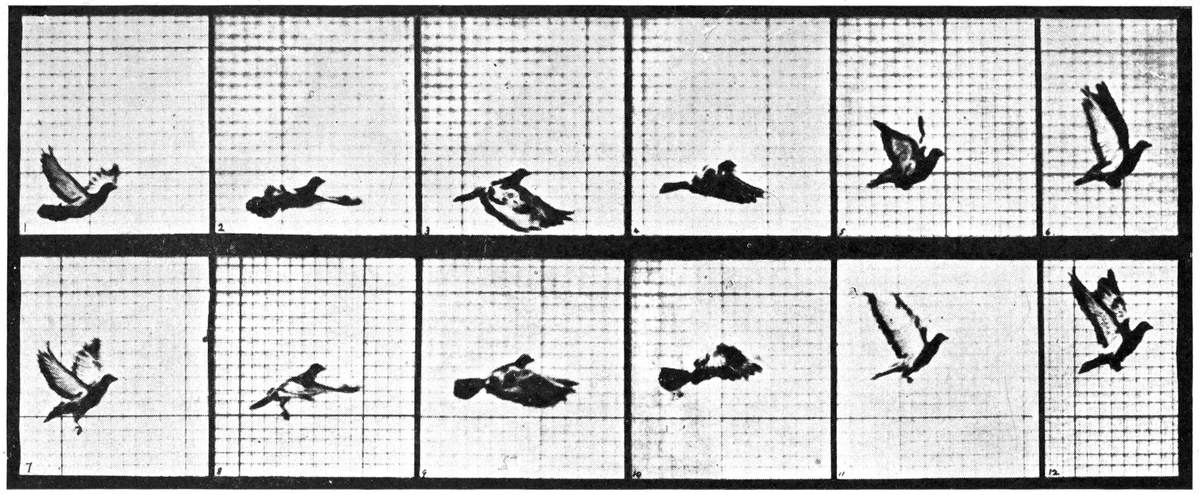
Note the positions with the wings pointing downward. These are phases of wing movement anticipated by the Japanese artist before their existence was clearly shown by instantaneous photography.
Note the positions with the wings pointing downward. These are phases of wing movement anticipated by the Japanese artist before their existence was clearly captured by high-speed photography.
Part of a plate in Muybridge’s “Animals in Motion.” Copyright, 1899, by Eadweard Muybridge. London, Chapman & Hall, Ltd. New York, Charles Scribner’s Sons. A valuable work for the artist in studying movement in animals.
Part of a plate in Muybridge’s “Animals in Motion.” Copyright, 1899, by Eadweard Muybridge. London, Chapman & Hall, Ltd. New York, Charles Scribner’s Sons. A valuable resource for artists studying animal movement.
[143]
[143]
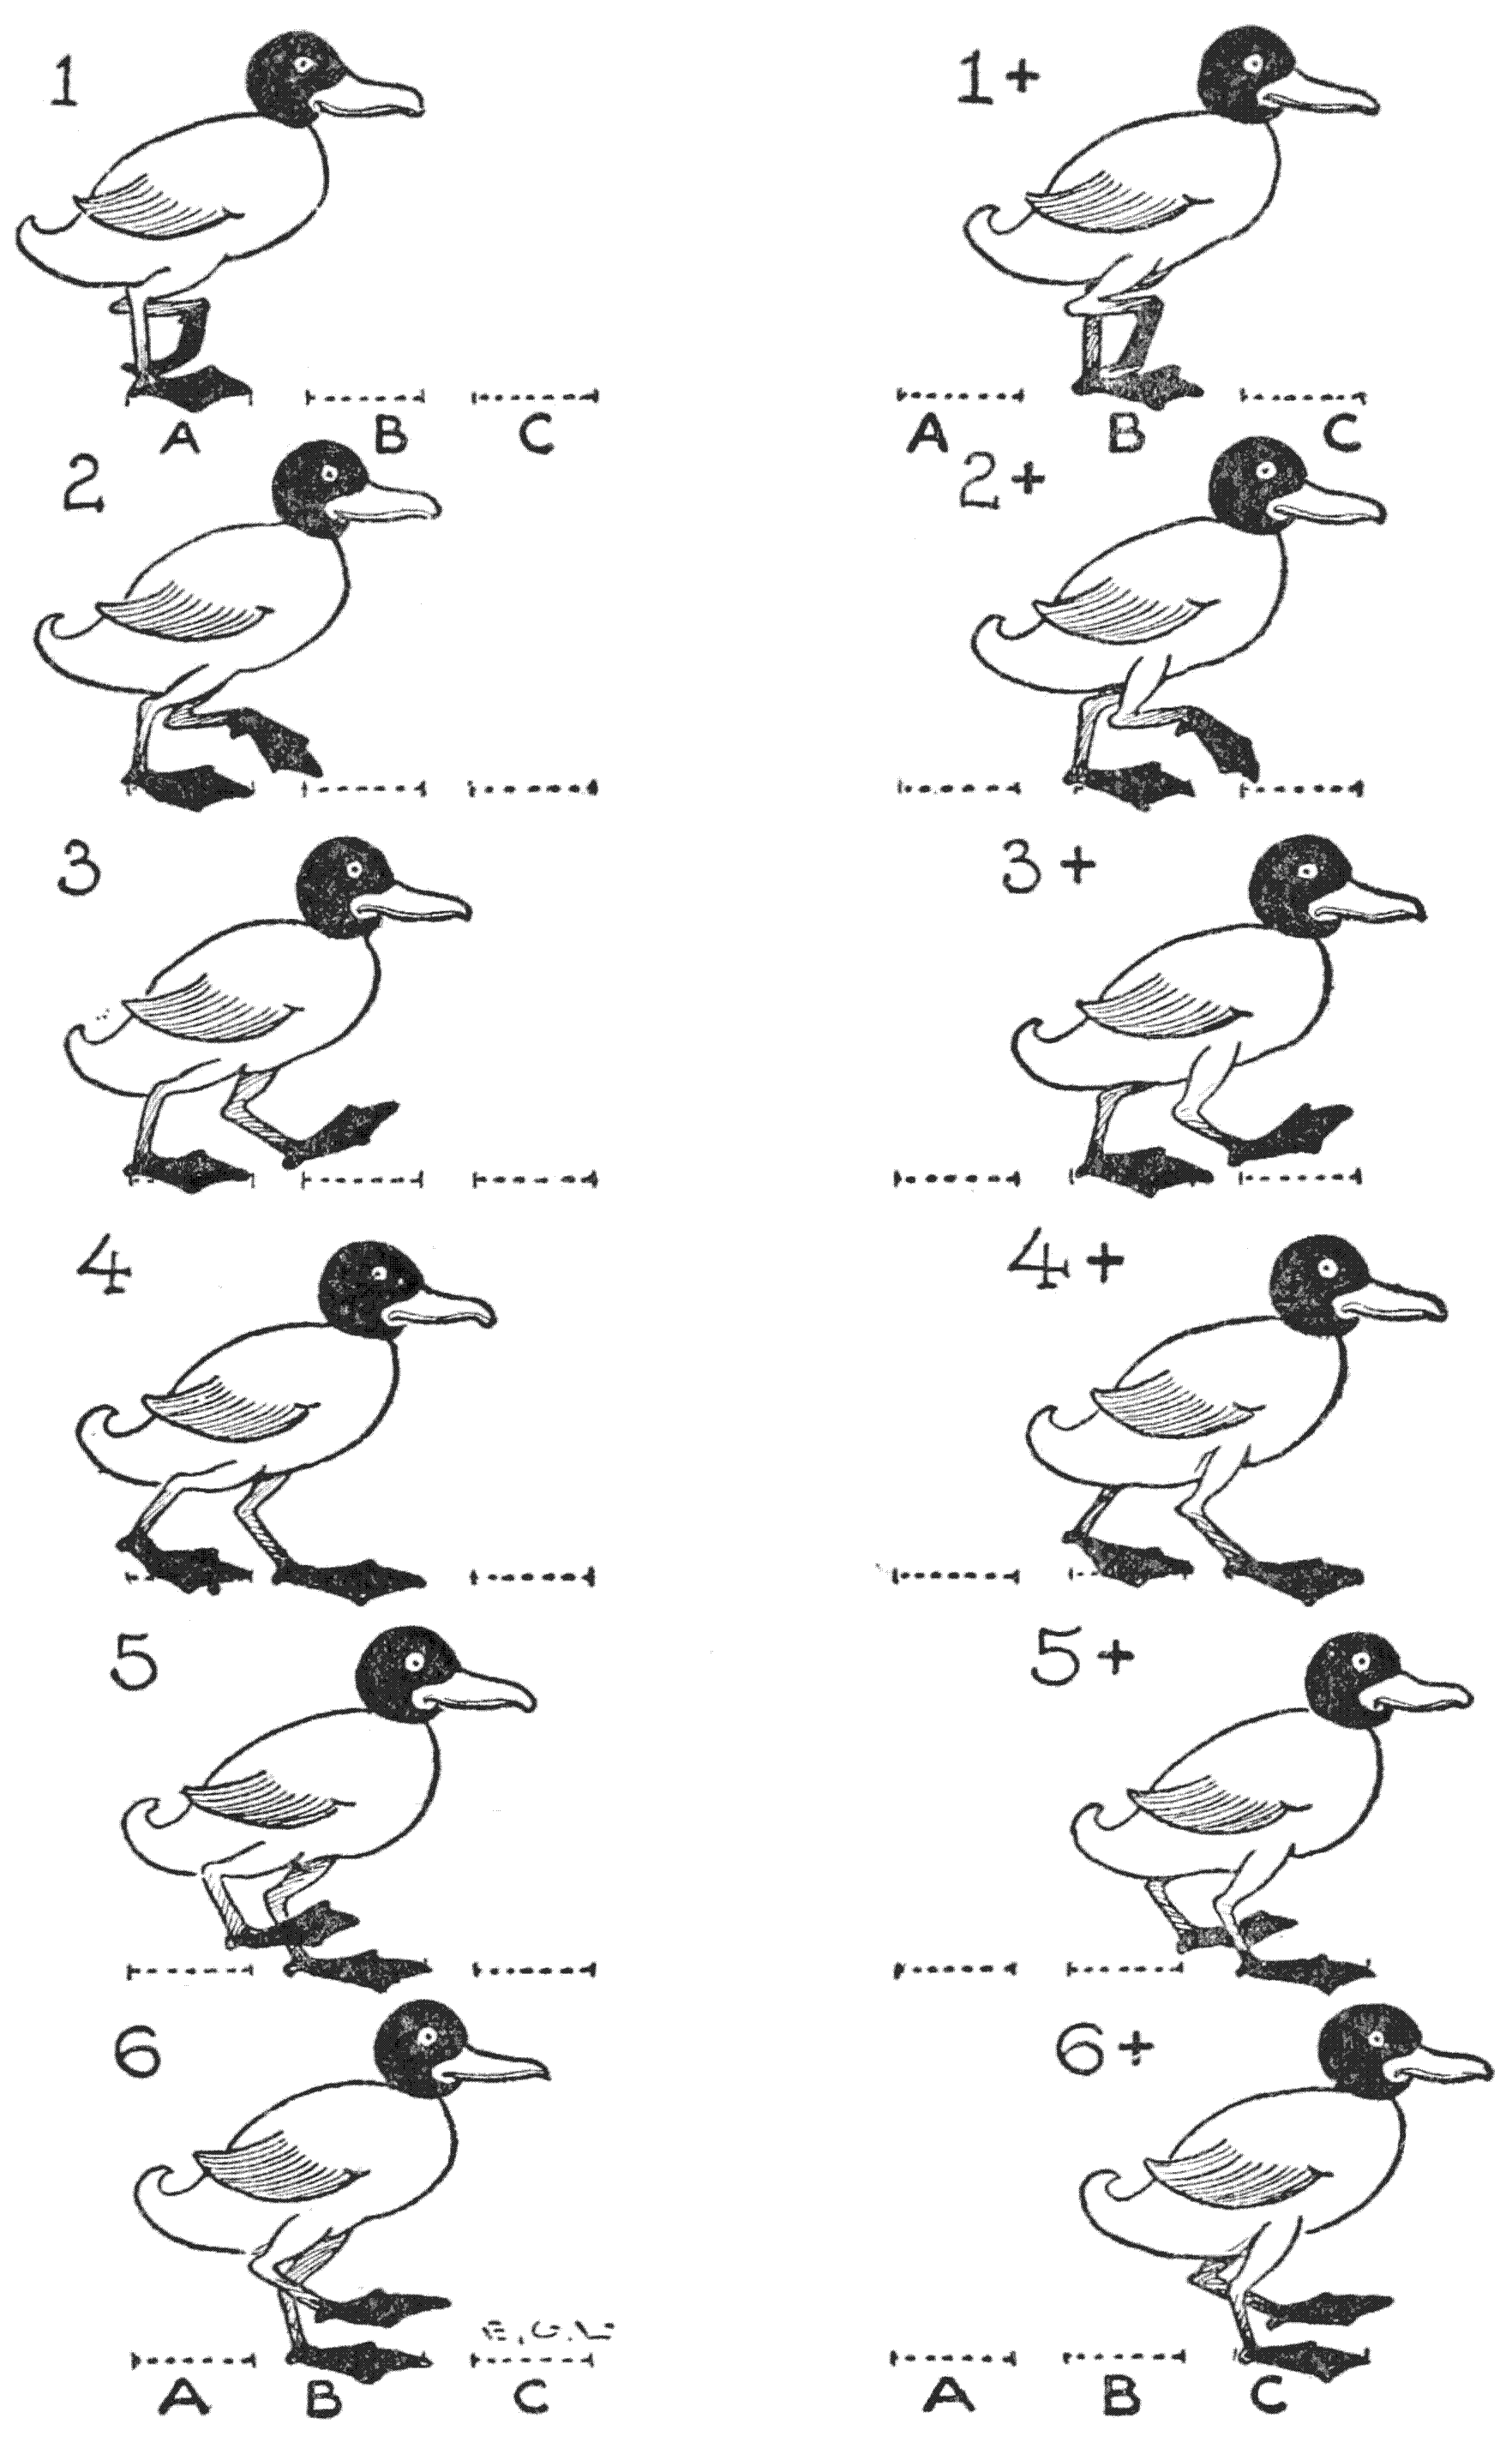
Series of drawings required to move the bird from A to C.
Series of drawings needed to move the bird from A to C.
One good way, if an animator wishes to represent a bird flying across the sky, is to have several—five or seven—positions for the action drawn on cardboard and then cut out. These little bird models are placed, one at a time, over the general scene during the photography and manipulated in the same way as described for [144]other cut-out models. The slight wavering from the direct line of the bird’s flight that may occur by this cut-out method would not matter very much. The bird describes a wavering line anyway as he flies—its body dropping slightly when the wings go up and a correlative rise occurring when the wing flap takes place.
One good way for an animator to show a bird flying across the sky is to have several—five or seven—positions for the action drawn on cardboard and then cut out. These little bird models are placed, one at a time, over the general scene during filming and moved the same way as described for [144] other cut-out models. The slight wavering from the direct line of the bird’s flight that may happen with this cut-out method isn’t a big deal. The bird naturally follows a wavering path as it flies—its body dips slightly when the wings go up, and a corresponding rise occurs when it flaps its wings.
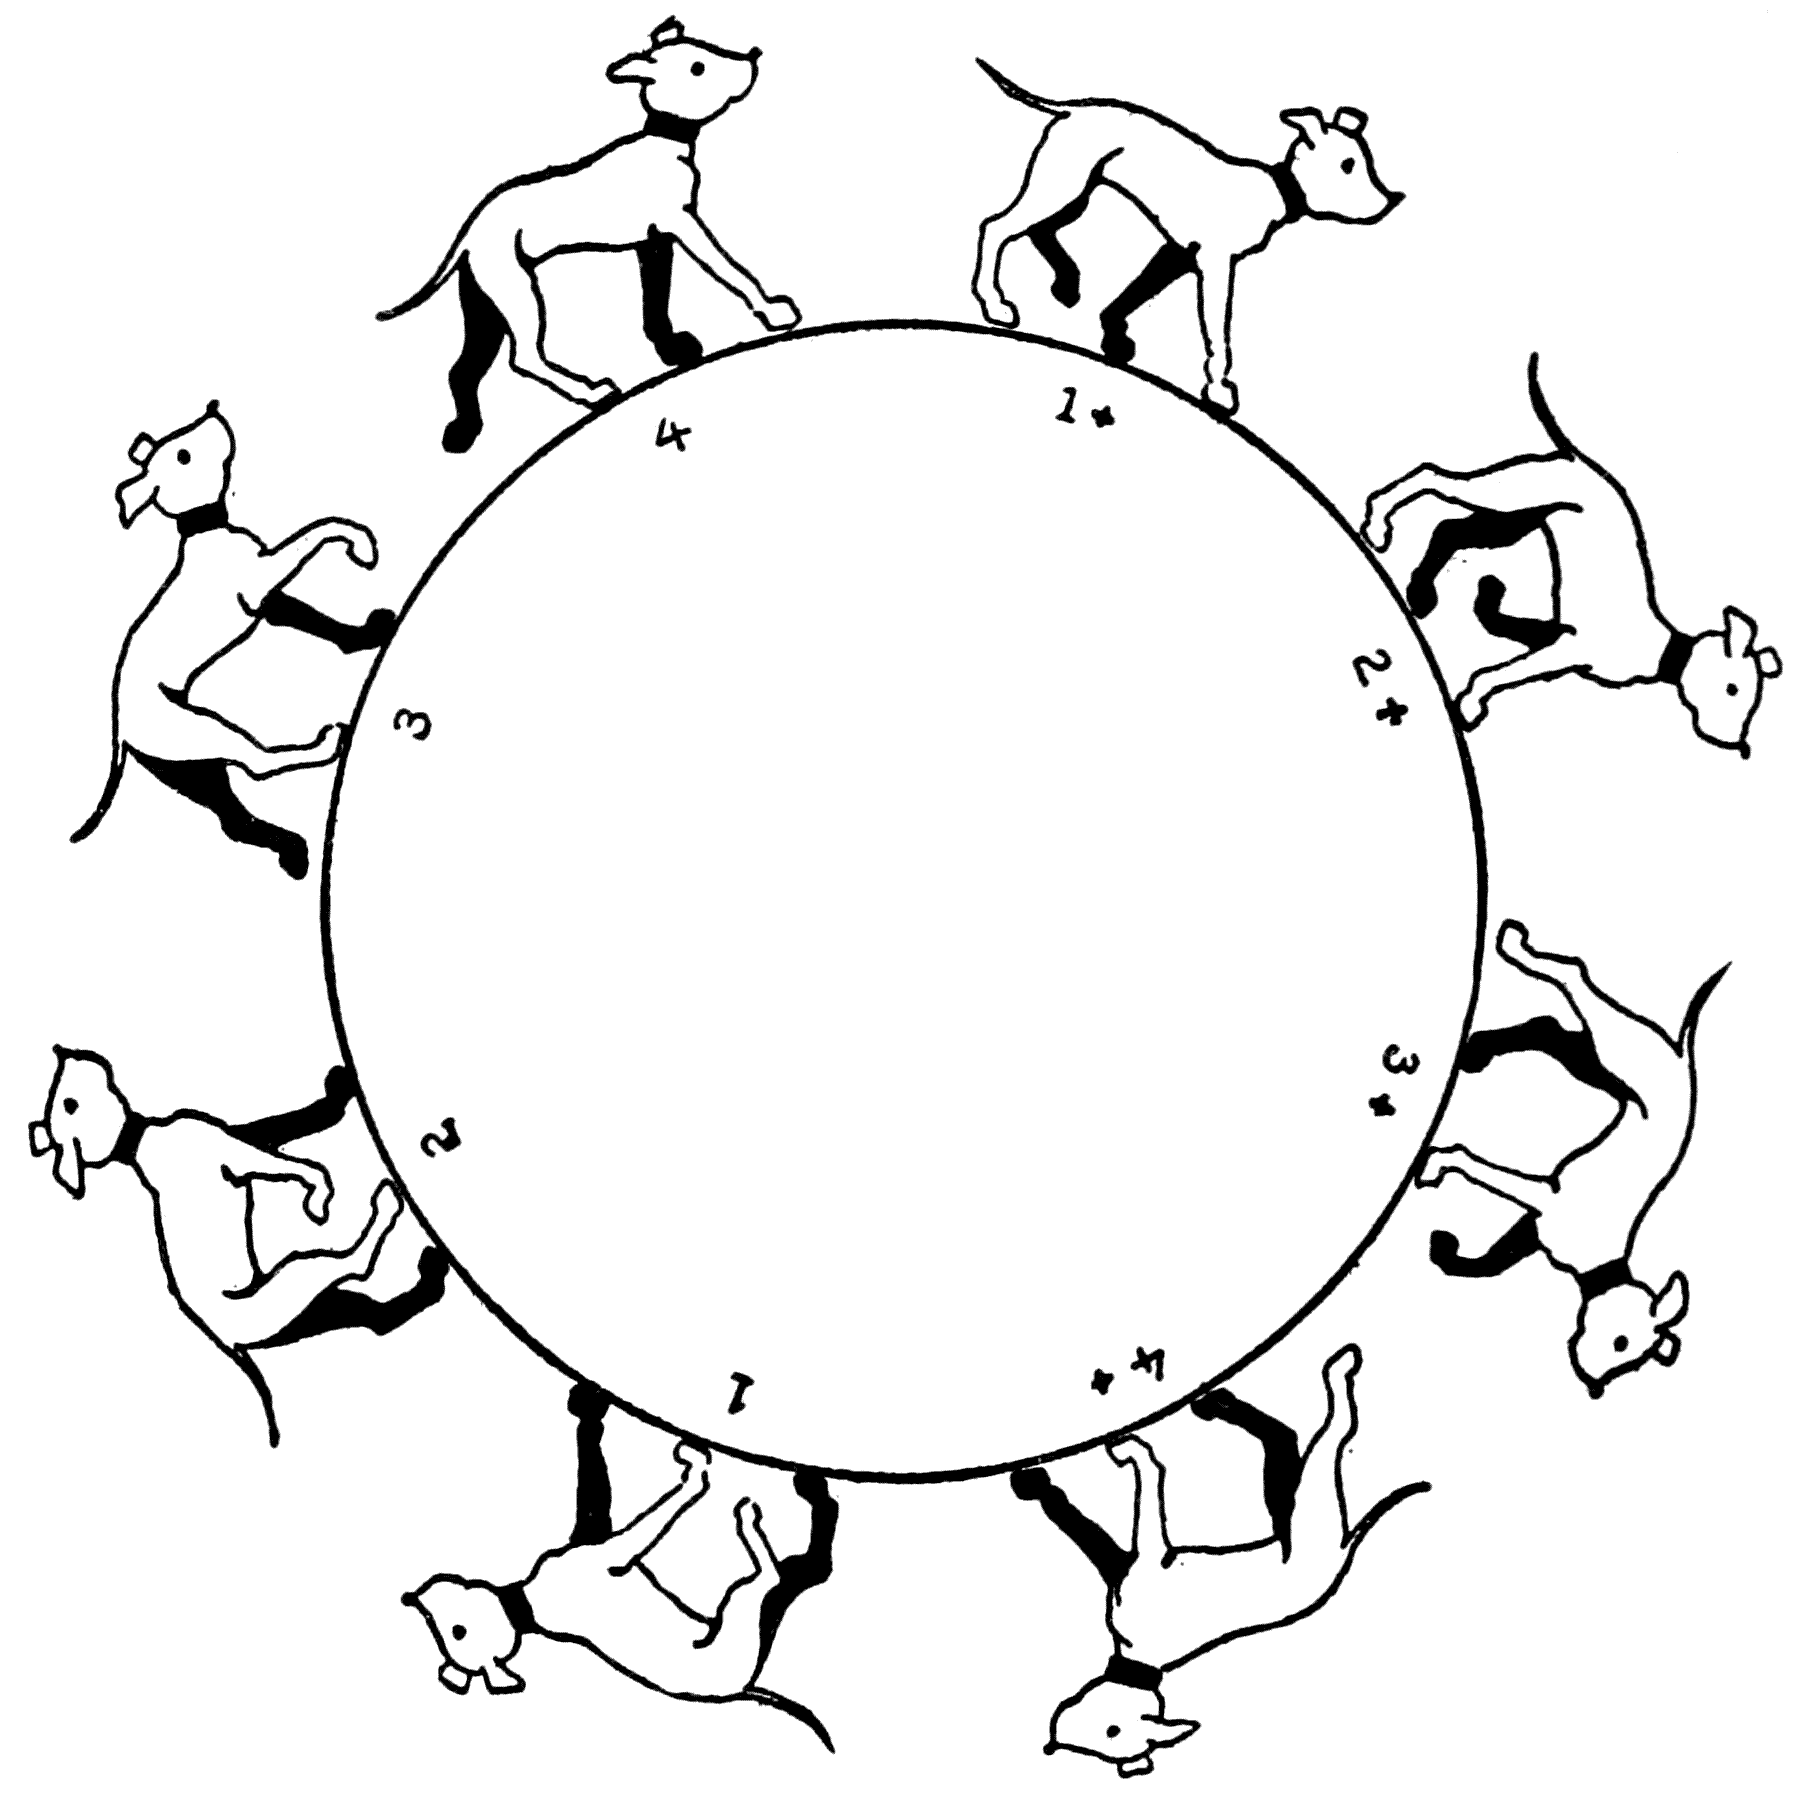
[145]
[145]
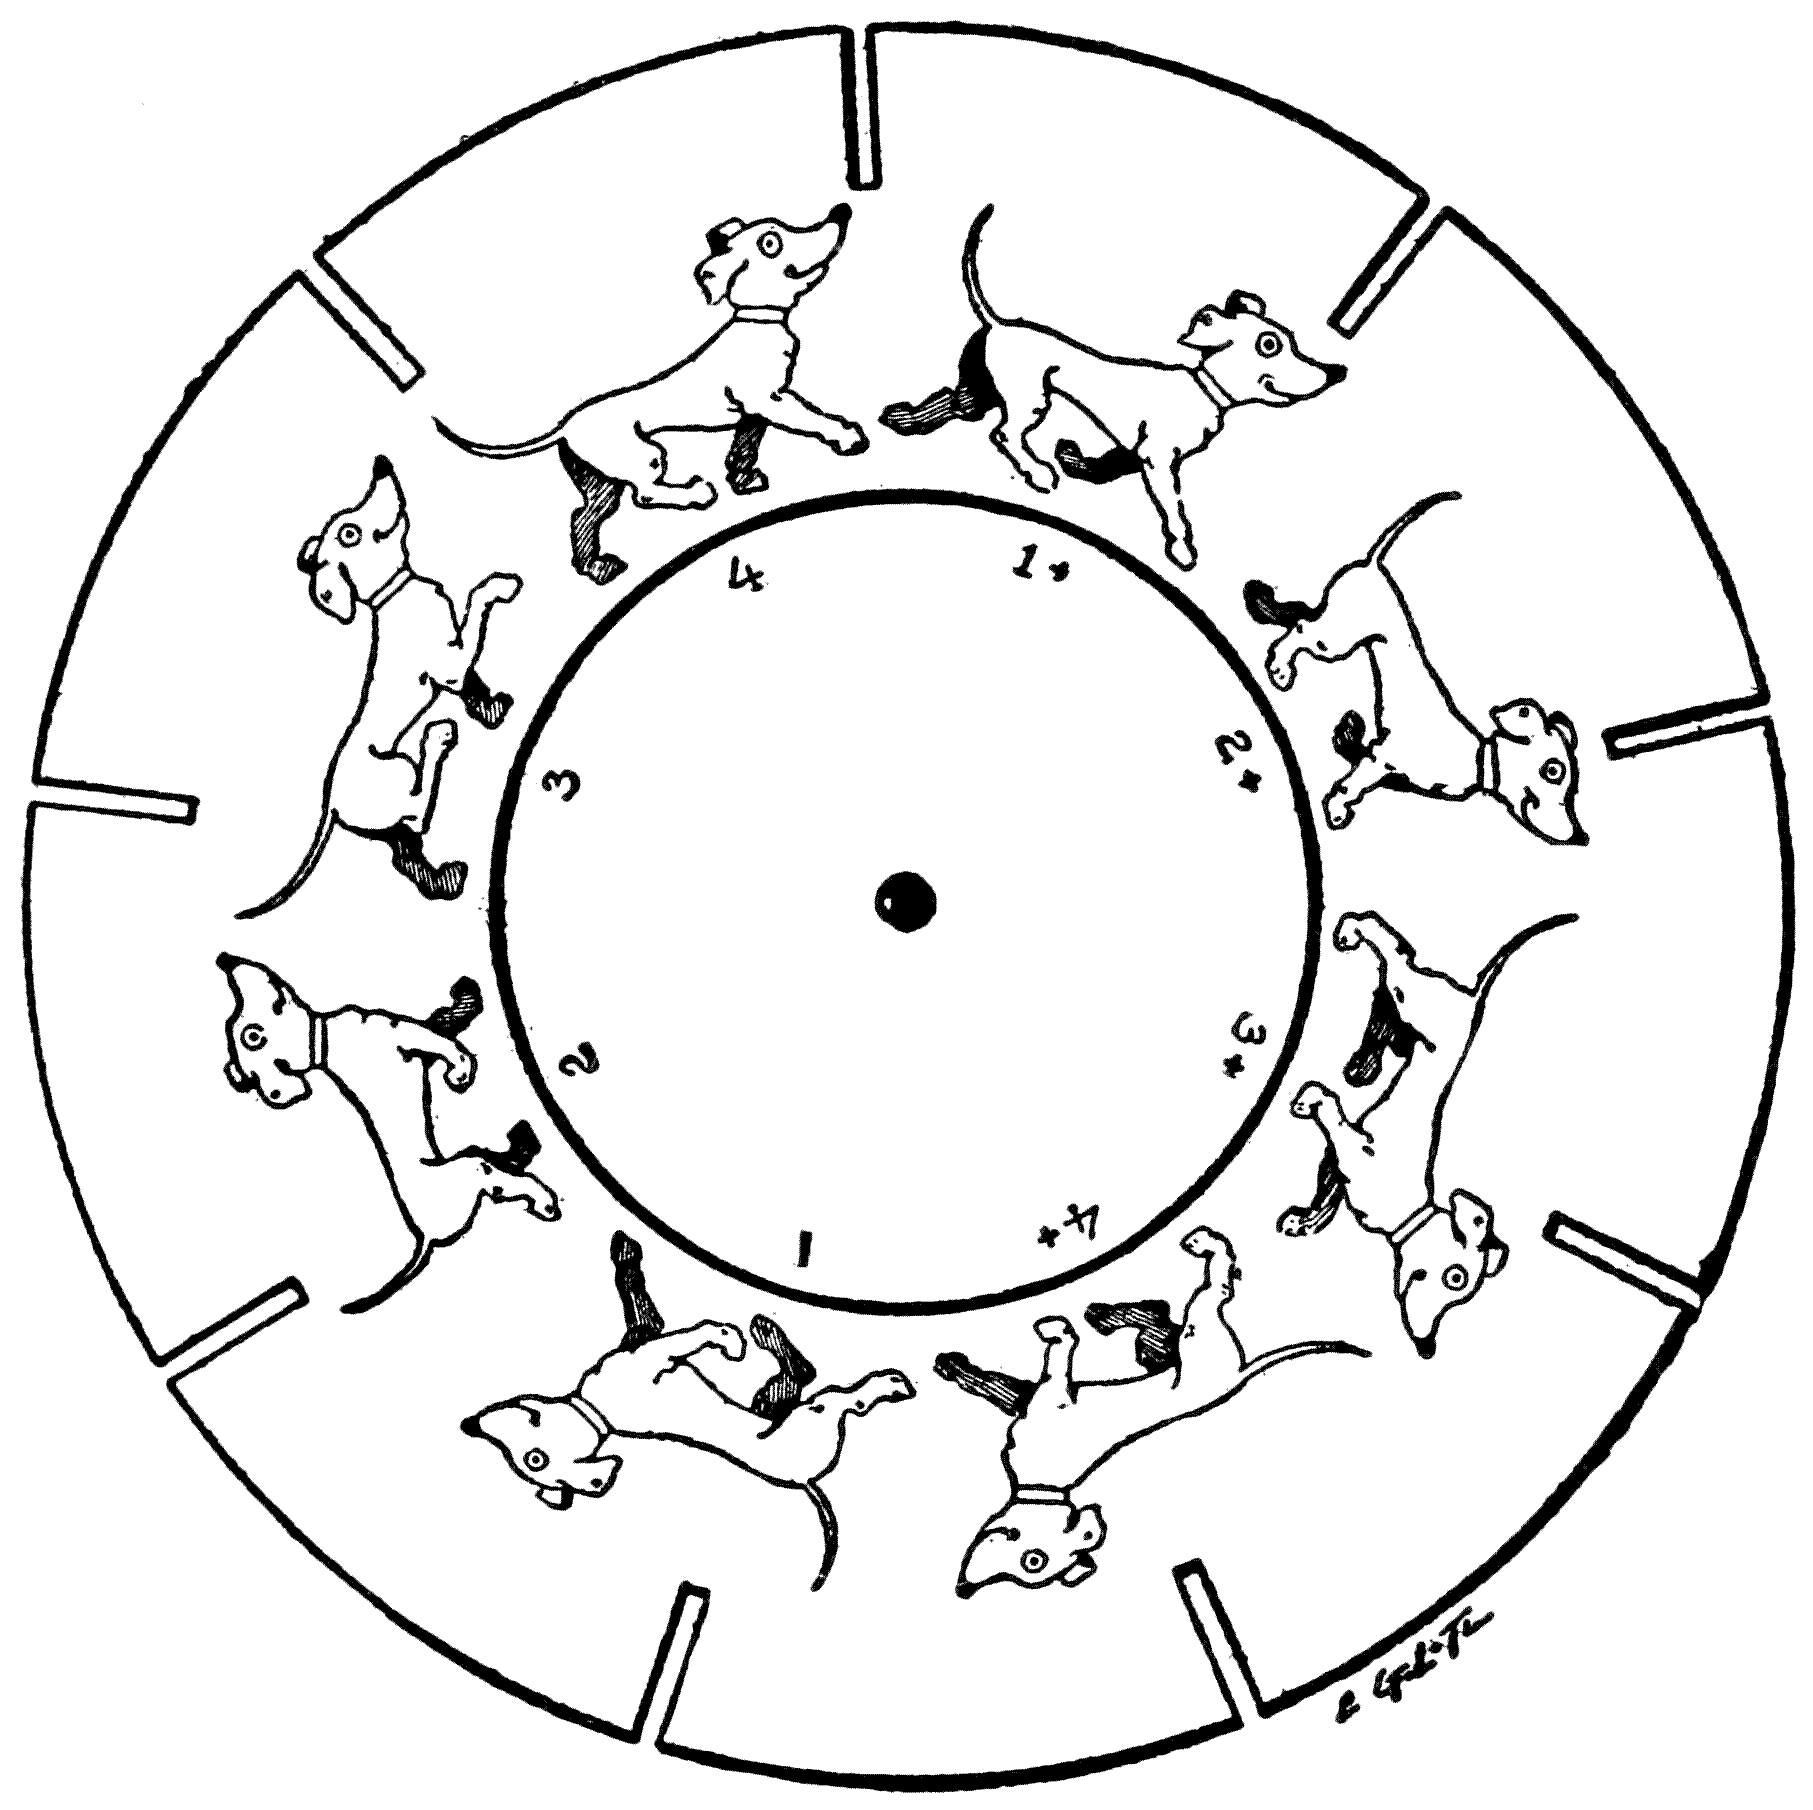
If an artist wishes scrupulously to be exact in drawing a bird flying across the sky, he should observe certain rules of perspective applying to the case. The problem is the same as that of the airplane, previously noted, which flew across the field of the picture. Regarding this matter, to specify: When the bird appears on one side[146] it is represented in a side view, which changes as it gets near the centre to a profile. After it has been viewed in profile, the perspective changes again and when it reaches the other side it is again in a perspective side view, slightly from the back.
If an artist wants to be precise in drawing a bird flying across the sky, they should follow certain rules of perspective. The situation is similar to that of the airplane mentioned earlier, which flew across the field of the picture. To clarify: when the bird appears on one side[146], it is shown in side view, which shifts to a profile as it moves toward the center. After being viewed in profile, the perspective changes again, and by the time it reaches the other side, it is once again shown in a side view, slightly from the back.
In the mode of progression that was given as the usual one in quadrupeds, in which a diagonally opposite fore and hind limb moved simultaneously, there is a sinuous lateral twisting of the back-bone. It is not so perceptible to us in the larger beasts. It is an effect, though, that takes place in other creatures and in some of them can be clearly seen. In the walk of the lizard, as an instance, when viewed from above, a successive undulation of the back-bone takes place. As one fore limb—the right, to particularize—moves forward, that side of his body—the right shoulder, moves forward, too; while approximately at the same time the left hind limb moves forward and carries with it that side or the left pelvic regions. This causes an alternating obliquity of the transverse axes of the shoulder and the hind regions of the body of the reptile as he walks on the ground. And this alternate changing of these axes gives rise to a continuing sinuosity in the spine.
In the typical way of moving for quadrupeds, where a foreleg and the diagonally opposite hind leg move at the same time, there's a noticeable lateral twisting of the spine. This effect isn't very obvious in larger animals. However, it's present in other creatures and is quite clear in some. Take the lizard, for example. When viewed from above, you can see a wave-like motion of its spine. As the right foreleg moves forward, that side of its body—the right shoulder—also moves forward at about the same time as the left hind leg pushes ahead, carrying along the left side of the pelvis. This creates a back-and-forth tilt in the shoulder and hind sections of the reptile's body as it walks. This alternating shift in these axes results in a continuous wave-like motion in its spine.
[147]
[147]
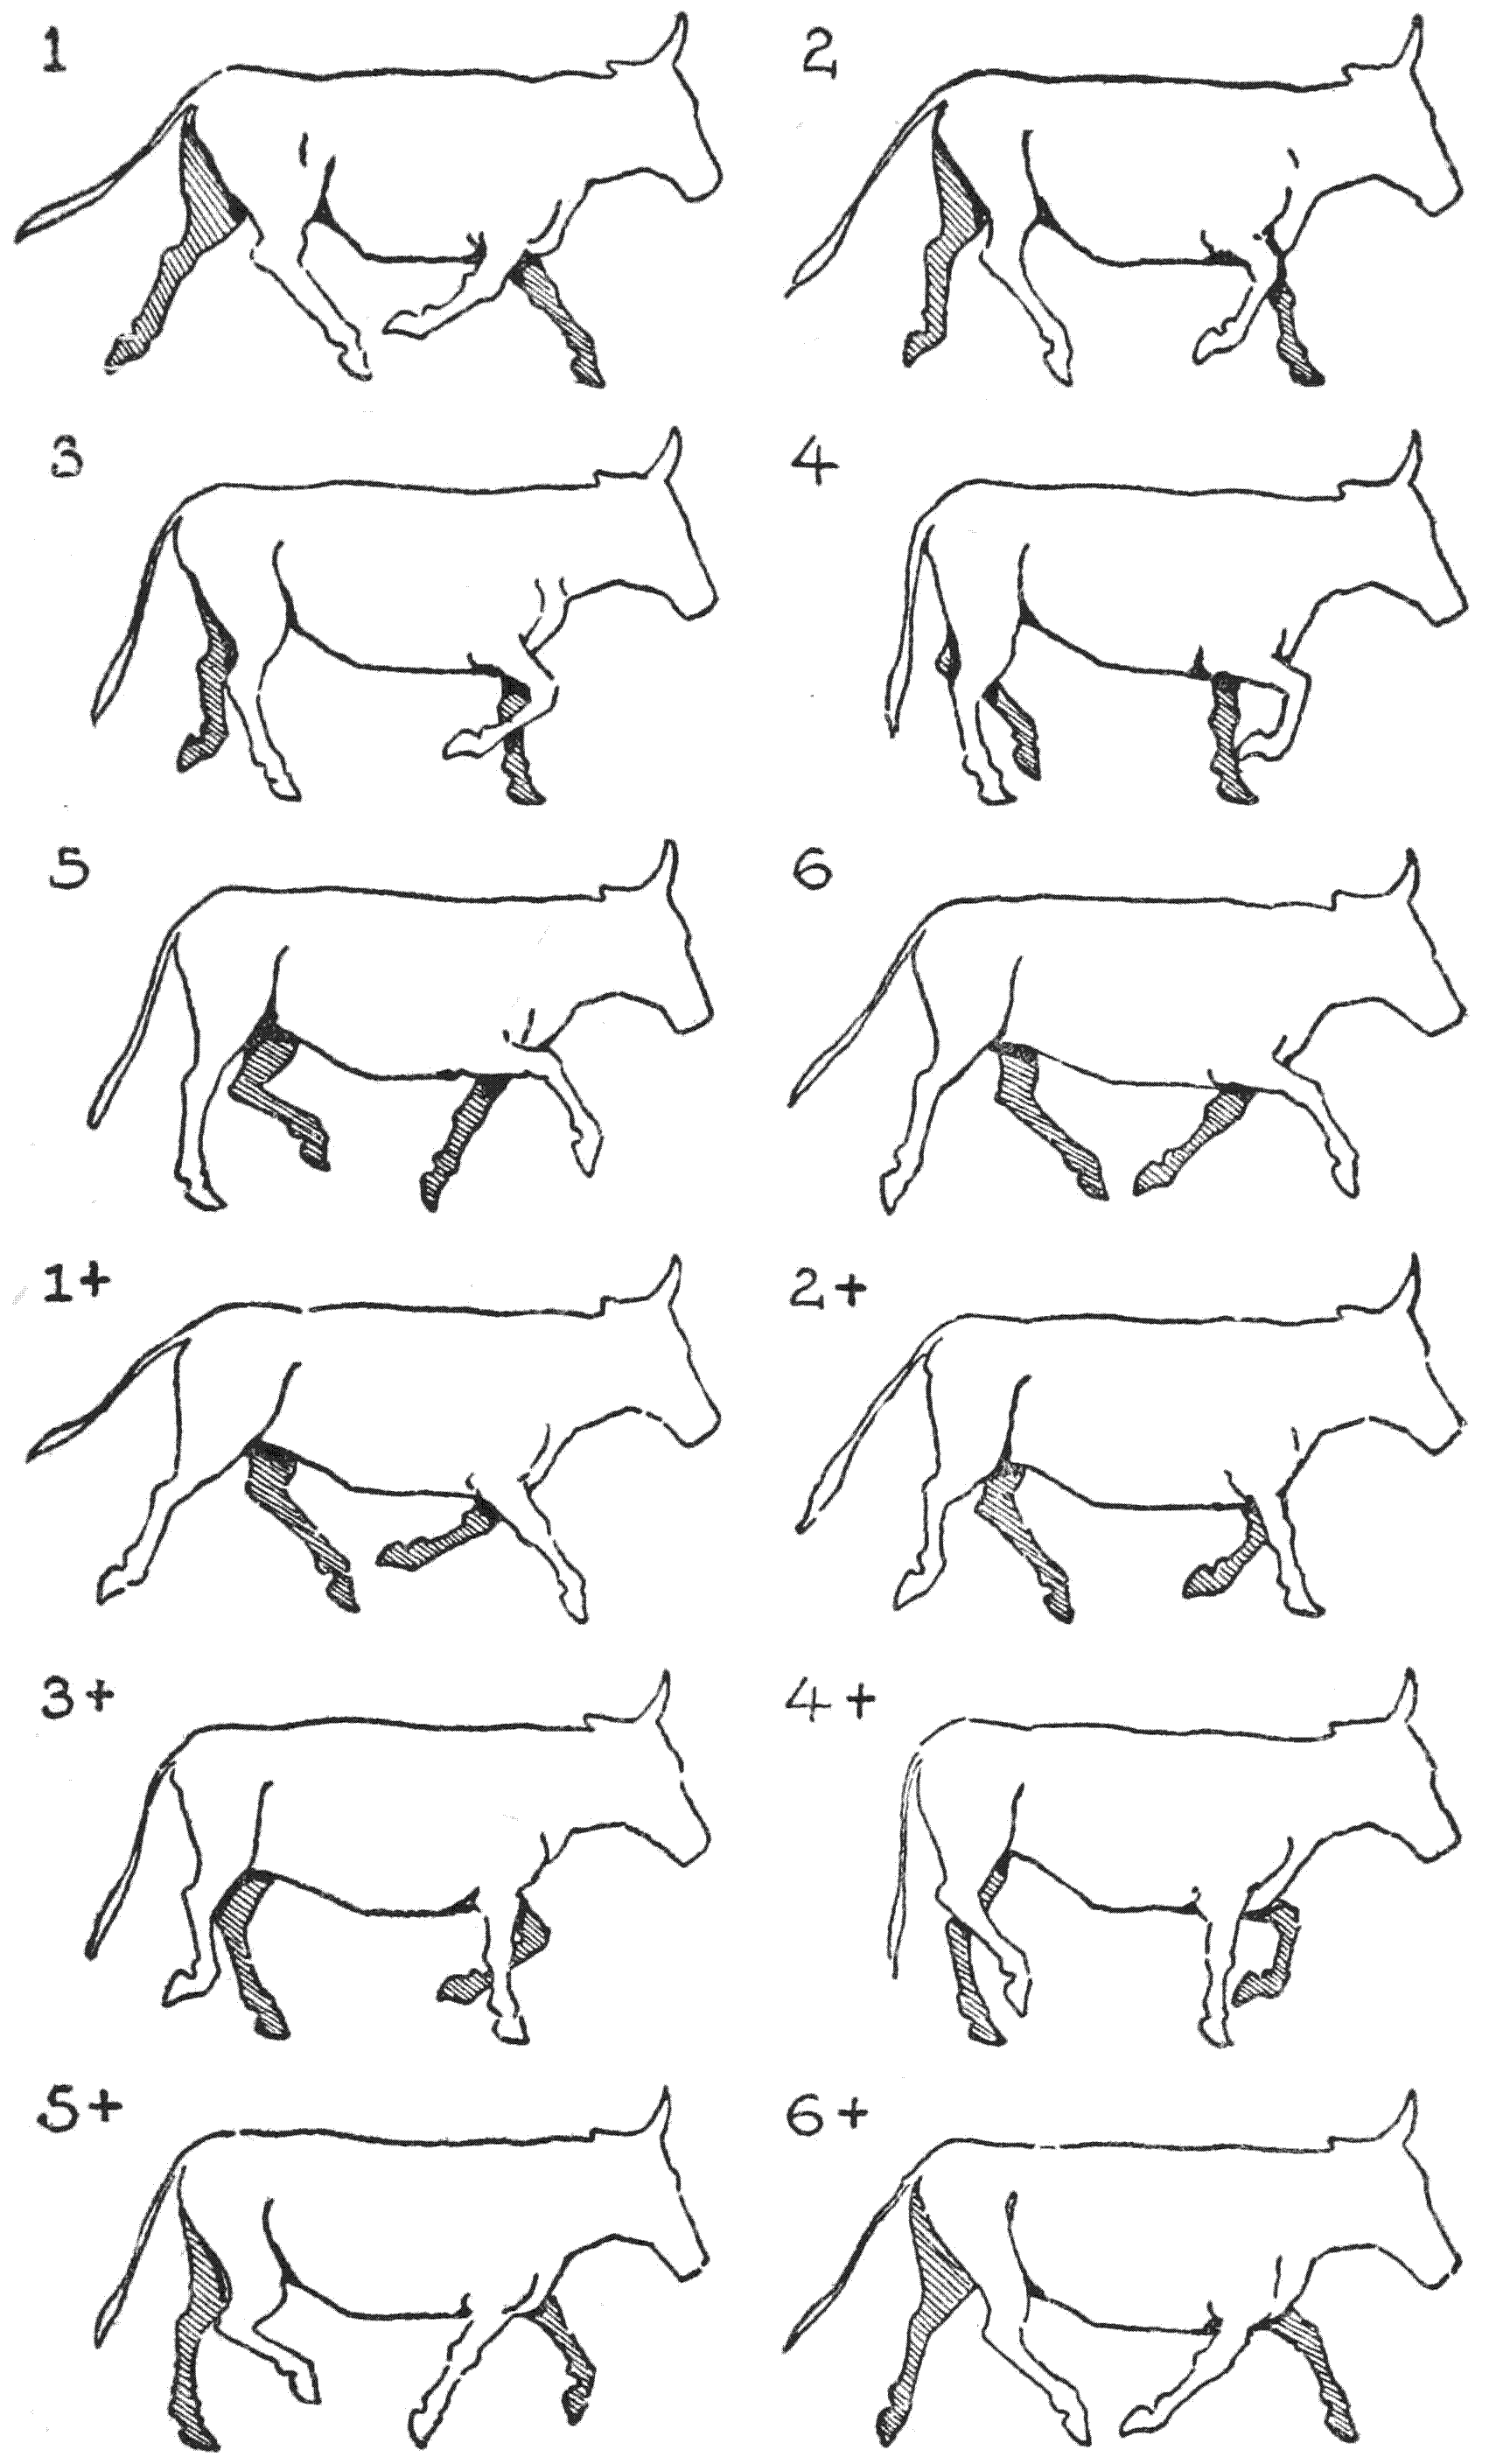
Positions selected and adapted from Muybridge’s photographs.
Positions chosen and adjusted from Muybridge’s photos.
[148]
[148]
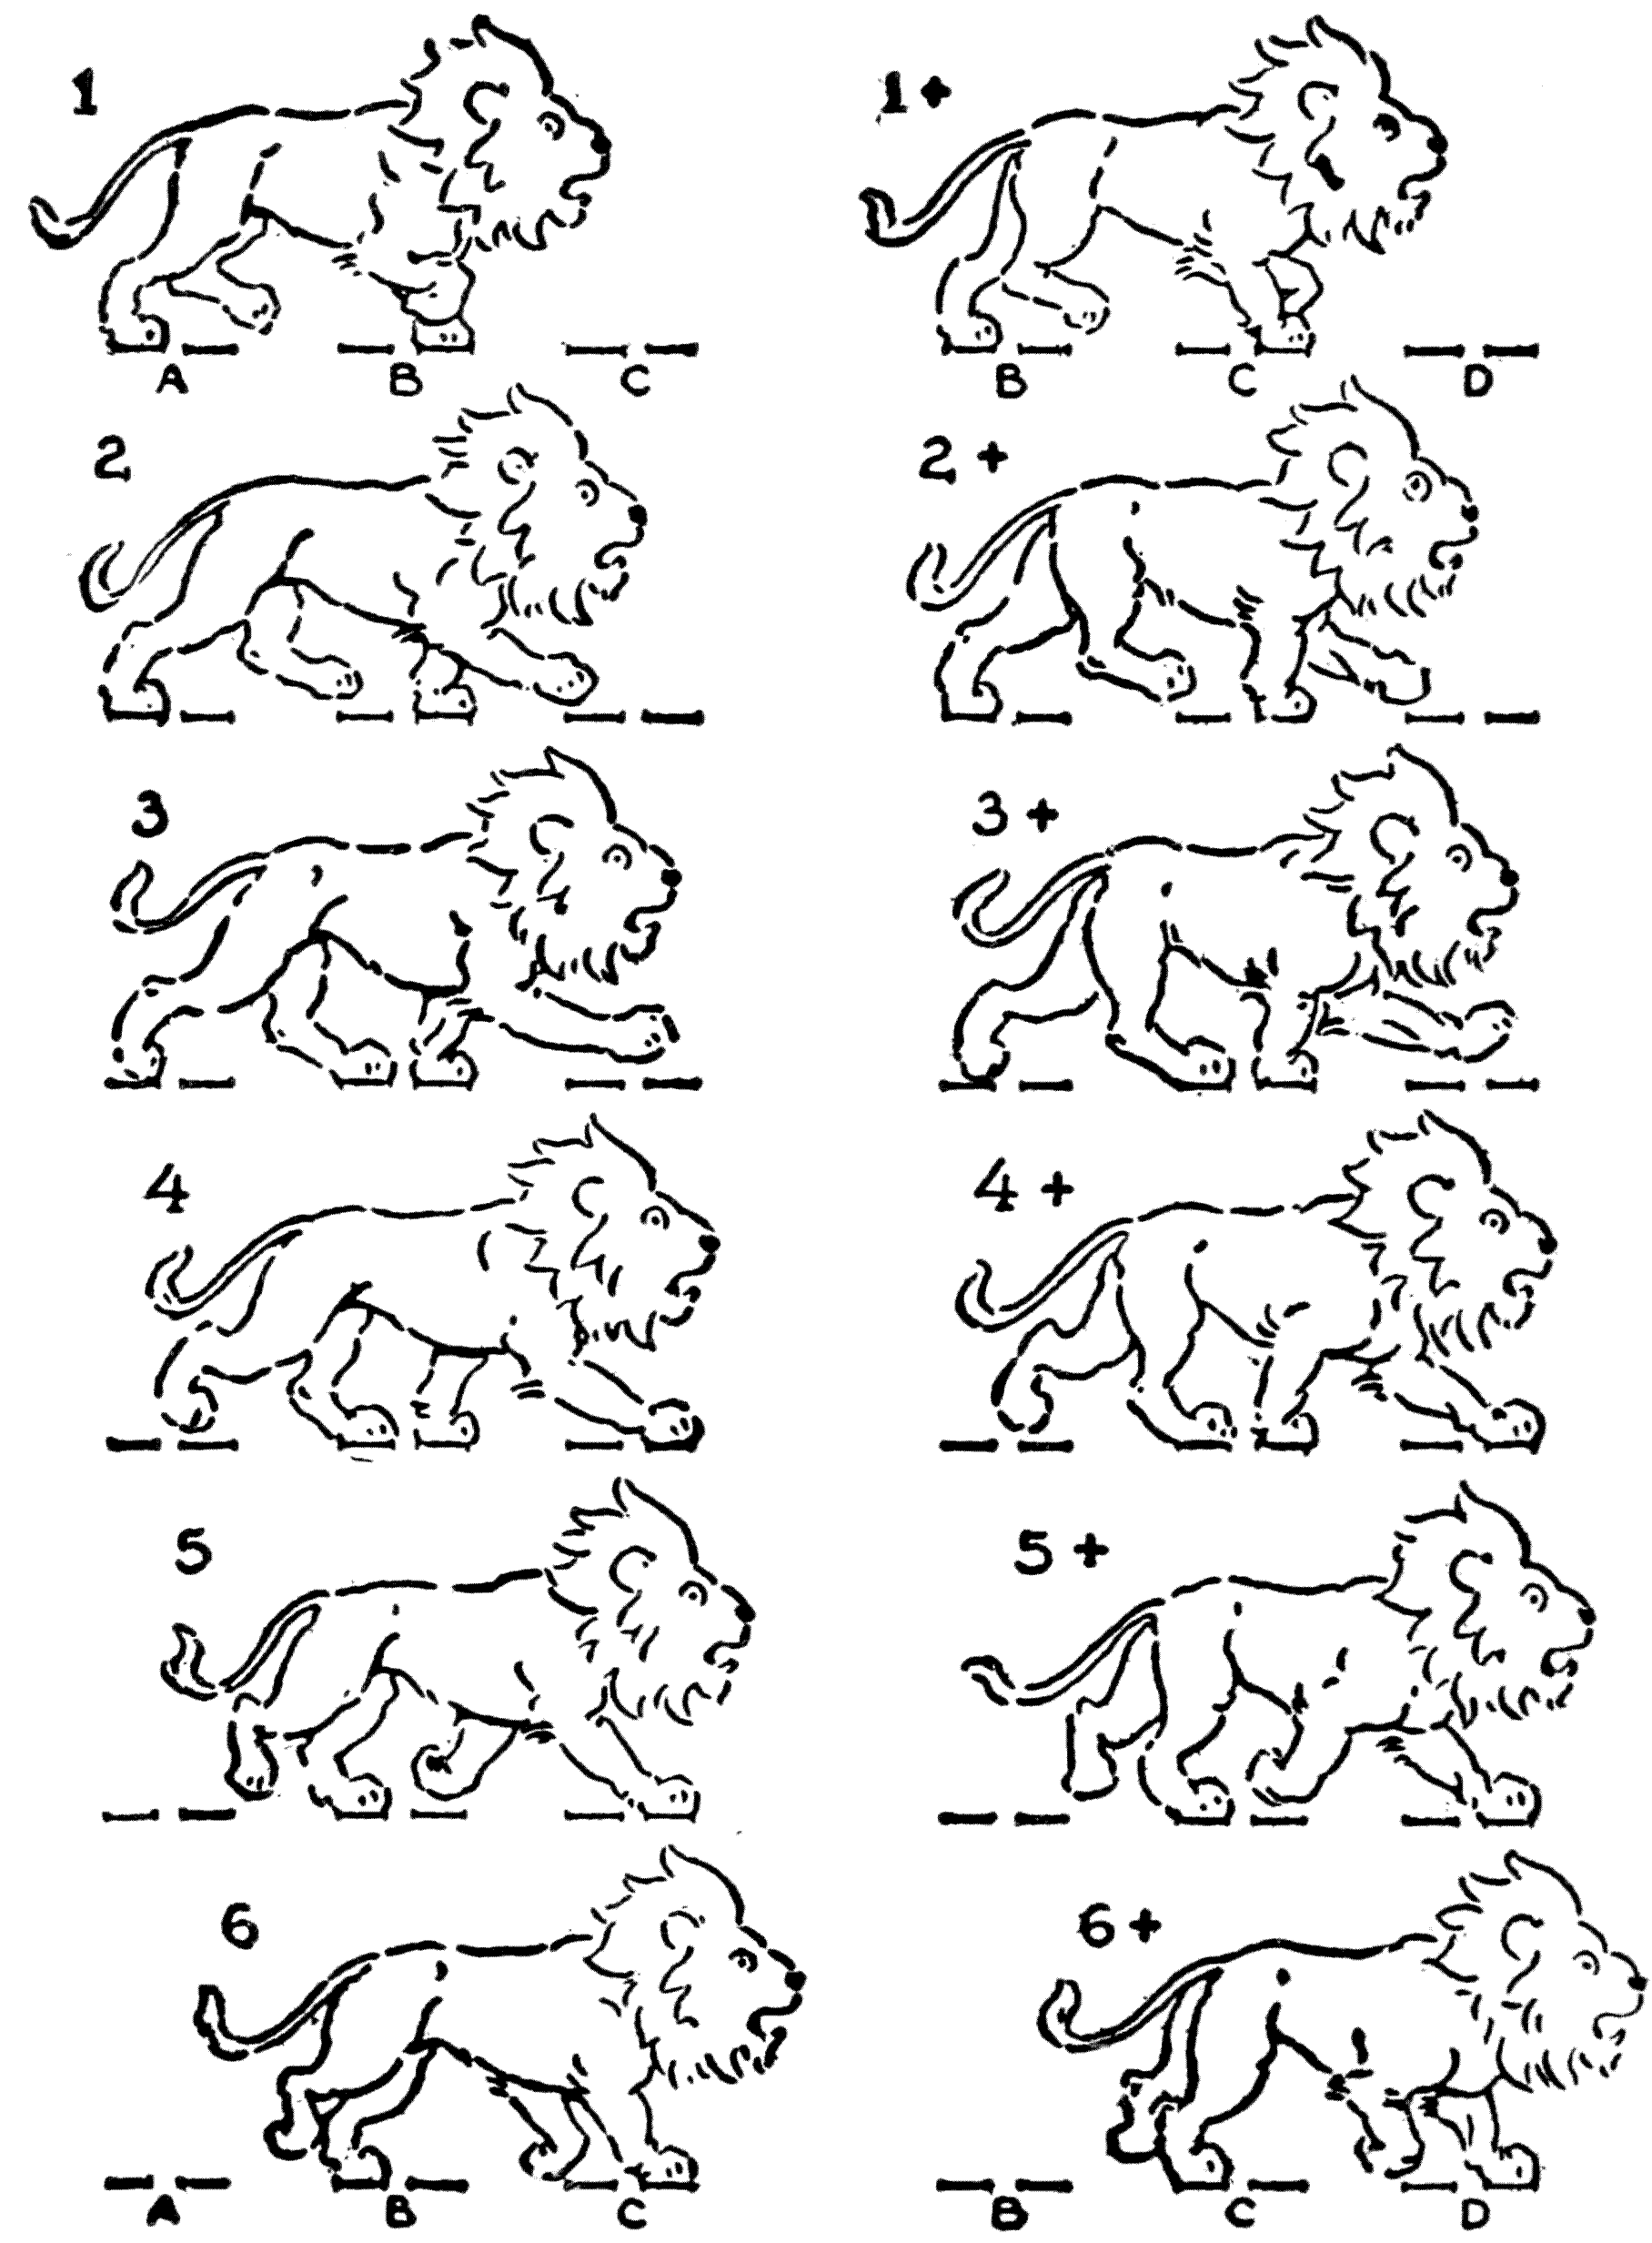
[149]
[149]
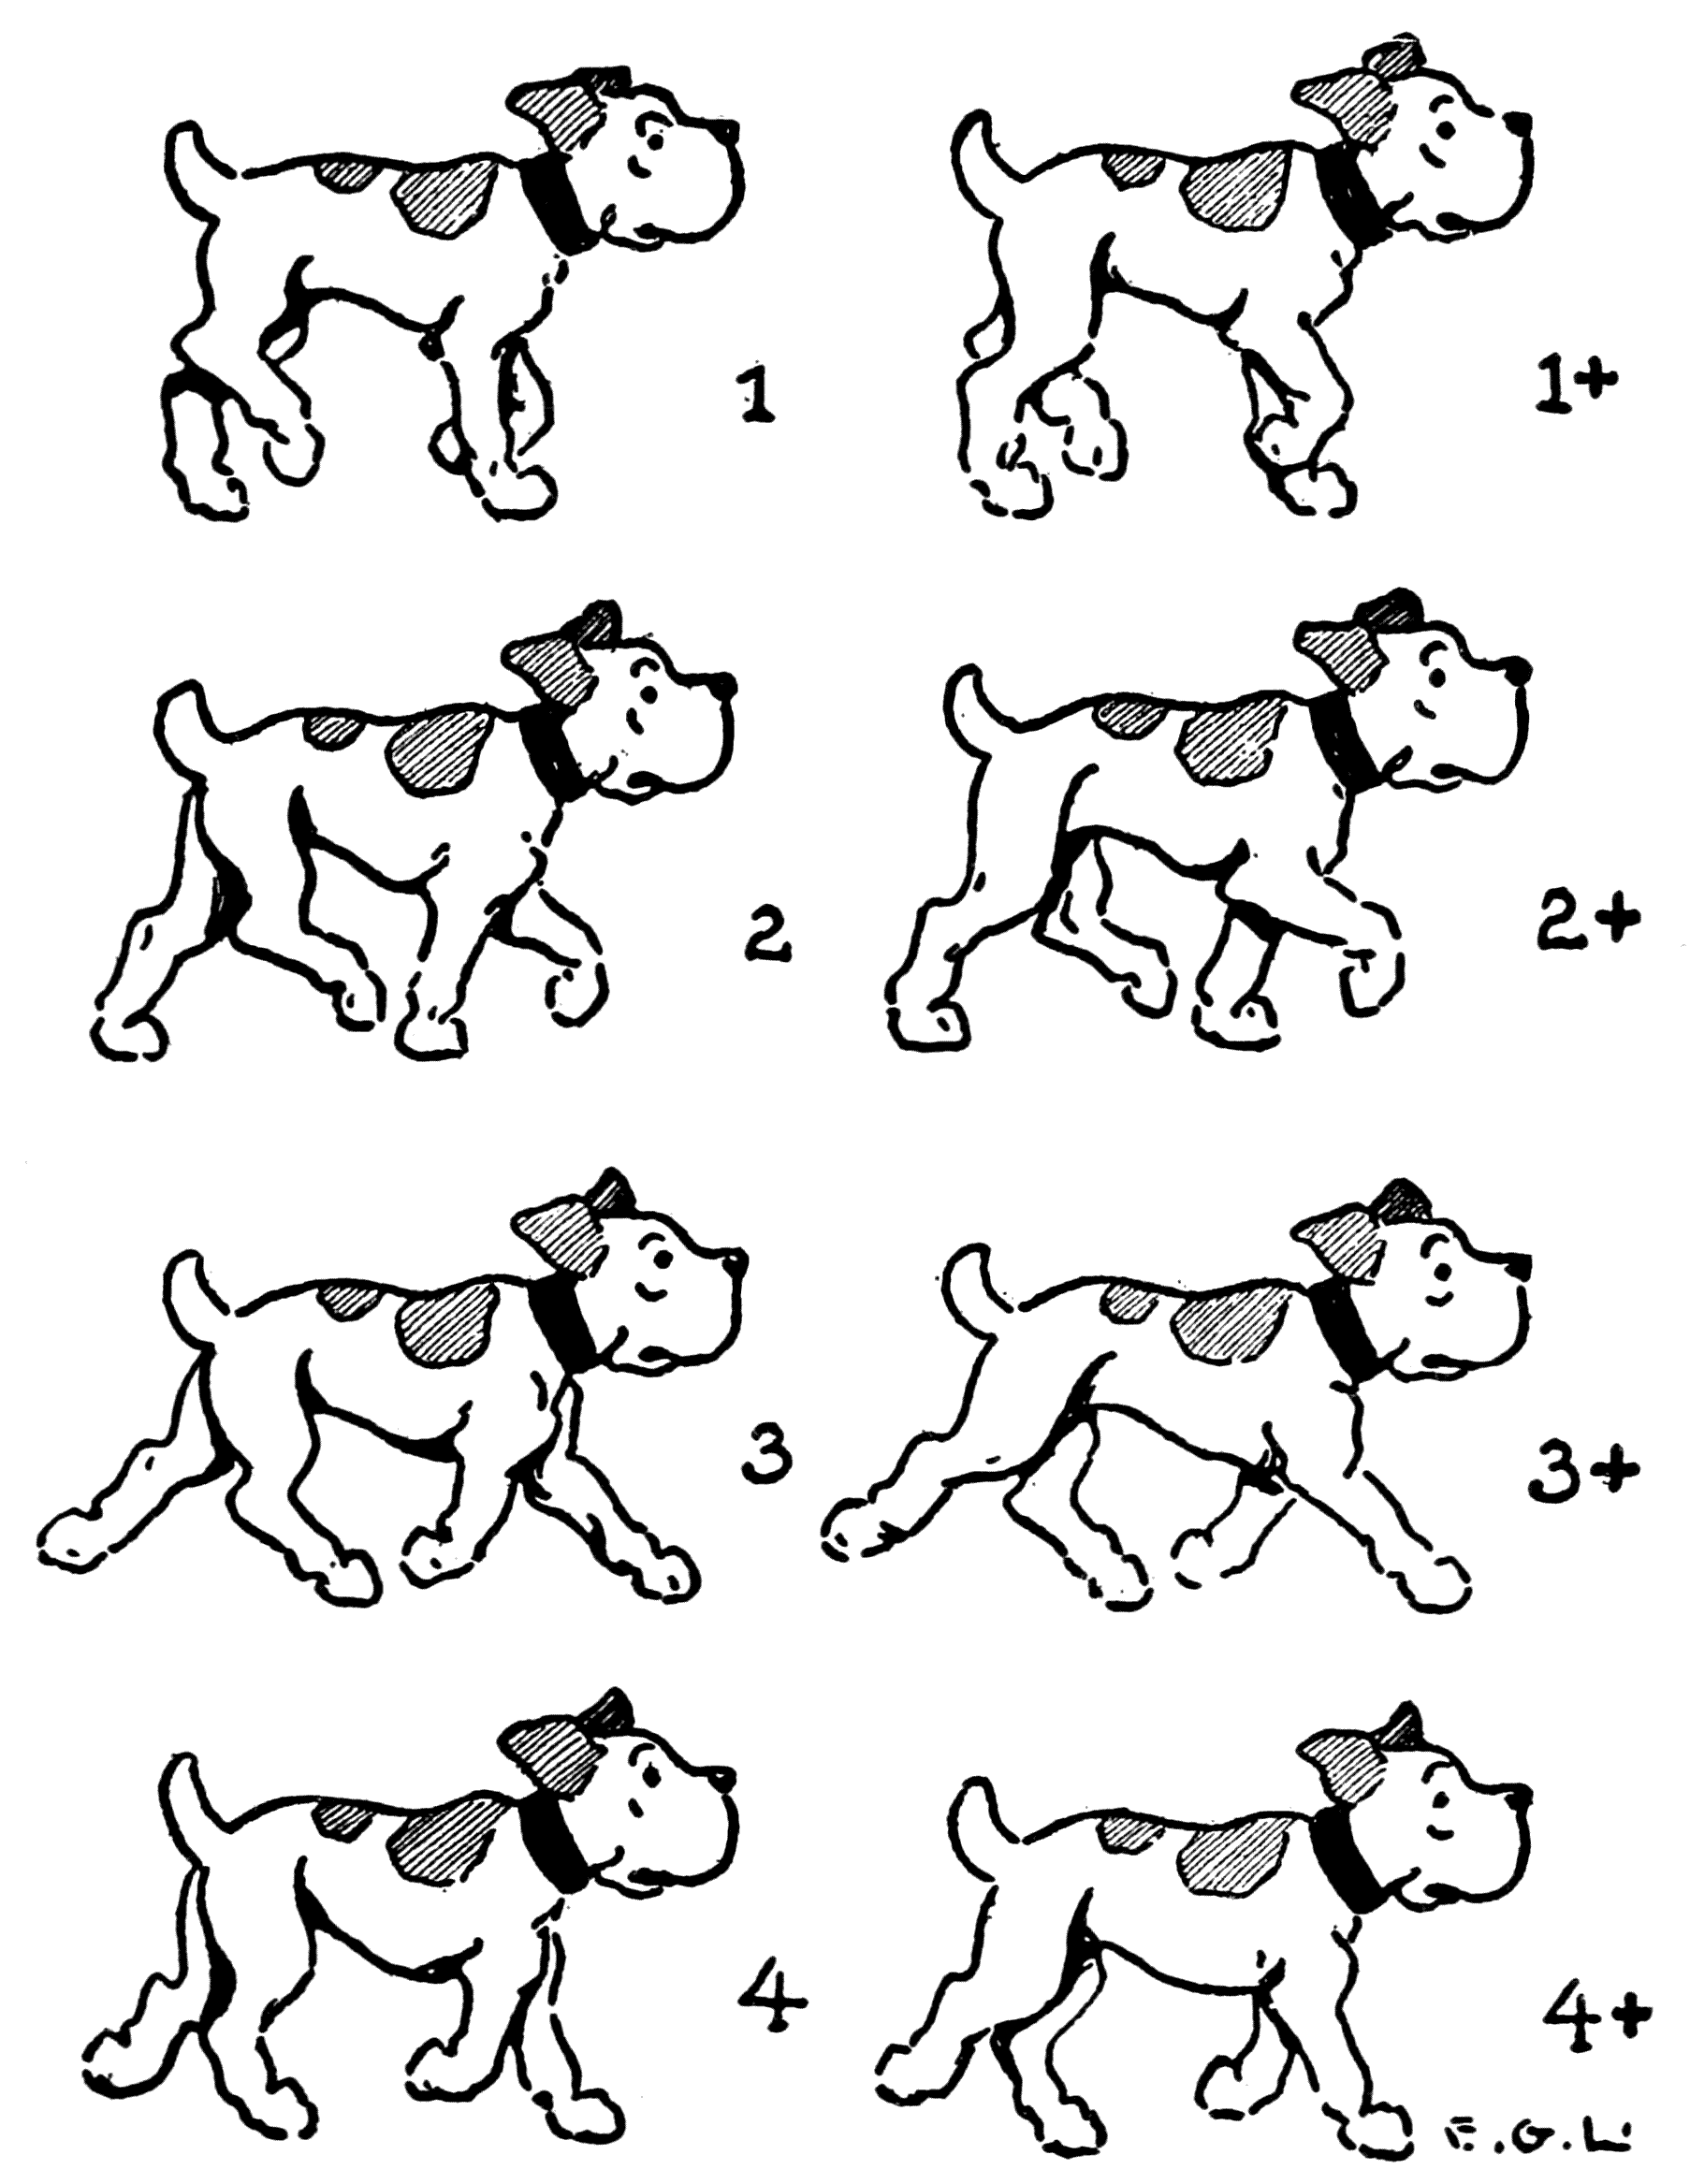
The mode of progression in legless creatures is distinguished, too, by a lateral bending in and out. Snakes and eels, for example, as they proceed[150] agitate their bodies in wave-like motions. The waves pass from the head to the tail, the fluctuations taking the form of rather large loop-like wrigglings of the elongated body. A spring-like coiling up and then an expanding—flexion and extension again—is the principle of the locomotory manœuvre in the snake.
The way legless creatures move is defined by a side-to-side bending. Snakes and eels, for instance, move by creating wave-like motions with their bodies. These waves travel from the head to the tail, with the movements resembling large loops of their long bodies. The basic principle of movement in snakes involves coiling up like a spring and then extending—flexing and stretching again.
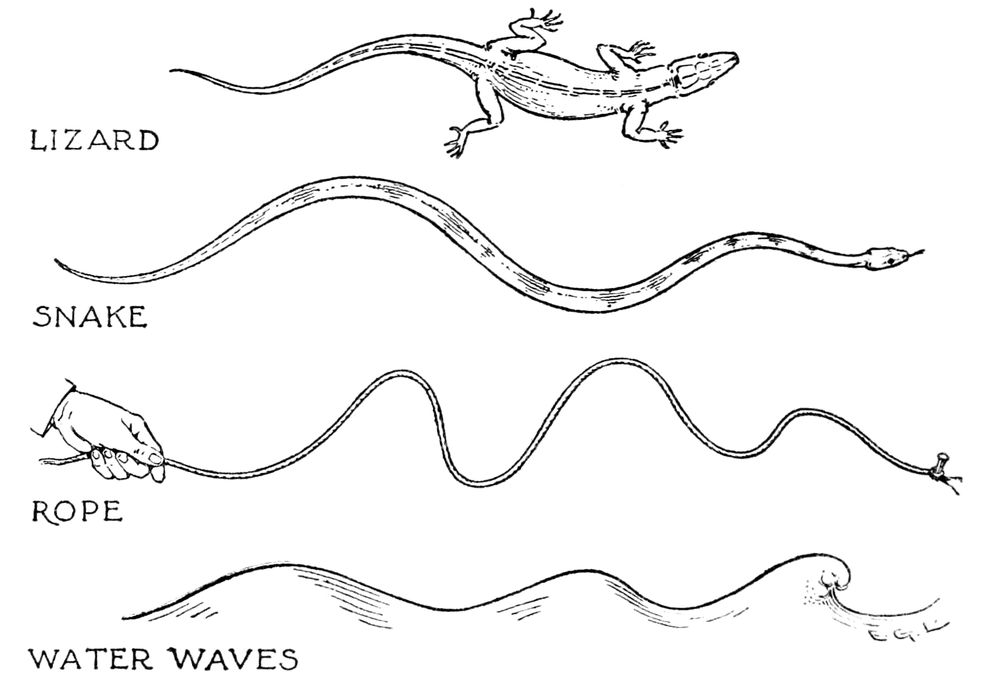
A characteristic of many forms of movement which the animator gets in certain of his delineations.
A feature of many types of movement that the animator captures in some of his illustrations.
The undulatory motive impulse of a creeping animal is somewhat like the sudden lashing of a whip, or the wave-like disturbance given to a rope when it is sharply and strongly shaken in a certain way.
The wave-like movement of a crawling animal is similar to the quick snap of a whip or the ripple effect produced when a rope is sharply and forcefully shaken in a specific manner.
INANIMATE THINGS IN MOVEMENT
Moving Objects
CHAPTER VII
INANIMATE THINGS IN MOVEMENT
There is very little effect of motion on the screen of a moving straight line by itself without any contrasting elements. Or, as the moving-picture draftsman would say, it does not animate well.
There is very little impact of motion on the screen from a moving straight line on its own without any contrasting elements. Or, as a moving-picture animator would say, it doesn't bring to life very well.
Now supposing a picture is intended of a man tugging at a rope. He pulls hard and the rope is taut and it appears practically straight. The animation of the arms shows that they are moving and give a good illusion of the tugging, but the rope shows no movement on account of its rectilinearity. It will be only when the artist gives the rope a little undulating—or even a snake-like—motion now and then that he can give the effect of any disturbance in it. This sort of thing, a slight shaking or a wavering of the line, would do for ordinary cases but it would be better if the artist showed a loose strand of cordage fibre creeping along in the direction that the[154] rope is supposed to be going. But still better would it be to have a few kinks forming in the rope and showing them agitated as they go in the direction of the pull on the rope. In producing this latter illusion the likely expedient that the skilled animator would use is that of having a set of celluloids with drawings—three or five—showing the kink represented in a number of progressive positions. The plan would be to have the details in a cycle, so that when the last detail of the cycle is photographed, the first one exactly follows in a proper order. The artist can put these rope drawings on the same sheets of paper that hold the arm movements—we have in mind the picture of the man tugging at the rope, of course. Then the cycle of drawings with the arm movements and the kinks of the rope in their progressive order can be used over and over again as long as it seems consistent with good judgment.
Now imagine a scene with a man pulling on a rope. He pulls hard, and the rope is tight and looks almost straight. The motion of his arms makes it clear that he’s pulling, creating a good illusion of the tugging, but the rope doesn’t show any movement because it's straight. It’s only when the artist gives the rope a slight undulating—or even snake-like—motion occasionally that the effect of any disturbance in it can be created. This kind of slight shake or wavering of the line works for typical situations, but it would be better if the artist depicted a loose strand of rope fiber moving in the direction the rope is supposed to go. Even better would be to show a few kinks forming in the rope and make them appear to move as they follow the pull on the rope. To create this last illusion, a skilled animator would likely use a set of celluloids with drawings—three to five—showing the kinks in various stages of movement. The idea is to create a cycle so that when the last detail of the cycle is photographed, the first one seamlessly follows in order. The artist can place these rope drawings on the same sheets of paper as the arm movements—we’re still thinking about the image of the man pulling on the rope. Then, the cycle of drawings, along with the arm movements and the kinks in the rope in their progressive sequence, can be reused as long as it seems reasonable.
This idea of arranging things in cycles is the general way of animating inanimate things. Nearly all the technical items in this chapter are managed with some such plan. Generally, too, the details are drawn on the transparent celluloids.
This concept of organizing things into cycles is the common method for bringing inanimate objects to life. Almost all the technical elements in this chapter are handled with this approach. Typically, the details are also illustrated on clear celluloids.
[155]
[155]
The problem in devising the components of any cycle is to have these components so arranged that the orderly movements take place from the first of the series to the last and then begin with the first again. The action must not skip, cause a hesitation, or go backward. This simply means that the components are to be spaced properly with respect to their relations to each other.
The challenge in creating the parts of any cycle is to arrange them so that the movements flow smoothly from the first in the series to the last and then start over with the first again. The action shouldn't skip, hesitate, or move backward. This just means that the parts need to be spaced correctly in relation to one another.
It would be difficult to give by words any directions exactly how to do this; actual drawing, with a testing in the preliminary sketches is the surest way of accomplishing it. As general directions, however, the advice would be to have an odd number of drawings and to vary the spatial intervals between the separate items. They should not, above all things, be equidistant.
It would be hard to explain exactly how to do this with just words; actually drawing and experimenting with the preliminary sketches is the best way to achieve it. As general advice, though, aim for an odd number of drawings and mix up the spacing between the individual items. They definitely shouldn’t be equidistant.
Where the artist wishes to present to the spectator an animated drawing of a waving banner, or flag, he makes a cycle of different drawings. If it is a flag, these drawings are made with undulating folds that pass the length of the flag as if it were agitated by the wind. Almost any sort of rippling effect, necessitating but three slightly different drawings, will satisfy the average audience. But if the artist wishes to do conscientious[156] work, he will give a little more attention to his planning and try to make it nearer actuality. Then he will contrive that there be one dominant drapery fold which is carried out farther and farther along the ruffled flag. As this fold nears the end it lessens its volume and at last disappears in a sudden flap. This will take five or seven drawings. In planning the cycle it will be arranged that immediately before the last flapping, the first phase of the dominant fold begins again.
Where the artist wants to show the viewer an animated image of a waving banner or flag, he creates a series of different drawings. If it’s a flag, these drawings feature flowing folds that extend the length of the flag as if it were being blown by the wind. Almost any kind of rippling effect, requiring just three slightly different drawings, will satisfy most viewers. However, if the artist aims to do thorough work, he will pay more attention to his planning and try to make it more realistic. He will design a main drapery fold that flows further and further along the fluttering flag. As this fold approaches the end, it decreases in size and ultimately disappears with a sudden flap. This will take five to seven drawings. In planning the sequence, it will be organized so that just before the last flap occurs, the first phase of the main fold starts again.
This effect of ruffling drapery by a fixed set of cycles used always in the same order will, of course, give a monotonous waving. But it can be diversified by an occasional break in the order in which the separate elements of the cycle are photographed, or an added modification obtained by a supplemental large flapping fold which can be produced by one extra drawing.
This effect of ruffling fabric through a fixed sequence of cycles used consistently will naturally create a repetitive wave pattern. However, it can be varied by occasionally changing the order in which the individual elements of the cycle are captured, or by adding a large flapping fold that can be created with one additional drawing.
An ordinary fragment of drapery in a garment is easily animated by making it in three phases. This will give a satisfactory quivering motion when projected in any bit of drapery that is blown about or flutters on a figure in action.
An ordinary piece of fabric in clothing can be easily brought to life by creating it in three stages. This will produce a pleasing fluttering motion when displayed in any part of fabric that is blown around or moves on a figure in action.
[157]
[157]
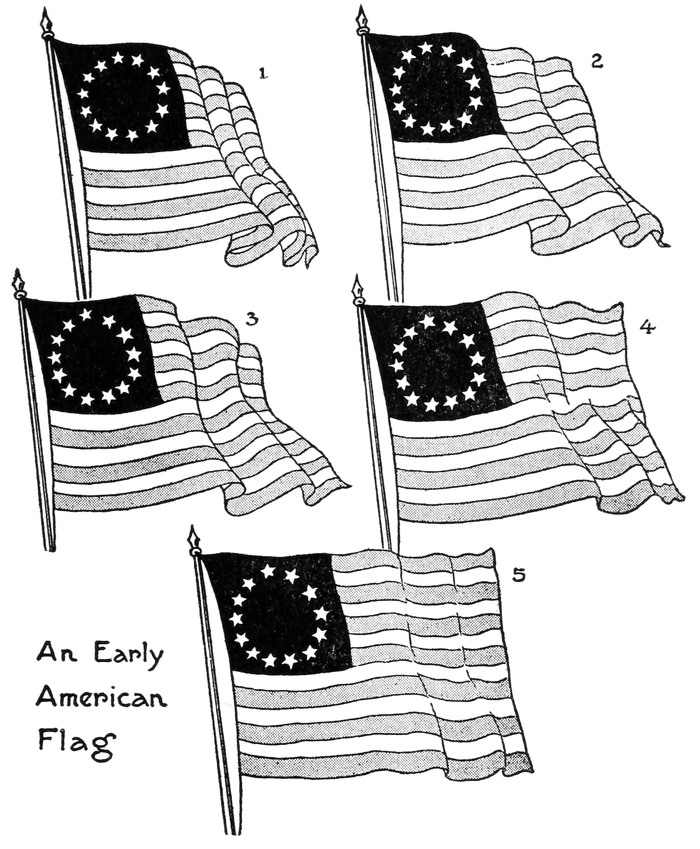
[158]
[158]
Flowing water, waves, and rippling on the surface of a stream, are not difficult matters to animate if the artist keeps in mind that the plainest unelaborated line work gives for these elusive pictorial ingredients the most striking effects on the screen.
Flowing water, waves, and ripples on the surface of a stream aren’t hard to animate if the artist remembers that simple, straightforward line work creates the most impactful effects for these tricky visual elements on the screen.
It is customary, again, for artistic particulars like these to be made in cycles of three or five drawings. The action for this class of subjects is nearly always quick, and so drawings for the purpose need not be numerous.
It’s common for artistic details like these to be created in groups of three or five drawings. The action for this type of subject is usually fast-paced, so you don’t need a lot of drawings for this purpose.
A water-splash is a detail of a screen animation rather frequently introduced. Animators have adopted a stereotyped way of rendering it. When it is associated with a falling of some unlucky character into the water, it is very effective from a pictorial and a humorous point of view. The succeeding up-rushing column of water, after the splash, is made in the form of a huge mushroom—rather conventional but extremely comical.
A water splash is a common detail in screen animations. Animators have developed a typical way of depicting it. When it happens alongside a character unfortunate enough to fall into the water, it's quite effective both visually and humorously. The following column of water that rises after the splash is shaped like a giant mushroom – somewhat conventional, but very funny.
In such a particular as a jet of water, a cycle of drawings is also used. In planning such drawings for animation care must be taken that they give in the combined screen illusion a proper one of falling water. The slightest misplacing of succeeding details representing the jet may give an[159] effect of the water going backward. A funny touch is what is wanted in a humorous picture, but, generally, not of this sort.
In a specific instance like a jet of water, a series of drawings is also utilized. When creating these drawings for animation, it's important to ensure they collectively create the right illusion of falling water on the screen. Even a tiny mistake in positioning the successive details of the jet can make it look like the water is flowing backward. A humorous element is desired in a funny picture, but usually not in this context.

The drawings are repeated, number 1 following number 3.
The drawings are repeated, with number 1 following number 3.
Imparting an appearance of rain over a scene is produced by having several celluloids with lines indicating this. They would be used in their order as designed during the photography in the usual way.
Imitating a rainy look in a scene is done by using several celluloid sheets with lines showing this effect. They would be used in the intended order during filming in the usual way.
[160]
[160]
Falling snow—that indispensable ingredient of the provincial melodrama—is simply managed by spreading, at haphazard over several celluloids, spots of white pigment. A general tinting, of course, over the underlying pictorial composition would add, by contrast of tone, to the illusion.
Falling snow—an essential part of the small-town drama—is easily created by randomly applying white paint on several film frames. A general tint over the base image would enhance the illusion by creating a contrast in tone.
A blank sheet of celluloid placed over the entire drawing is often employed to hold components of some quickly moving element of an incident. Each separate detail of its drawing, in this case, is made on this blank celluloid under the camera and photographed as it is made. Supposing that it is lightning zigzagging across a dark background. There will be drawn over this celluloid the first part of the bolt, photographed and then another part drawn which is photographed, and then the end of the bolt which is also separately taken. This drawing of the lightning-bolt, in white pigment, can be easily rubbed off with a paint rag, or cotton wadding, and then another lightning-bolt drawn and photographed in the same way.
A blank sheet of celluloid placed over the entire drawing is often used to capture the components of a quickly moving part of a scene. Each individual detail of the drawing, in this case, is created on this blank celluloid under the camera and photographed as it’s made. Let’s say it’s lightning zigzagging across a dark background. The first part of the bolt is drawn on this celluloid, photographed, then another part is drawn and photographed, and finally, the end of the bolt is also taken separately. This lightning bolt, drawn in white paint, can easily be wiped off with a rag or cotton wool, allowing for another lightning bolt to be drawn and photographed in the same way.
In some cases where a large volume of smoke is to be shown in hurried movement, the animator draws the smoke in distemper pigment—sombre dark grays, half-tints, or in white—on a blank[161] sheet of celluloid covering the scene. The effect of smoke moving very quickly could also be drawn in progressive fragments on the upper surface of the glass in the frame that is pressed down upon the drawings each time that they are photographed. If it is a house burning, for instance, the flames in white paint and the smoke in grays and black can be put on its surface.
In some situations where a lot of smoke needs to be depicted in quick motion, the animator uses distemper paint—dark grays, lighter shades, or white—on a blank[161] sheet of celluloid that overlays the scene. The effect of rapidly moving smoke can also be created in progressive sections on the top surface of the glass in the frame, which is pressed down on the drawings every time they are photographed. For example, if there's a house on fire, the flames can be painted in white and the smoke in grays and black on the surface.
Little happenings that form part of a general scene are managed, as a rule, too, by cycles of drawings or cycles of details in a drawing. To specify a few things, we may cite puffs of vapor from an automobile, steam pouring out of the spout of a teakettle, and smoke from a chimney.
Little occurrences that make up a general scene are usually handled through sequences of drawings or sets of details in a drawing. To mention a few examples, we can include puffs of vapor from a car, steam coming out of a kettle, and smoke from a chimney.
[162]
[162]
Vapor, steam, and smoke are best represented by pigment, as hard ink contours are not exactly suited for such elements of a pictorial composition. But such elements defined by ink lines in a comic drawing are, of course, excusable. Sometimes to show smoke moving where the drawings are all on paper, representing it by crayon-sauce with a stump has been found to be effective.
Vapor, steam, and smoke are best depicted with pigment since hard ink outlines aren't really suited for these elements in a picture. However, using ink lines to define these elements in a comic drawing is perfectly acceptable. Sometimes, to show smoke drifting in drawings that are all on paper, using crayon with a blending stump has proven to be effective.
If an artist is picturing in a comic cartoon the firing of a cannon, he indicates a globular projectile leaving the cannon’s mouth. The artist does not do this because of any scrupulous care in picturing reality but merely that it seems in keeping with the idea of vivid comic delineation.
If an artist is depicting in a comic cartoon the firing of a cannon, they show a round projectile coming out of the cannon’s muzzle. The artist doesn’t do this out of a meticulous attention to reality but simply because it fits the concept of lively comic representation.
In producing the appearance of a cannon-ball following its trajectory off into the far distance he takes heed of the law of perspective that requires an object to become visionally smaller as it nears the horizon. This animation is easily[163] managed. A certain number of models of the missile are cut out of thin cardboard graduated in size from the first that leaves the cannon’s mouth to the smallest for the distance. They are used by putting one at a time in their proportionate places under the camera in connection with the other work during the photography. Not many of these models would be required, as the action is so rapidly represented that almost any sort of illusive effect will do for the purpose.
In creating the look of a cannonball following its path into the distance, he pays attention to the perspective rules that state an object should appear smaller as it approaches the horizon. This animation is straightforward[163] to manage. Several models of the missile are cut from thin cardboard, sized from the first one that exits the cannon to the smallest for the distance. They are used one at a time, placed in their proper spots under the camera alongside the other work during the photography. Not many of these models are needed since the action is represented so quickly that almost any type of illusion will work for the effect.
According to the popular idea, every comic scenario should provide for some cataclysmic climax in which the entire picture area, or a large part of it, is to be filled with the graphic symbols denoting an explosion or any sudden occurrence or mishap. Such things for the animator are not hard.
According to the common belief, every comic situation should lead to a dramatic climax where the whole scene, or a big part of it, is filled with visual symbols representing an explosion or any unexpected event or accident. For the animator, these things are not difficult.
[164]
[164]

A. General effect of the animation.
General impact of the animation.
B. Part of the design which is drawn on the transparent celluloid.
B. A section of the design that's drawn on the clear celluloid.
Below: Three separate drawings, used in sequence, with the design on the stationary celluloid.
Below: Three different drawings, used one after the other, with the design on the stationary celluloid.
[165]
[165]
But bits of dramatic business like these should be used in moderation and in their proper places and always at the right time. Besides, being easily drawn, their accomplishment on the film presents no difficulties.
But moments of drama like these should be used sparingly and in the right context, always at the appropriate time. Plus, since they’re easy to create, executing them in the film isn't hard.
The several methods by which they can be produced are: (1) To arrange their components[166] in cycles; (2) drawing them in their order under the camera and photographing progressively; (3) have little cut-out pieces to move about under the camera and photographed at each place that they have been moved to.
The various ways they can be created are: (1) arranging their components in cycles; (2) drawing them in order under the camera and taking photos progressively; (3) using small cut-out pieces that can be moved around under the camera and photographed each time they are moved.

The four simple elements above give on the screen the lively animation indicated by the lower sketch.
The four basic elements above create the lively animation shown in the sketch below.
Take for instance such a nonsensical conceit as that of having a constellation of stars encircling a dazed man’s head. This could be made by having (1) a cycle of drawings for the effect; or (2) drawing it progressively under the camera over a piece of celluloid; or, again, (3) by having a number of little stars cut out of paper and[167] moved around and manipulated the same as other cut-out models.
Take, for example, the ridiculous idea of having a bunch of stars circling a confused person's head. This could be done by (1) creating a series of drawings for the effect; or (2) drawing it frame by frame on film; or, alternatively, (3) using small paper stars that are cut out and moved around like other cut-out models. [167]
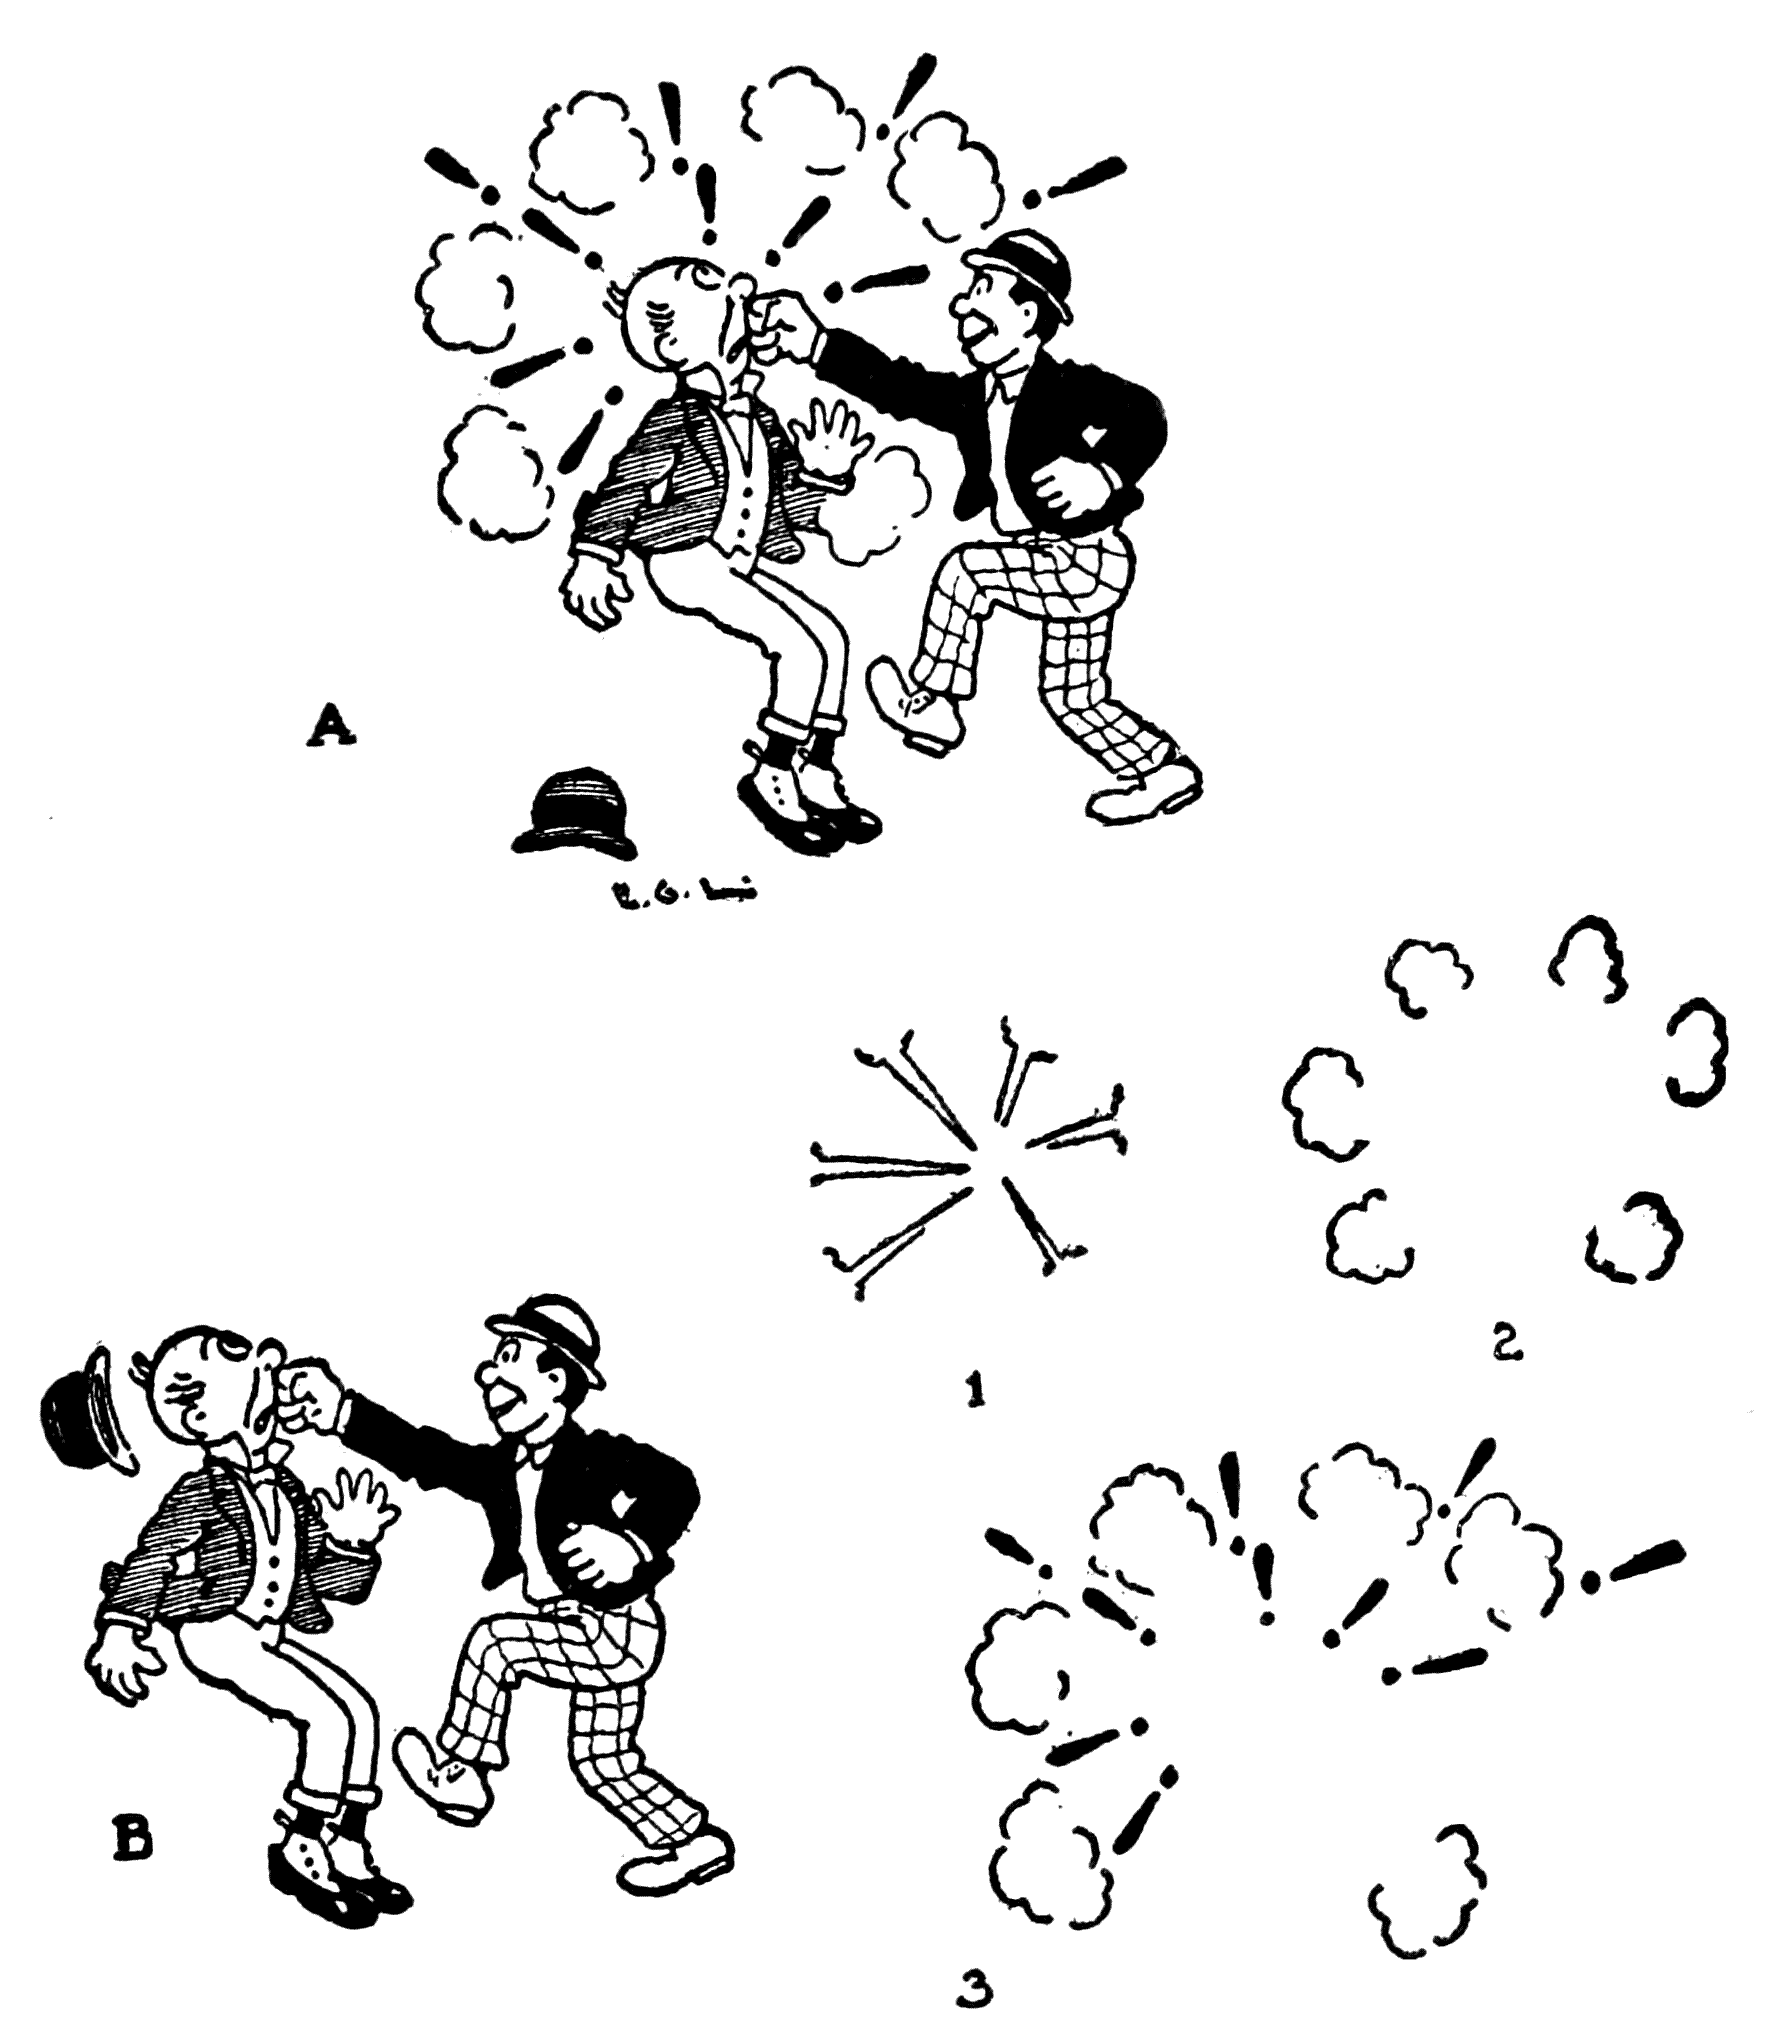
One can see from all these particulars that making animated cartoons is not always a matter of[168] drawing, pure and simple. The animator would make very little progress if he were to refuse to take advantage of any proper expedients or tricks to accelerate his work.
One can see from all these details that creating animated cartoons isn't just about drawing, plain and simple. The animator would make very little progress if they refused to use any appropriate techniques or shortcuts to speed up their work.

MISCELLANEOUS MATTERS IN MAKING ANIMATED SCREEN PICTURES
MISCELLANEOUS MATTERS IN CREATING ANIMATED MOVIES
CHAPTER VIII
MISCELLANEOUS MATTERS IN MAKING
ANIMATED SCREEN PICTURES
Many of the striking ways of telling incidents of an animated cartoon put one in mind of the pictorial symbols of primitive man. An example is that of a vision appearing above the head of some one in doubt or in a revery. Then there is the miniature scene floating over a sleeper to tell that of which he is dreaming. These and other similar forms are supplementary ways of explaining incidents in a screen story. They are also used in the regular photographic film; but they are specifically typical of the animated cartoon.
Many of the unique ways of depicting events in an animated cartoon remind us of the visual symbols used by early humans. For example, there’s a vision that appears above someone who is uncertain or daydreaming. Then, there’s the small scene hovering over a person asleep, depicting their dream. These and other similar techniques are additional ways of illustrating events in a screen story. They are also found in traditional films, but they are especially characteristic of animated cartoons.
They are amusing additions to a film that are certain to please whether used to apprise the audience of what is going on in the character’s mind, or to explain the dream of a sleeper as he lies abed.
They are entertaining elements in a film that are sure to delight, whether used to inform the audience about what's happening in the character's mind, or to explain a sleeper's dream while they lie in bed.
There are several modes of creating any of[172] these effects. The usual way would be that of having the quiescent part, say it is a sleeper, limned on the celluloid; and the details of the moving part, say the vision, on three or five sheets of paper.
There are several ways to create any of[172] these effects. The common method would be to have the still part, like a background, drawn on the film; and the details of the moving part, like the animation, on three or five sheets of paper.
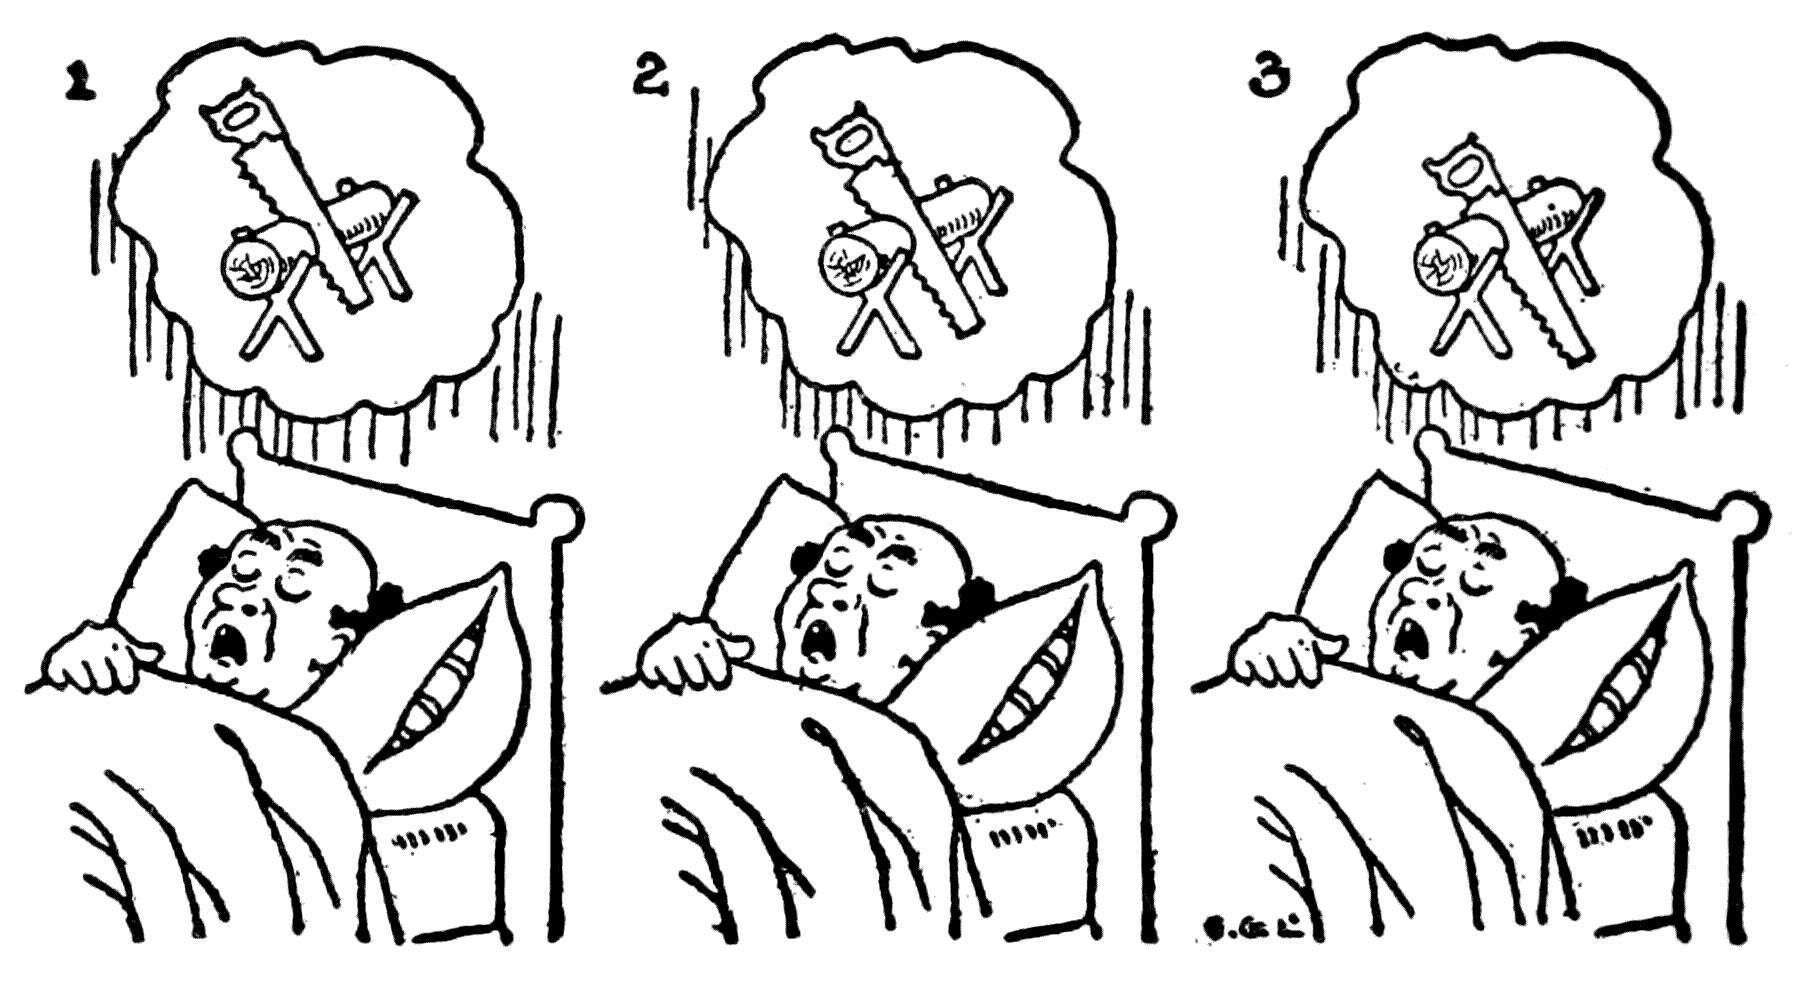
To effect this, the sleeper would be drawn on celluloid and the pictures in the clouds on separate sheets of paper.
To achieve this, the sleeper would be depicted on celluloid and the images in the clouds on separate sheets of paper.
Perhaps the humorist-artist wishes to make his picture a little bit more telling by indicating, with appropriate onomatopœic consonants, the sound of snoring. These additions can be drawn while the photography is taking place on a blank celluloid sheet superimposed over all the drawings in a way explained in a preceding chapter.
Perhaps the humorist-artist wants to make his picture more expressive by using fitting sound words to represent the sound of snoring. These additions can be created while the photography is happening on a blank film sheet placed over all the drawings, as explained in a previous chapter.
Symbols of musical notation and sound-imitating[173] words are often introduced into a screen picture. They can be made to dance in rhythm, or at haphazard, by drawing them in series of three or so, on celluloid sheets. These would be placed, one at a time, in their order over the general scene and repeated as long as desired.
Symbols of musical notation and sound-imitating[173] words are often included in a screen picture. They can be made to move in rhythm, or randomly, by drawing them in groups of three or so on celluloid sheets. These sheets would be placed, one at a time, in order over the main scene and repeated for as long as needed.

Series of drawings marked A show the screen effect desired. Below: the elements representing it that are used with the simple component—on celluloid—marked B.
Series of drawings marked A show the desired screen effect. Below: the elements that represent it and are used with the simple component—on celluloid—marked B.
[174]
[174]
The employment of balloons—they have been alluded to before—is a frequent one in comic screen work. They are the mouthpieces containing the dialogue of the characters. Their outline, more or less balloon-shaped, hovers over the heads of the speakers. The lines defining the balloons can come into the scene gradually in a lively way, and the dialogue itself can come in word by word. This latter scheme itself suggests talking.
The use of balloons—which has been mentioned before—is common in comedic films. They serve as the speech bubbles for the characters. Their shape, generally resembling a balloon, floats above the speakers' heads. The lines that outline the balloons can appear in a dynamic way, and the dialogue can show up word by word. This method itself implies conversation.
When the first animated cartoons were produced and an effect with balloons was intended, the artist thought that he was doing well enough if he showed the lettering and merely had the person supposed to be speaking standing motionless. But now an artist who cares enough for his craft to put as much business into the scenes as possible will show the lips moving and the arms gesticulating at the same time that the lettering appears.
When the first animated cartoons were created, and an effect with balloons was intended, the artist thought he was doing well if he just displayed the text and had the character who was supposed to be speaking standing still. But now, an artist who really cares about his craft will make sure to show the lips moving and the arms gesturing at the same time the text appears.
There are innumerable things that the artist must think of while he is photographing his drawings, and one of the weighty ones is to have the lettering for any particular dialogue, or explanation, held long enough on the screen for it to be[175] read. Every studio has its own special rule as to the number of separate frames of a film to allow for a word. The only way to arrive at any conclusion as to how much film to take for any sentence in a balloon, or on a title, is to have some one read it and then time this reading. In this way the artist will be able to tell how much to give any particular wording. He will be able, too, after a while, to formulate his own rule with regard to the matter.
There are countless things the artist has to consider while photographing his drawings, and one of the important ones is how long the lettering for any specific dialogue or explanation stays on screen for it to be[175] read. Every studio has its own specific rule about the number of separate frames in a film to allocate for each word. The only way to determine how much film to use for any sentence in a speech bubble or title is to have someone read it and then time that reading. This way, the artist will know how much time to give to each particular phrase. Over time, he’ll also be able to come up with his own rule regarding this.
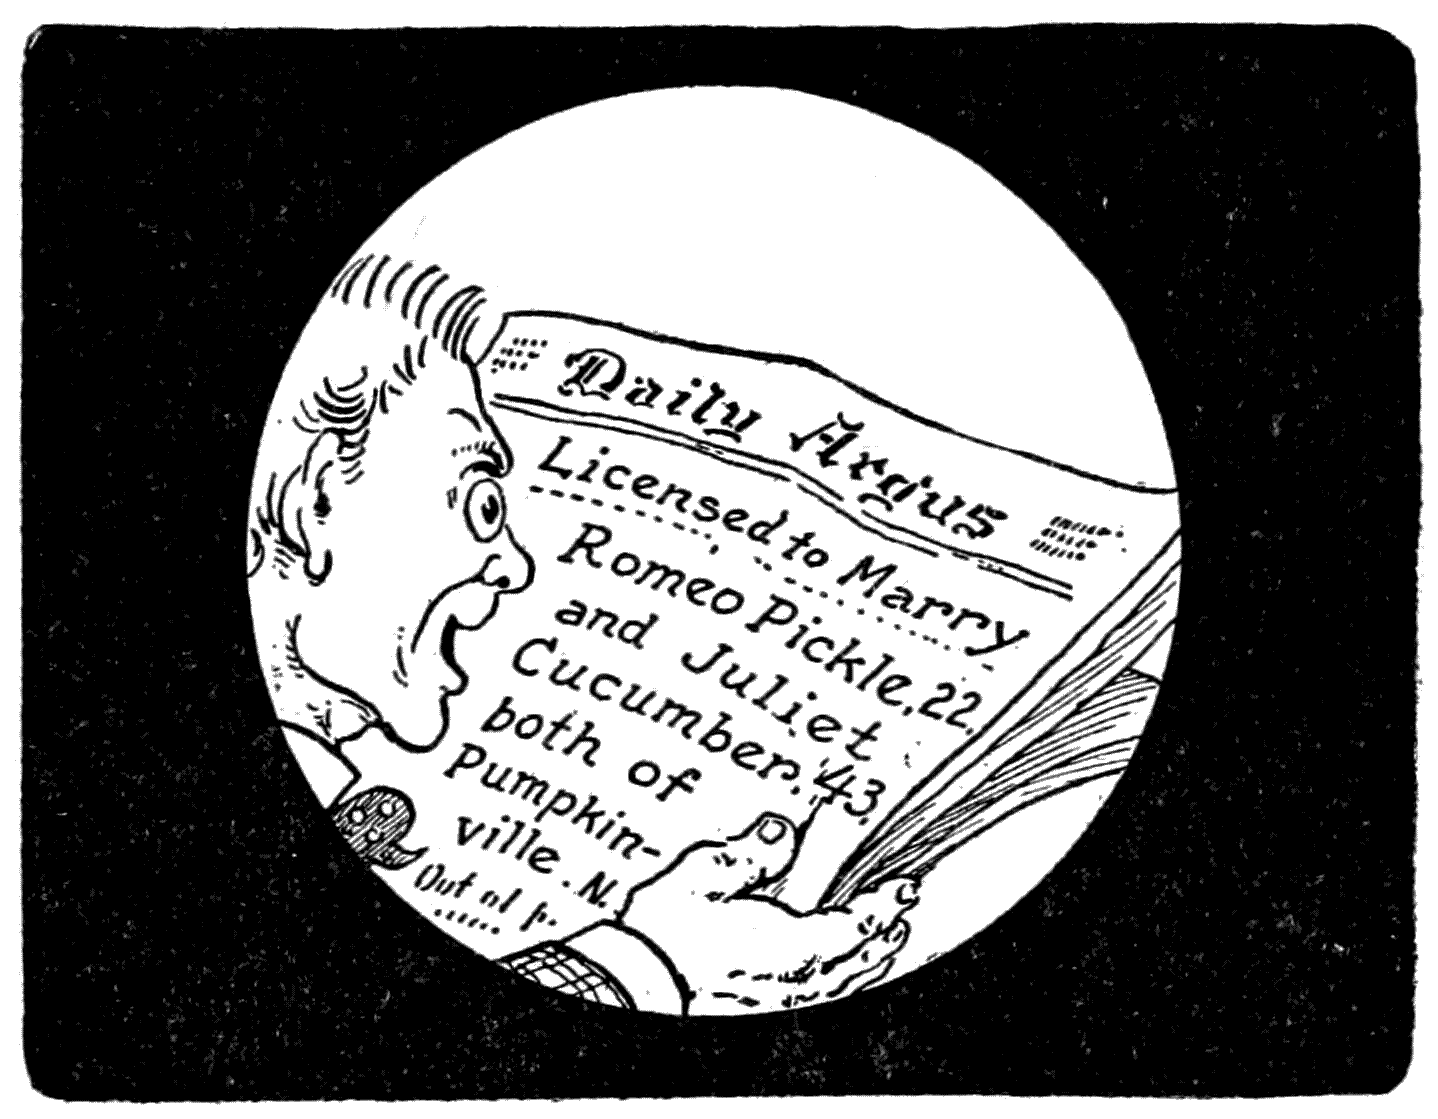
A favorite method of telling something, or to hint as to that which is to follow, is to have a[176] character discovered reading a newspaper upon which the item explaining the matter shows in an exaggerated type. The design is usually enclosed within a circle with the outside space a solid black. There is no special reason for using this particular encircling design. It is a way often used. Technically it is a good plan to employ this telescopic mat, as it may be called, as its forcible contrast of solid black margin breaks the monotony of the general uniform photographic tone of the rest of the film.
A popular way to reveal something or to hint at what's coming next is to have a[176] character seen reading a newspaper that has the important information displayed in bold type. This design is typically placed inside a circle with the surrounding area filled in with solid black. There’s no specific reason for using this particular circular design; it's just a common technique. From a technical standpoint, using this kind of design, which might be thought of as a telescopic mat, is effective because the stark contrast of the solid black border breaks up the uniform photographic tone of the rest of the film.
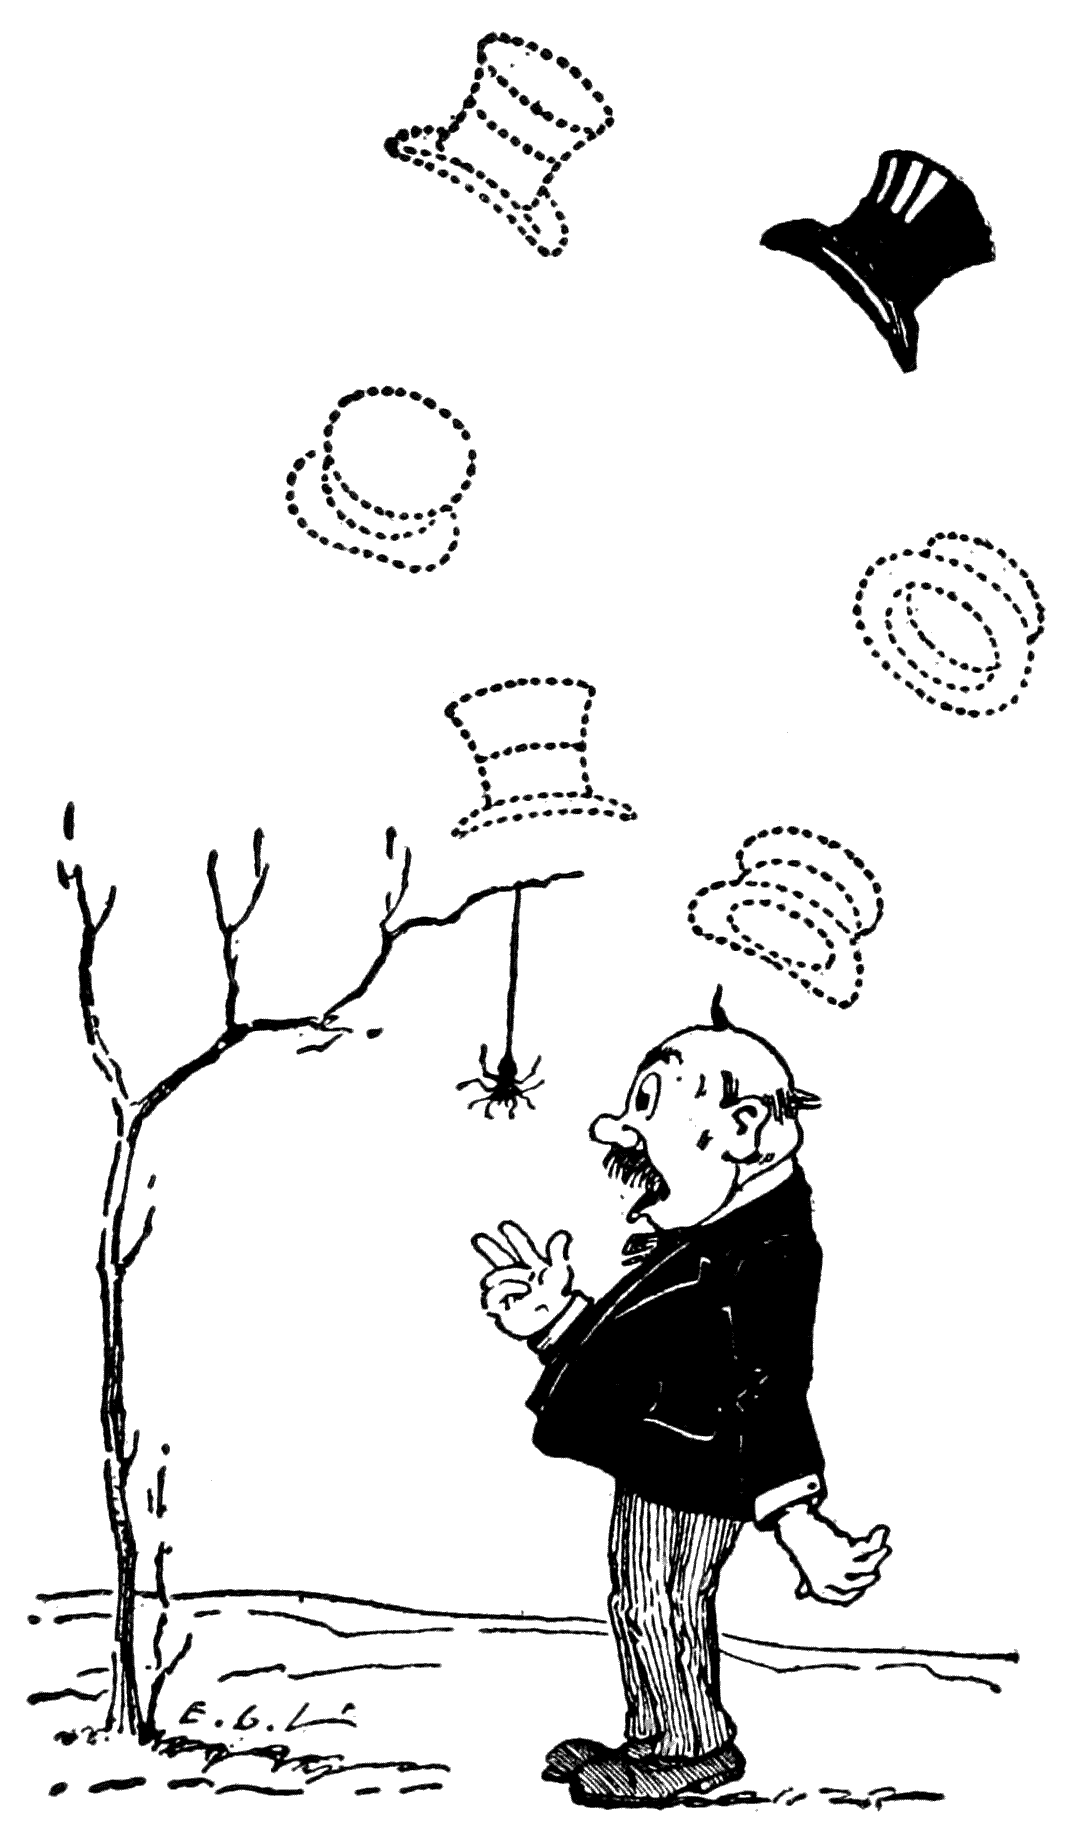
To vivify this on the screen, little “model” hats are used during the photography.
To bring this to life on the screen, small “model” hats are used during the photography.
An amusing occurrence sometimes brought into a story is that of having a man’s hat fly from his head into the air and come down upon[177] his head again. Of course, the practical way of putting this on a length of film would be that of having a little cut-out dummy. The artist, however, takes the trouble of making several dummies of the hat drawn in different views. A single dummy would show but a mere mechanical turning, but by using several in different views, he gets a very good similitude of actuality in the wind twirling the hat around in a lively way. A little point to help the humor of the situation is that of having the hat hesitate, as it were, and give an extra spin immediately before it lands upon the head.
An amusing scenario often included in a story is when a man’s hat flies off his head into the air and then comes back down onto his head. To make this work in a film, the practical approach would be to use a little cut-out dummy. However, the artist goes the extra mile by creating several dummies of the hat in different angles. Using just one dummy would only show a basic spin, but by utilizing several from different perspectives, he captures a more realistic effect of the wind playfully tossing the hat around. To enhance the humor, it’s also a nice touch to have the hat pause slightly and do an extra spin just before it lands back on the head.
It isn’t always necessary for an artist to make a cycle or a series of drawings for a movement. For instance, he is showing a rather large face on the screen and it is intended that the eyes move. This could be effected by drawings, but there is a much simpler way. The places for the eyes on the main drawing are left blank and holes cut out the size of these blank spaces. On a narrow piece of paper at the proper distance, two eyes are drawn. This paper, with the eyes, is slipped underneath the one with the drawing that has the eye spaces cut out. Now the manipulation[178] of this paper, holding the eyes while in position under the face, is easy. The various positions in which the eyes are placed, it is understood, will be photographed by the stop-motion method.
It isn't always necessary for an artist to create a cycle or series of drawings for a movement. For example, he is displaying a pretty large face on the screen, and it's meant for the eyes to move. This could be done with drawings, but there's a much simpler way. The spots for the eyes in the main drawing are left blank, and holes are cut out where those blank spaces are. On a narrow piece of paper at the right distance, two eyes are drawn. This paper with the eyes is slid underneath the one with the cut-out spaces for the eyes. Now, moving this paper while keeping the eyes in position under the face is easy. It's understood that the different positions of the eyes will be captured using the stop-motion method.[178]
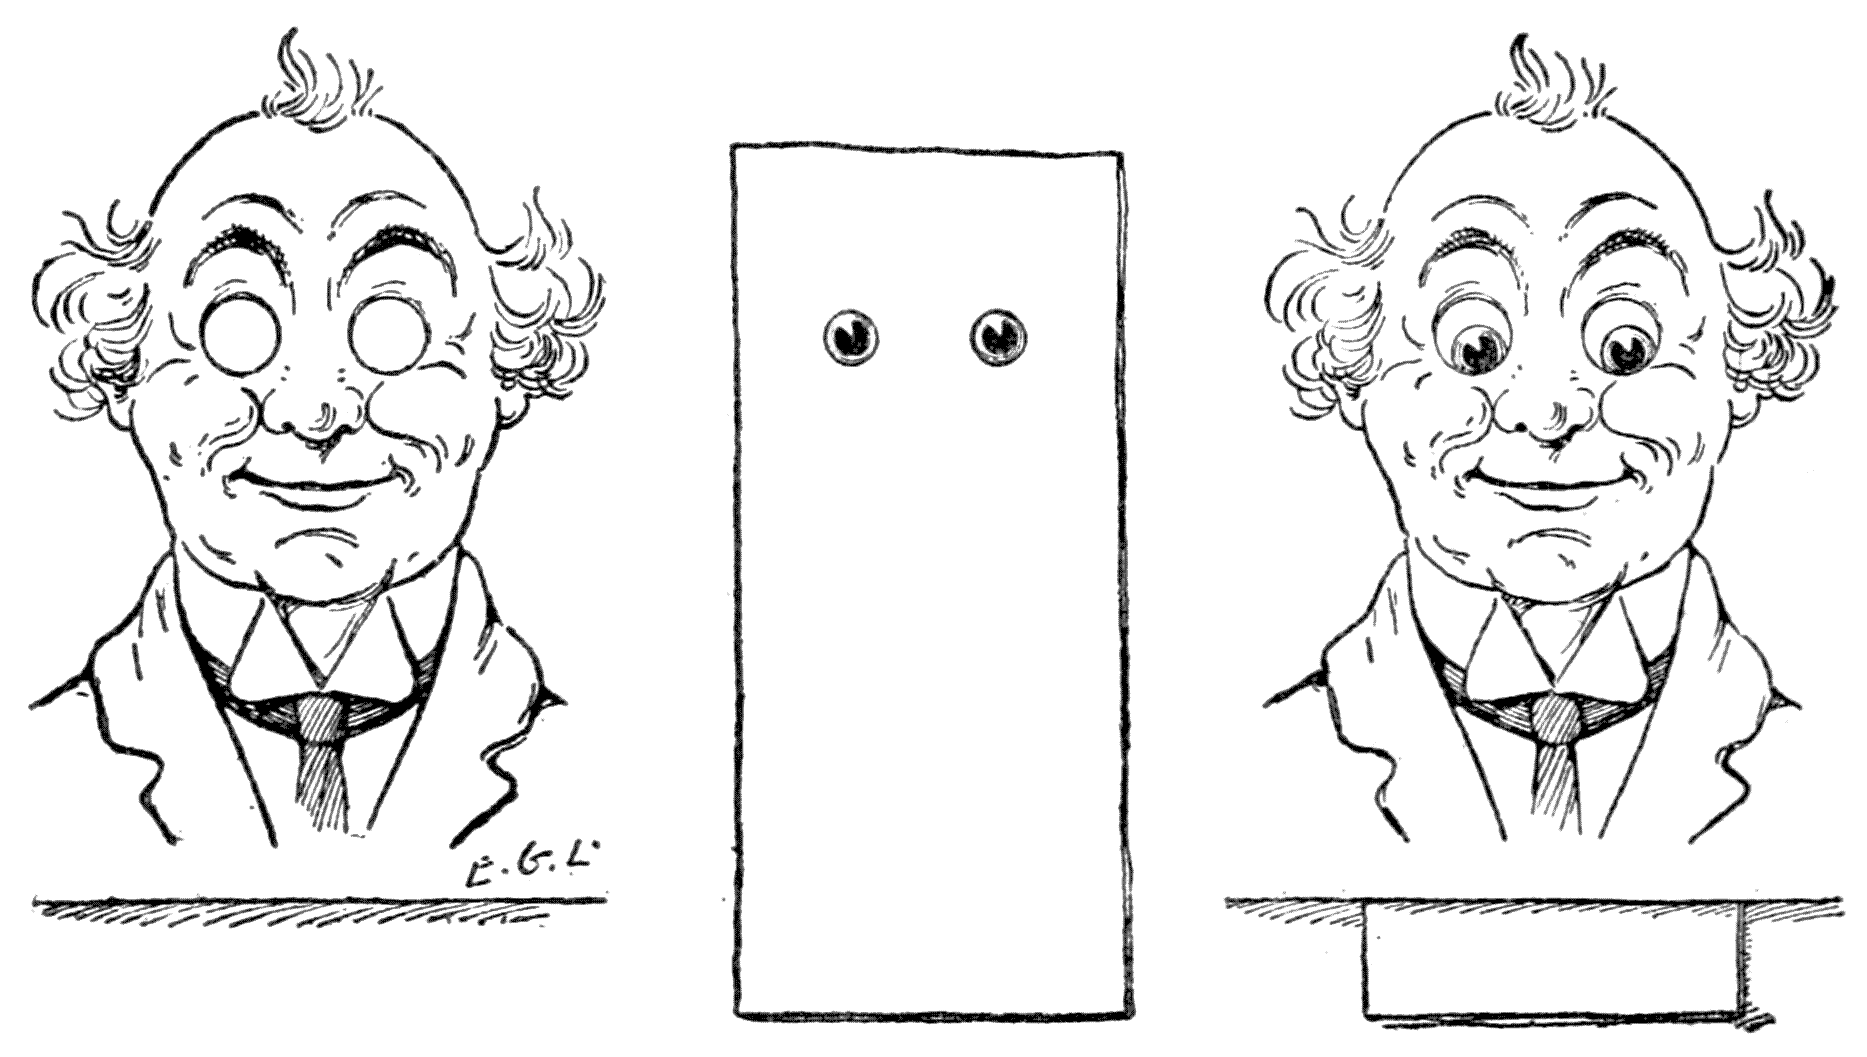
The true artist, in keeping with his talent for creative work, will be disposed to devise helpful contrivances or expedients to lighten irksome and monotonous details arising in this art. And in addition to the possession of this talent, and that of good draftsmanship, he must be quick in deciding on the best means of economizing labor, so that he can spend more time where thorough drawing is needed. He must, in short, in[179] any particular case, put in as much work as it requires and no more. By experience he will learn to know where to slight—“slight” isn’t exactly the word, but it will do—the drawing.
The true artist, leveraging their creative talent, tends to come up with useful tools or methods to make tedious and repetitive tasks in this art easier. Besides having this skill and good drawing ability, they also need to be quick at figuring out the best ways to save effort, allowing them to focus more on areas that require detailed work. In short, they must put in just enough effort for each situation without overdoing it. Through experience, they'll learn where to cut back—though “cut back” isn’t the perfect term, it gets the point across—on the drawing.
With respect to this latter point, suppose there is some arm movement, with the arm swinging as it does in a hurried walk. Hands, it is certain, are difficult details to draw, and if they are carefully rendered in all of the positions it would take a long time to draw the entire series. But the experienced animator has learned that at times he can, for some of the positions, every other one perhaps, make quickly lined marks indicative of hands. These quickly made lines, however, must be drawn in a way that will help the action. Exactly how to make them and to what extent to “slight” them is learned only by long experience.
Regarding this last point, imagine there's some arm movement, like the arm swinging in a brisk walk. It's true that hands are tricky details to draw, and if every position is carefully illustrated, it would take a long time to complete the whole set. However, an experienced animator has figured out that for some positions, perhaps every other one, they can quickly sketch lines to represent hands. These quick lines must be drawn in a way that enhances the action. Exactly how to create these lines and to what degree should they be simplified is something learned only through extensive experience.
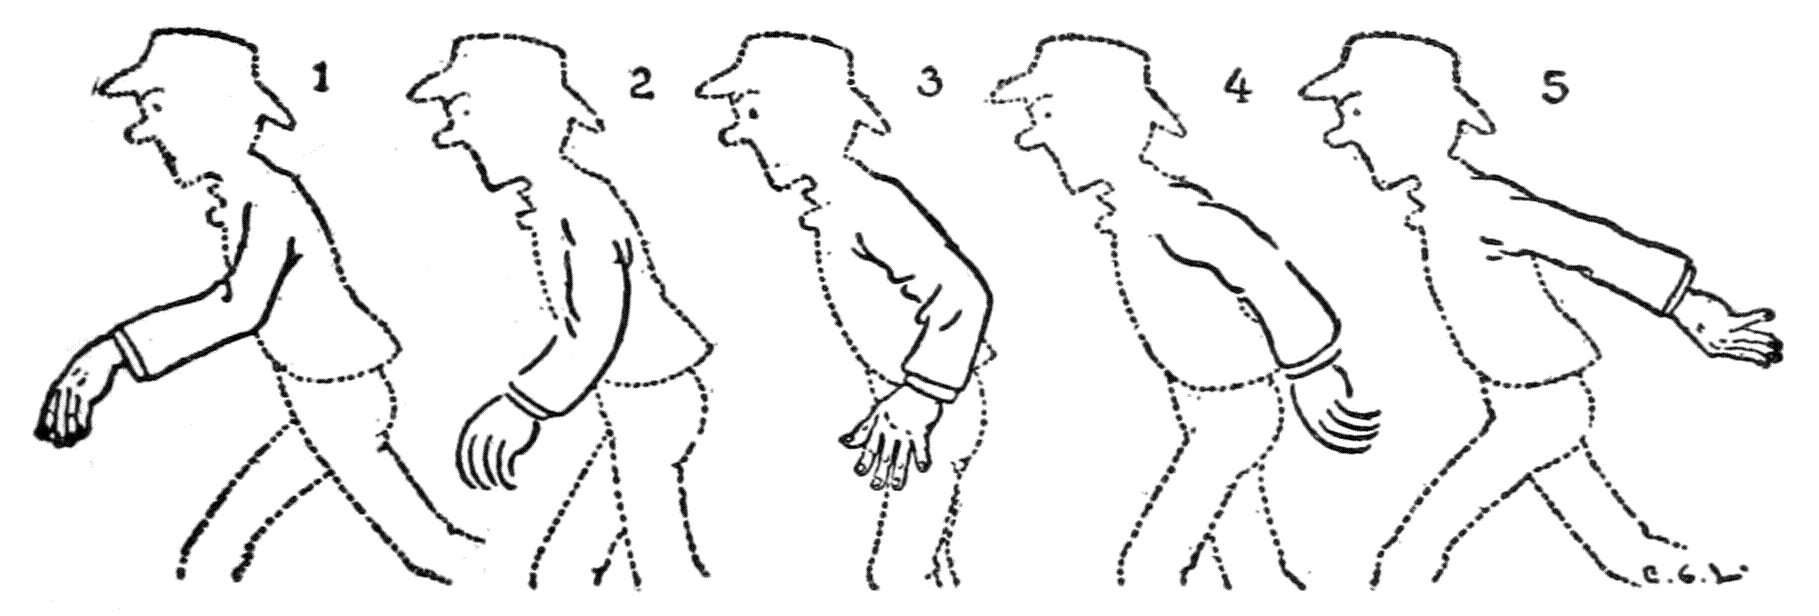
[180]
[180]
Often there is a question as to the number of drawings necessary for a movement. If a hand, for example, is to be moved from the side of the thigh to the head and then to touch the brim of the hat, one single position half-way between the two extreme ones may do for some swift action in a humorous cartoon, but if it is for a slower action it should have at least three positions between the extremes.
Often, there's a question about how many drawings are needed for a movement. For instance, if a hand is supposed to move from the side of the thigh to the head and then touch the brim of the hat, one position halfway between the two extremes might work for a quick action in a funny cartoon. However, for a slower action, there should be at least three positions between the extremes.

Above: for a quick movement.
Below: for a slower movement.
But it doesn’t worry the skilled animator very much whether he makes three, five, or even more[181] drawings between the extreme positions of any gesture or action. Nevertheless, while the artist is making these arm movements he must put thought into the work. There is, for instance, a certain matter with respect to drawing the relative axes of the segments of a limb that requires reflective attention. To be precise, suppose the action is to represent an arm moving from below and pointing with the index-finger skyward. Now, in any directly following phases of the movement the same degree of flexure at the articulations must not be present in the drawings. The whole arm as it hangs by the side, before the action begins, is nearly straight, with very little bending at either elbow or wrist. In moving it upward, it is not to be traced with this same relative straightness and same degree of joint angularity in all the positions. It would move then on the screen with the ungracefulness of an automaton.
But the skilled animator isn’t too concerned about whether they create three, five, or even more[181] drawings between the extreme points of any gesture or action. Still, while the artist is making these arm movements, they need to think carefully about their work. For example, there's a specific detail regarding how to draw the relative angles of a limb's segments that requires thoughtful attention. To be specific, let’s say the action shows an arm moving up and pointing with the index finger towards the sky. In the subsequent phases of this movement, the same degree of bending at the joints should not be consistent across the drawings. The entire arm, when it hangs by the side before the action starts, is almost straight, with very little bend at either the elbow or wrist. As it moves upward, it shouldn’t maintain this same relative straightness and angle at the joints in every position. Otherwise, it would appear on the screen as clumsy as a robot.
Instead, the several drawings should have the joints—elbow and wrist—at different degrees of flexure. Especially is this difference to vary from one drawing to a succeeding one, with the angle at the joint, just a little more, or just a little less. The whole matter can be best comprehended[182] if the artist, before depicting this action, try it himself. Then he would see that if he moves the arm as if it were a rigid thing, only hinged at the shoulder, the movement would be false and not characteristic of a living organism. The natural way is an unconstrained, easy bending movement. The animator in his drawings slightly emphasizes this manner of moving.
Instead, the various drawings should show the joints—like the elbow and wrist—at different angles of flexion. This difference should change from one drawing to the next, with the angle at the joint being slightly more or slightly less. The whole concept can be best understood[182] if the artist tries this movement themselves before illustrating it. They would realize that if they move their arm as if it’s a stiff object, just hinged at the shoulder, the motion would appear unnatural and not true to a living being. The natural motion is a relaxed, smooth bending movement. The animator should subtly highlight this way of moving in their drawings.
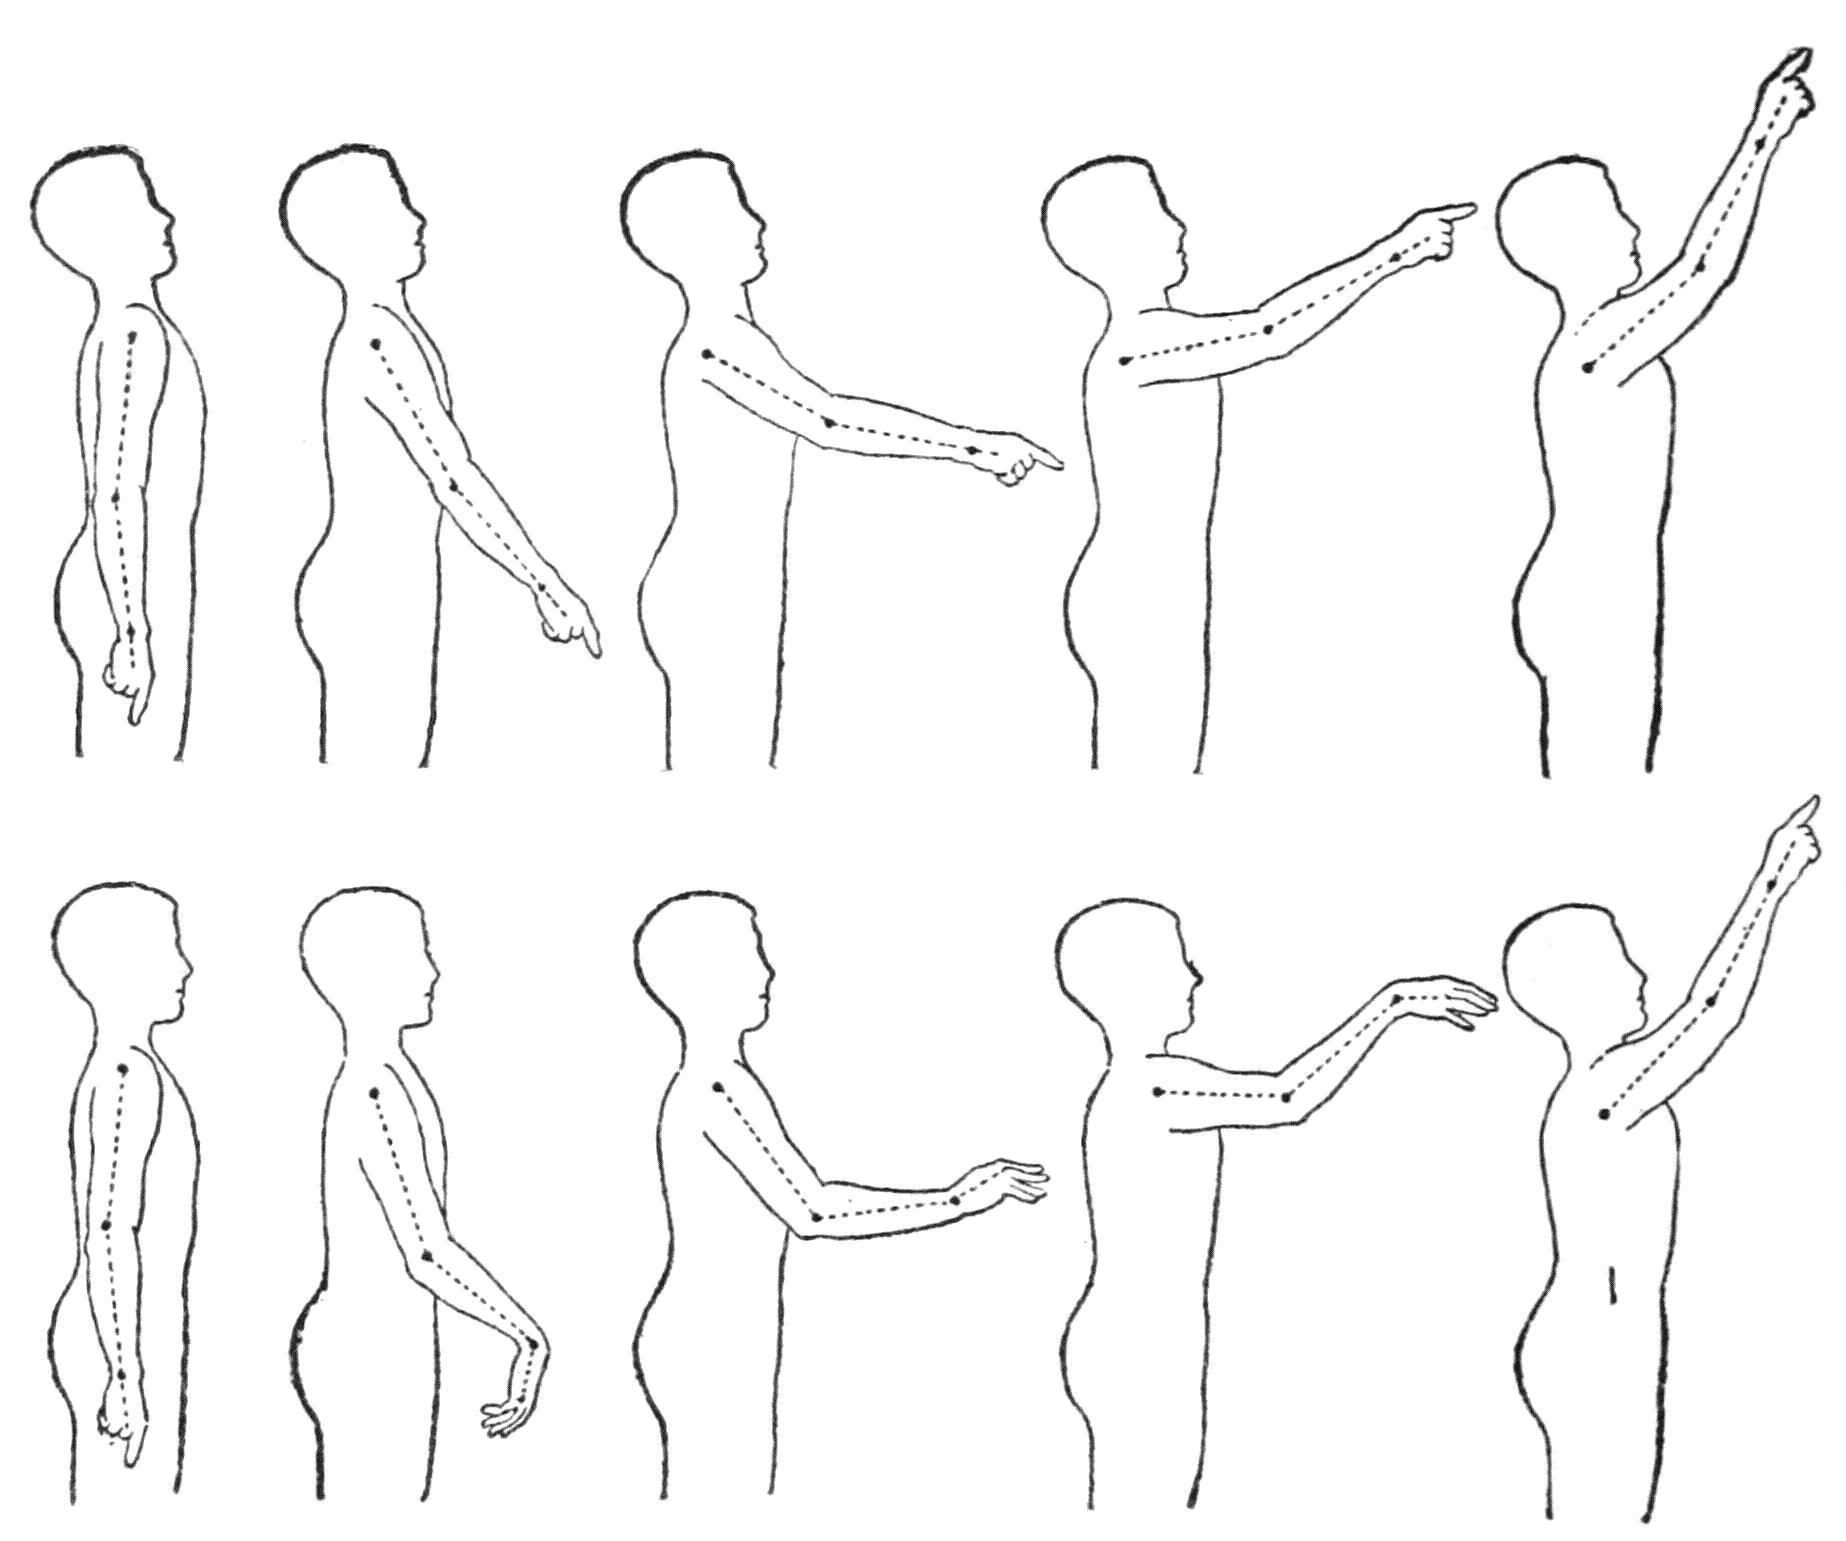
Above: moving automaton-like with no bending at the joints.
Below: moving with various degrees of flexion at the joints.
[183]
[183]
An artist shows his aptness for character delineation in the way in which he draws the views of a face for turning it from side to side. A graphic caricaturist of limited scope has a proneness for adhering to a few stencil patterns, in the matter of pose, for his characters. Front face, profile, and occasionally a three-quarter view make up his catalogue of facial picturing. The animator uses this delineatory trilogy, too, in the ordinary turning of the head from side to side. But he must be skilled, besides that of portraying a face in these views, in drawing it in any view. And a skill that is still more needed is that of being able to keep the portraiture of a character throughout any series of drawings.
An artist demonstrates his talent for capturing character through how he depicts a face from different angles. A graphic caricaturist with limited range tends to stick to a few standard patterns for his characters' poses. A front view, profile, and occasionally a three-quarter view make up his repertoire of facial illustrations. The animator also uses this set of views when rotating the head side to side. However, he must be skilled not only in portraying a face in these angles but also in drawing it from any perspective. An even more essential skill is the ability to maintain the character’s likeness throughout a series of drawings.
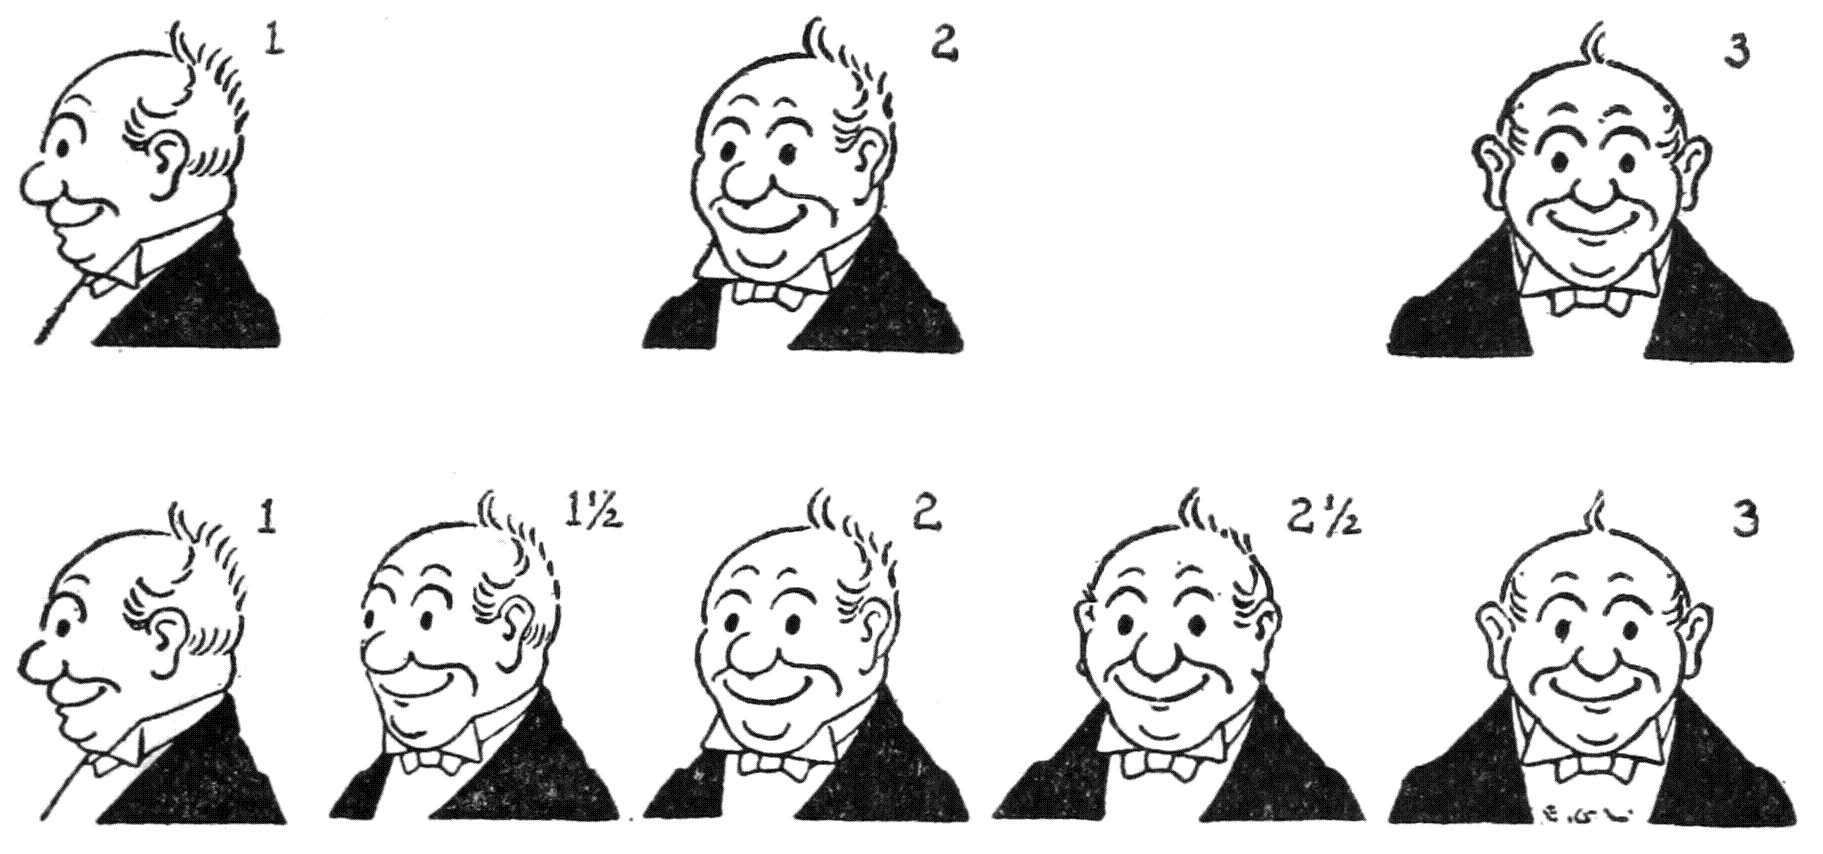
[184]
[184]
To keep the features the same throughout a number of drawings it is found advantageous to spend a little more time in the preliminary planning when creating the original sketch for the character. The idea is not so much to make a face that is easy to draw as to give it certain distinguishing lineaments that are recognizable in the varying positions needed in animating it.
To maintain consistent features across multiple drawings, it’s helpful to invest some extra time in the initial planning when making the original character sketch. The goal is not just to create a face that’s easy to draw but to give it specific distinguishing traits that are recognizable in the different positions required for animation.
Besides, when originating a face for frequent repetition in a cartoon, seeking one that can be drawn quickly and easily represented in any view facilitates the work of the tracers.
Besides, when creating a face for frequent repetition in a cartoon, looking for one that can be drawn quickly and easily from any angle makes the tracers' job easier.
A little trick of comic graphic artists is that of making the features of a face in small circles, or somewhat roundish curves. This sort of thing is not conducive to good character drawing. The animator also uses these forms—round eyes, circle-like nose, and a circular twist in other parts of the features. Now in his case, this can be forgiven, perhaps, when one considers the difficulties of his art; for these particular forms are, as we shall try to explain immediately below, easy to copy and trace. As in caligraphy, unfixed and diverse in its qualities and peculiarities, so with every individual in pen drawing, certain traits[185] occur in the strokes. In pen-and-ink drawing the more individual and distinctive the style, the harder it will be to copy or counterfeit it. But if the markings approach the geometric, definite and precise, then they are easily copied and imitated. This is why the little circles and similar curved markings are so frequently used in animated cartoons. There is nothing ambiguous in the lineaments of a face made with saucer-like eyes, and a nose like a circle. Its peculiarities are quickly noticed, easily remembered, and traced with facility.
A little trick that comic artists use is to create facial features with small circles or slightly round shapes. This approach isn’t great for good character design. Animators also rely on these shapes—round eyes, a circular nose, and curves in other facial features. In their case, this can be forgiven, considering the challenges they face; these specific shapes are, as we will explain shortly, simple to copy and trace. Just like in calligraphy, which has varying qualities and characteristics, individual traits appear in the strokes of pen drawings. In pen-and-ink art, the more unique and distinctive the style, the harder it is to replicate or forge. But when the lines start to look geometric, clear, and precise, they become easy to copy and imitate. This is why small circles and similar curved lines are so often found in animated cartoons. There’s nothing unclear about a face drawn with wide, saucer-like eyes and a circular nose. Its features are quickly recognized, easily remembered, and can be traced effortlessly.
As has been explained, an artist rarely finishes an entire set of drawings for a film without help, but has a staff of helpers. It can be well understood, then, that an essential to success is that the members of this staff keep the same quality of line in all the drawings. One of the difficulties in a staff of helpers is that of keeping a uniformity of portraiture in the characters. And because the circular lineaments are easy to trace that is the reason why they are chosen to form the basis for the details of a face.
As explained, an artist rarely completes an entire set of drawings for a film alone and usually has a team of assistants. It's clear that a key to success is ensuring that all team members maintain the same line quality in all the drawings. One challenge with having a team of assistants is achieving consistency in the portrayal of characters. The circular features are easy to draw, which is why they're often used as the foundation for detailing a face.
There is a tendency in every one, even on the part of the author of the original model, to depart[186] from the first-planned type of face. The approved way of avoiding this is to have a set of sketches of the characters drawn on special sheets of paper that are to be used by all the workers to trace from. In a studio with numerous workers, all rushing to finish a five-hundred-foot reel in every week, it is the custom to have plates engraved from the original sketches and a number of copies printed, so that all may have a set. With these[187] printed copies it will then be merely a matter of having a steady hand and an ability to trace accurately from the copy on to a fresh sheet of paper placed over the illuminated glass of the drawing-board.
There's a tendency in everyone, even in the creator of the original design, to stray from the initially planned character style. A good way to avoid this is to have a series of sketches of the characters drawn on special sheets of paper for all the team members to trace from. In a studio with many workers, all trying to complete a five-hundred-foot reel each week, it’s common to have plates engraved from the original sketches and print several copies so everyone has a set. With these printed copies, it simply becomes a matter of having a steady hand and the skill to trace accurately from the copy onto a new sheet of paper laid over the illuminated glass of the drawing board.
No doubt, as it has been referred to so many times, it is clearly understood now what an important part transparent celluloid plays in this art. It is employed not only to save the labor of reproducing a number of times the details of a scene, but also to help keep these details coincident, or uniform. In a face, there is a certainty that its lineaments will be the same if it is drawn but once on celluloid; but if it is copied each time on a long string of successive sheets of paper, there is a likelihood that it will vary and so give the lines on the screen an effect of wiggling about.
No doubt, as it has been mentioned so many times, it's now clearly understood how important transparent celluloid is in this art. It's used not only to save the effort of reproducing the details of a scene multiple times but also to keep those details consistent and uniform. In a face, there's a guarantee that its features will be the same if it's drawn just once on celluloid; however, if it's copied each time on a long series of successive sheets of paper, there's a chance it will vary, which could make the lines on the screen appear to wiggle.
There are many little matters of technic and rendering that arise in this art. For example, in making certain parts of a figure, say a coat, in solid black, it has been found best, instead of making it an absolute silhouette, to indicate by the thinnest of white lines the contours of the details. A sleeve, for instance, should be outlined with such a white line. This seems to be[188] a lot of trouble for so little, but, judged by the result on the screen, has been shown to be worth while.
There are many small technical details and rendering techniques that come up in this art. For instance, when creating certain parts of a figure, like a coat in solid black, it's generally better not to make it a complete silhouette. Instead, it's more effective to suggest the contours of the details with the thinnest white lines. A sleeve, for example, should be outlined with such a white line. This might seem like a lot of effort for a small effect, but, based on the result on the screen, it proves to be worthwhile.[188]
At this point we can touch upon the question of what is meant by “animation.” An artist with little experience may make a series of movement phases for an action, but when the drawings are tested it is found that they do not animate; that is, give in synthesis the illusion of easy motion. It may be a matter of incorrect drawing, perhaps, or he may have the drawings nearly correct, but he has failed to make use of certain little tricks, or, shall we say, failed to observe certain dexterous points in the technic of the art?
At this point, we can discuss what “animation” actually means. An artist with little experience might create a series of movement phases for an action, but when the drawings are tested, they don't come to life; that is, they don't convincingly create the illusion of smooth motion. It could be due to some incorrect drawings, or maybe the drawings are almost right, but the artist hasn’t utilized certain little tricks, or, let's say, they haven't noticed some skilled techniques essential to the art.
We will cite one little trick—humoring the vision, if one may put it this way: have a spot, or patch, of black repeated relatively in the same position throughout the series of a movement. An example is that of having the boots of a figure of a solid black. The eye catching the two black spots as they alternately go back and forth is deluded with respect to the forcibleness of the animation even if the walking action is not as correctly drawn as it should be. An added effect is given to this illusory ruse if a tiny[189] high light is left on the toe of each black boot.
We’ll mention a simple trick—playing with visual perception, if you will: have a spot or patch of black repeated in roughly the same position throughout a movement sequence. For example, if the boots of a character are solid black. The eye is tricked by the two black spots as they move back and forth, creating an illusion of more dynamic movement, even if the walking action isn’t drawn as accurately as it should be. This illusion is enhanced if a small highlight is left on the toe of each black boot.
The final test for drawings for animation is, it stands to reason, the result on the screen. One may, though, approximately find out whether or not any sequence of drawings animate by flapping them in a sort of way akin to the book-form kineograph novelty noted in a preceding chapter. Two immediately following drawings can be tested this way: with one hand they are held near one corner pressed against the drawing-board, then with the other hand the top drawing is moved rapidly up and down. In this way the two drawings are synthesized somewhat, and if the action is delineated correctly there will be some notion of the appearance on the screen.
The final test for animation drawings is, of course, the result on the screen. However, you can roughly determine whether any sequence of drawings will animate by flipping them in a way similar to the book-style kineograph mentioned in a previous chapter. You can test two consecutive drawings this way: hold one drawing near a corner pressed against the drawing board with one hand, then with the other hand, quickly move the top drawing up and down. This way, the two drawings are combined somewhat, and if the action is drawn accurately, you’ll get an idea of how it will look on the screen.
This little experiment crudely demonstrates the phenomenon of after-images and the operation typifies a simple synthesizing apparatus.
This small experiment roughly shows the phenomenon of after-images, and the setup represents a basic synthesizing device.
A significant addition to a scene, if it is suited to the story and consistent with the general plan, is to have some foreground detail in front of the moving figure, or figures. This sometimes consists of a rock, a clump of foliage, or a tree trunk. The contrast of the inertness in these details gives[190] an added force to the animating that takes place back of their mass.
A valuable enhancement to a scene, if it fits the story and aligns with the overall plan, is to include some foreground detail in front of the moving figure or figures. This could be a rock, a bunch of leaves, or a tree trunk. The contrast between the stillness of these details adds extra impact to the action happening behind them. [190]
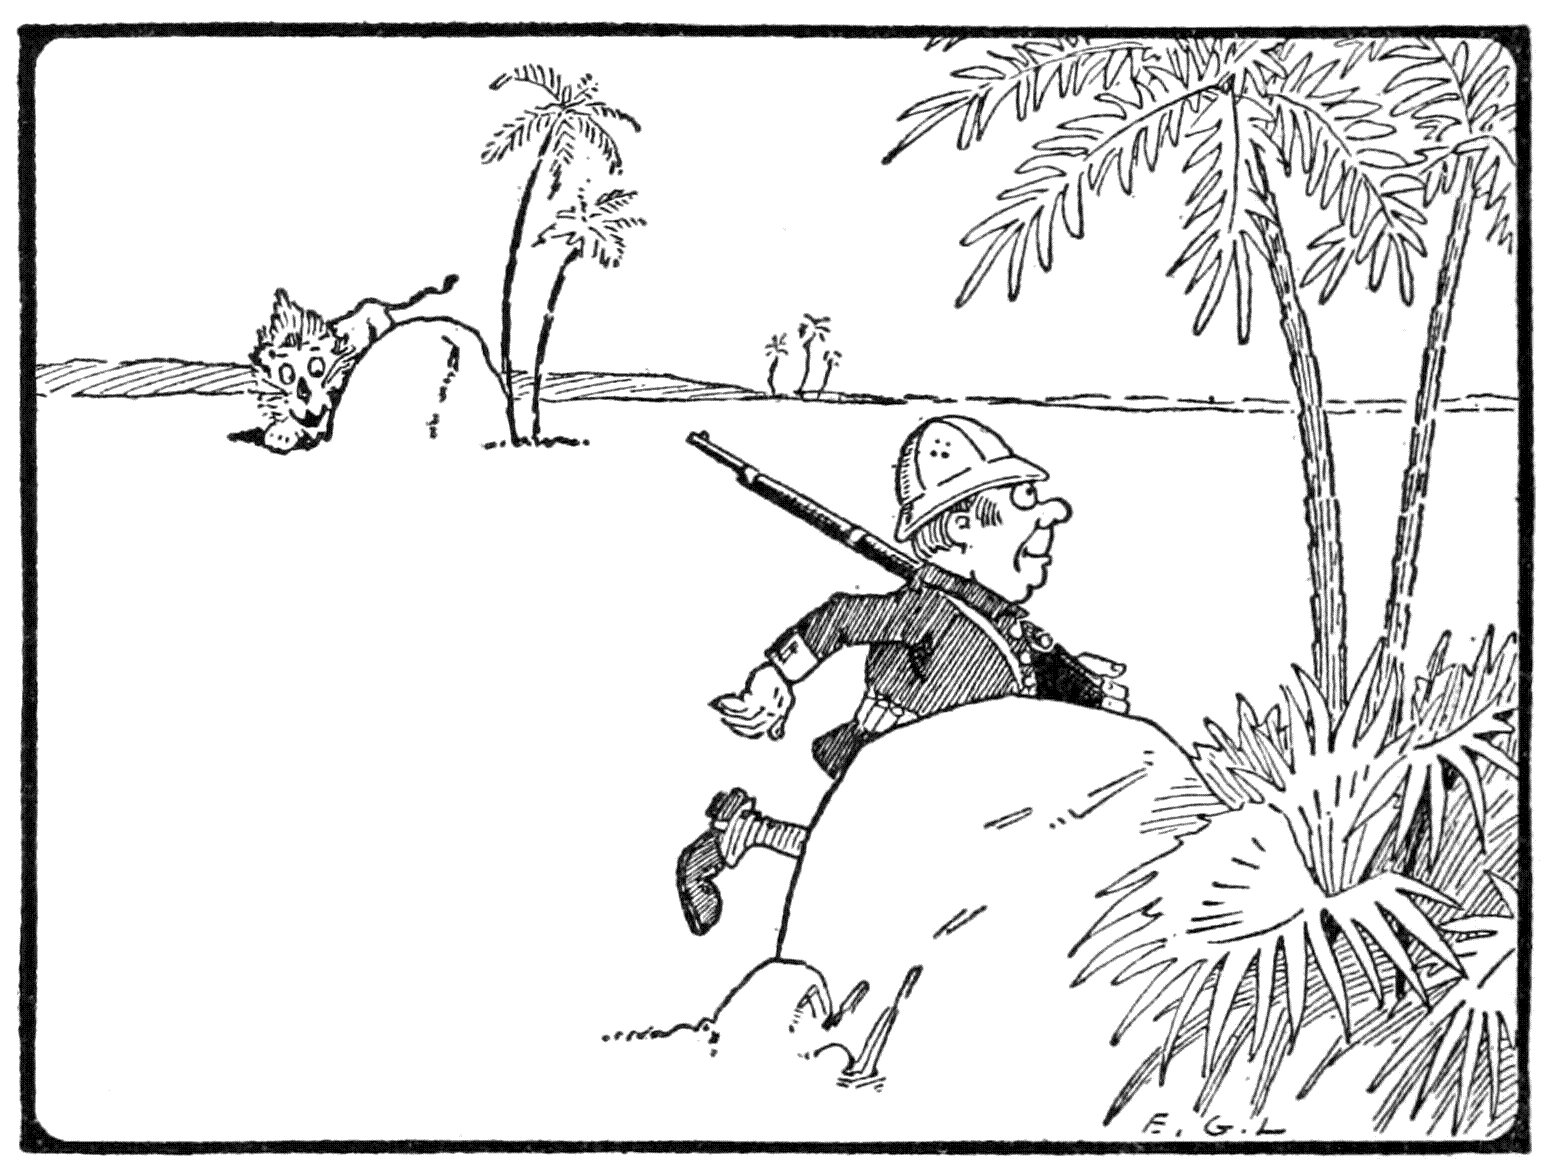
Foreground details of a pictorial composition help the animator in several ways. Their inertness, for one thing, affords a contrast to the moving figure.
Foreground details of a visual composition assist the animator in several ways. Their stillness, for one thing, provides a contrast to the moving figure.
This feature of a picture is drawn on celluloid that is placed on top of the rest of the set having to do with the particular animation. It is possible, though, for an artist, if he is dexterous, to fasten this inert foreground to the under-side of the glass in the frame which is pressed down over the drawings during the photography. The foreground feature, of course, is cut out in silhouette and fastened with an adhesive like rubber cement.[191] This cement is an article of great usefulness in a photographic studio; especially for temporary use over drawings, as it can be easily rubbed off afterward by the friction of the finger-tips.
This feature of a picture is created on celluloid that is placed on top of the rest of the set related to the specific animation. However, if an artist is skilled, they can attach this stationary foreground to the underside of the glass in the frame that is pressed down over the drawings during photography. The foreground feature, of course, is cut out in silhouette and glued with an adhesive like rubber cement.[191] This cement is incredibly useful in a photography studio, especially for temporary use over drawings, as it can be easily wiped off later with the friction of your fingertips.
Radically opposite in method to the scheme described above, in which an inert object helps the animation, is the panorama. In this screen illusion the figure, which is thought of as moving, occupies the same position; while the landscape, normally quiet, is in motion.
Radically different in approach from the scheme described above, where a stationary object aids the movement, is the panorama. In this visual illusion, the figure that appears to be moving stays in the same spot, while the landscape, usually still, is in motion.
Certainly we have all experienced the sensation, when seated in a railway-train waiting for it to go, of suddenly imagining that it has started; when, in fact, it has not budged. This simply has happened: while occupied with thoughts not pertaining to our surroundings—perhaps reading—we casually caught sight of a moving train on an adjacent track, and as we were in the state of expectancy of at any moment being on the move, we immediately thought that our anticipation had been fulfilled. Even if, in a moment or two, we realize that our senses have deceived us, it is hard to shake off the first-formed delusion of being in motion.
Certainly we have all felt that moment, when sitting in a train waiting to depart, when we suddenly think it has started moving; when, in reality, it hasn't budged at all. This happens: while we’re lost in thoughts unrelated to our surroundings—maybe reading—we casually notice a train moving on an adjacent track, and since we’re in a state of expecting to be on the move at any moment, we immediately believe our anticipation has come true. Even if, after a moment or two, we realize our senses have tricked us, it’s hard to shake off that initial feeling of being in motion.
Now the screen panorama is a similar delusion.[192] We see near the centre of the screen a figure going through the motions of progression, but we know perfectly well that he is in the same place all the time. And we know that the landscape is drawn on a band of paper that is pushed along back of the figure. All our knowing does not help us. In spite of it the little figure spectrally advances and the landscape deceptively passes by as we know it does (visionally) when we ourselves are running very fast.
Now the screen panorama is a similar illusion.[192] We see a figure near the center of the screen moving as if making progress, but we know for sure that he’s staying in the same spot the whole time. And we understand that the landscape is just printed on a strip of paper that gets pulled along behind the figure. Knowing this doesn’t change anything. Despite that, the little figure seems to move forward, and the landscape misleadingly flows by, just like it does (visually) when we’re running really fast ourselves.
[193]
[193]
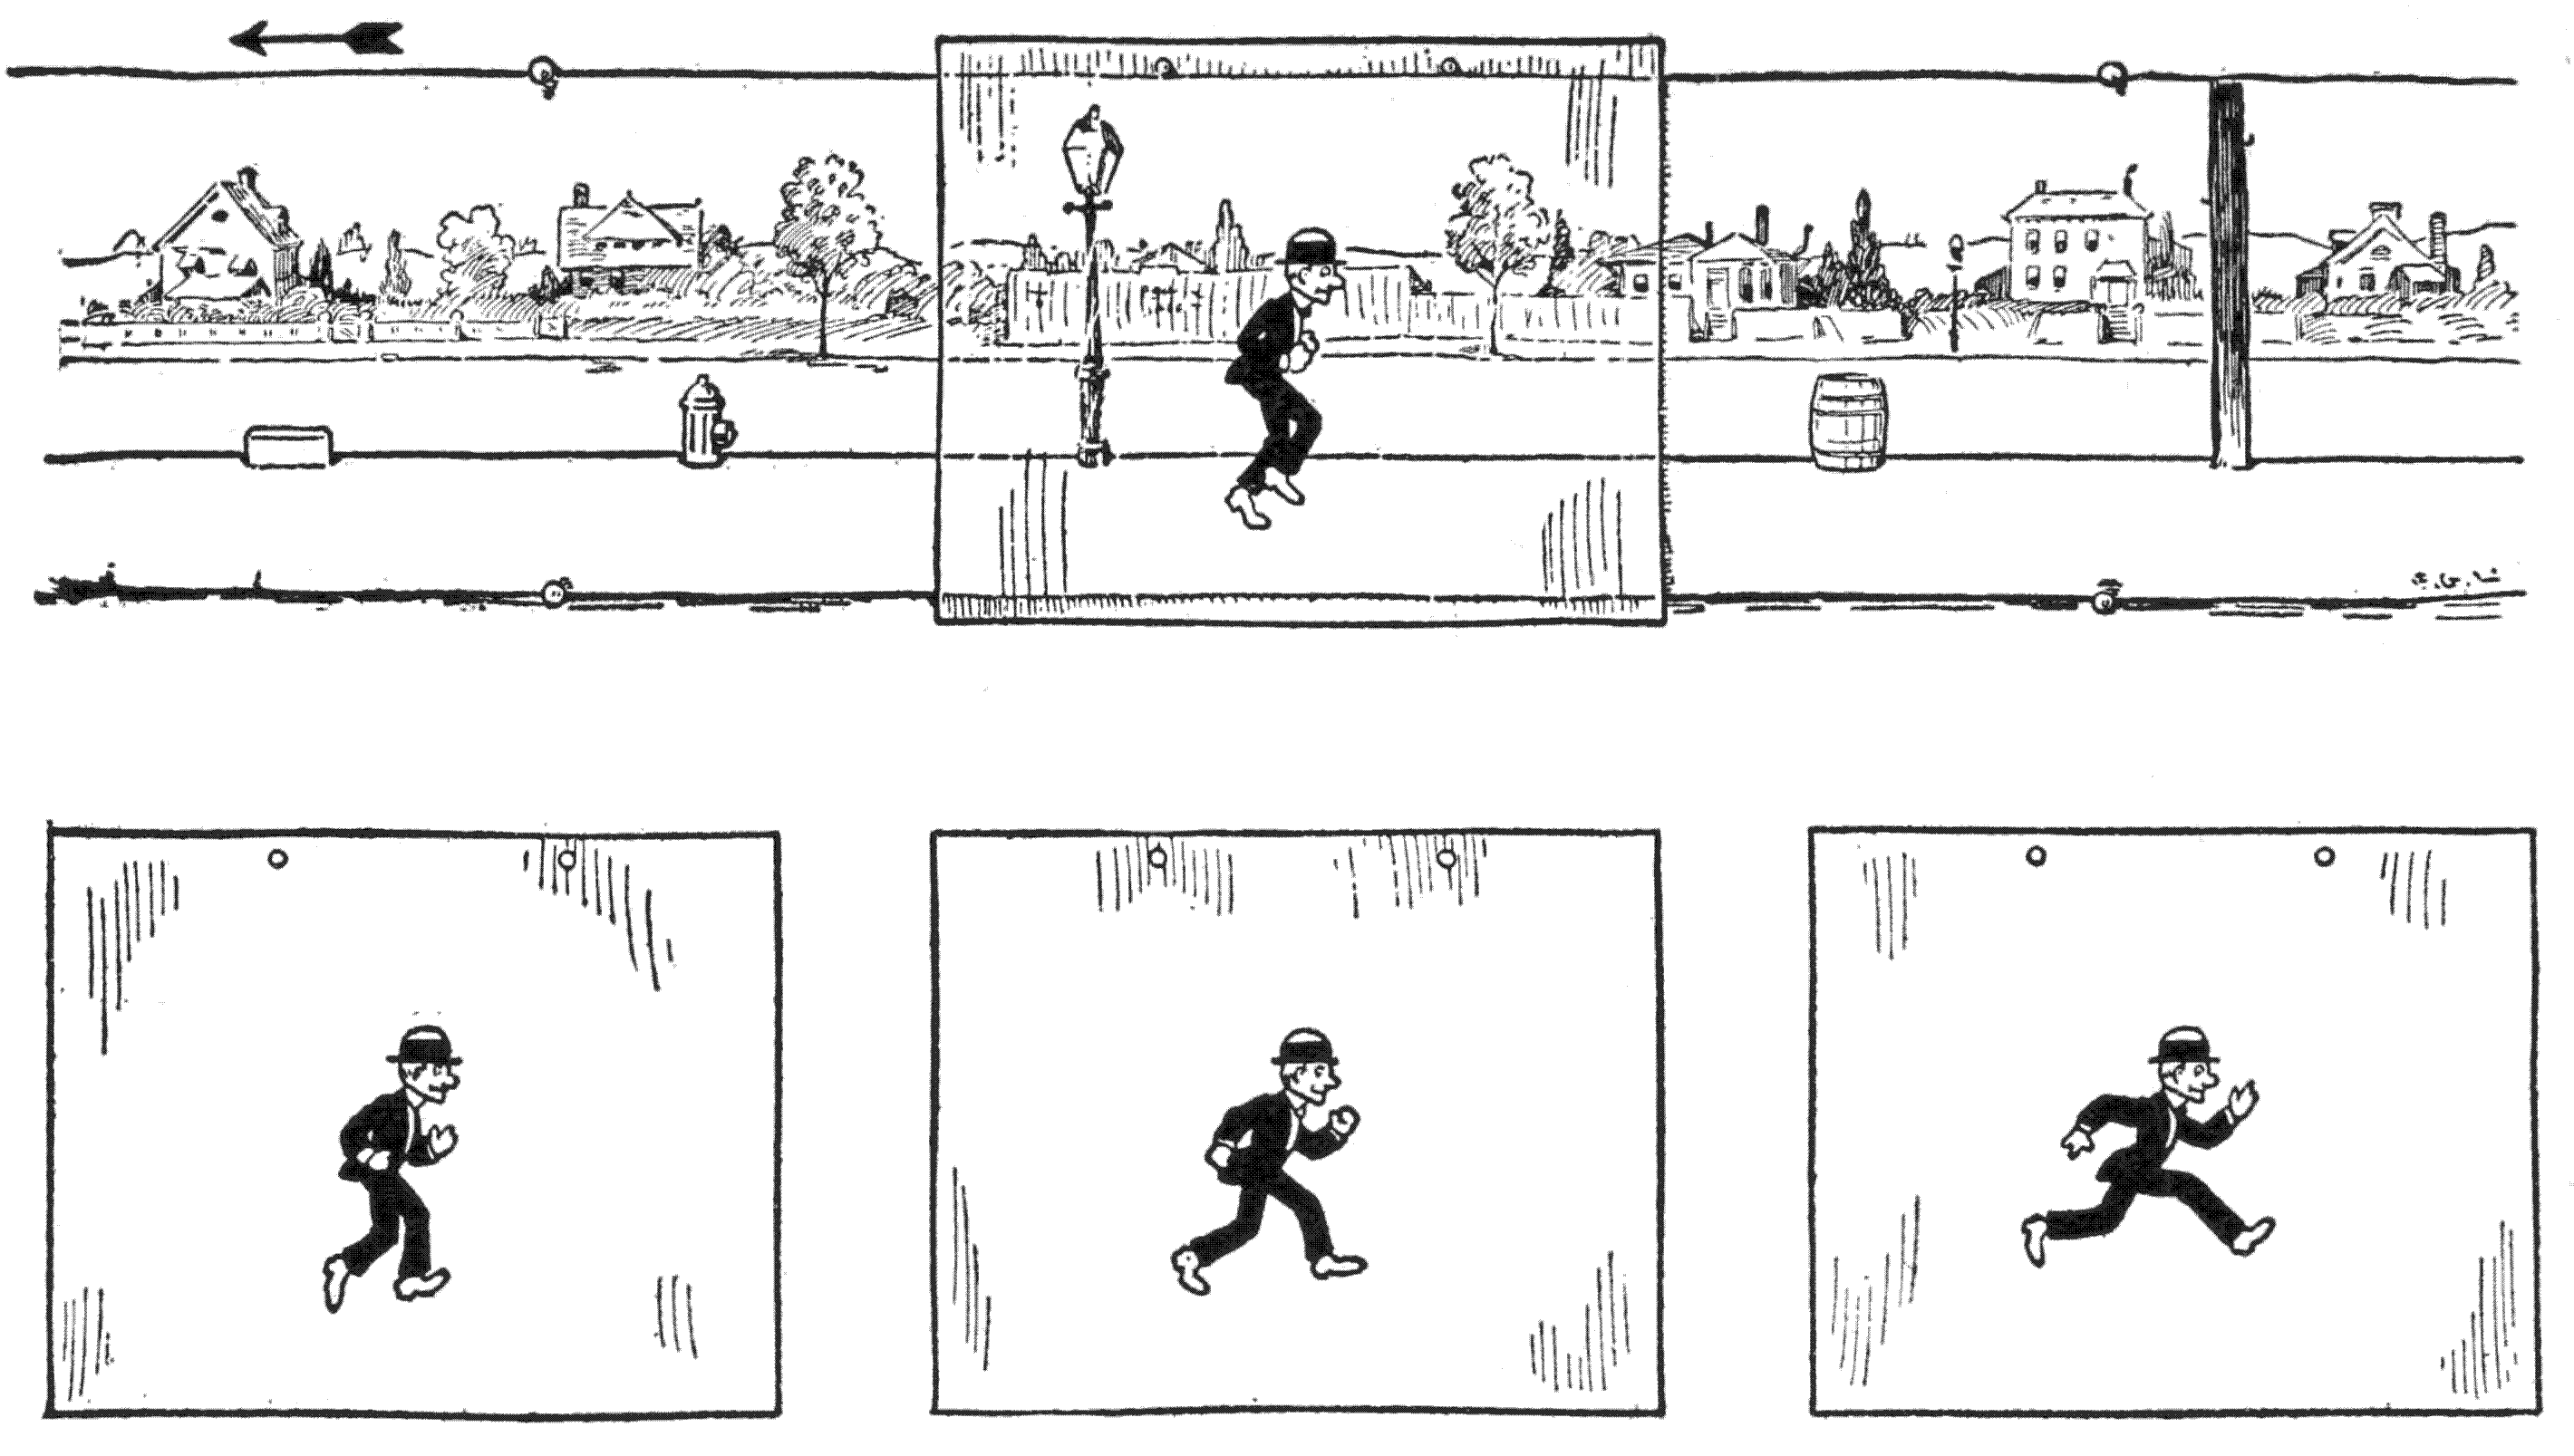
The figure is depicted in a series of movement phases drawn on separate sheets of celluloid. These are used continuously, one at a time, and in their proper order during the photography. The landscape, drawn on a strip of paper, moves along under the celluloid little by little in the direction of the arrow.
The figure is shown in a series of movement phases sketched on individual sheets of celluloid. These are used one at a time, in the correct order, throughout the photography process. The landscape, illustrated on a piece of paper, shifts gradually under the celluloid in the direction of the arrow.
The manner in which a panorama is produced is this: the landscape is drawn on a long strip of paper; this is to be moved little by little and photographed at each place to which it has been moved. The figure that is to walk, or run, is drawn in the different phases of action on sheets of celluloid. These are placed in their order over the landscape during the photography. The separate drawings of the actions of the figure were drawn so that the bodies remained relatively in the same place, but the limbs, or heads, varied in attitudes. The planning of the action in a figure for a panorama is proceeded with in the same way as that for producing a regular walk or run. One special care in the work, however,[194] is this: the limbs as they are sketched in their appropriate attitudes in the several drawings must not have identical outlines. That is, explaining it in another way, if all of the set are placed together over the illuminated tracing glass, no two drawings should correspond with respect to the positions of the limbs. The bodies in the drawings should exactly concur in position, but if some attention is given to the rise and fall of the trunk, as in a typical walk, the screen illusion will be very much better. Slightly shifting it up and down on a vertical would effect this.
The way a panorama is created is like this: the landscape is drawn on a long strip of paper, which is moved gradually and photographed at each position it reaches. The character that walks or runs is drawn in different stages of action on sheets of celluloid. These are placed in order over the landscape during photography. The individual drawings of the character's actions are designed so that the body stays relatively in the same spot while the limbs or head change positions. Planning the action for a panorama is done the same way as for a regular walk or run. However, one crucial aspect of the work is that the limbs, as they are drawn in their respective positions in each sketch, should not have identical outlines. In other words, if all the drawings are laid out together on the illuminated tracing glass, no two should match in terms of limb positions. The bodies in the drawings should align perfectly, but paying attention to the rise and fall of the torso, like in a typical walk, will enhance the illusion on screen. Slightly adjusting it up and down vertically can achieve this.
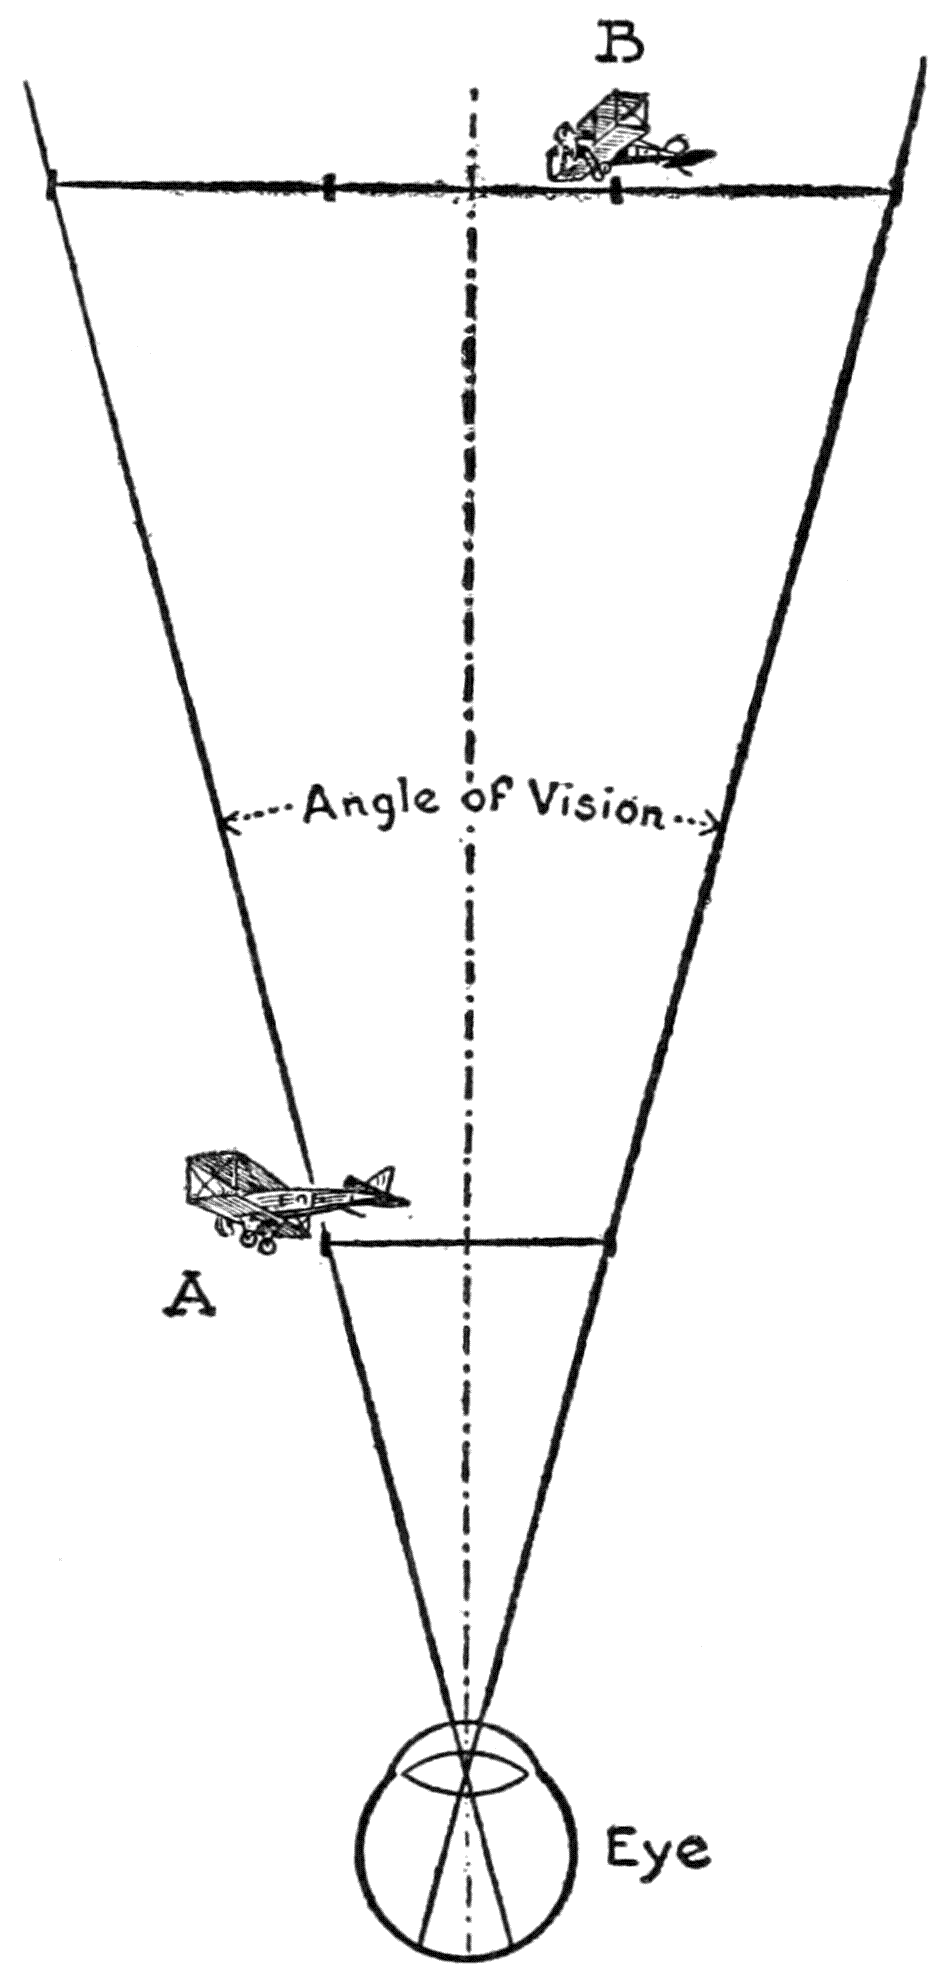
The band of paper with the landscape is moved in the direction opposite to that in which the figure is supposed to go.
The strip of paper with the landscape is moved in the opposite direction from where the figure is meant to go.
The photographer has many things to think of while he is putting this panorama effect on a film. He must move the landscape strip; sometimes as little as one-sixteenth of an inch at a time; put a celluloid sheet with one of the phases of the action in place, get it in its proper order, and then turn the camera gearing to make the exposure. In some special cases he will have another matter to think of; namely, a second panorama strip to move, and at a different speed.
The photographer has a lot to consider while creating this panorama effect on film. He needs to adjust the landscape strip, sometimes moving it only one-sixteenth of an inch at a time; place a celluloid sheet with one of the action phases in position, ensure it’s in the correct order, and then adjust the camera settings to make the exposure. In some unique situations, he might also need to manage another panorama strip, moving it at a different speed.
[195]
[195]
This is when he wishes to give a little better representation of verisimilitude than that produced by the single panorama strip.
This is when he wants to provide a slightly better representation of realism than what is produced by the single panorama strip.
Far-off moving objects, as we know, appear to go slower than those that are close to us. We are aware of this in looking at a distant airplane high up in the sky that we know is going very fast but seems as though it is going very slowly. And at night an illuminated railway-train in the valley below us, when we are on an elevation, seems to creep along like a snail.
Far-off moving objects, as we know, appear to move slower than those that are close to us. We notice this when we see a distant airplane high in the sky that we know is flying really fast but looks like it's going very slowly. At night, a lit-up train in the valley below, when we're on a higher ground, seems to crawl along like a snail.
To bring it to pass that a panorama have the effect of near objects going faster than those that are distant, it is necessary to have two strips of[196] panorama details. One strip will represent the foreground, which is to be moved much quicker, one-eighth of an inch, or so. A second strip will answer for the distance, which is moved, about one-sixteenth of an inch, or even less. If the foreground strip is moved at rather wide intervals, the effect on the screen will be a little like that which we see from the window of a railway-coach when telegraph-poles and near objects seem to fly by.
To create the effect where nearby objects appear to move faster than those in the distance, you need two strips of[196] panorama details. One strip will represent the foreground, which should move significantly quicker, about one-eighth of an inch or so. The second strip will be for the background, which moves about one-sixteenth of an inch or even less. If the foreground strip is moved at relatively wide intervals, the effect on the screen will be similar to what we see from the window of a train when telegraph poles and nearby objects seem to rush by.
The panorama strip for the foreground is designed with simple elements so that it can be cut out in silhouette and laid over the other one. With reference to the quality of the details of a scene on a panorama; although it is usual to fill up the whole length with items of interest, there must be observed some degree of simplicity. Perhaps it might be best to say that there should be a subordination in the details, even if they are numerous, and then have some striking feature or object occurring every once in a while, to catch the eye and so help the movement.
The foreground panorama strip is created with basic elements so it can be cut out in silhouette and placed over the other one. When it comes to the quality of the details in a panorama scene, while it's common to fill the entire length with interesting items, there should still be some level of simplicity. It might be better to say that the details should play a subordinate role, even if there are many, and then include some standout feature or object now and then to attract attention and support the flow.
Objects, too, automobiles and other vehicles, are combined with these panoramas. This brings us to the consideration of the matter of animating[197] wheels, or making them turn in the screen illusion.
Objects, like cars and other vehicles, are included in these scenes. This leads us to discuss the idea of animating[197] wheels, or making them rotate in the visual illusion on screen.
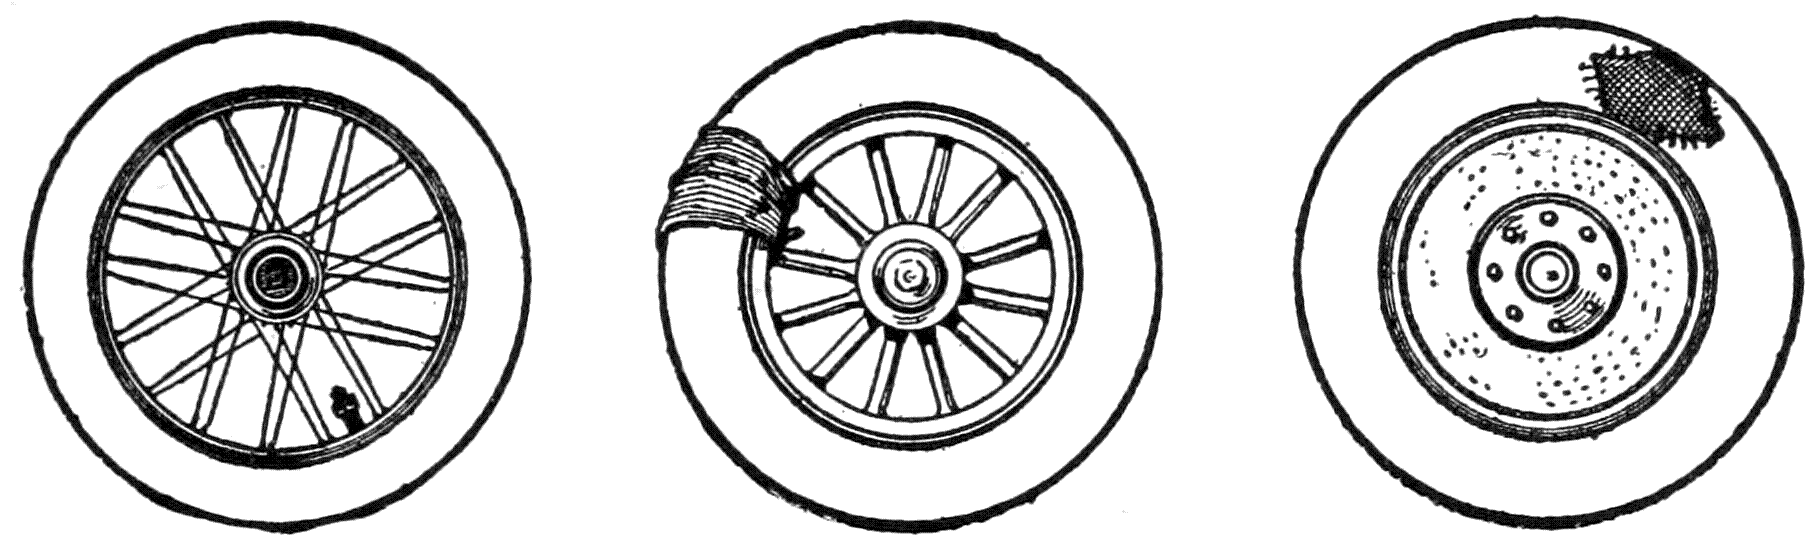
A wheel true and accurately adjusted and going rapidly gives—with the exception of a blurring of spokes, if there are any—very little evidence of rotation. It is only when it turns unsteadily, or when there is some distinguishing mark found on or near the rim, that we see plainly that the wheel turns. Sometimes it is a stain, a spot on the tire, a temporary repair, or a piece of paper that has caught in the spokes that indicates a turning of the wheel. Further amplification is needless, as a glance at the vehicles, as they pass in the roadway, will make clear. So the animator, when he wishes to show a wheel turning, simply copies actuality by drawing a wheel with some such feature as noted above. A mere black spot on a wheel near the circumference is sometimes[198] sufficient. It is usual to have the wheels drawn on thin cardboard and cut out and fastened in their proper places so that they can be turned. They are turned a little at a time and photographed after each turn.
A wheel that is balanced, properly adjusted, and spinning fast shows very little sign of movement—besides maybe a blur of the spokes, if there are any. We only notice it’s turning when it wobbles, or when there's a mark on or near the rim that makes it clear. Sometimes it's a stain, a spot on the tire, a temporary fix, or a piece of paper stuck in the spokes that suggests the wheel is turning. There's no need for more explanation; just watching vehicles pass by on the road makes it obvious. So when an animator wants to depict a wheel turning, they simply replicate reality by drawing a wheel with one of these features mentioned earlier. Even a simple black spot on the wheel near the edge can be enough. It's common to draw the wheels on thin cardboard, cut them out, and attach them in the right positions so they can spin. They are turned slightly at each time and photographed after each turn.
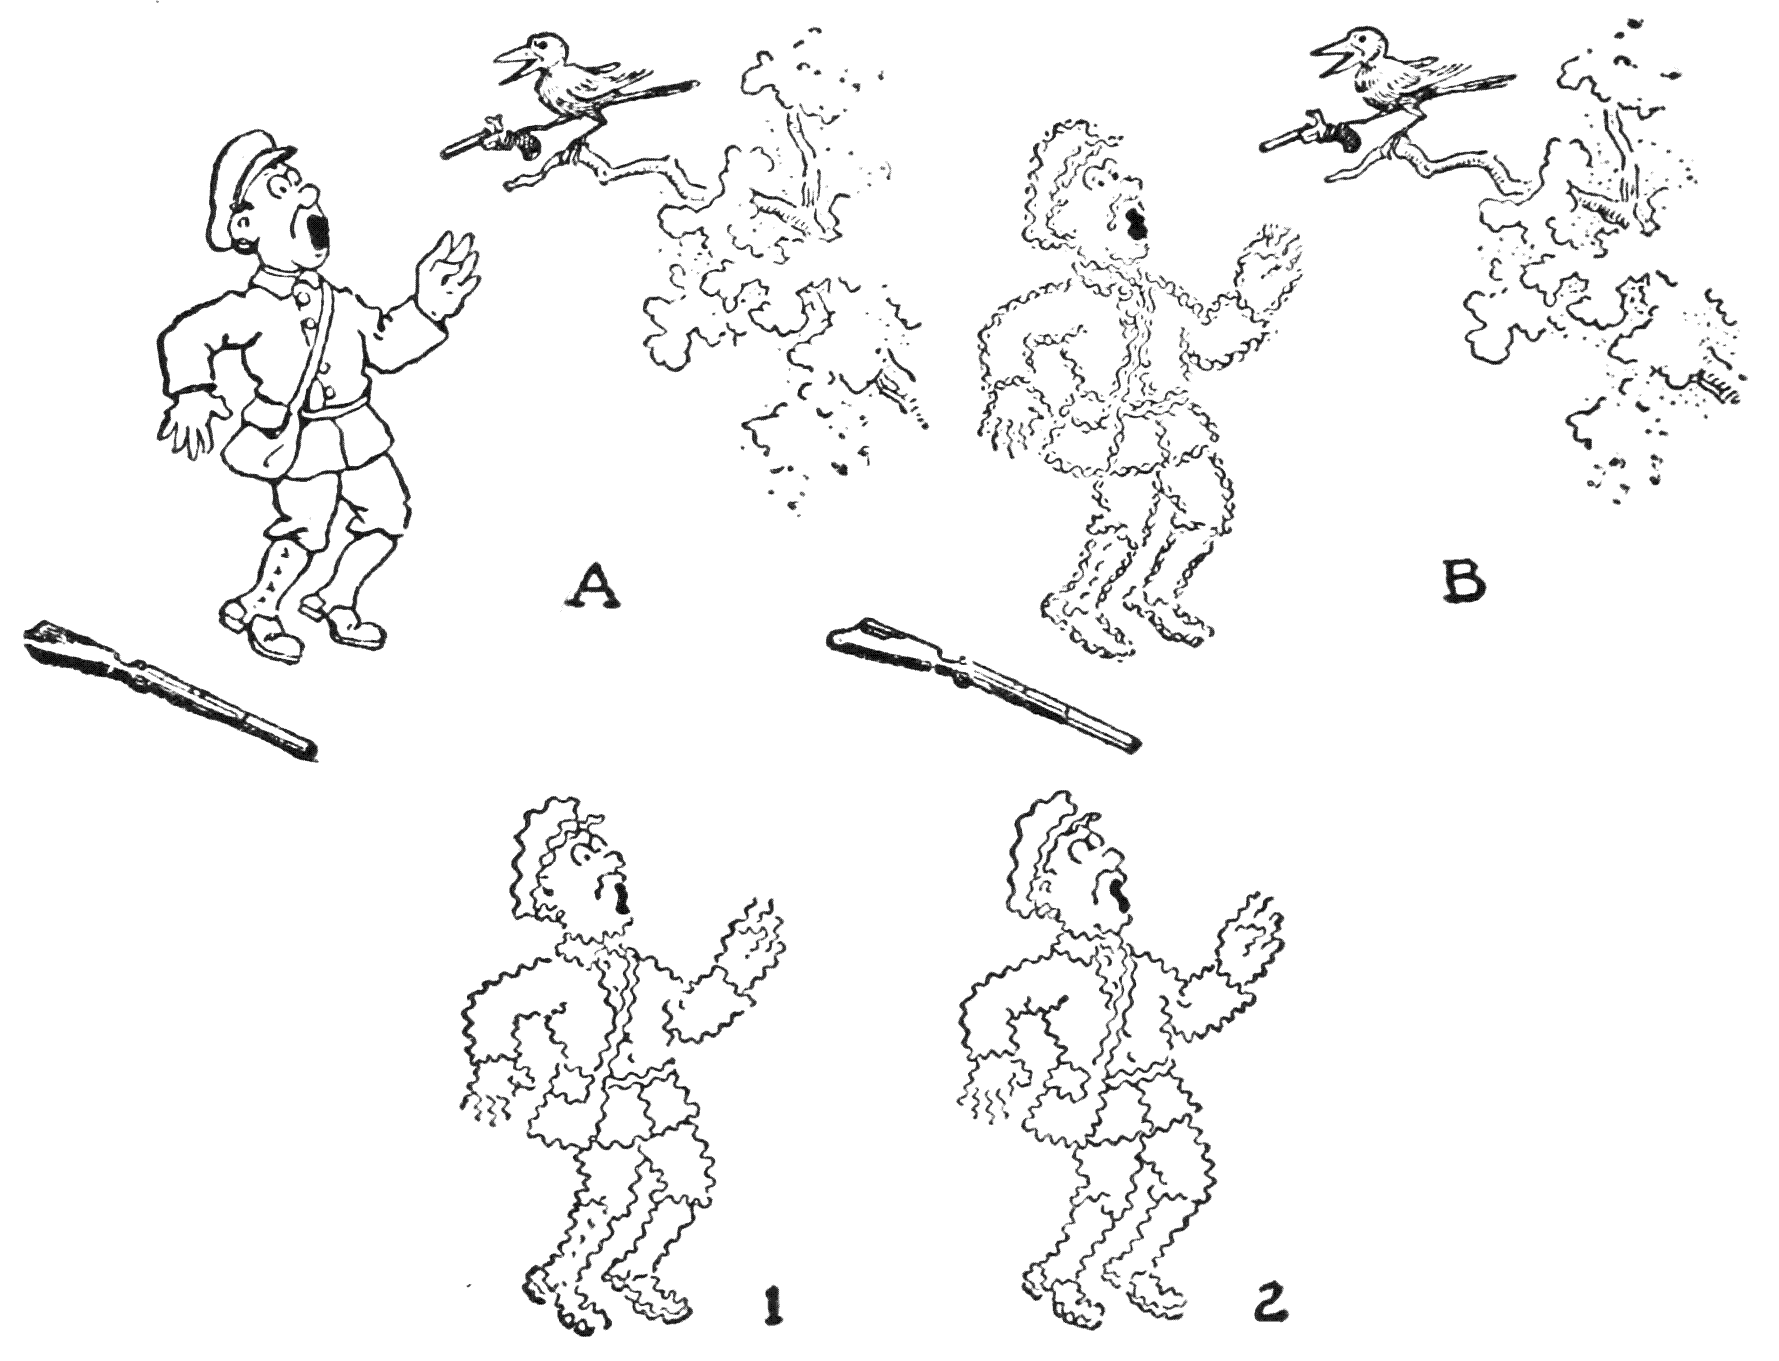
To represent the hunter in sketch A suddenly trembling with fear as in sketch B, two drawings, 1 and 2, with varying wavy lines are used alternately during the photography.
To show the hunter in sketch A suddenly shaking with fear like in sketch B, two drawings, 1 and 2, with different wavy lines are used back and forth during the photography.
PHOTOGRAPHY AND OTHER TECHNICAL MATTERS
Photography and Other Tech Matters
CHAPTER IX
PHOTOGRAPHY AND OTHER TECHNICAL
MATTERS
Respecting adaptability and results, the same motion-picture camera that is used in the field, or the studio, can be used to make films for animated cartoons. In making cartoons, however, two particulars at variance with the usual procedure first must be noted: (1) The camera is pointed downward and not horizontally, as is ordinarily the case, and (2) with each turn of the camera handle only one frame—one-sixteenth of a foot of film—is photographed, and not eight, as is commonly the case.
Regarding adaptability and results, the same movie camera used in the field or studio can also create animated films. However, when making cartoons, two key differences from the usual process need to be noted: (1) The camera is aimed downward instead of horizontally, as is typically done, and (2) with each turn of the camera handle, only one frame—one-sixteenth of a foot of film—is captured, rather than eight, which is the standard practice.
The camera in making animated cartoons is held, pointing downward, by a firmly built framework. The artist, having decided on the dimension of the field for his drawings, determines the height approximately of the camera above the table top, where the drawings are placed. Naturally it will be high enough so that when he works[202] at the table while disposing the drawings, adjusting the dummies, or in some cases making drawings, his head will not come in contact with the front of the lens. The particular distance between the lens and the table top is dependent upon the kind of lens in the camera. It is a common practice to equip a camera with a two-inch (fifty-millimetre) lens. It is possible to use a lens of this focus for cartoons.
The camera used to create animated cartoons is held in place, pointing downward, by a sturdy framework. The artist decides on the size of the area for their drawings and sets the height of the camera above the table where the drawings are placed. It will naturally be high enough so that when the artist is working at the table—arranging the drawings, adjusting the models, or sometimes drawing—their head won’t bump into the front of the lens. The specific distance between the lens and the tabletop depends on the type of lens in the camera. It's common to use a two-inch (fifty-millimeter) lens. A lens of this length works well for cartoons.
There is no special type of structure for supporting the camera above the board upon which the drawings are placed for photography. An artist contemplating embarking upon this line of work, and intending to carry on the whole process from the beginning to the time when he hands the exposed film to the laboratory for development, will have a chance to put any inventive ability that he may have into practice in designing a framework for the purpose. In building such a structure these things must be thought of: (1) The structure must be firmly built so that the likelihood of the camera being jarred is lessened; (2) the distance between the camera and board to be ascertained, approximately at first; (3) an arrangement for fixing the camera in a[203] grooved sliding section so that its exact height can be adjusted when the field and focus are definitely fixed or there is to be any later readjustment. The camera, for instance, may get jarred and put out of focus, or get set obliquely with respect to the lines defining the field.
There isn't a specific type of structure needed to support the camera above the board where the drawings are set up for photography. An artist who is thinking about pursuing this type of work and plans to handle everything from the start until they hand the exposed film to the lab for development will have the opportunity to use any creative skills they have to design a framework for this purpose. When building such a structure, the following points should be considered: (1) The structure needs to be sturdy to minimize the chance of the camera being jolted; (2) the distance between the camera and the board should be roughly determined at first; (3) there should be a way to secure the camera in a grooved sliding section so that its exact height can be adjusted once the field and focus are set, or if any later adjustments are needed. For example, the camera might be jolted and go out of focus, or it could be positioned at an angle in relation to the lines defining the field.
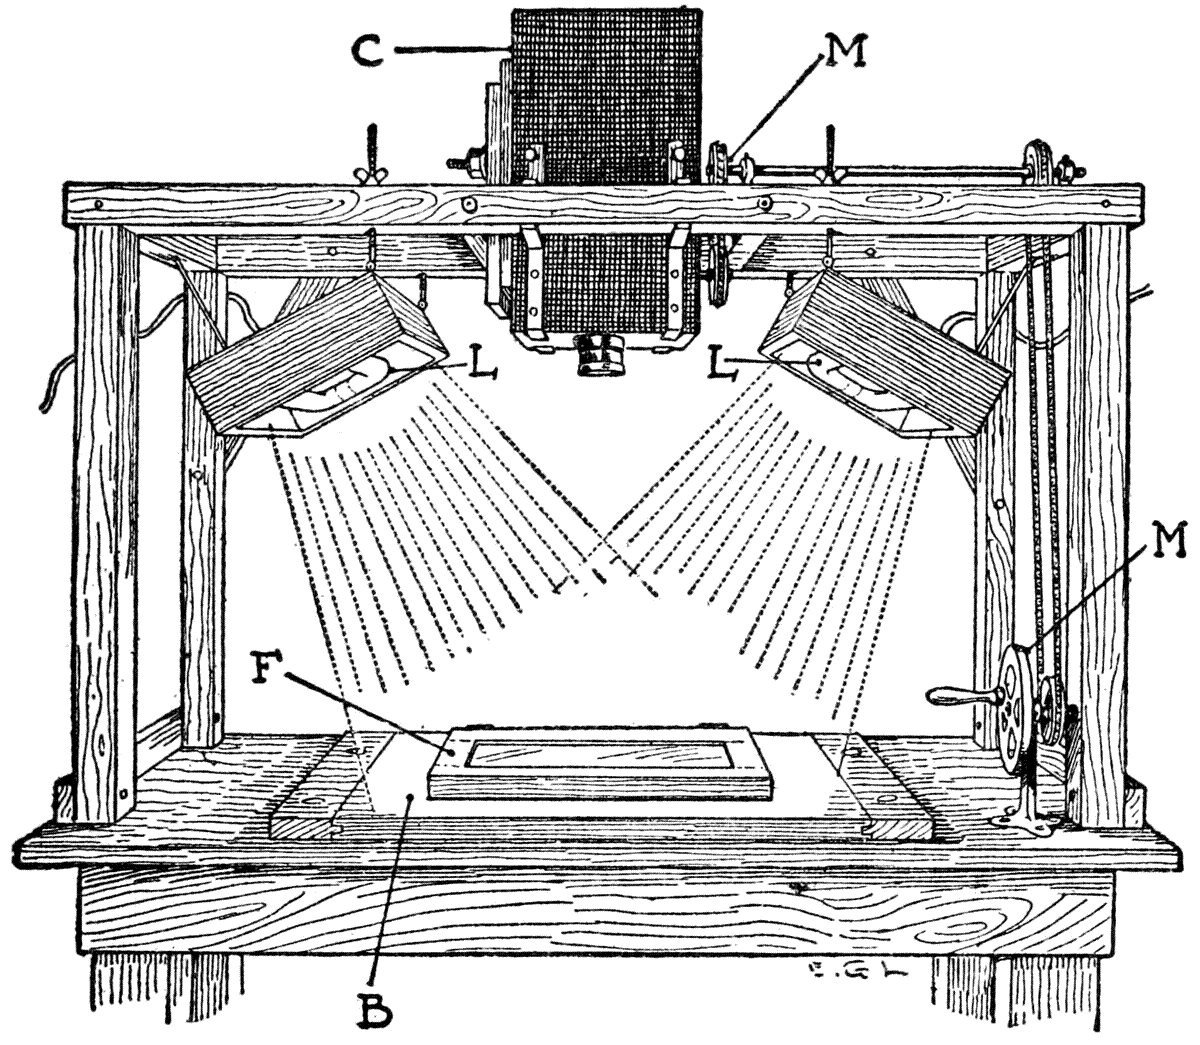
C. Camera. L. Lights. M. Mechanism to turn camera shutter. F. Hinged frame with glass to press down on the drawings. B. Board holding the registering pegs.
C. Camera. L. Lights. M. Mechanism to operate the camera shutter. F. Hinged frame with glass to hold down the drawings. B. Board holding the registration pegs.
Some animators have mounted their camera so that the same framework can be used for a[204] small field as well as a larger one. This necessitates, each time that the size of field is changed, a troublesome setting of the camera in order again. It is wisdom to keep to one size of field for all work, so that when the camera is once in position it need not be changed.
Some animators have set up their camera in a way that allows the same framework to be used for both a small field and a larger one. However, this requires a complicated adjustment of the camera every time the field size changes. It's smarter to stick with one size of field for all work so that once the camera is in place, it doesn't need to be moved.
The frame that holds the glass, and which is hinged to the board where the drawings are placed, and the registering pegs have already been described. It is an excellent plan to have this board with the above-named adjuncts separate but screwed down upon the table top. By having it this way it is possible to have another means of getting the camera and the field lines adjusted. Then if the outline of the field on the board and those defining the field in the camera do not fit each other exactly, the board can be unscrewed, shifted until it is right, and fastened again.
The frame that holds the glass, which is hinged to the board where the drawings are placed, along with the registering pegs, has already been described. It's a great idea to have this board, along with the mentioned components, separate but screwed down to the tabletop. This setup allows for another way to adjust the camera and the field lines. If the outline of the field on the board and the one in the camera don’t match perfectly, the board can be unscrewed, shifted until it's aligned correctly, and fastened again.
In any film where there is a preponderance of straight lines—horizontal ones, especially—it is a serious fault to have the slightest obliquity. It will be emphasized on the screen. The outlines of the little rectangular area, where the pictures are taken in the camera, must coincide with the outlines of the field on the board. When the[205] field is fixed and permanently marked with ink lines, it is a good plan to draw a smaller rectangle, one-half inch all around, within the outer one. The idea of this is to have a limiting area within which all important matters of the drawing are kept.
In any film that has a lot of straight lines—especially horizontal ones—it's a major issue to have any slight tilt. This will be noticeable on screen. The edges of the small rectangular area where the shots are taken in the camera must align with the edges of the field on the board. When the field is set and permanently outlined with ink lines, it's a good idea to draw a smaller rectangle, a half inch inside, within the outer one. The purpose of this is to create a boundary area where all important elements of the drawing are contained.
If the animator has had any experience with the ordinary still camera, the practical knowledge gained then will help him in the matter of focussing, or regulating the diaphragm of the lens, so that all the details of the picture are sharply defined. This comes next, or rather in conjunction with the determining of the field and the permanent fixing of the camera. In a still camera—that is to say, an ordinary portrait or view apparatus—the focussing is on a ground glass, while in a cinematographic instrument it is usual to place a piece of celluloid with a grained surface somewhat like ground glass into the place where the film passes. The picture is focussed on this celluloid. Some, however, find a piece of blank film answers the purpose.
If the animator has any experience with a regular still camera, the practical knowledge gained will assist them in focusing and adjusting the lens diaphragm to ensure that all details of the image are clearly defined. This step comes next, or rather happens simultaneously with determining the field and securely positioning the camera. In a still camera—which is to say, a regular portrait or landscape device—the focusing is done on a ground glass. In a cinematographic camera, it's common to use a piece of celluloid with a grained surface similar to ground glass in the space where the film moves. The image is focused on this celluloid. However, some people find that a piece of blank film works just as well.
To the above consideration of setting up the camera and ascertaining the correctness of the field and the sharpness of the image, the worker[206] wise in perception will, before beginning any important work, make a test. This is merely a matter of photographing a drawing, or two, on a short length of film, taking it out of the camera, and developing it. Here, again, any knowledge of photographic processes previously learned will be found useful.
To the earlier discussion about setting up the camera and checking the accuracy of the scene and the sharpness of the image, a perceptive worker[206] will, before starting any significant project, conduct a test. This simply involves photographing a drawing or two on a short piece of film, taking it out of the camera, and developing it. Once again, any knowledge of photographic processes previously learned will come in handy.
There are in all metropolitan centres film laboratories to which the animator can send his exposed films to be developed and printed. But for a test before beginning the work it is prudent and expeditious to keep a supply of chemicals on hand, and then, in a few minutes, it will be possible to tell how matters stand in any particular that is in doubt.
There are film labs in every major city where animators can send their developed and printed films. However, it's a good idea to have a stock of chemicals available for testing before starting the work. This way, within a few minutes, you can figure out the status of anything that's uncertain.
The next step, after the camera has been fixed in place, is to construct a mechanism by which it can be turned conveniently by the photographer, as he is seated below at the board where the drawings are placed. This is contrived by a system of sprocket-wheels and chain-belts coming from the camera and carried down to the side of the table top, where it ends in a wheel with a turning handle. For the average individual this would not be a difficult construction to put up; but it[207] would be an altogether different problem if the animator wished to equip his camera with an electric motor to turn the camera mechanism. In this case he would have many things to consider, getting the particular type of motor, for instance, that will operate with the continual turning on and off of the power. Here certainly the best course is to have an expert install the motor and fix the intermediary mechanism connecting it with the camera-working parts.
The next step, after the camera is securely set up, is to create a system that allows the photographer to easily turn it while sitting at the table where the drawings are laid out. This is achieved using a setup of sprocket wheels and chain belts that extend from the camera down to the side of the tabletop, ending in a wheel with a handle for turning. For most people, this wouldn’t be too hard to build; however, it becomes a more complicated issue if the animator wants to equip the camera with an electric motor for the mechanism. In that case, they would need to consider several factors, such as choosing the right type of motor that can handle constant powering on and off. It’s definitely advisable to have an expert install the motor and set up the connecting mechanism with the camera's moving parts.
Electric motors to drive camera mechanisms are in general use among those who make titles for moving-picture films. For this particular branch of the industry they are an indispensable adjunct.
Electric motors for operating camera mechanisms are commonly used by those who create titles for movies. In this specific area of the industry, they are an essential component.
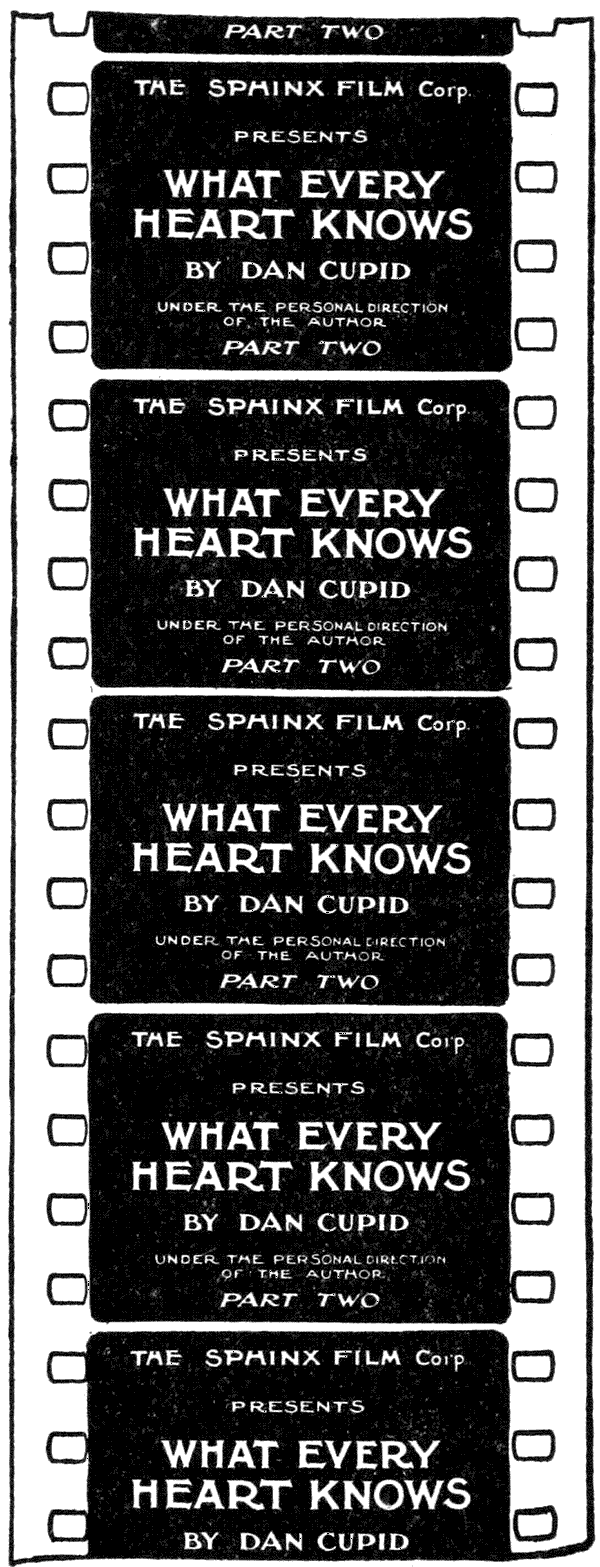
It would seem to the spectator in the theatre, unfamiliar with the technic of cinematography, that when he sees a title held on the screen for any lengthy period, the practical way of effecting this would be to have a single picture of this title kept stationary during the period. But this is not the way the matter is worked out. A title in a screen story is given a certain length of film, with every frame in this length containing the same words. The particular length—footage—allowed[208] for a title depends upon the amount of its reading-matter. Some titles are very long. One such, requiring, say, fifteen feet, makes it necessary to turn the camera handle two hundred and forty times, if the operation is by hand. A very monotonous job. So title studios attach a motor and appropriate mechanism to a camera, and with it, too, an automatic counter. Then in photographing a title it is a simple matter of starting the mechanically driven shutter, watching the figures on the[209] counter dial, and when the required exposures have been registered, pulling the lever that stops the mechanism. Where a camera, however, is used for animated drawings exclusively, a motor is not absolutely necessary.
It might seem to a theatre audience member, unfamiliar with how filmmaking works, that when they see a title held on the screen for an extended period, the easiest method would be to keep a single image of that title stationary. But that’s not how it's done. A title in a film is assigned a certain length of film, with every frame in that length displaying the same words. The specific length—footage—for a title depends on how much text it has. Some titles can be pretty long. For instance, one that needs about fifteen feet requires the camera to rotate two hundred and forty times if it's operated manually. It’s a tedious task. So, title studios attach a motor and proper mechanisms to the camera, along with an automatic counter. When photographing a title, it becomes straightforward: just start the motor-driven shutter, keep an eye on the numbers on the counter dial, and when the necessary exposures are complete, pull the lever to stop the mechanism. However, if a camera is used solely for animated drawings, a motor isn’t absolutely necessary.
An automatic counter would be a very useful addition to a camera in making dissolves. One form of these fantasies is that in which the screen is perfectly black at first and then a small spot of light appears, which grows larger by degrees, to reveal at the full opening the scene or subject of the film. This is produced by a vignetter, or iris dissolve. A vignetter is a device, fixed generally in front of a lens, that consists of a number of crescent-shaped segments of thin metal pivoted on a circumference. When these segments move in unison toward the centre, they gradually decrease the aperture in the lens tube. But when the movement is in a contrary direction, they cause the aperture to open by degrees. Those who have used an ordinary snap-shot camera no doubt are familiar with a similar device—the iris diaphragm, or lens stop. But in the diaphragm the segments do not completely close, and there is always a tiny opening left in the[210] centre. The iris dissolve, or vignetter, is made to close completely.
An automatic counter would be a really useful addition to a camera for creating dissolves. One type of these effects starts with a completely black screen, then a small spot of light appears, gradually getting larger until it fully reveals the scene or subject of the film. This effect is created by a vignetter or iris dissolve. A vignetter is a device, usually placed in front of a lens, made up of several crescent-shaped segments of thin metal that are pivoted on a circle. When these segments move together towards the center, they gradually reduce the aperture in the lens tube. Conversely, when they move in the opposite direction, they slowly open the aperture. Those who have used a regular snapshot camera are likely familiar with a similar mechanism—the iris diaphragm or lens stop. However, in the diaphragm, the segments never completely close, so there's always a tiny opening left in the [210] center. The iris dissolve, or vignetter, is designed to close completely.
The way by which pictures are “faded on” is to start with the vignetter closed and then open it while the camera handle is turned to take the picture. To “fade off” a picture, the process is simply reversed; i. e., gradually closing the vignetter while the last part of the picture is being taken.
The method for "fading in" pictures is to start with the vignetter closed and then gradually open it while turning the camera handle to capture the image. To "fade out" a picture, just reverse the process; that is, slowly close the vignetter while finishing the last part of the picture.
The most frequent application that an animated cartoon artist makes of a vignetter is making cross dissolves, or causing one picture to blend into another. Imagine now that the idea to be expressed, through the medium of one of these cross dissolves, is that of a character standing in an attitude of reflection and supposed to be thinking of how he would look in a complete suit of armor. There will be two drawings: one with the figure in ordinary dress, and the other with him clad in the armor. First the picture with ordinary dress is photographed. During this operation the vignetter is closed by degrees. When it is closed, the film that was just photographed upon is wound back again into the magazine. Now, as we know, during this procedure the[211] light, which was getting weaker and weaker, proportionately lessened its effect on the sensitized emulsion of the film, so that its picture-forming property was not all used up. There is still a certain proportion of photographic potency left for the next exposure. The next step is to replace the first drawing with the one showing the character in armor.
The most common way an animated cartoon artist uses a vignetter is to create cross dissolves, or to blend one image into another. Imagine that the idea being conveyed through one of these cross dissolves is a character in a reflective pose, thinking about how he would look in a full suit of armor. There will be two drawings: one with the character in regular clothes and the other with him in the armor. First, the drawing with the regular clothes is photographed. During this process, the vignetter is gradually closed. Once it's closed, the film that's just been photographed is rewound back into the magazine. As we know, during this procedure, the light, which is getting weaker, gradually reduces its effect on the sensitized emulsion of the film, so its ability to form images isn’t completely used up. There’s still some photographic power left for the next exposure. The next step is to swap out the first drawing for the one depicting the character in armor.
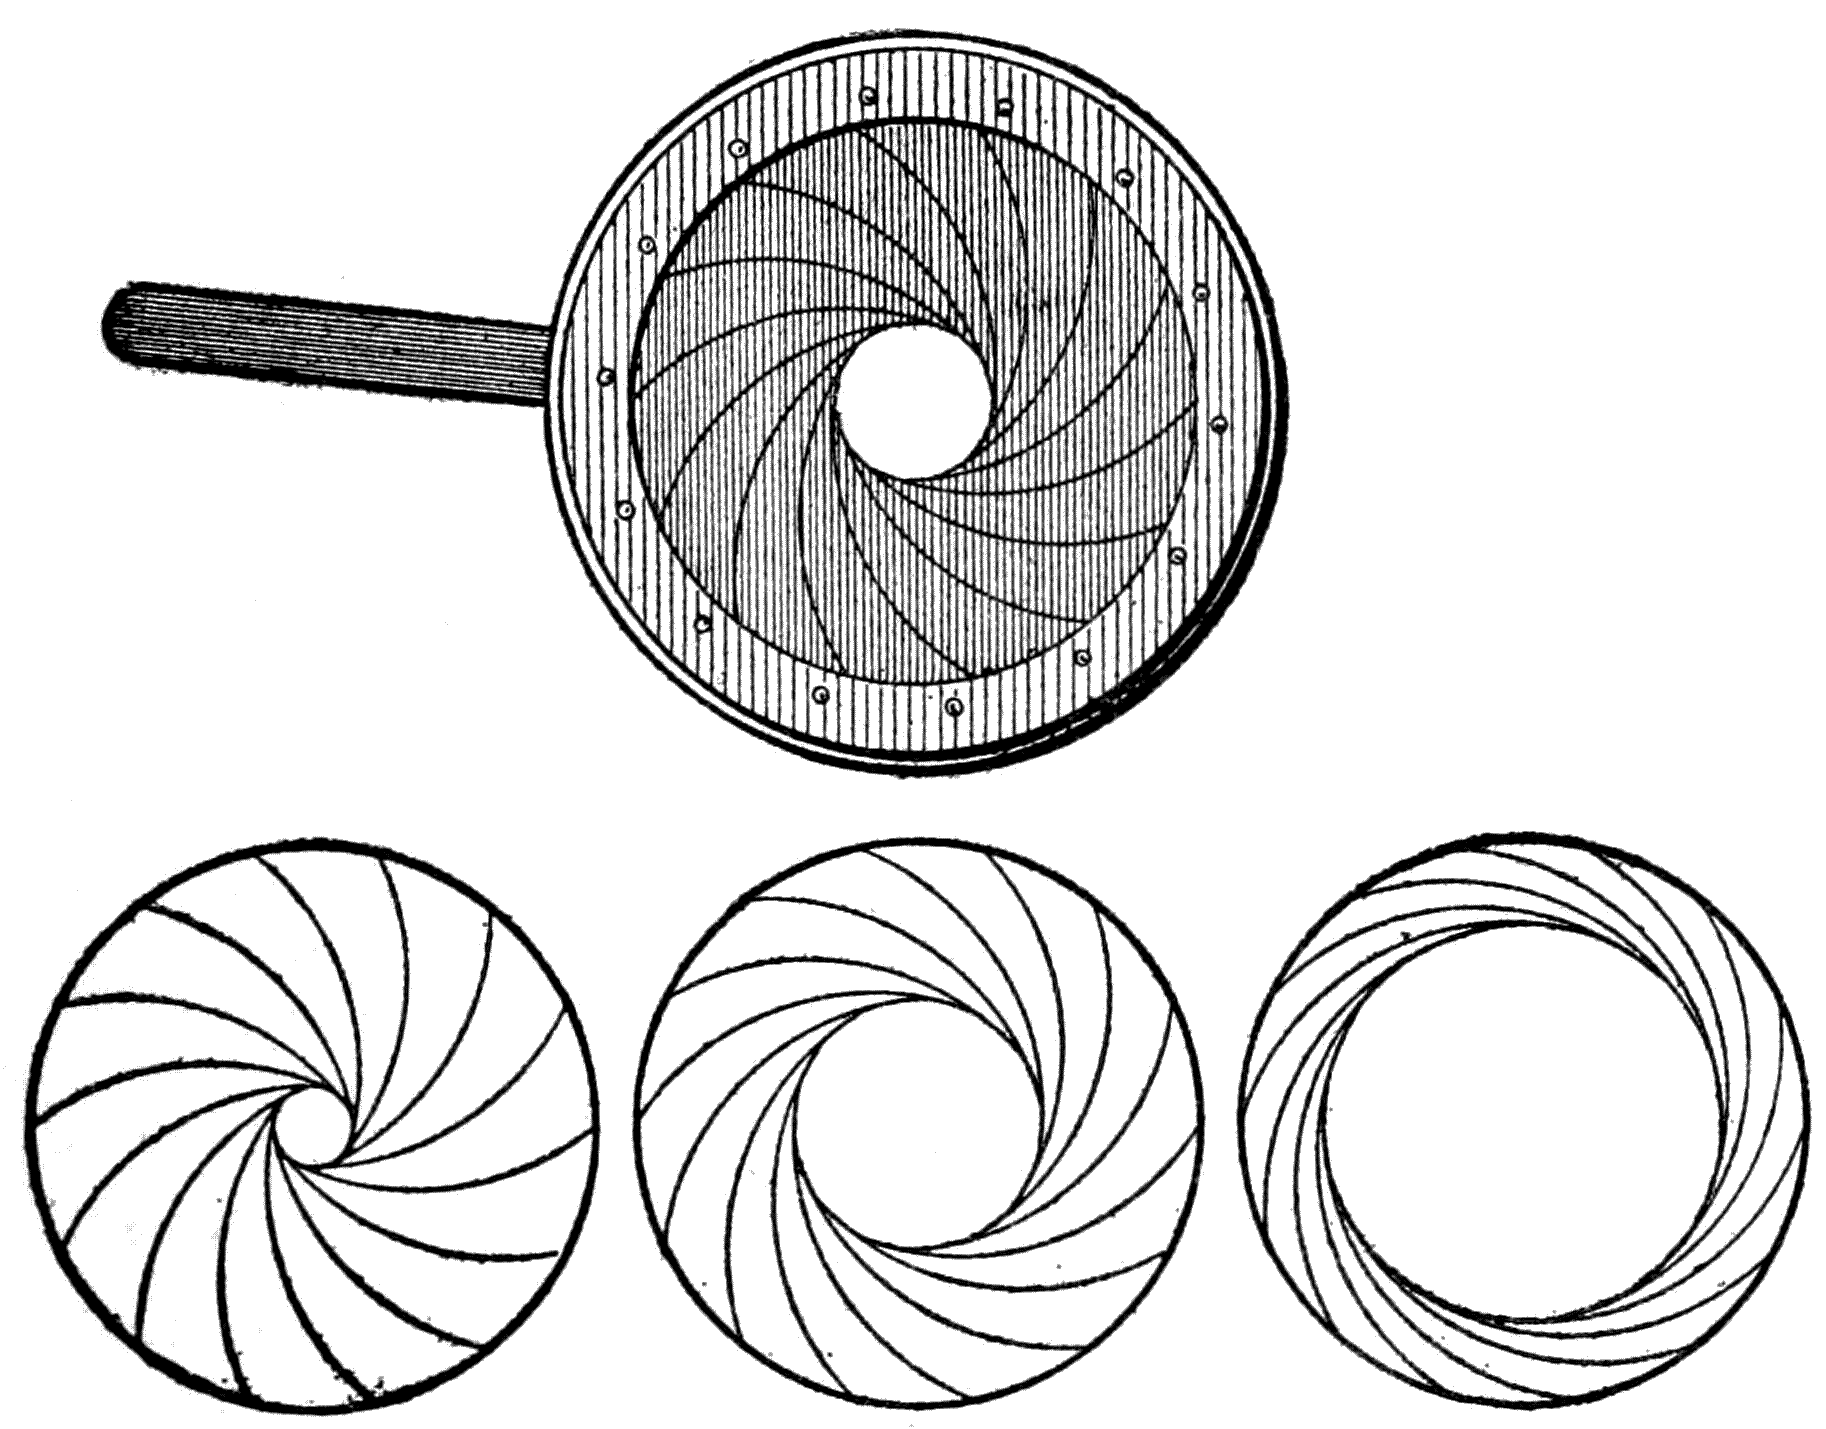
Below: Three stages during the movement of the pivoted segments.
Below: Three stages during the movement of the pivoting segments.
We left the vignetter completely closed, and the same length of film that had just passed back[212] of the lens has been wound back into the magazine and is ready to cross the exposure field again and be photographed upon the second time. Now the vignetter is gradually opened, the new picture is being taken and blended with the image of the first picture.
We left the vignetter fully closed, and the same length of film that just passed back[212] through the lens has been rewound into the magazine and is ready to cross the exposure field again to be photographed a second time. Now the vignetter is slowly being opened, the new picture is being taken, and it's merging with the image of the first picture.
These two procedures in their method of operating and their effects compensate one another. The gradual closing of the vignetter has its reciprocal part in the gradual opening; the lessening of the light strength is reciprocal to the increase of the light strength; then the fading of definiteness in one picture is made up by the gradually increasing clearness in the other.
These two processes, in how they function and their effects, balance each other out. The slow closing of the vignetter has a corresponding effect in the gradual opening; the decrease in light intensity corresponds to an increase in light intensity; then the blurring of clarity in one image is balanced by the gradually improving clarity in the other.
In trick work of this kind a mechanical counter would be very useful in measuring the length of film as it is turned into the magazine and then out again. It is understood, of course, that our particular counter also counts backward. And, again, with reference to cameras: an animator when he selects his camera should be certain that he gets one with which it is possible to turn the camera backward for making these dissolves and any other trick work involving like manipulation.
In this kind of trick work, a mechanical counter would be really helpful for measuring the length of film as it goes into and comes out of the magazine. It's understood, of course, that our specific counter can also count backward. Also, when it comes to cameras, an animator should make sure they choose one that allows for backward movement to create these dissolves and any other trick work that requires similar manipulation.
Immediately above we gave certain reasons[213] for the making of tests on a small piece of film before photographing. Another matter for which tests should be made is the question of illumination. It is important that the field should be evenly illuminated. All this is an affair of adjusting the lights; that is, getting them one on each side of the camera in their proper positions with reference to the lens opening and the distance away from the drawing-board.
Immediately above we gave certain reasons[213] for doing tests on a small piece of film before taking photos. Another thing that needs testing is the lighting. It’s important for the area to be evenly lit. This all involves adjusting the lights; that is, placing one light on each side of the camera in the right spots relative to the lens opening and the distance from the drawing board.
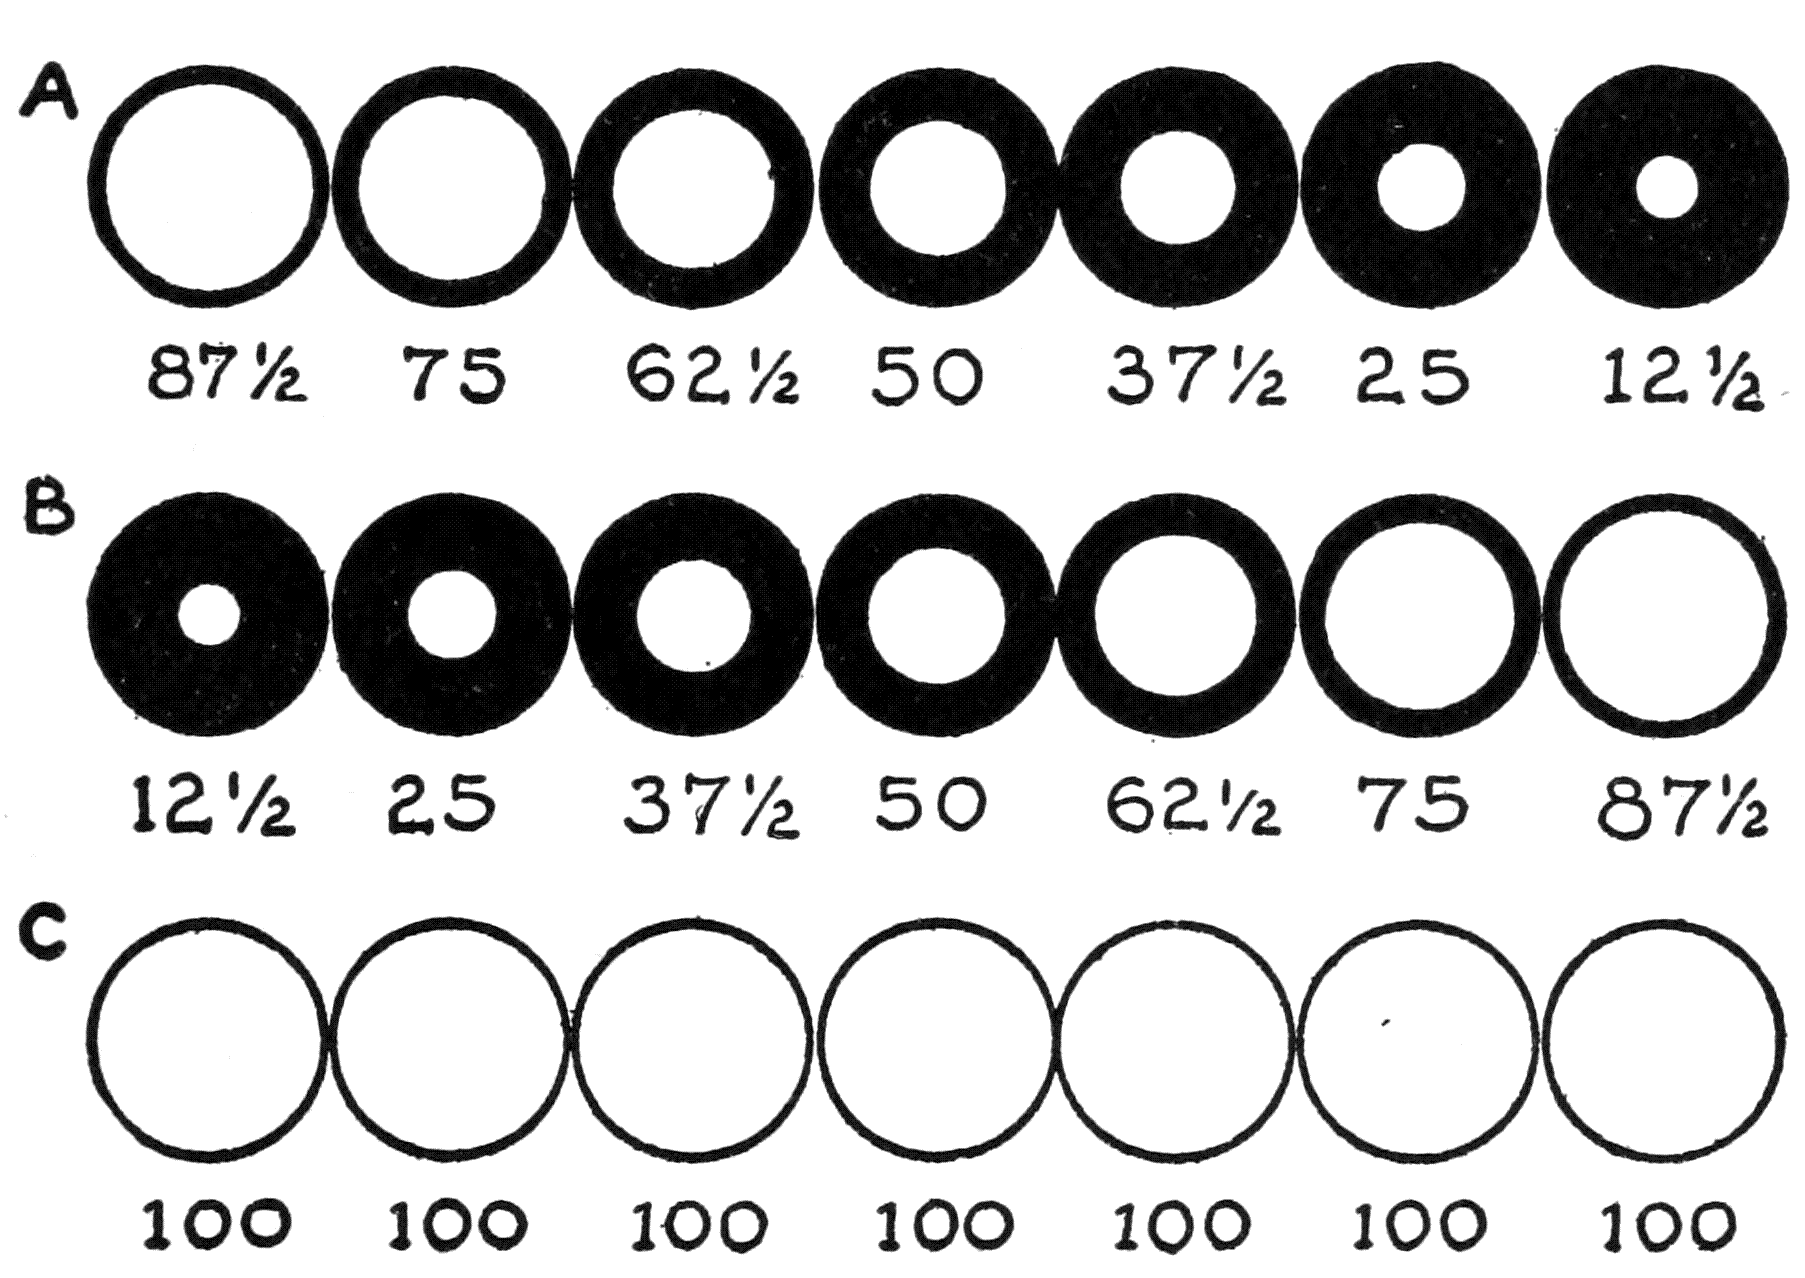
A. When the vignetter is gradually closed during the taking of the first picture. (The film having been wound back is ready to be photographed upon again for the second part of the procedure.) B. While the vignetter is gradually opened during the taking of the second picture. C. The percentages of light in the two exposures combined and giving the complete exposure time.
A. When the vignetter is slowly closed while taking the first picture. (The film has been rewound and is ready to be photographed again for the second part of the process.) B. While the vignetter is slowly opened during the taking of the second picture. C. The percentages of light in both exposures combined, determining the total exposure time.
[214]
[214]
The mercury vapor-lamp which, as has been mentioned, is in general use for cartoon films, has besides its illuminating qualities another great merit. It is this: it does not emit heat rays. When it is remembered that an artist sometimes spends hours at a stretch photographing his numerous drawings for a cartoon film, and that all this time his head is but a few inches from the lights, this absence of heat is a desirable feature.
The mercury vapor lamp, which is commonly used for cartoon films, has another significant advantage besides its lighting capabilities. It doesn't produce heat rays. Considering that an artist can spend hours photographing their many drawings for a cartoon film and is often only a few inches away from the lights, this lack of heat is a very beneficial feature.
The manner of going about the photography, which is the next stage of the work, has been touched upon in another part of the book.
The way to approach the photography, which is the next step in the process, has been discussed in another section of the book.
There are many more minute particulars in the making of an animated film to be considered. Take, for instance, the technical questions respecting the preparation of the drawings. In the process where most of the drawings are made on paper, the paper should be a fair quality of white linen ledger paper—but not too thick, as transparency is a thing to think of, and it is preferable, too, that there be no water-mark. The design of a water-mark would be a disturbing element in tracing from one drawing to another. Ordinary black drawing ink is used for the line work,[215] but when a large area is to be solid black, it has been found best to employ one of the black varnish stains that are mixed with turpentine. In spite of the turpentine medium it is possible to apply it to paper. These black stains are an intense black and do not lose their strength when viewed through the celluloid sheets.
There are many more tiny details in creating an animated film that need to be addressed. For example, consider the technical aspects of preparing the drawings. Most of the drawings should be done on a decent quality of white linen ledger paper—but it shouldn't be too thick, as transparency is important, and it’s also better if there’s no water-mark. A water-mark could be distracting when tracing from one drawing to another. Regular black drawing ink is used for the line work,[215] but when filling in a large area with solid black, it's best to use one of the black varnish stains mixed with turpentine. Despite the turpentine medium, it can still be applied to paper. These black stains are a deep black and maintain their intensity when viewed through celluloid sheets.
It is not usual to obliterate a mistake in drawing with white pigment, as it is an uncertain quantity in photography. Whether or not it will come out as a patch of gray, or photograph correctly as white, is difficult to judge beforehand. It is best to take out ink lines that are not wanted with a sharp-bladed penknife and then smooth the surface of the paper with an ink eraser (of rubber).
It’s not common to cover up a mistake in drawing with white paint, since it’s unpredictable in photography. Whether it turns out as a gray spot or correctly as white is hard to determine in advance. It’s better to remove unwanted ink lines with a sharp penknife and then smooth the surface of the paper with a rubber ink eraser.
In drawing over the smooth surface of the celluloid a preliminary cleaning with weak ammonia water will make the ink flow evenly. It is of course understood that the celluloid sheets can be used again after any particular film is finished. Ink or pigment can very easily be washed off with water.
In drawing on the smooth surface of the celluloid, a quick clean with diluted ammonia water will help the ink flow smoothly. It's understood that the celluloid sheets can be reused after finishing any specific film. Ink or pigment can easily be washed away with water.
In drawing on celluloid with a pen it is well to select one that will not scratch the surface. Scratches will hold, in their shallow depths, enough[216] ink or pigment to break the evenness of a uniform background. They will come out as spots on the film. A well-worn pen, one that has been “broken in,” as the pen draftsmen say, is the best.
When drawing on film with a pen, it's best to choose one that won't scratch the surface. Scratches can trap enough ink or pigment in their shallow grooves to disrupt the smoothness of a uniform background. They will appear as spots on the film. A well-used pen, one that has been "broken in," as pen draftsmen say, is the ideal choice.[216]
The scheme of employing celluloid sheets to hold simple ink drawings, which scheme is in common usage in the art, has been adapted to the purpose of holding intricate drawings in distemper pigment. Before drawing any series of movements on celluloid it is the usual plan to work out all the scenes and actions on paper first and then trace them, from these drawings, to the surface of the celluloid.
The method of using celluloid sheets to hold basic ink drawings, which is widely used in the art world, has been adapted to hold detailed drawings in tempera paint. Before drawing any sequence of movements on celluloid, it’s standard practice to plan all the scenes and actions on paper first and then trace them onto the surface of the celluloid from these drawings.
When the drawings for a cartoon have been photographed, the magazine into which the exposed film has been wound is taken out of the camera. Then, in the dark room, the film is taken out of this magazine and put into a regulation tin can and sent to the laboratory. And so as to make it quite certain that the lid will not slip off and spoil the whole reel, it is sealed around the edge with a piece of adhesive tape.
When the drawings for a cartoon have been photographed, the magazine that holds the exposed film is removed from the camera. Then, in the darkroom, the film is taken out of this magazine and placed into a standard tin can and sent to the lab. To make sure the lid doesn’t come off and ruin the whole reel, it is sealed around the edge with a piece of tape.
After the film has been developed, the next step in the process is that of printing the positive.[217] This as well as the remaining technical matters is attended to by the laboratory. Titles, to be sure, could have been made at the same time that the animated pictures were taken; but it is found advisable to have titles made by a studio that does this work exclusively and then have them joined to the film in their proper order.
After the film has been developed, the next step is to print the positive.[217] The laboratory handles this and all other technical aspects. Yes, titles could have been created while the animated scenes were being filmed, but it's generally better to have a studio that specializes in this work create the titles and then add them to the film in the correct order.
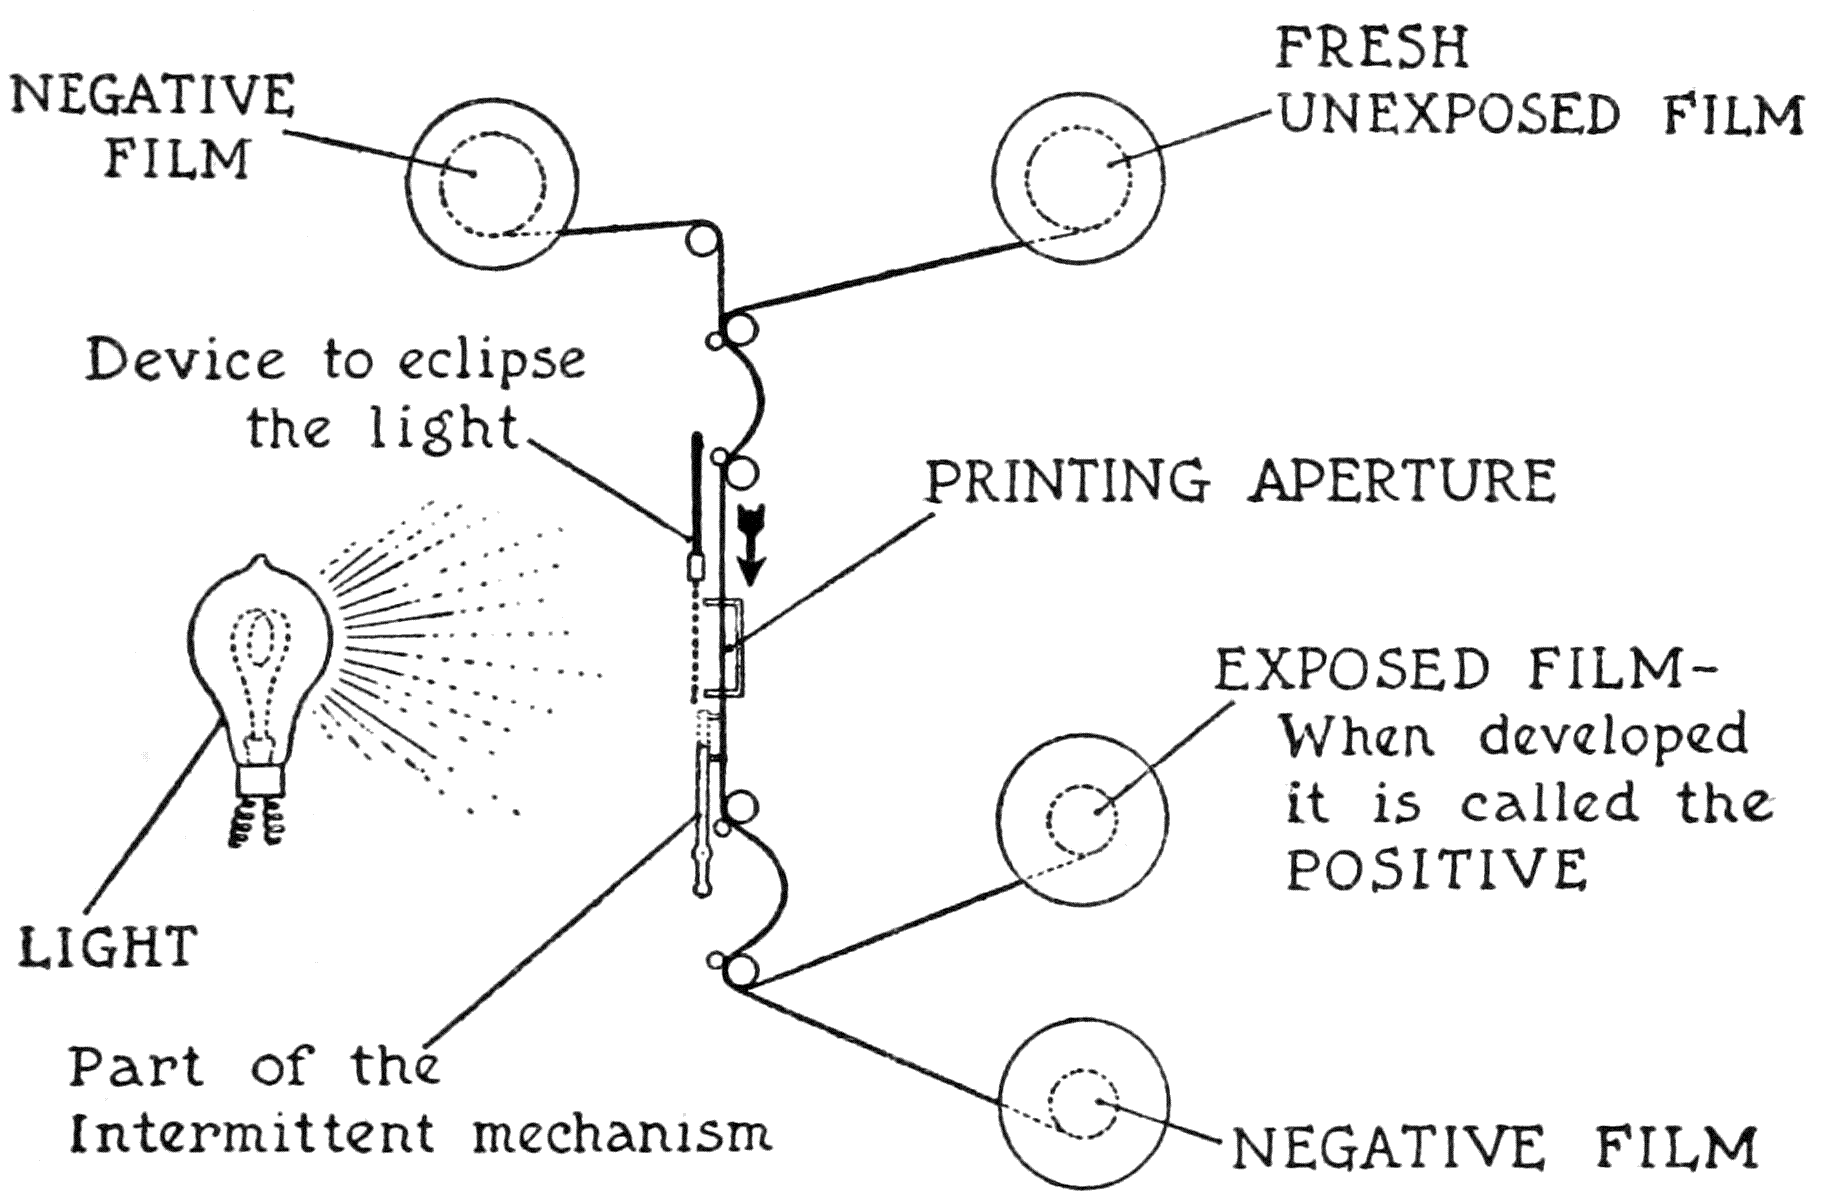
With respect to this joining, or splicing, this is also looked after for the animator at the film laboratory. But as it is not difficult to do, the animator—impatient to have his film completed,[218] and not caring to wait until the laboratory finish it—will try his hand at it, no doubt.
With regard to this joining or splicing, the film laboratory also takes care of it for the animator. However, since it's not hard to do, the animator—eager to finish his film and not wanting to wait for the lab to complete it—will likely give it a try himself, for sure.[218]
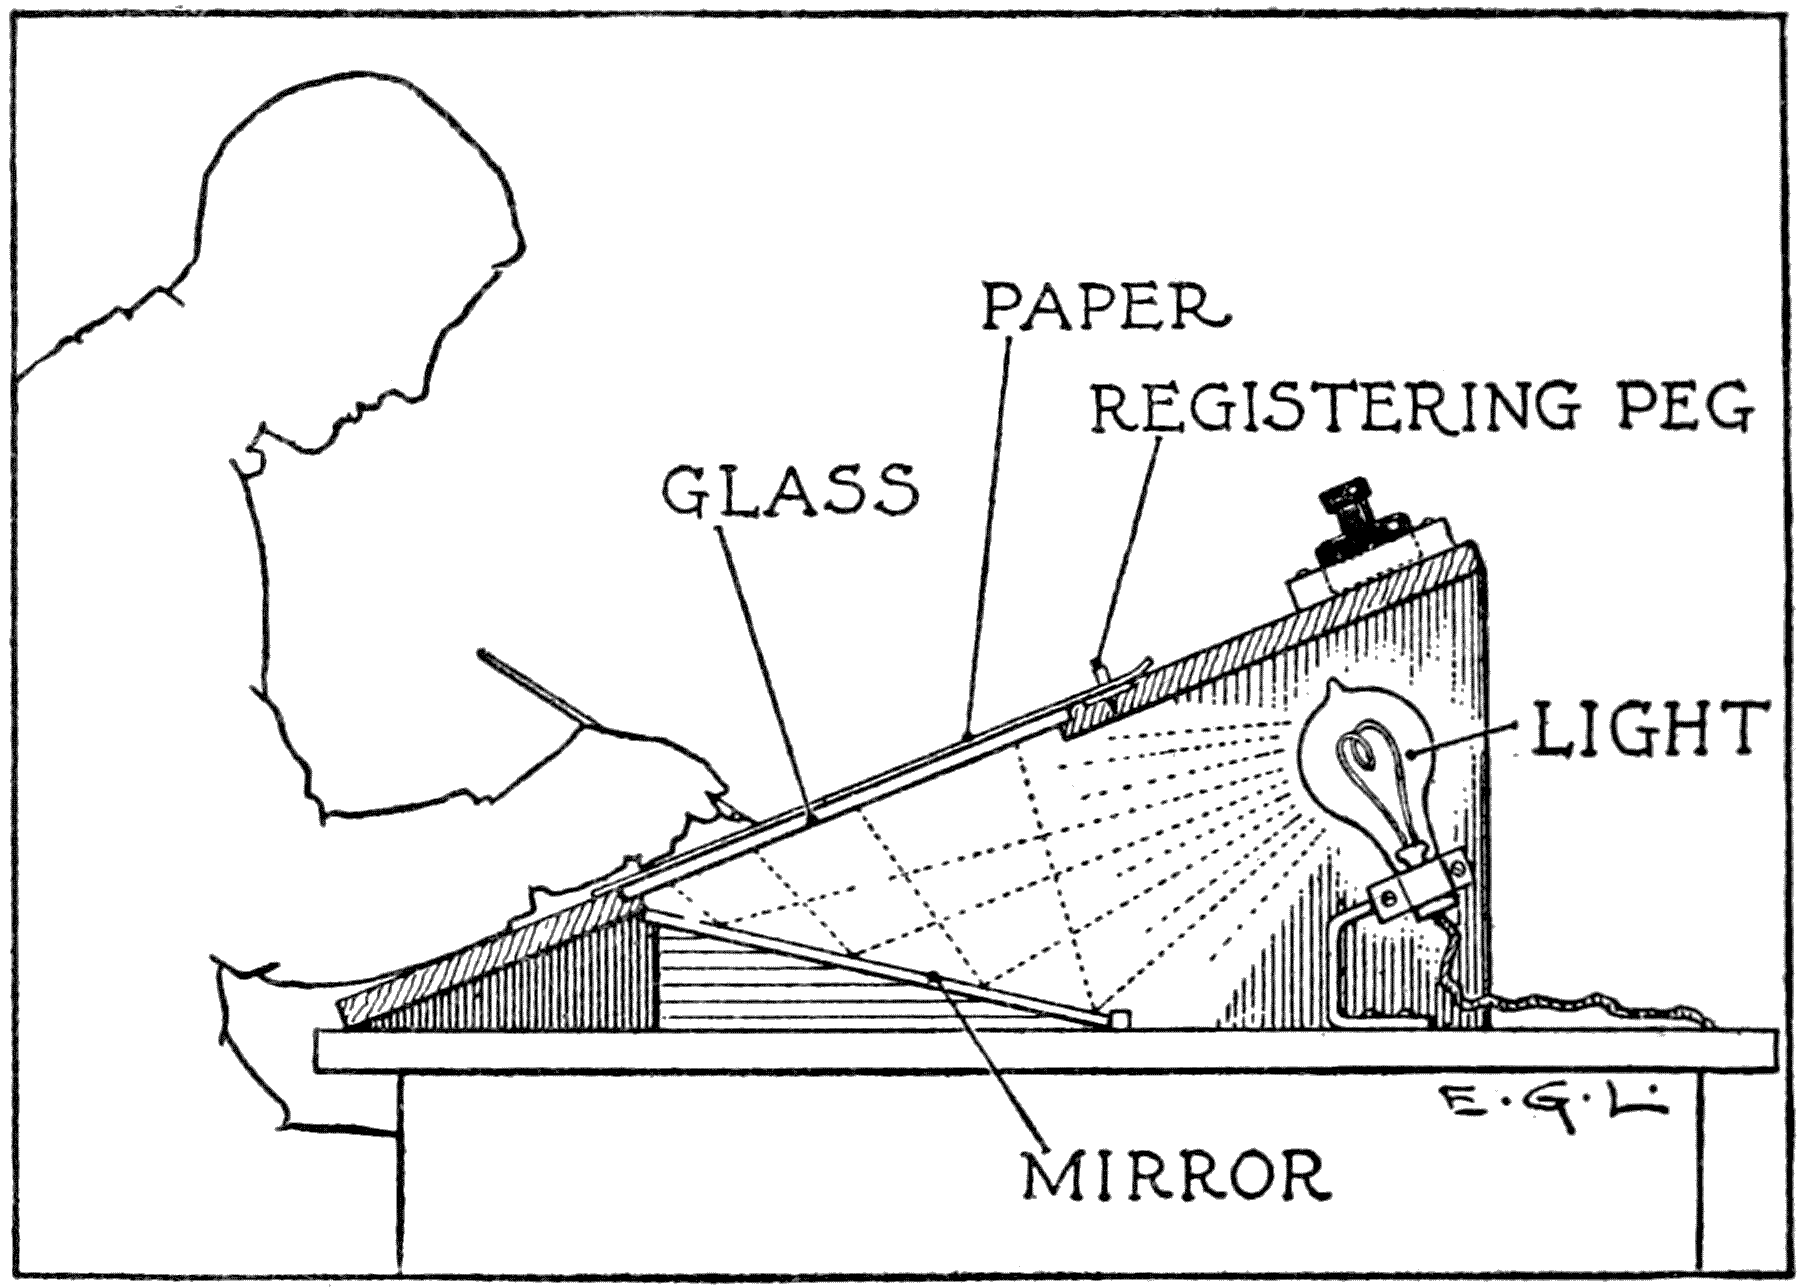
Reflecting the light with a mirror does away with the direct glare of the electric lamp.
Reflecting light with a mirror eliminates the harsh glare from the electric lamp.
He needs for this a little device to hold the two ends of the film together in their proper relationship while he spreads on the overlapping section a little film cement. This is a firm adhesive. The emulsion on the film where the cement is spread must be removed by a little moistening.
He needs a small tool to keep the two ends of the film aligned while he applies a bit of film cement to the overlapping part. This is a strong adhesive. The emulsion on the film where the cement is applied must be removed with a bit of moisture.
[219]
[219]
When the positive is entirely finished, with main title and subtitles, it is ready for screen examination. Then only will the artist be able to see, as a finality, his skill as an animator, his expertness as a technical worker, his cleverness as a humorist, and the extent of his adroitness in plot construction.
When the positive is completely finished, with the main title and subtitles, it’s ready for review on screen. Only then will the artist be able to see, as a final result, their skill as an animator, their expertise as a technical worker, their cleverness as a humorist, and the extent of their skill in plot construction.

In giving screen life to the above, the dog and dish would be drawn but once on celluloid and the other parts separately drawn for each phase of the movement.
In bringing the above to life on screen, the dog and dish would be animated just once on film, while the other parts would be animated separately for each stage of the movement.
ON HUMOROUS EFFECTS AND ON PLOTS
ON HUMOROUS EFFECTS AND ON PLOTS
CHAPTER X
ON HUMOROUS EFFECTS AND ON PLOTS
The purpose of the animated cartoon being to amuse, the experienced animator makes it his aim to get, as the saying goes in the trade, a laugh in every foot of film. The animated cartoon is allied in its kind to an extravagant farce or a lively comedy of the spoken stage.
The purpose of animated cartoons is to entertain, so a skilled animator strives to achieve what’s known in the industry as getting a laugh in every foot of film. Animated cartoons are similar to over-the-top farces or energetic comedies from live theater.
Although strongly limned character and that there be something moving all the time seem to be the two important ingredients of a film of this type, it is not to be forgotten that plot is an essential in the work.
Although well-defined characters and constant movement seem to be the two key elements of a film like this, it's important to remember that plot is also essential to the work.
Naturally, a scenario, or skeletonized plan of the story, is written out first. The full details of the action and business, from the beginning to the very end, are not worked out as they are in a manuscript for a stage play. It is simply that some sort of a framework, on which to build the story, is first required.
Naturally, a basic outline or framework of the story is created first. The complete details of the action and events, from start to finish, are not fully developed as they would be in a script for a stage play. It's just that a structure to build the story on is needed initially.
In the early days of the art a film with a string[224] of incidents only, but with plenty of movement in the animated figures, would find a ready market and an appreciative audience. At the present time not only must the pictorial properties be well rendered imageries of nature but the story must be artistic in form. This signifies that the idea of plot, and all its attendant concomitants, should be present. The usual requirements of a dramatic story are now sought for in an animated cartoon. The plot must be the orderly establishment of parts leading up to some main point, or the working to a climax and a subsequent untangling of it all.
In the early days of film, a movie that was just a series of events but had lots of movement in the animated characters would easily find an audience and be well-received. Nowadays, not only do the visuals need to accurately depict nature, but the story also has to be artistically structured. This means that there should be a clear plot and all its related elements. Today, people expect the same dramatic storytelling elements in an animated cartoon. The plot should systematically build up to a key moment, leading to a climax and then resolving everything afterward.
If the artist does write the first sketch of the play himself, he at least will elaborate it and add various bits of dramatic business. This is all[225] very well if he understands and knows what he is about, but if, on the other hand, he has not the dramatic idea, his additions are quite likely to confuse the story.
If the artist does write the first draft of the play himself, he will at least develop it further and add different elements of dramatic action. This is fine as long as he understands what he’s doing, but if he lacks the dramatic concept, his additions might end up confusing the story.
Whether a film is for the purpose of amusement or to educate, the plan should show that the attainment of something is being striven for. In an educational film this is brought about by an adherence to pedagogical principles. If it is a comic story, due regard must be paid to dramatic construction.
Whether a film is meant for entertainment or education, the plan should demonstrate that achieving something is the goal. In an educational film, this is achieved by following teaching principles. If it’s a comedic story, attention must be given to the structure of the drama.
It is obvious that if a humorous scenario has but two characters this will simplify the telling, and the idea of their antagonisms, obstacles, and embarrassing difficulties are easily told. The clash and the struggle between the two can be expressed in many simple ways, the story carried on, curiosity stimulated, and an expectant feeling engendered as to what will happen. The final episode is apt to be some calamitous fall with the whole picture area perhaps filled with a graphic representation of an explosion, to be followed by an after-climax, when the smoke has cleared away, of the victim rubbing his head.
It’s clear that if a funny situation involves just two characters, it makes it easier to tell the story. Their conflicts, challenges, and awkward moments can be explained simply. The fight and tension between them can be shown in various straightforward ways, keeping the story going, sparking curiosity, and creating anticipation about what will happen next. The last scene often ends with some disastrous fall, possibly showing an explosion, followed by a moment after things have settled down, where the victim is rubbing their head.
To be sure, an animated cartoon needs a good[226] many more incidents than one calamitous occurrence. It is indispensable, for the sake of an uninterrupted animation, that it should have a succession of distressing mishaps, growing in violence. This idea of a cumulative chain of actions, increasing in force and resultant misfortune, is peculiarly adapted to animated drawings.
To be sure, an animated cartoon needs a lot more than just one disastrous event. It’s essential, for the sake of smooth animation, that it includes a series of unfortunate incidents that escalate in intensity. This concept of a chain of actions, increasing in strength and leading to more misfortune, works particularly well with animated drawings.
The animator, if he is a good draftsman, can manage his little picture people much easier than the theatrical manager does the members of his company. A great danger, nevertheless, is that the animator, with this facility of doing whatever he pleases with his characters, may overdo the matter. He must be careful that he does not create too much business for his actors, and so retard the sequence of those episodes proper to the plot.
The animator, if he's a good artist, can handle his little characters much more easily than a theater manager manages his cast. However, a big risk is that the animator, with the freedom to do whatever he wants with his characters, might go overboard. He needs to be careful not to give his actors too much to do, which could slow down the flow of the story.
The very best type of animated cartoon tells the story from the very first incidents and throughout its whole continuance to the crisis, and the ending by pantomimic acting only. This means that there is no dialogue lettered on the drawings themselves. Symbolical signs, like exclamation-marks, sound-suggesting letters, or the like, are naturally proper and happy additions to drawings;[227] but as little dialogue as possible should be used in drawings. They break the continuity of the animation, for one thing. Although it is true that balloons with their wording make an easy way for the animator to have the automatic counter register “footage” (a consideration appealing to the business sense of the artist), it is only when there is a good jest brought out that lettering on the drawings themselves can be forgiven.
The best kind of animated cartoon tells the story from the very first events all the way through to the climax, using only pantomime to convey the ending. This means there’s no dialogue written on the drawings themselves. Symbolic signs, like exclamation marks or letters that suggest sounds, are naturally good and fitting additions to the images; [227] however, there should be as little dialogue as possible in the drawings. This is because dialogue disrupts the flow of the animation. While it’s true that incorporating speech bubbles with text makes it easy for animators to keep track of “footage” (a consideration that appeals to the business side of the artist), text on the drawings can only be excused when it serves to deliver a good joke.
In the early period of the development of animated comic drawings, not even subtitles were interspersed throughout a film. The entire story was told by pantomime. Nowadays it is becoming the fashion to use subtitles, and have them to introduce incidentals, mark a change of scene, or bring in a witty remark. Wording brought[228] into a cartoon film this way is often felicitous and technically legitimate. But dialogue, as has been stated, should be kept out of the drawings themselves, not only for the sake of artistic form, but for commercial reasons. (Films intended for exportation to countries where English is not spoken are much more valuable if they are without lettering in the pictorial parts. With all wording on separate titles, it is very easy to change them and have them joined to the film proper.)
In the early days of animated comics, there weren’t even subtitles in films. The whole story was conveyed through pantomime. Nowadays, it's common to use subtitles to introduce side notes, indicate a change in scene, or add a clever remark. The wording added to a cartoon film this way is often clever and technically sound. However, as mentioned, dialogue should be kept out of the drawings themselves, both for artistic reasons and for commercial purposes. (Films meant for export to countries where English isn't spoken are much more valuable if they don’t have any text in the visual parts. With all text on separate titles, it’s very easy to change them and attach them to the main film.)
The above statement with its frank allusion to a matter of business seems to be getting away from our subject; but it is not, as it calls to our attention the principal quality of a comic screen drawing—namely, pantomime—and it emphasizes, too, the universality of pantomime. An animated cartoon clever in gesturing is understood by all races.
The above statement, with its direct reference to a business matter, might seem unrelated to our topic, but it actually isn't, as it highlights the key trait of a comic cartoon—specifically, pantomime—and also stresses the universality of pantomime. A lively cartoon that's skilled in gestures is understood by everyone, regardless of their background.
It is to be remembered that pantomime is a matter of interpretation, both on the stage by an actor and by the artist when he essays to represent it pictorially. If it were an actual copying of nature, it only would be as interesting as a normal photograph; and that is not very interesting. As in all interpretative arts there is a[229] slight betrayal of the mechanical means, or processes, so in pantomime there is a suggestion of the mechanistic. Let us recall the rhythmical and toy-like movements of the actors whom we have seen playing in some whimsical dumb show.
It's important to remember that pantomime is open to interpretation, both by the actor on stage and by the artist when they try to depict it visually. If it were just a direct copy of nature, it would only be as engaging as an ordinary photograph, which isn’t very captivating. Like in all interpretative arts, there's a slight hint of mechanical methods or processes, and pantomime has a suggestion of the mechanical as well. Let's think back to the rhythmic and playful movements of the actors we've seen performing in some quirky silent show.[229]
How often do the clowns pretend in their foolery that they are automatons, or that they can move only by mechanistic motions. They find need, too, in their ludicrous acting, for mechanical properties—slap sticks, absurd objects, or toys.
How often do clowns playfully pretend that they're robots, or that they can only move in robotic ways. They also find it necessary in their silly performances to use mechanical props—like slapsticks, ridiculous objects, or toys.
It is very certain that there are some forms of motion productive of laughter that do not imitate actions natural to the human organism, but seem to acquire their power of risibility from their resemblance to mechanical motion. This is on the order of the notion that Bergson has elaborated upon in his treatise in explanation of the comic. He states, in substance, as one law of the ludicrous, that the human body appears laughable when its movements give a similitude of a machine in operation. There is no question of the correctness of this view as a matter of mere exterior observation. Rather it seems to us that machine-like movements in organic bodies amuse[230] us because of the rhythmic, orderly, or periodic occurrences of these movements in themselves, and not to any matter of comparison.
It’s clear that some types of motion that make us laugh don’t mimic actions that are natural to humans; instead, they seem to get their humor from looking like mechanical movements. This idea aligns with what Bergson discusses in his essay on comedy. He essentially explains one principle of what’s funny: the human body looks funny when its movements resemble those of a machine at work. There’s no doubt about the validity of this observation from an outside perspective. It seems to us that machine-like movements in living beings amuse us because of their rhythmic, orderly, or repetitive nature, rather than any direct comparison.
In a boisterous low comedy it is always incumbent upon the victim of a blow to reel around like a top before he falls. It never fails to bring laughter. An effect like this is easy to produce in animated cartoons. There is no need to consider physiological impossibilities of the human organism, the artist can make his characters spin as much as he pleases.
In a loud comedy, it’s always expected that the person who gets hit will spin around like a top before they fall. It always gets a laugh. This kind of effect is easy to create in animated cartoons. There’s no need to worry about the body's physical limits; the artist can make their characters spin as much as they want.
In a screen picture two boys will be seen fighting; at first they will parry a few blows, then suddenly begin to whirl around so that nothing is visible but a confused mass and an occasional detail like an arm or leg. It will be exactly like a revolving pinwheel. This is made on the film by having a drawing representing the boys as clinched and turning it around as if it were a pinwheel.
In a video, you’ll see two boys fighting; at first, they’ll block a few punches, then suddenly they’ll start spinning around so fast that all you’ll see is a chaotic blur with an occasional glimpse of an arm or leg. It’ll look just like a spinning pinwheel. This effect is created in the film by using a drawing of the boys in a clinch and rotating it like a pinwheel.
In a panorama screen effect it seems to be sufficiently realistic, for laughter purposes, to have the legs and arms of the individual in a hurry give a blurred impression, in some degree, like that of the spokes of a rapidly turning wheel.
In a panoramic screen effect, it appears to be realistic enough for comedic purposes to have the legs and arms of a hurried person create a blurry impression, somewhat similar to the spokes of a quickly spinning wheel.
[231]
[231]
The pinwheel effect of the two boys that have come to blows is produced by turning around to four different positions a drawing representing the boys fighting.
The pinwheel effect created by the two boys who are fighting comes from rotating a drawing of the boys in four different directions.
[232]
[232]
It is an indisputable fact that the human mind finds fascination in any movement resembling a rotary one. Witness the interest that a novel mechanism or an automatic toy creates in a shop-window. Such interest is still further stimulated if there is an added item of anything of the human, or something definite accomplished in the operations.
It is a clear fact that the human mind is drawn to any movement that looks like it’s spinning. Just look at the attention a new gadget or an automatic toy gets in a store window. This interest grows even more if there’s a human element involved, or if something specific is achieved through the actions.
We require, it seems, if we are really alive, not occasional, but constant, stimuli of some sort. When we become weary of toil—which in itself is often an unwelcome and imposed form of stimulus—we seek stimuli in recreation. Or if we haven’t energy enough for the self-stimulation of sports, or the like activity, we look for it outside of ourselves.
We need, it seems, if we're truly alive, not just occasional but constant stimuli of some kind. When we get tired of work—which can often be an unwanted and forced form of stimulation—we look for excitement in leisure activities. Or if we don't have enough energy for the self-stimulation of sports or similar activities, we seek it from external sources.
Perhaps it is music, exciting us metronomically; or a play where our emotions are agitated—rhythmically or in dissonance; maybe it is a circus or the music-hall, where color and sound vibrations stimulate us. Everywhere it will be some form of measured time, movement, or rotation, whether the theme be comic or serious.
Maybe it’s music, exciting us like a steady beat; or a play that stirs our emotions—smoothly or in conflict; perhaps it’s a circus or a performance venue, where colors and sounds energize us. No matter where we are, it’s some form of structured time, movement, or rotation, whether the theme is funny or serious.
Idlers will stop to gaze at a machine in motion where there is building going on, or they will stop[233] to peer into the windows of a busy factory. There is something in all this that shows that the human mind craves the periodicity of stimulation.
Idlers will pause to watch a machine in action where construction is happening, or they'll stop to peek into the windows of a busy factory. There's something about all this that reveals the human mind's need for regular stimulation.
Perhaps one of the reasons why those crudely executed white on black animated cartoons—alluded to in a preceding chapter—are so laugh-provoking is that they represent the characters performing their antics more or less mechanically. A windmill effect, a twirling, a spinning, and a merry-go-round movement are of striking import in animated cartoons. They never fail to cause laughter when depicted in some such fashion or other.
Perhaps one of the reasons why those poorly made black-and-white animated cartoons mentioned in a previous chapter are so funny is that they show the characters doing their antics in a pretty mechanical way. Actions like a windmill effect, twirling, spinning, and merry-go-round movements are really significant in animated cartoons. These always manage to make people laugh when shown in some way or another.
Sometimes in a pursuit in a comic picture there is an introduction of a chase around a house or around a tree. The gyration about the house is particularly productive of laughter. The slight interruption while the figure passes back of the house gives occasion for the necessary pause in this comic business.
Sometimes in a comedy, there's a chase happening around a house or a tree. The running around the house is especially funny. The brief moment when the character goes behind the house creates the perfect pause needed for this comedic scene.
The author recalls a film of real people and scenes that exemplified the potency of a mechanical turning and the value of a pause for laugh-provoking purposes. The scene represented a tiny bungalow that was blown from its foundation[234] by the force of the storm and made to revolve as if it were pivoted in the centre. The droll character of the play saved himself from being blown away by clinging to one corner of the porch. The laughter of the audience although continuous came in waves of different strength. The twirling house itself caused laughter, but it increased when the ludicrous figure clinging to the porch came into view, and it decreased when he disappeared while he was being twirled around the far side of the house.
The author remembers a film featuring real people and scenes that showcased the power of a mechanical turn and the importance of pausing for comedic effect. The scene depicted a small bungalow that was lifted from its foundation by the storm's force and spun around as if it were pivoting at the center. The humorous character in the play saved himself from being blown away by hanging onto one corner of the porch. The audience's laughter, though constant, came in waves of varying intensity. The spinning house itself provoked laughter, but it grew even louder when the silly figure clinging to the porch was visible, and it faded when he disappeared around the far side of the house.[234]
Possibly one of the reasons why this performance was so successful was because this movement allowed for the physiological necessity of a rest on the part of the spectators. The emotional excitement would have been fatiguing to the breaking point had the incitement to laughter been continuous. The humorous proceeding operated so that any individual member of the audience was not compelled to shake or be agitated by laughter all the time, but could slacken up and rest rhythmically.
Possibly one of the reasons why this performance was so successful was that this movement allowed the spectators to take a necessary break. The emotional excitement would have been overwhelming if the urge to laugh had been continuous. The humor worked in a way that meant each audience member didn't have to laugh constantly but could relax and rest at a comfortable pace.
The need of a rhythmic slowing-up, or pause, to allow for a respite for the emotions and the convulsed physical organism is well illustrated in[235] the following incident often introduced into animated scenes. A little figure is observed running up hill and down dale. The manner of his performance is like this: he runs up the first hill and disappears; there is a moment or so when the scene is empty and during which he is supposed to be running down the far side of the hill. Soon he is discovered running up the second hill, at the top of which he again disappears for a time to[236] run down its far side. In another moment he is scrambling up the next hill and down the other side again. This continues until he is lost as a tiny black spot near the horizon.
The need for a rhythmic slow down, or pause, to give a break for the emotions and the exhausted body is well illustrated in[235] the following incident often shown in lively scenes. A small figure is seen running up hills and down valleys. Here's how it looks: he runs up the first hill and disappears; there’s a brief moment when the scene is empty, during which he is thought to be running down the other side of the hill. Soon, he’s spotted running up the second hill, where he again disappears for a bit to[236] run down the other side. In a moment, he is scrambling up the next hill and down the other side. This keeps going until he is just a tiny black dot on the horizon.
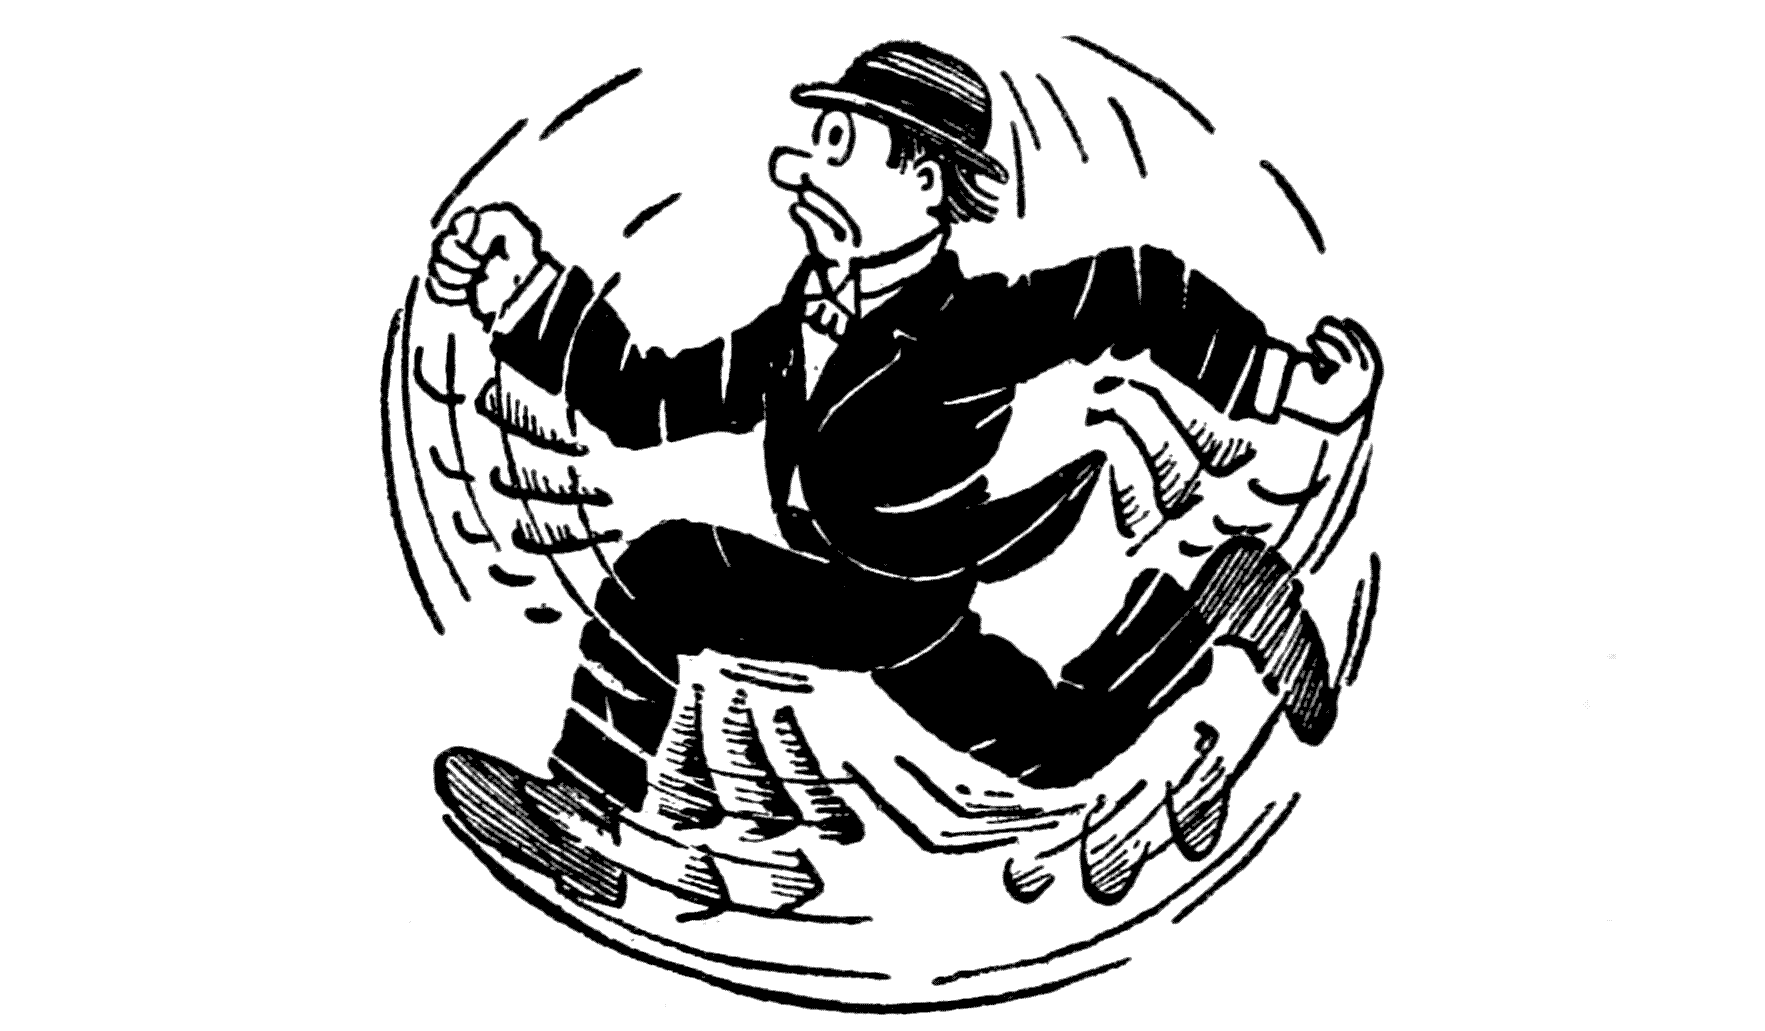
This disjointed hill-climbing causes hilarious laughter and, as in the case cited above, comes in waves. The rise and fall of the laughter waves can be distinguished as the little figure runs up the hills and down the valleys.
This awkward hill-climbing brings about hilarious laughter and, like in the example mentioned earlier, comes in waves. You can see the ups and downs of the laughter waves as the little character runs up the hills and down the valleys.
A pause is a necessary element in any continued comic situation. It is, in fact, proper to any series intended to arouse the emotion of laughter. And in some respects a pause corresponds to the negative moment of flexion—adverting our[237] thoughts for a moment to physical activity—while the outburst of laughter corresponds to the positivity of extension.
A pause is an essential part of any ongoing comedic situation. It's actually suited to any series meant to provoke laughter. In some ways, a pause relates to the brief moment of flexing—shifting our[237] thoughts for a moment to physical action—while the burst of laughter relates to the positivity of stretching.
A bit of striking animation is that of having a continuous stream of individuals pouring out of a building, or a procession of funny animals coming out of a receptacle from which we did not expect such a parade. These episodes of movement do resemble a parade—a species of regularly recurring stimulation.
A bit of eye-catching animation is having a steady stream of people pouring out of a building, or a line of amusing animals coming out of a container from which we didn’t expect such a parade. These scenes of motion do look like a parade—a kind of regularly occurring excitement.
The psychological questions in regard to these effects is related certainly to the matter of the delight of the human mind in a stirring up by repetition. Undoubtedly the same liking or pleasure in these little bits of screen animation bear a resemblance to the delight experienced in watching a parade. What is there in a spectacle of this[238] sort that tickles our senses? Is it the regularness of the step-keeping, the hypnotic music of the band, or the show of varied uniforms? Perhaps the principles of unity and variety—two essentials of any art work—enter into the matter. The variety in the uniforms of the different sections satisfies the eye, and the unity of the marching pleases the mind.
The psychological questions regarding these effects are definitely connected to how humans find joy in things that are stirred up through repetition. The enjoyment we get from these little animated clips is similar to the pleasure we feel when watching a parade. What is it about a spectacle like this[238] that excites our senses? Is it the rhythmic marching, the catchy music of the band, or the display of different uniforms? Maybe it's the balance of unity and variety—two key elements of any artwork—that plays a role. The variety in the uniforms from different groups pleases the eye, while the unity of the marching satisfies the mind.
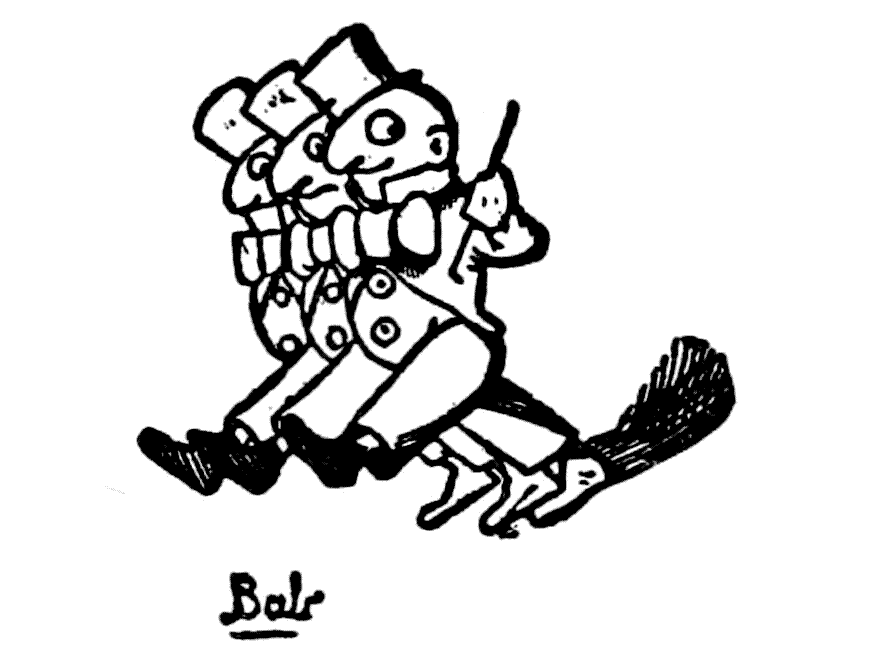
FROM “THE ‘BAB’ BALLADS.”
FROM “THE 'BAB' BALLADS.”
Keeping step is an artificial recurrence of movement. It pleases, of course, but when this motion is rendered strongly mechanistic it takes on immediately an element of the comic. In some of the little figures drolly drawn by Bab (W. S. Gilbert, of “Pinafore” and “Mikado” fame), this is[239] well expressed. A little picture of his, for instance, shows three tiny men stepping out like mechanically operated toys.
Keeping in step is an artificial repetition of movement. It can be enjoyable, but when this motion becomes overly mechanical, it quickly turns funny. Some of the little figures humorously illustrated by Bab (W. S. Gilbert, known for “Pinafore” and “Mikado”) capture this idea well. One of his illustrations, for example, depicts three tiny men marching out like wind-up toys.
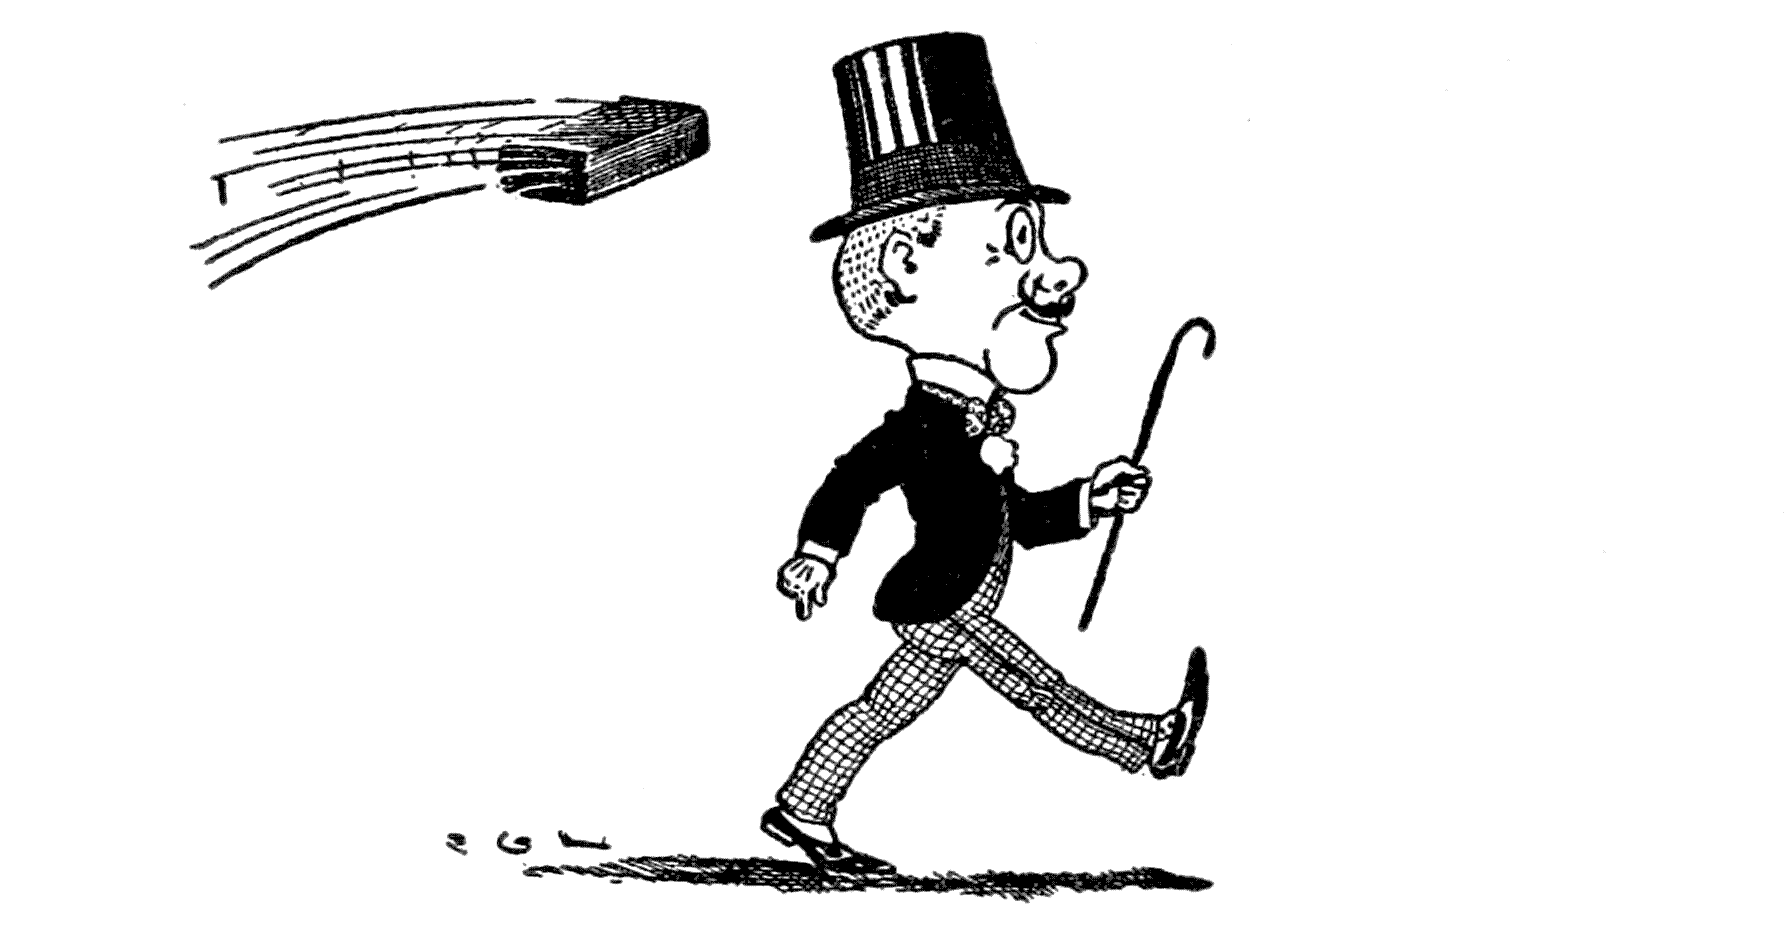
One of the most primitive of practical jokes is that of throwing a stone at a hat on some one’s head. And its most aggravated form as a joke is that in which the hat is of a stovepipe pattern. In a humorous stage play, merely to show an individual with a stone in his hand while a sprucely[240] dressed one wearing a high hat is passing is motive enough to cause laughter. The graphic artist copies this situation by representing a stone in the air nearing the hat. Action lines, as they are called, indicate that the missile is flying through the air. In both of these cases—in reality and in the picture—mere anticipation is enough to awaken the risibilities. The animator, of course, can gratify both the spectator’s joy of anticipation and the mischievous delight of seeing the consummation of the action.
One of the simplest practical jokes is throwing a stone at someone’s hat. The most extreme version of this joke involves a stovepipe hat. In a funny play, just showing a person holding a stone while a sharply dressed person with a tall hat walks by is enough to make people laugh. An illustrator captures this moment by depicting a stone flying through the air toward the hat. Action lines show that the stone is in motion. In both the real situation and the illustration, just the anticipation is enough to trigger laughter. The animator can satisfy the audience's excitement from waiting and the playful enjoyment of seeing the action unfold.
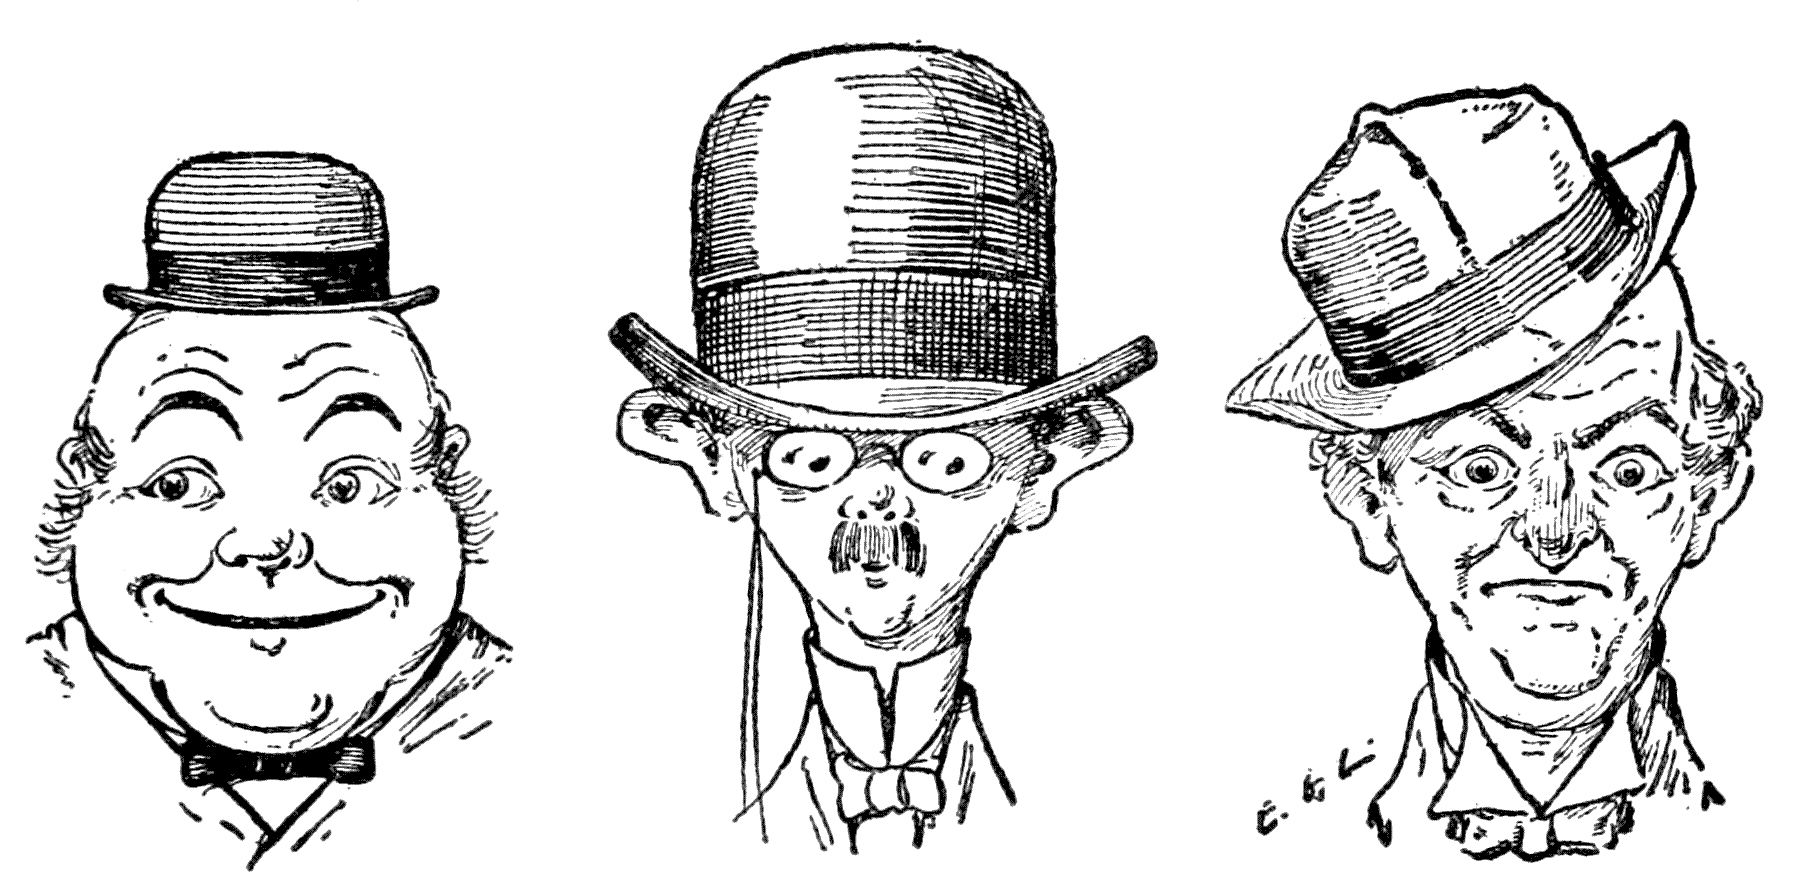
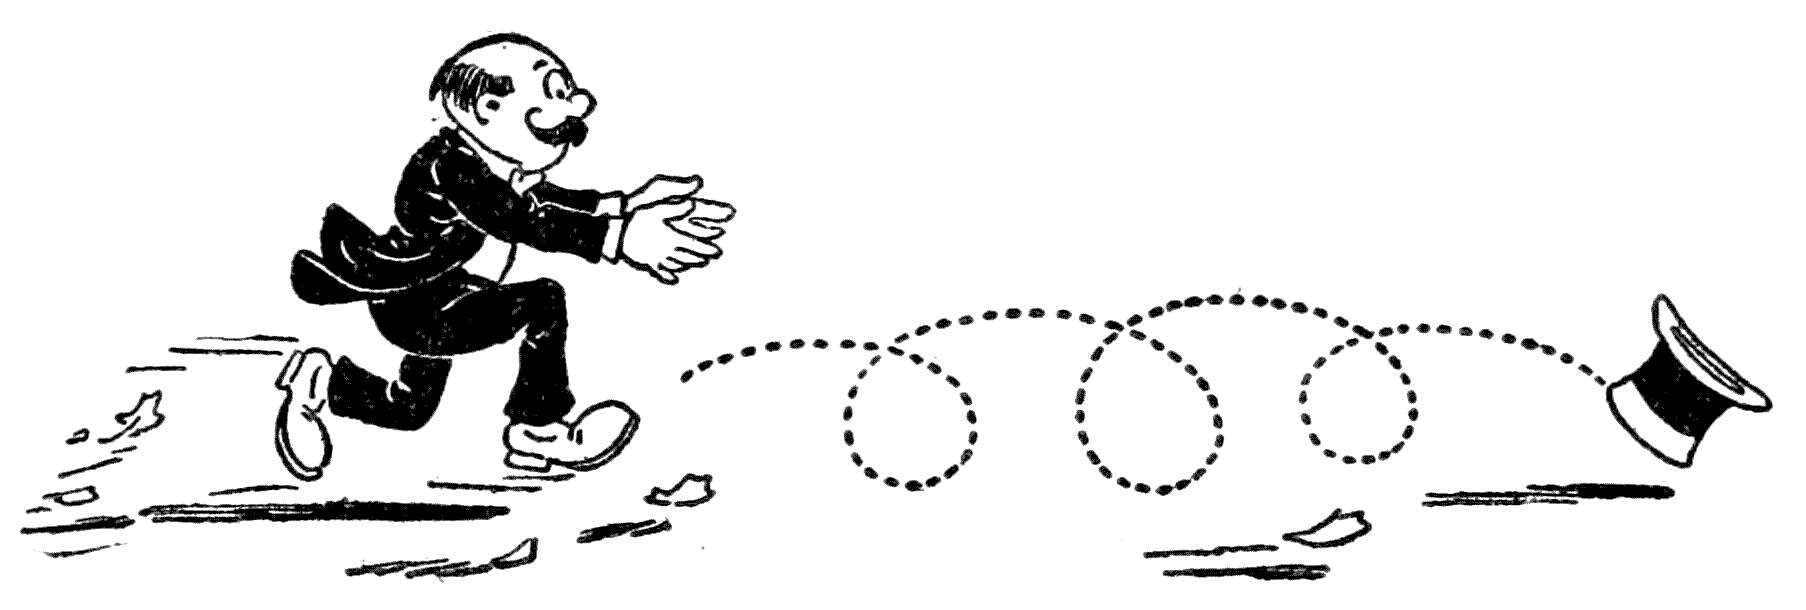
Many professional entertainers have built their reputation on some dramatic business with hats. Either they wear some odd head-gear or else it[241] will be in their manner of wearing a hat or a trick in doffing it. If a hat is too small, it is sure to create laughter; and if too large, it is a certainty that there will be mocking hilarity. And even if it is of the right size, it need only to be perched on the head at an angle to be considered ludicrous.
Many professional entertainers have made a name for themselves through their quirky hat styles. Whether they're sporting some strange headgear or showcasing a unique way to wear or take off a hat, they know how to grab attention. If a hat is too small, it’s guaranteed to get a laugh, and if it’s too big, it will definitely spark some teasing laughs. Even if it fits perfectly, just wearing it at a tilt can make it look ridiculous.
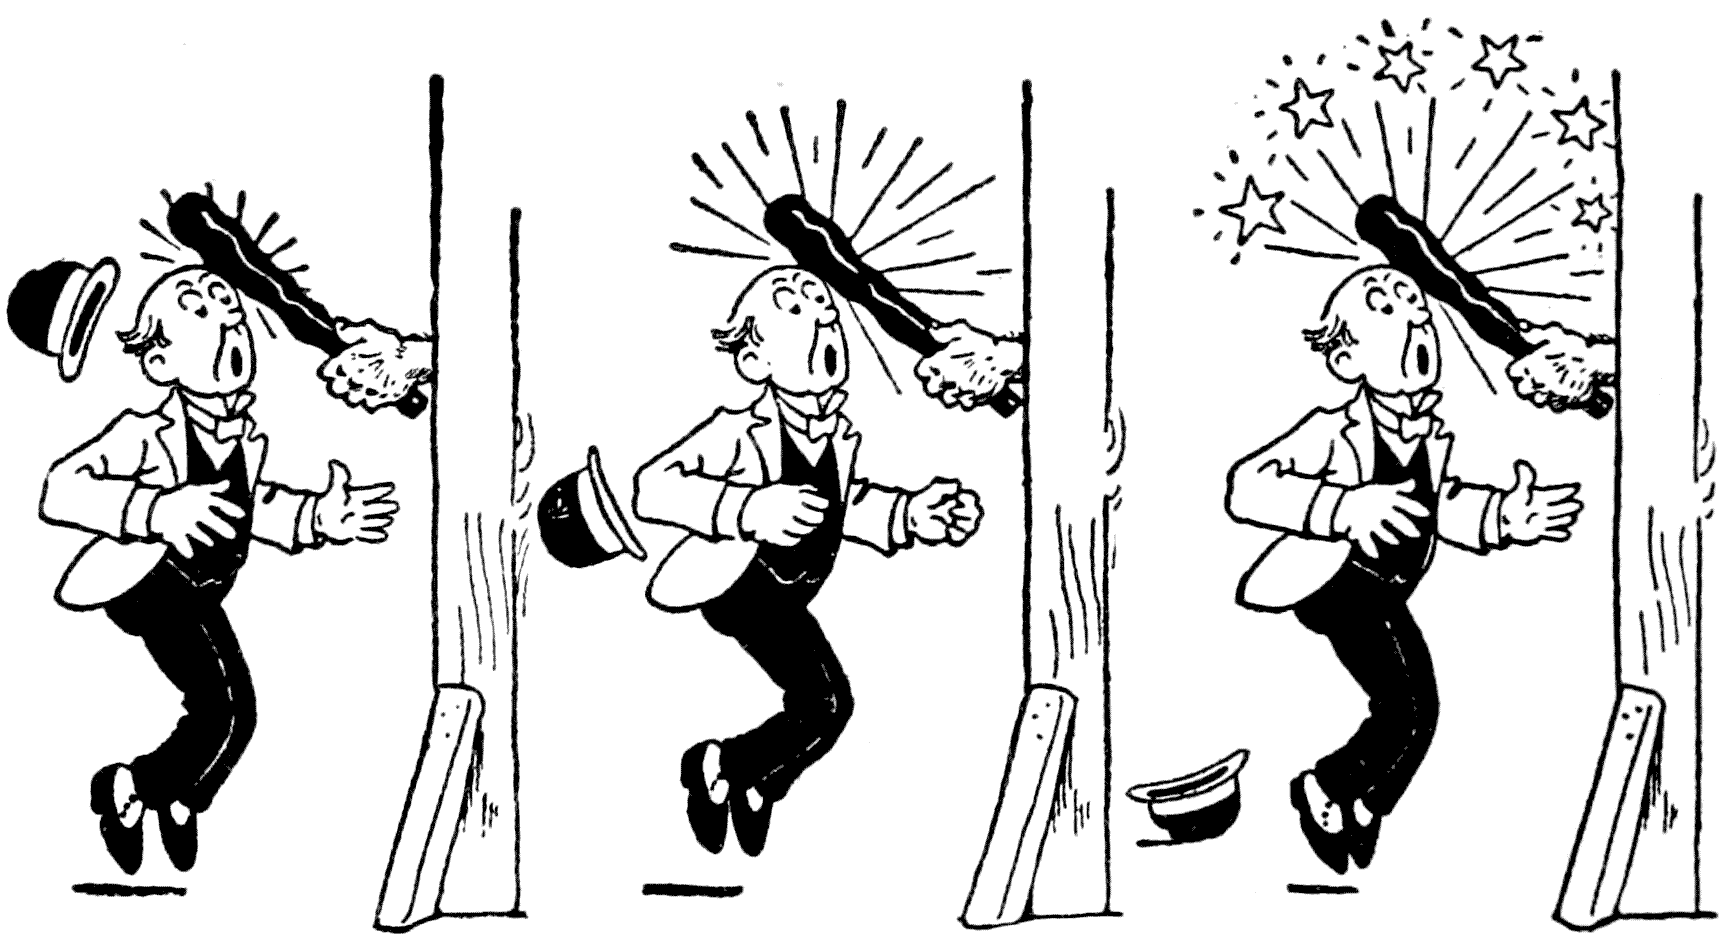
The spirited screen actors, too, of the animator’s pencil are shown going through all sorts of strange doings with their hats.
The lively screen actors brought to life by the animator’s pencil are seen engaging in all kinds of bizarre antics with their hats.
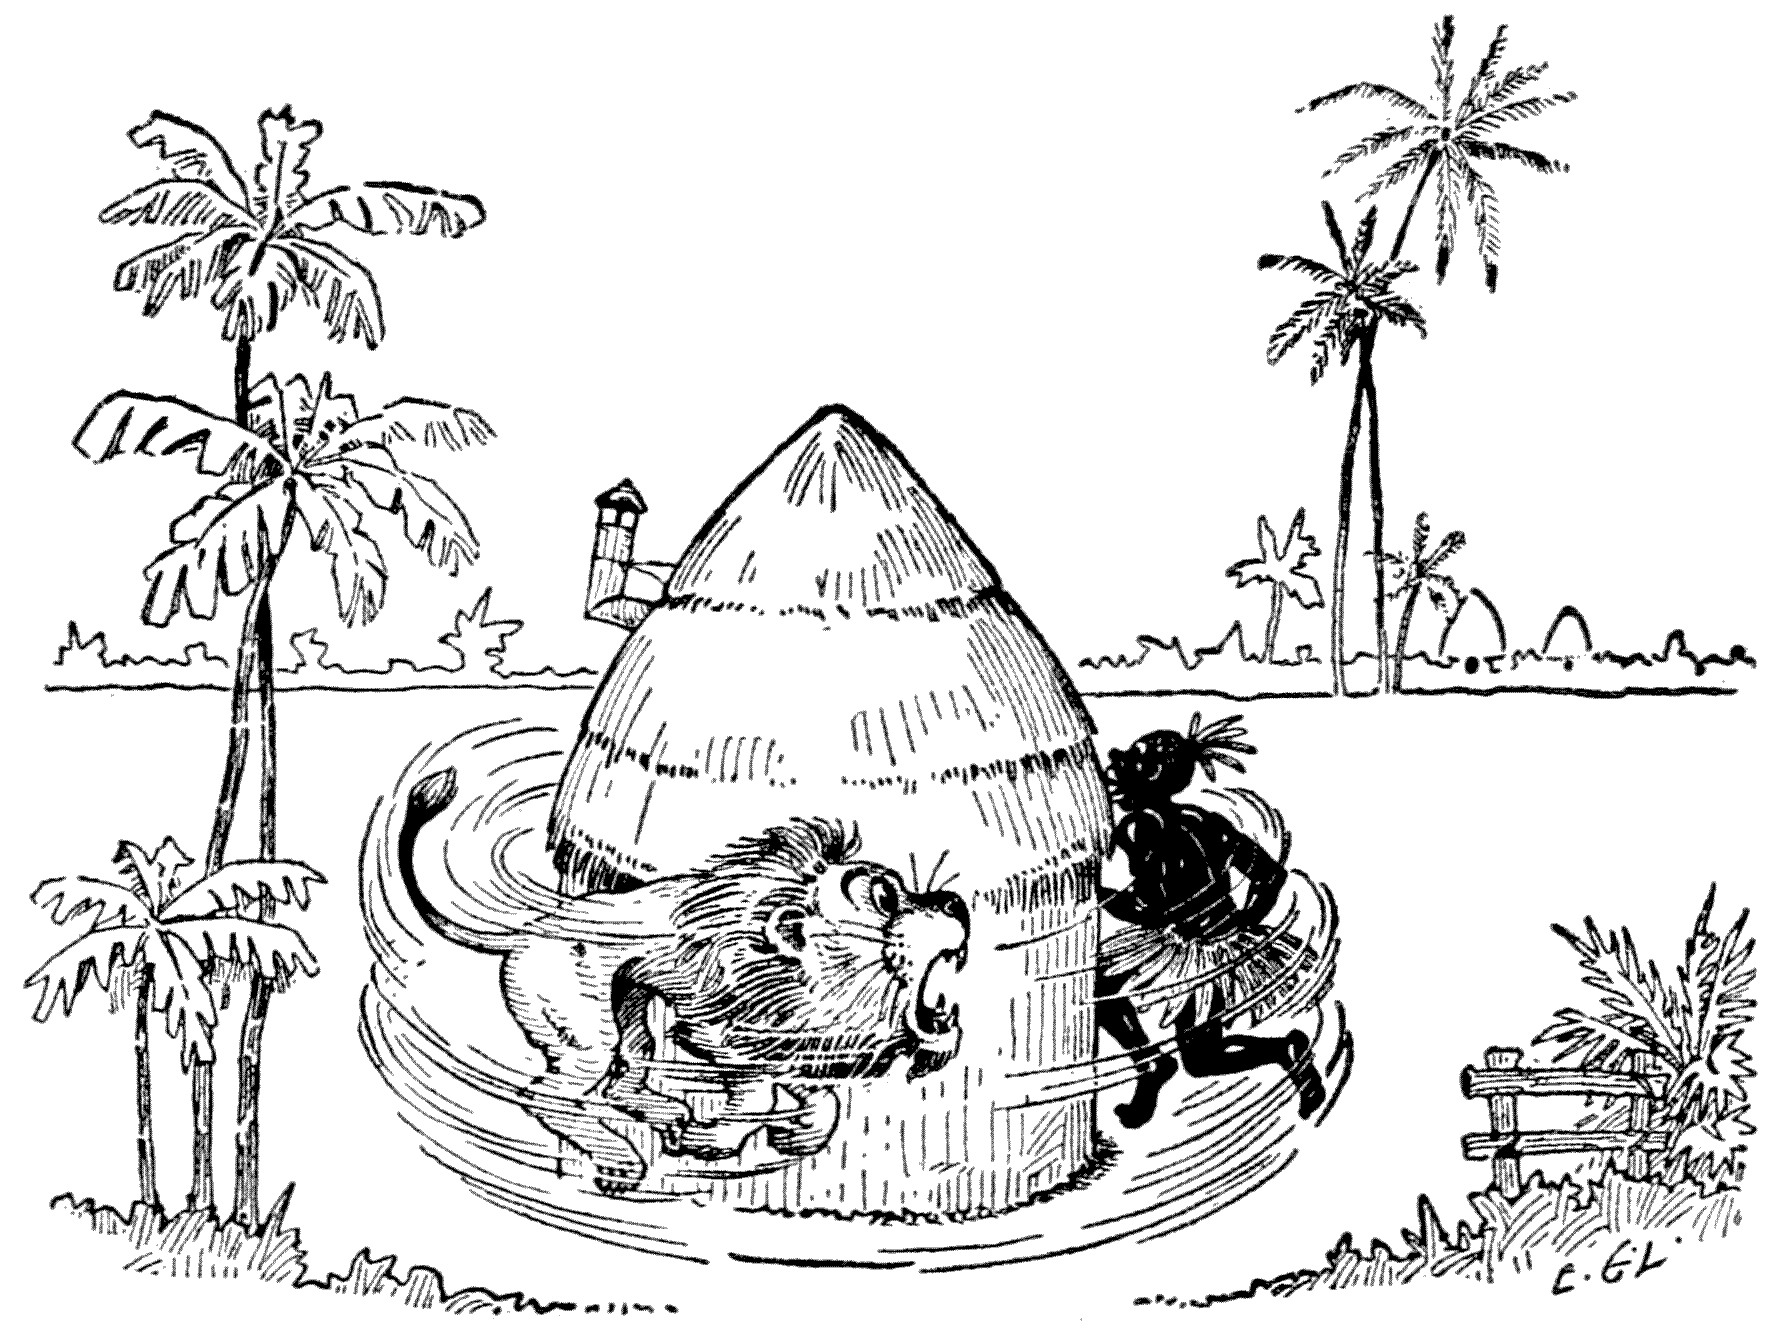
ANIMATED EDUCATIONAL FILMS AND THE FUTURE
ANIMATED EDUCATIONAL FILMS AND THE FUTURE
CHAPTER XI
ANIMATED EDUCATIONAL FILMS AND THE
FUTURE
Nearly everything in our book so far, in accord with its title, has had reference to the making of comic screen drawings. They gratify a proper human longing and they strike a responsive chord in the consciousness. Now there is another kind of appeal, in the matter of satisfying a human need, to which animated screen drawings can be put. It is that touched upon in the introductory chapter; namely, animated films of educational subjects. By educational films would be meant, if the strict definition of the term is intended, only those that are instructional. It is to be remarked, however, that enlightened opinion now includes in the category of educational subjects any theme, or story for children, even if a slight touch of the humorous or diverting is to be found in it.
Almost everything in our book so far, in line with its title, has focused on creating comic screen drawings. They fulfill a natural human desire and resonate with our awareness. Now there’s another type of appeal for animated screen drawings that meets a human need. This was mentioned in the introductory chapter; specifically, animated films on educational topics. When we talk about educational films, we're referring, by strict definition, to those that are instructional. However, it’s worth noting that current thinking now includes in the educational category any theme or story for children, even if there’s a hint of humor or entertainment in it.
The kind of stories, with the latter thought particularly[246] in mind, especially fitted for the screen are those of Lewis Carroll. His “Alice in Wonderland” is a good example of the type of fanciful tale on the order of which animated cartoons could be made for children.
The types of stories, particularly with that last idea in mind, that are especially suited for the screen are those of Lewis Carroll. His “Alice in Wonderland” is a great example of the kind of whimsical tale that animated cartoons could be based on for kids.
And Sir John Tenniel’s interpretations of the characters seem to have been created especially for translation to the animated screen. The Mad Hatter, with his huge beaver (signalizing again the hat as inspiring the comic), would make an admirable figure to pace across the screen.
And Sir John Tenniel’s interpretations of the characters appear to have been made specifically for adaptation into animation. The Mad Hatter, with his large beaver hat (again highlighting the hat as a source of humor), would be an excellent character to stride across the screen.
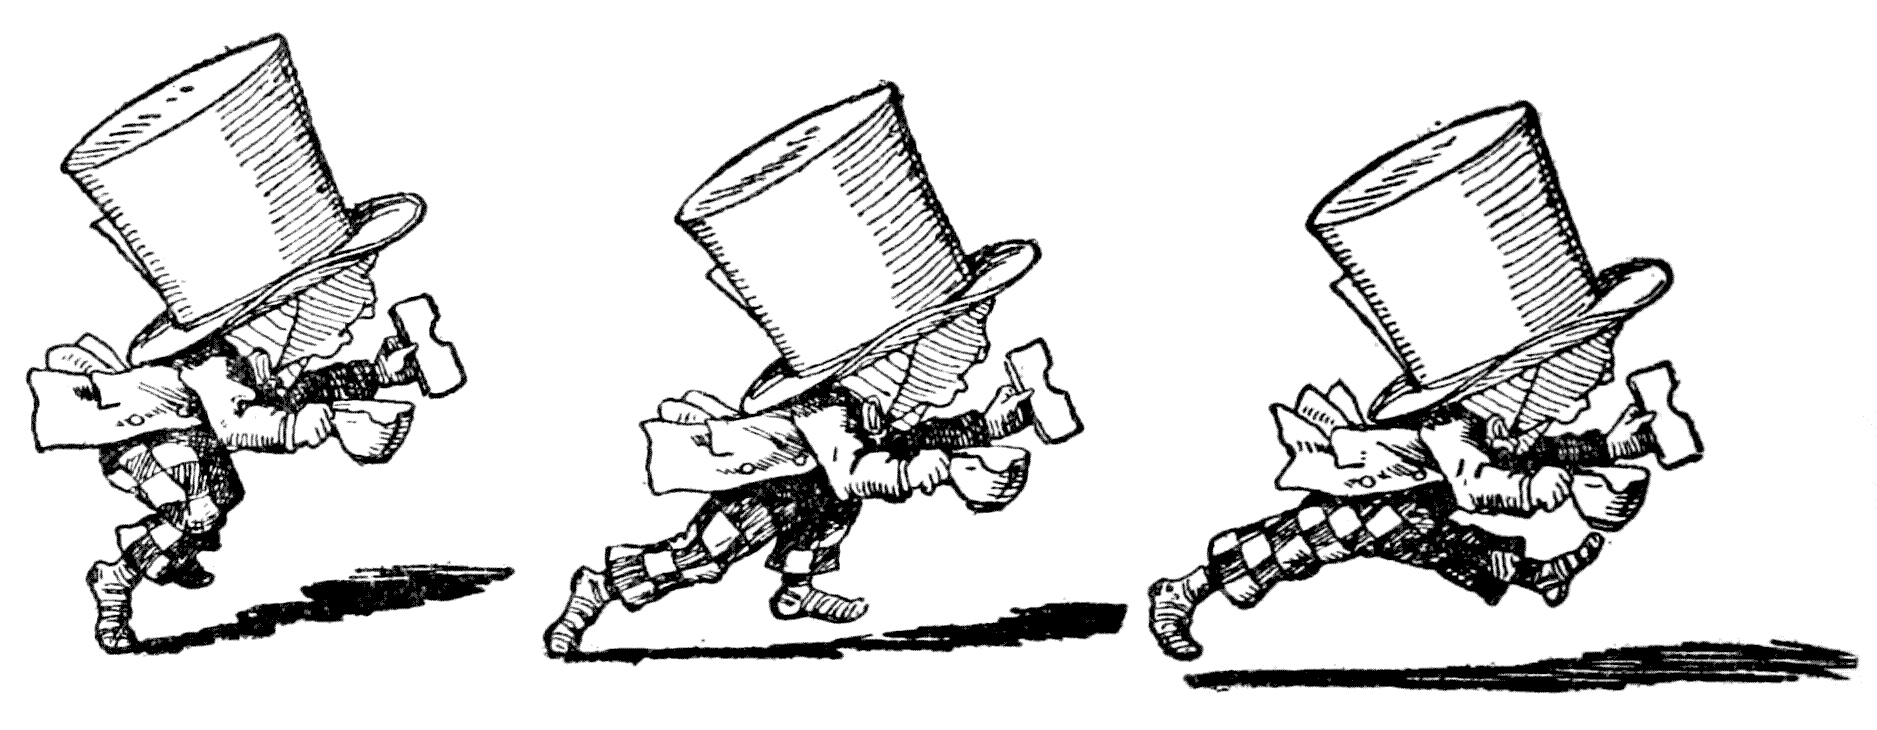
An artist desiring to be the author of an animated story built on the model of Carroll’s classics would need a gleeful imagination and a turn for the fantastic. And he would require, besides, if he hoped to draw characters on a par with[247] Tenniel’s depictions, more than the ordinary qualifications of a screen draftsman.
An artist aiming to create an animated story inspired by Carroll’s classics would need a joyful imagination and a flair for the fantastical. Additionally, if they hope to create characters that compare to Tenniel’s illustrations, they would need more than just the usual skills of a storyboard artist.
As in the rough-and-tumble antics of the rustic clown little refinement is either prevalent or expected, so in the ordinary comic animated cartoon exquisiteness of drawing is neither found nor ordinarily looked for. But in a story with fineness of wit, and told artistically, it is obligatory that its interpretation be of a corresponding quality. It is necessary, in other words, that the artist be good at figure work and especially skilful in drawing difficult actions and perspective walks. As remarked before, when the latter subject was considered, this requires dexterity in picturing figures in foreshortened views. And to become expert in this particular means study. For examples of foreshortened figures to contemplate, the student of animation can find no better ones than those in the frescos of Michael Angelo. Especially valuable are the decorations of the Sistine Chapel in Rome. Photographs or copies, no doubt, of these wonderful art works can be found in the print-rooms of public libraries or in any collection of engravings of a picture-gallery.
As with the rough-and-tumble antics of the rural clown, there's little sophistication expected in ordinary comic animated cartoons. However, in a story that showcases clever wit and is told with artistry, it's essential that its interpretation matches that quality. In other words, the artist needs to be skilled in figure work and particularly adept at drawing complex actions and perspectives. As mentioned earlier when this topic was addressed, this necessitates a talent for depicting figures in foreshortened views. To become proficient in this area, one must study. For examples of foreshortened figures to observe, animation students can find no better reference than the frescoes by Michelangelo. The decorations of the Sistine Chapel in Rome are especially valuable. Photographs or copies of these incredible artworks can surely be found in the print rooms of public libraries or any collection of engravings in a picture gallery.
[248]
[248]
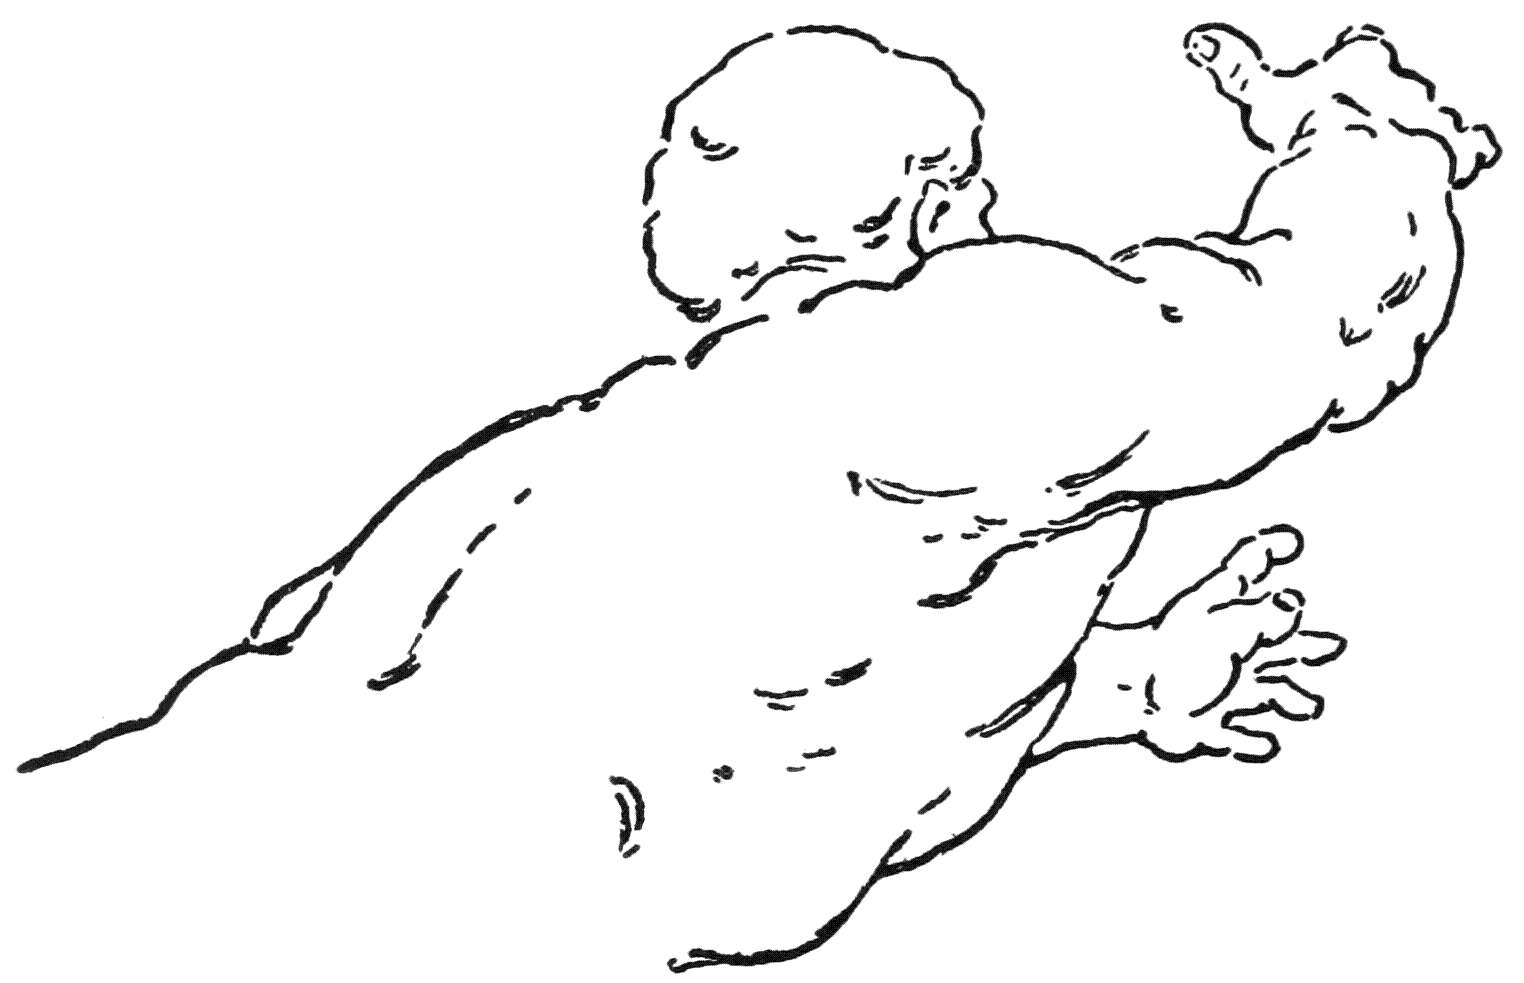
It is an entertaining speculation as to whether or not Michael Angelo, being a man of many artistic activities, would have tried his hand at animating drawings, had the art been in existence in his time.
It’s an interesting thought to consider whether Michael Angelo, a person involved in many artistic pursuits, would have attempted to animate drawings if the art form had existed during his time.
In our own day, patterns for emulation in the matter of depicting action and the delineation of character are found in the drawings of Mr. A. B. Frost. Witness his achievements in these respects in his book “Stuff and Nonsense.” Then, too, Mr. Frost’s appreciation of the comic spirit is particularly noteworthy. His graphic work could with every success be set forth on the animated screen.
In today's world, examples to follow for showing action and character development can be seen in the drawings of Mr. A. B. Frost. Check out his work in the book “Stuff and Nonsense.” Additionally, Mr. Frost’s sense of humor is especially impressive. His illustrations would make a great fit for the animated screen.
[249]
[249]
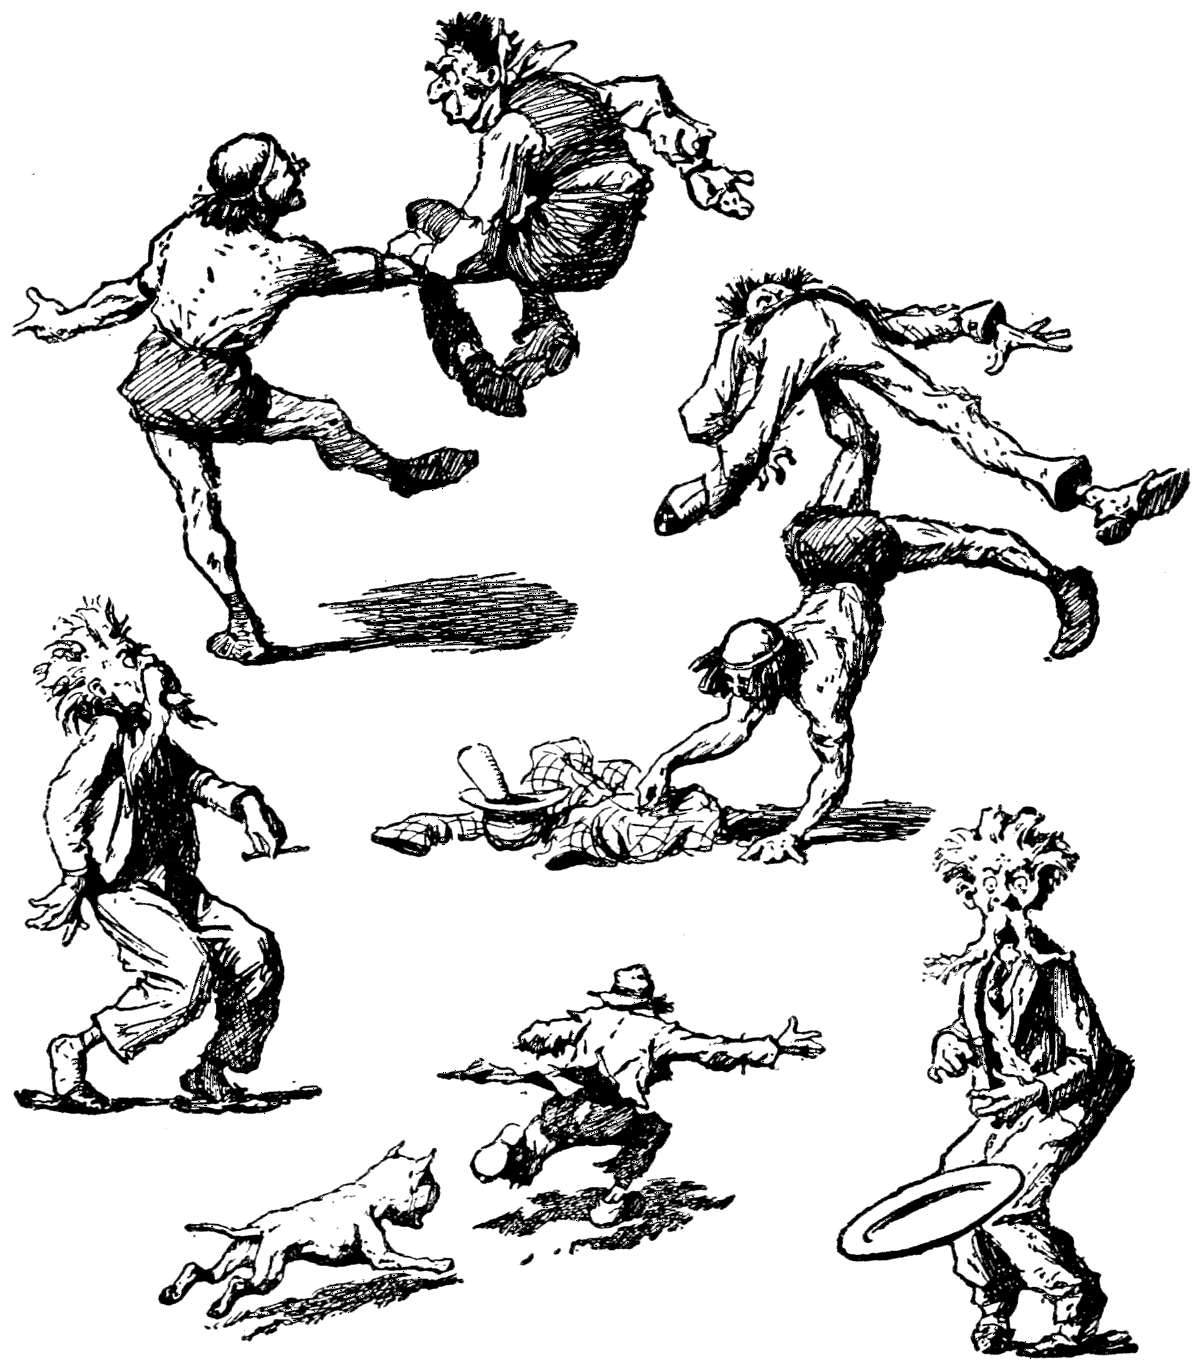
The old-fashioned peep-show has long since passed its way, and in its place has come the cinematographic exhibition. Children consider it a commonplace occurrence in their lives to be taken to the “movies.” Very soon they will imbibe knowledge as well as receive entertainment through[250] the medium of the films. There are many instructional themes that could be elucidated in the school by animated drawings.
The outdated peep-show is a thing of the past, replaced by movie screenings. Kids see going to the “movies” as a normal part of their lives. Before long, they will gain knowledge as well as entertainment from films. There are plenty of educational topics that could be explained in school using animated drawings.[250]
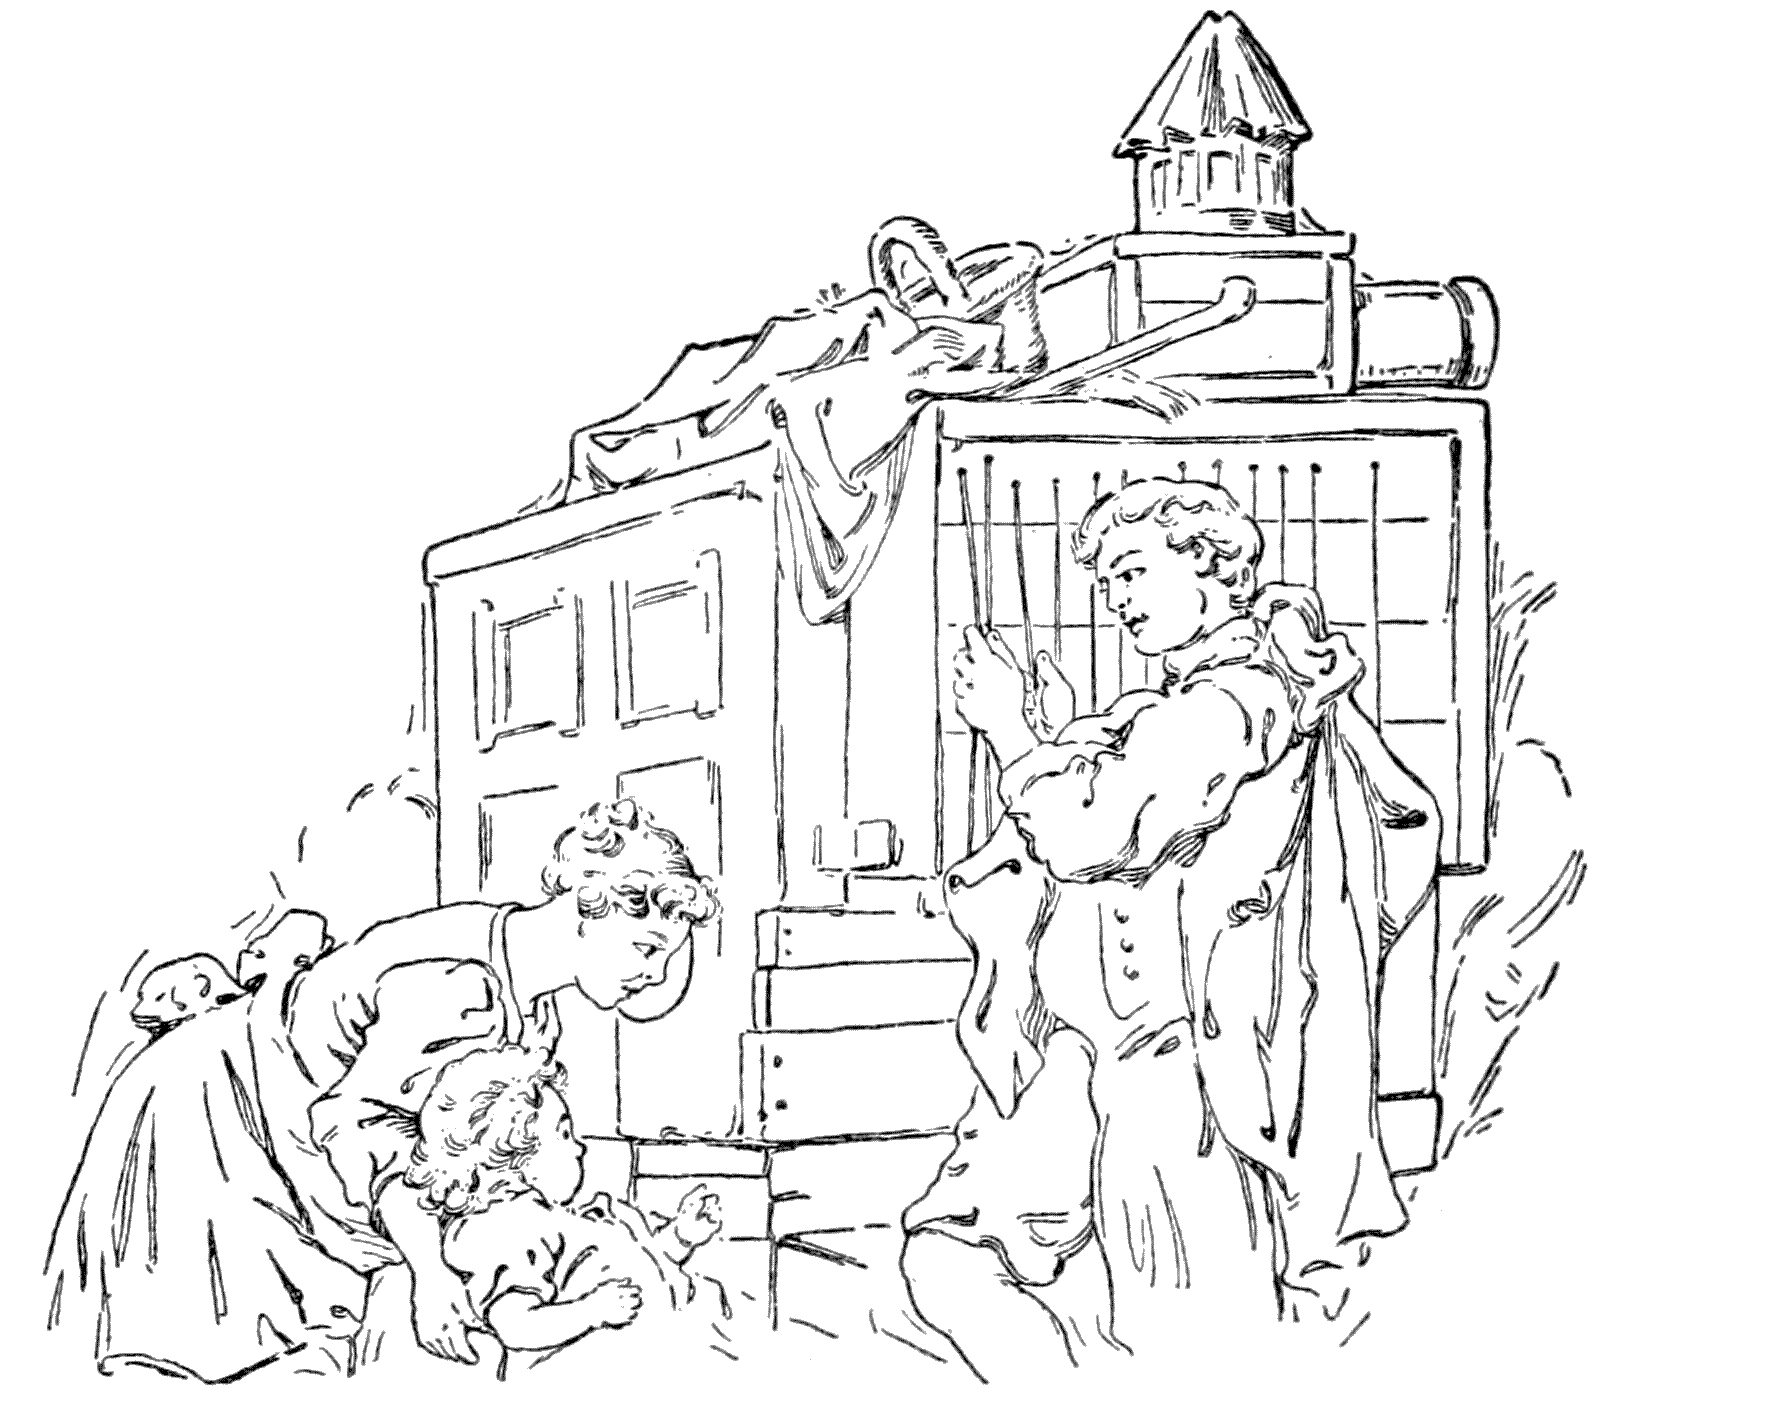
Detail of a composition of a French eighteenth-century tapestry designed by Boucher.
Detail of a composition of an eighteenth-century French tapestry designed by Boucher.
Educational, travel, and scenic films are frequently presented in motion-picture theatres, but the possibilities in these subjects have not been exhausted.
Educational, travel, and scenic films are often shown in movie theaters, but the potential in these topics hasn't been fully explored.
Some of the first investigators who looked into the problems connected with photographic analysis[251] and pictorial synthesis to produce the appearance of movement had ideas of applying the results of their labors to practical purposes. M. G. Demeny, in Paris, to cite an instance, invented an instrument by which deaf-mutes could learn to speak and to read lip movements. His instrument consisted of an optical contrivance that gave the representation of a person speaking by the turning of a glass disk upon which there was placed a series of photographs of a person speaking. The pictures were arranged in a cycle which, when the disk was made to rotate, produced a continuous effect of the action.
Some of the early researchers who looked into the issues related to photographic analysis[251] and visual synthesis to create the illusion of movement wanted to use their findings for practical purposes. For example, M. G. Demeny in Paris invented a device that helped deaf-mutes learn to speak and read lips. His device was an optical setup that showed a person talking by spinning a glass disk that had a series of photographs of a speaking person. The images were arranged in a sequence that, when the disk rotated, created a continuous portrayal of the action.
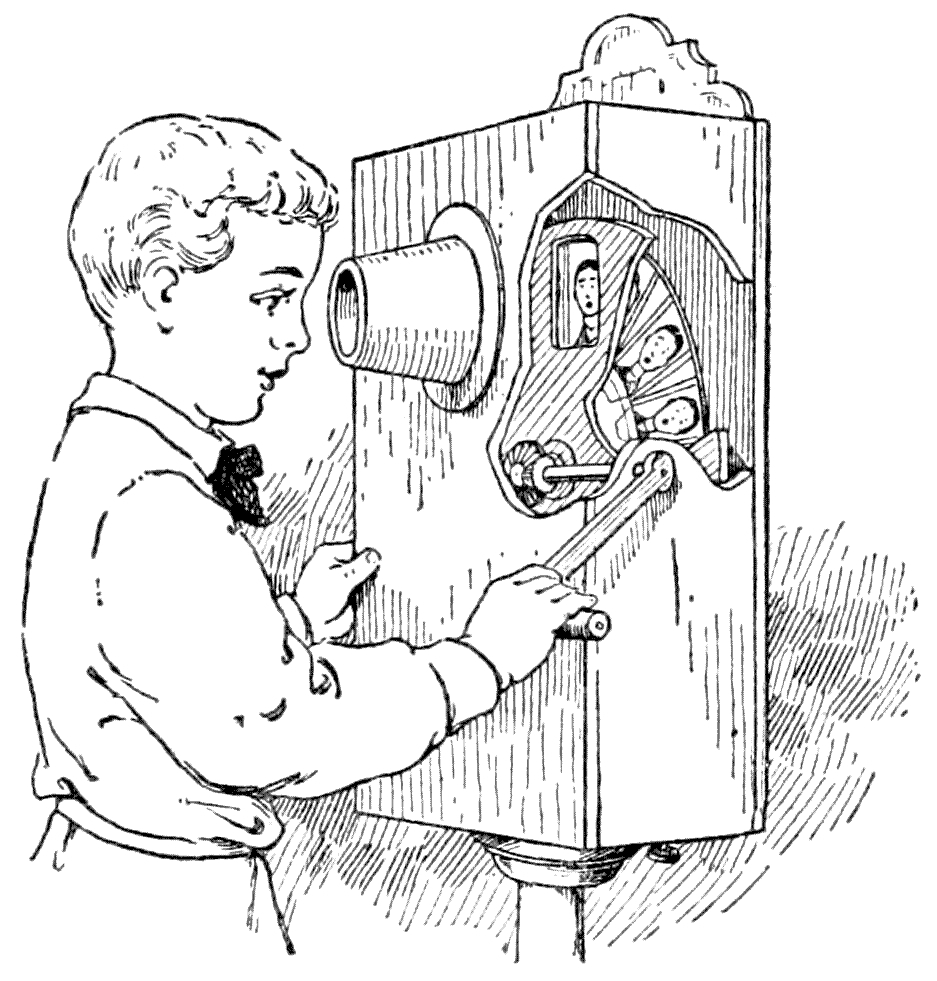
Modified from a picture in La Nature, 1892.
Modified from a picture in La Nature, 1892.
One form of this apparatus, or photophone, was made to be turned by hand, and the combined picture or illusion viewed through a lens by one person at a time. Another type was constructed so that the synthesized picture of the speaking face could be thrown on a screen.
One version of this device, or photophone, was designed to be operated by hand, allowing one person at a time to see the combined image or illusion through a lens. Another type was built so that the generated image of the speaking face could be displayed on a screen.
[252]
[252]
There is a natural curiosity in nearly every one to want to know about methods in art. And the interest is general in watching a craftsman create an object of art, or an artist bring into graphic being some imagery of his brain. It would not be out of place for these reasons, as well as a matter of instruction, to produce films showing art methods.
There’s a natural curiosity in almost everyone to learn about techniques in art. People generally enjoy watching a craftsman create an artwork or seeing an artist turn their imagination into a visual form. For these reasons, as well as for educational purposes, it would make sense to produce films that showcase artistic methods.
Especially for elementary pupils would it be a desirable thing to show the way of making simple free-hand drawings. Then, instead of an instructor repeating the process—sometimes with indifferent interest or enthusiasm—it can be arranged that some one skilled in drawing, and when he is feeling at his best, go through the procedure under the motion-picture camera. The result could be multiplied a number of times and shown in many classrooms with an evenness of performance not possible when some one does it day in and day out.
Especially for elementary students, it would be great to demonstrate how to create simple freehand drawings. Instead of an instructor going over the process—sometimes with little interest or enthusiasm—it could be arranged for someone skilled in drawing, and who is in a good mood, to perform the procedure in front of a motion picture camera. The outcome could then be reproduced multiple times and shown in various classrooms with a consistency that isn’t achievable when someone does it day in and day out.
Methods and principles of the more advanced branches of art instruction—pictorial composition, for instance, could be taught, too.
Methods and principles of the more advanced branches of art instruction—like pictorial composition, for example—could be taught as well.
As one example, we will suppose that the purpose is to show what good pictorial composition[253] is. First an indifferent picture, poorly arranged, is shown; the various components appear on the screen exactly as they would in making a picture on canvas or paper; then little things pointed out that are lacking in artistic merit, or an explanation given of any detail that is not quite clear. (For this purpose a drawing of a pointer is made on cardboard and cut out in silhouette. It is moved around precisely as if it were a real pointer.) After showing the faulty construction the various components can be moved again, but into places to form the well-composed picture.
As an example, let's say the goal is to demonstrate what good pictorial composition[253] looks like. First, an average picture that’s poorly arranged is displayed; the different elements are shown on the screen just like they would be when creating a picture on canvas or paper. Then, minor issues that lack artistic merit are pointed out, or explanations are provided for any details that aren’t clear. (For this, a pointer is drawn on cardboard and cut out in silhouette. It moves around just like a real pointer.) After showing the flawed arrangement, the various elements can be repositioned to create a well-composed picture.
Methods of designing in the crafts could be demonstrated by animated drawings; and they could also be employed to explain visually the story or history of design. Ornament can be shown as it evolves from its natural form, to the first rudimentary basic type; then it passes into the best classical style, after which it becomes, as in all art evolution, the merely decorative. And it can be shown, as is usually the case in the history of an ornamental form, terminating in a debased and meaningless figure or scroll. All these screen pictures could be managed so that the pictures[254] go through their mutations before the eyes as if they were living things.
Methods of designing in crafts could be shown through animated drawings, which could also be used to visually explain the story or history of design. Ornament can be displayed as it develops from its natural form to the first simple basic type; then it progresses into the best classical style, after which, like all art evolution, it becomes just decorative. It can also be illustrated how, as is often the case in the history of an ornamental form, it ends up as a degraded and meaningless figure or scroll. All these visual displays could be designed so that the images change and evolve before the viewer's eyes as if they were living entities.
Presuming that in the acquiring of knowledge all brains function in a similar way, what could be better as a means of instruction than a film of some educational subject?
Presuming that when it comes to gaining knowledge, all brains work similarly, what could be a better way to teach than an educational film on a specific topic?
In any special study or theme in physics, for instance, an entire course could be planned for an animated film. Some of the divisions of the theme could be actual photographs of the experimental apparatus in operation. But other matters would need to be moving diagrams, or progressively changing charts. Explanations on the titles and other wording, previously thought out with due regard to their educational value, would be combined with the film.
In any special study or topic in physics, for example, a whole course could be designed around an animated film. Some parts of the topic could feature real photographs of the experimental setup in action. However, other aspects would require moving diagrams or gradually changing charts. Explanations on the titles and other text, carefully considered for their educational value, would be included with the film.
Could there be anything more interesting than screen drawings of machinery in operation? To draw the successive pictures required for work of this character would present no great difficulties to any one trained in mechanical drafting. It would be a great improvement on the diagrams and mechanical plans with their complicated markings to see the work of the draftsman projected on the screen and giving the appearance[256] of motion. With vivid object-lessons of this kind, the eye can comprehend in a few moments that which it would take lengthy paragraphs to make clear.
Could there be anything more interesting than screen animations of machinery in action? Creating the series of images needed for this type of work wouldn't be a big challenge for anyone skilled in mechanical drafting. It would be a huge improvement over the complex diagrams and mechanical plans filled with intricate markings to see the draftsman's work displayed on screen, giving a sense of motion. With dynamic visual lessons like this, the viewer can understand in just a few moments what would take lengthy paragraphs to explain.

On this subject of animating machinery, it is an interesting fact to note that as early as 1860, Desvignes, who invented one form of the zootrope, is recorded as having made a series of pictures for his optical instrument that showed a steam-engine in motion.
On the topic of animating machines, it's interesting to point out that as early as 1860, Desvignes, who created one version of the zoetrope, is noted for making a series of images for his optical device that depicted a steam engine in action.
The teaching of history could be made still more interesting than it is by series of changing maps. Such maps would show, as their outlines changed, the growth or modification of a country as affected by events of history. Historical battles could be illustrated with the usual reference marks and symbols. But they would not be still; instead, they would move about to illustrate the progress of the battle. This form of animated maps frequently has been used in connection with pictorial-news reels.
The teaching of history could be made even more engaging than it is now by using a series of changing maps. These maps would show, as their outlines shifted, the growth or changes of a country influenced by historical events. Historical battles could be depicted with the usual reference marks and symbols. But they wouldn’t remain static; instead, they would move around to demonstrate the progress of the battle. This kind of animated maps has often been used alongside pictorial news reels.
Physiology and anatomy are two studies that need good pictorial exposition in the classroom. Scientific moving pictures of the actual subjects are in many cases available and their photography[257] is feasible. But for some details that cannot be taken with the camera, animated diagrams would have to be substituted. To suggest a very good theme in physiology, we may mention that of the circulation of the blood. Only a few particulars of this could be photographed. Most of the story of the blood circulation would have to be told by animated diagrams.
Physiology and anatomy are two subjects that benefit from effective visual presentations in the classroom. In many cases, scientific videos of the actual topics are available, and capturing these images is doable. However, for some aspects that can't be filmed, we would need to use animated diagrams instead. A great topic in physiology is the circulation of the blood. Only a few specific details could be filmed. Most of the information about blood circulation would have to be illustrated with animated diagrams.
There would be at first, perhaps, a sectional view of the heart showing the auricles, and ventricles with the valves and their reciprocal action. The flow of the vital fluid, to be sure, would be indicated very clearly as it passes through the cavities. A striking animation of this film would be that of the blood flow in its course through the body. This would be represented by a schematic diagram like those usually set forth in the books. It would have an added interest if the fluid were colored—the arterial blood red and the venous blood blue. (This is the usual way, when printed in colors, in which they are distinguished in textbooks.) A film like this, it can be understood, must be planned well—a scenario practically would be written for it.
There would initially be a sectional view of the heart showing the atria and ventricles, along with the valves and how they work together. The flow of blood would be clearly shown as it moves through the heart's chambers. An engaging feature of this film would be the depiction of blood flow throughout the body, illustrated with a diagram similar to those typically found in textbooks. It would be even more interesting if the fluid were colored—red for arterial blood and blue for venous blood. (This is the standard color scheme used in textbooks when printed.) A film like this would need to be well-planned, essentially requiring a script to be created for it.
The manner in which the muscles move the[258] bony frame of the body can be strikingly demonstrated by animated diagrams. Take as a simple case the bending of the arm. The two antagonist muscles of the front and the back of the upper arm can be made to show as swelling and lengthening, alternately, as they flex and extend the forearm.
The way muscles move the[258] bony structure of the body can be clearly shown through animated diagrams. For example, consider the bending of the arm. The two opposing muscles on the front and back of the upper arm can be seen alternately swelling and stretching as they flex and extend the forearm.
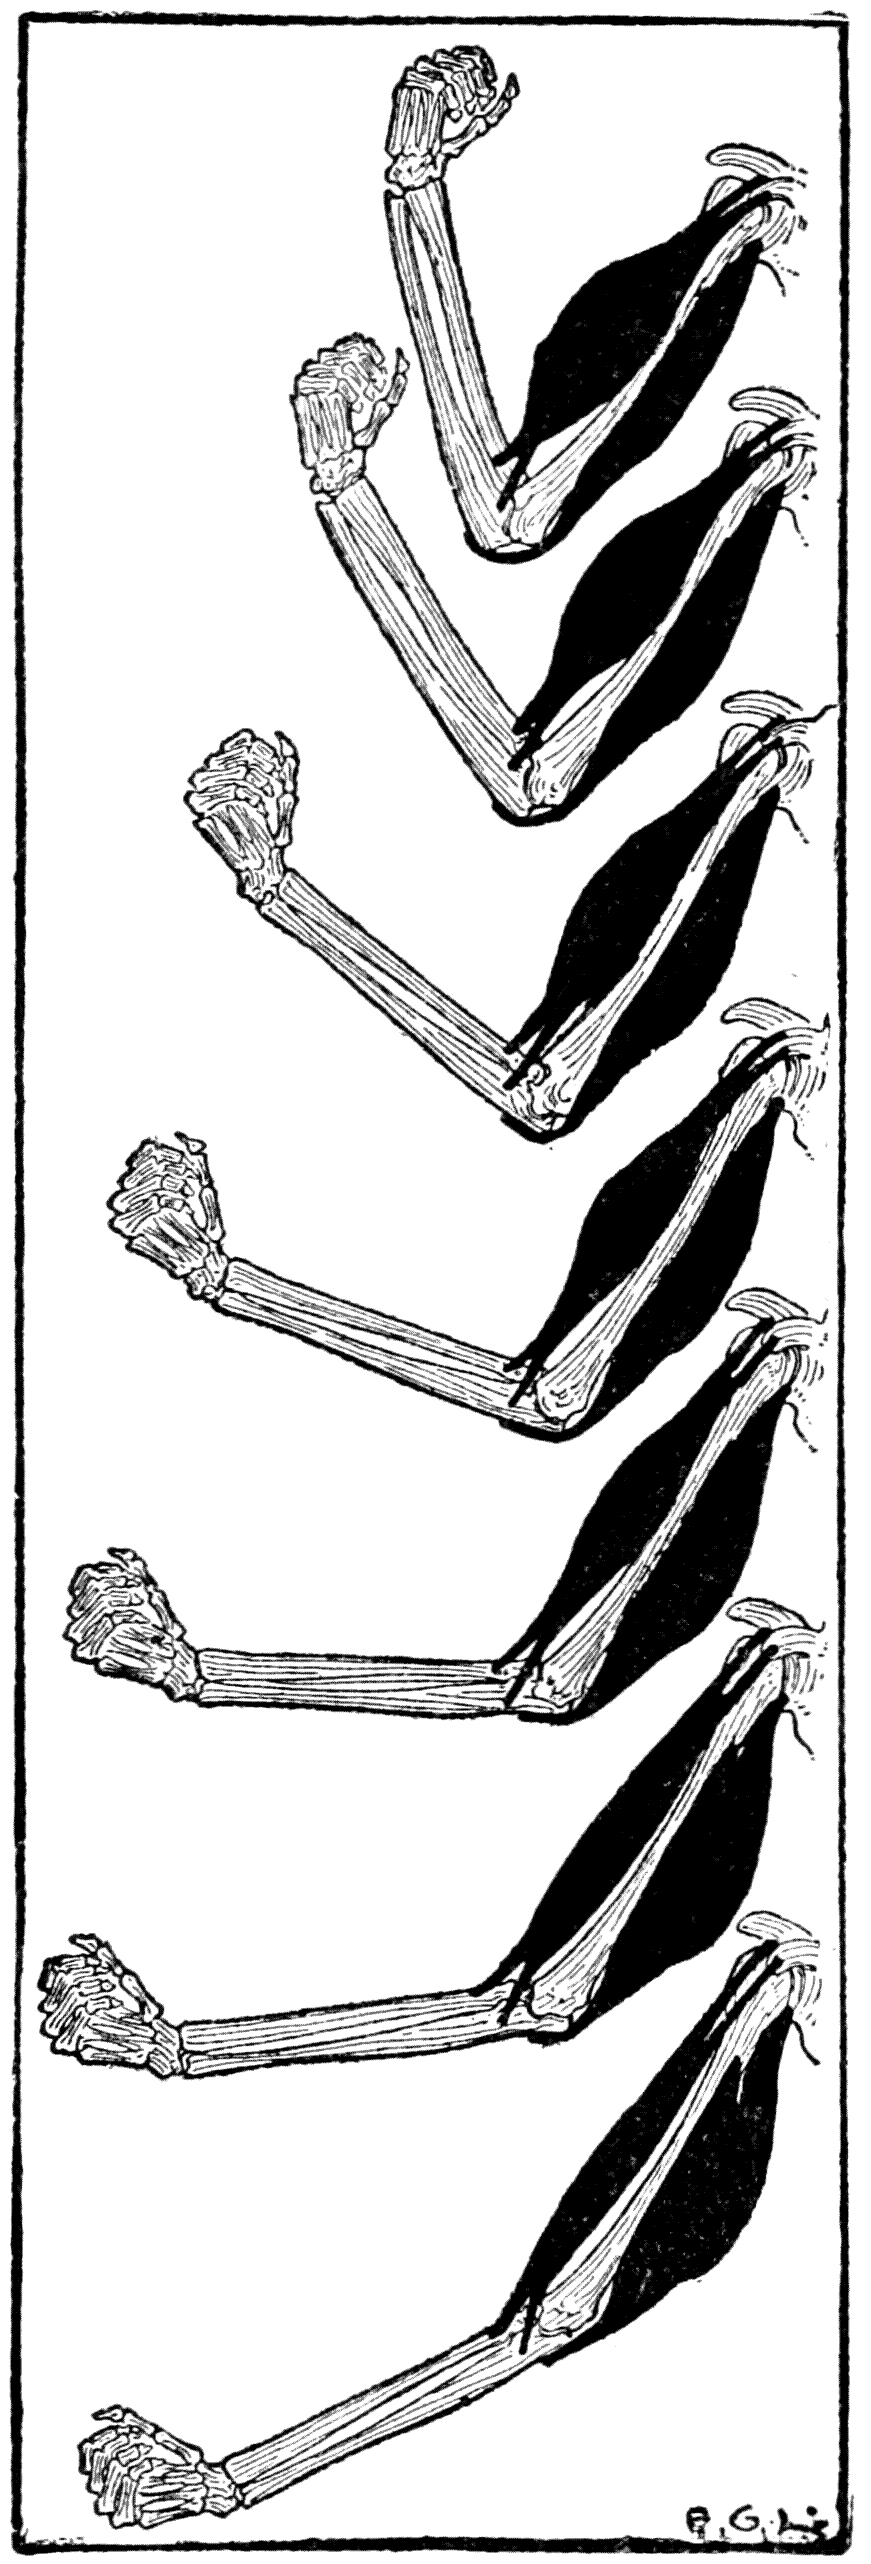
A series of drawings like this would be the first thing to prepare for making the film.
A set of drawings like this would be the first thing to get ready for making the movie.
A similar animation of the skeleton would be that of the bony levers in the human frame. And as a comparison, actual mechanical levers of all three orders could be made[259] to operate in connection with the levers in the skeleton.
A similar animation of the skeleton would be like the bones acting as levers in the human body. To compare, real mechanical levers from all three types could be created to work alongside the levers in the skeleton.[259]
It would be possible, to some extent, to put the “Origin of Species” on the screen with the help of animated diagrams. For the vertebrates, a section of the film could represent a schematic evolutionary tree. On it, the lower forms of back-bone life, such as amphibians and fishes, would be placed on an offshoot near the lowest part of the main trunk. Odd creatures like marsupials would branch off a little higher up, and still higher a larger branch of the tree would split into two minor branches for reptiles and birds, respectively.
It would be possible, to some extent, to bring the “Origin of Species” to the screen using animated diagrams. For vertebrates, a segment of the film could show a simplified evolutionary tree. On it, the lower forms of backbone life, like amphibians and fish, would be positioned on a branch near the bottom of the main trunk. Unusual creatures like marsupials would branch off a bit higher up, and even higher, a larger branch of the tree would split into two smaller branches for reptiles and birds, respectively.
The tree would show above a branching off into three important divisions for the ungulates, carnivores, and quadrumana. The story could be continued by separate delineations of the different branches and tell in further detail the development of the forms that belong to them.
The tree would highlight a split into three main groups for herbivores, carnivores, and primates. The narrative could continue with separate descriptions of the various branches and provide more details about the evolution of the species within them.
The art of the animated cartoon and the educational screen drawing has as yet not been developed to its highest point. It needs, for one thing, color. Such films are only shown, at present, in monochrome or simple outlines. Of course[260] colored cartoons will come. Effecting the tinting by hand would be easy as a process, but very tedious and costly. A practical way of coloring the ordinary photographic film is now in use by tinting them with the aid of stencils. Both the stencil-cutting and the coloring are accomplished by the help of machinery.
The art of animated cartoons and educational screen drawings hasn't yet reached its full potential. For one, it needs color. Right now, these films are only shown in black-and-white or basic outlines. Of course, colored cartoons will eventually arrive. Hand-tinting would be a simple process, but it's also very tedious and expensive. A practical method for coloring standard photographic film is currently being used, where stencils are utilized for tinting. Both the stencil cutting and coloring are done with the help of machines.
At present there are color processes that produce very beautiful photographs on the screen; but they do not show, at least in those that so far have come under the observation of the author, all colors of nature. The craft is awaiting the inspired inventor who will produce motion-pictures in colors that will exhibit nature’s full range of hues and shades. Then in comparison with Niepce’s simple process, of about 1824, of fixing a lens-formed image upon a metal plate coated with bitumen, the photographic art will have attained to a marvellous degree of technical development.
Right now, there are color processes that create really beautiful photographs on screen, but they don’t capture all the colors of nature, at least not in the ones the author has seen so far. The field is waiting for a brilliant inventor who will create motion pictures in colors that truly show nature's complete array of hues and shades. Then, compared to Niepce’s basic process from around 1824, which involved fixing a lens-created image onto a metal plate coated with bitumen, the art of photography will have reached an incredible level of technical advancement.
A consummate color process should reproduce, too, an artist’s work upon the canvas without losing any variations of hue that he has set forth. Then it will be possible to have animated paintings. One will go, when this wonder has been achieved, to an exhibition gallery to see art[261] works with the additional interest of movement as well as those of color and individual interpretation. And, too, our museums will have projecting rooms and fireproof libraries for keeping films.
A perfect color process should also be able to reproduce an artist’s work on canvas without losing any of the color variations they've created. Once this amazing feat is accomplished, we’ll be able to enjoy animated paintings. People will visit exhibition galleries to see art pieces that not only feature color and personal interpretation but also movement. Plus, our museums will have projection rooms and fireproof libraries for storing films.
It seems like fantastic dreaming to hold such notions; but many things that were once considered purely visionary—have now become commonplaces.
It may seem like a great dream to hold such ideas, but many things that were once seen as purely visionary have now become everyday realities.
Download ePUB
If you like this ebook, consider a donation!