This is a modern-English version of What to draw and how to draw it, originally written by Lutz, Edwin George.
It has been thoroughly updated, including changes to sentence structure, words, spelling,
and grammar—to ensure clarity for contemporary readers, while preserving the original spirit and nuance. If
you click on a paragraph, you will see the original text that we modified, and you can toggle between the two versions.
Scroll to the bottom of this page and you will find a free ePUB download link for this book.
Transcriber’s Note:
Transcriber’s Note:
![[Mice]](images/i_003.jpg)
![[Frog]](images/i_004.jpg)

WHAT TO DRAW and HOW TO DRAW IT
![[Owl]](images/i_007.jpg)
INSTRUCTIONS
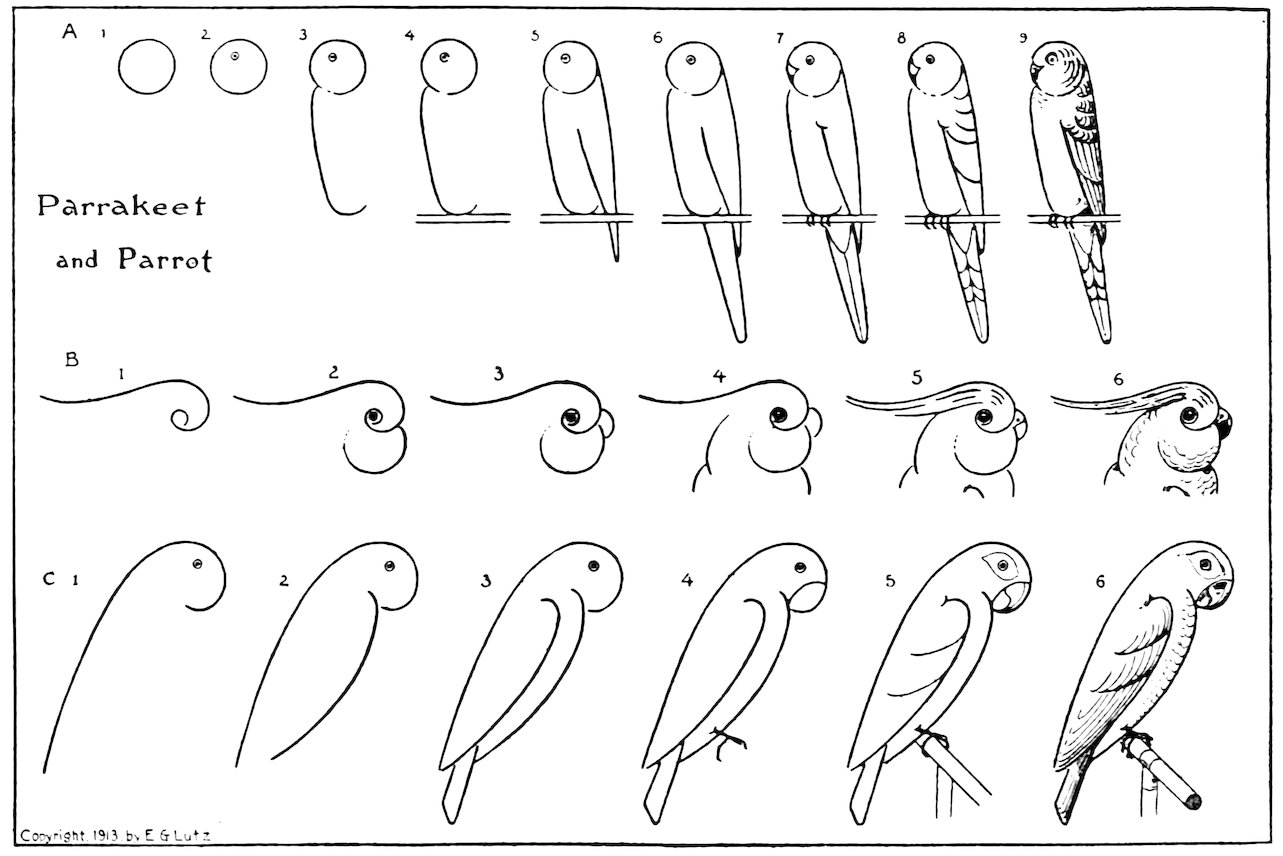
In drawing from this book, copy the last diagram, or finished picture, of the particular series before you.
In using this book, replicate the final diagram or completed image of the specific series in front of you.
The other diagrams—beginning with number one, then number two, and so on—show how to go on with your drawing. They give the order in which to make the various strokes of the pencil that together form the completed picture. The dotted lines indicate where light lines are drawn that help in construction—that is; getting proportions correctly, outlining the general form, or marking details in their proper places. Do not press hard on the pencil in making these construction lines, then they can be erased afterwards.
The other diagrams—starting with number one, then moving to number two, and so on—illustrate how to continue with your drawing. They show the sequence for making the different pencil strokes that come together to create the finished picture. The dotted lines indicate where to draw light lines that assist in construction—that is, getting the proportions right, outlining the overall shape, or marking details in the correct spots. Don’t press too hard on the pencil when creating these construction lines, as they can be erased later.
Use pencil compasses for the circles, or mark them off with buttons or disks.
Use pencil compasses for drawing circles, or mark them with buttons or disks.

To Draw a Five-Pointed Star
How to Draw a Star


![[Rooster]](images/i_024.jpg)


![[Crested Bird]](images/i_040.jpg)


![[Man]](images/i_050.jpg)

![[Man]](images/i_052.jpg)

![[Man]](images/i_054.jpg)


![[Men]](images/i_062.jpg)

![[Girls]](images/i_064.jpg)


![[Women]](images/i_068.jpg)


DRAWING OVALS AND ELLIPSES
Take note, first of all, of the difference between an ellipse and an oval.
Take note, first of all, of the difference between an ellipse and an oval.
The large plate explains the construction of an ellipse. It shows how to find the points where the three pins are placed that determine the size of the looped string. Be sure and make measurements accurately. Use a string that will not give, cotton thread is good for small ellipses, silk is too elastic. A suggestion to amateur gardeners: make elliptical flower beds this way.
The large plate explains how to create an ellipse. It shows how to find the points where the three pins are placed to determine the size of the looped string. Be sure to take accurate measurements. Use a string that won’t stretch; cotton thread is good for small ellipses, but silk is too stretchy. A tip for amateur gardeners: make elliptical flower beds this way.
The caution in regard to accuracy also applies to the making of the oval.
The same caution about accuracy also applies when creating the oval.

![[House]](images/i_072.jpg)
SUGGESTIONS FOR WATER-COLOR PAINTING
Here is a good list of colors for practical work. The first eight are enough for every purpose; but add, if you wish, purple and orange. Moist colors in pans are best. There are many different kinds of red, green, blue and brown paints; and as you may be puzzled and not know what to get, the names of the best hues of these particular colors are also given. The most useful paints in this list are yellow ochre, light red, Vandyke brown and Payne’s gray. Learn to work with them, use them often and see the beautiful effects they produce. Delicate tints are made with thin washes of yellow ochre and light red. Vandyke brown makes a variety of pleasing tints.
Here’s a great list of colors for practical work. The first eight are sufficient for any purpose, but if you want, you can add purple and orange. Moist colors in pans work best. There are many different shades of red, green, blue, and brown paints; and since you might be confused about what to choose, the names of the best shades of these specific colors are also included. The most useful paints on this list are yellow ochre, light red, Vandyke brown, and Payne’s gray. Learn to use them, practice with them often, and notice the beautiful effects they create. Delicate tints can be made with thin washes of yellow ochre and light red. Vandyke brown produces a variety of pleasing shades.
Use the bright colors sparingly.
Use bright colors minimally.
You do not need a black paint. Payne’s gray with either brown, blue, crimson or green gives rich dark tones. Payne’s gray is also useful in shadows and shading other colors. For the different kinds of greens, mix yellow ochre, blue or brown with Hooker’s green. Use thin washes of light red and blue for the gray of distances and clouds.
You don’t need black paint. Payne’s gray mixed with either brown, blue, crimson, or green creates rich dark tones. Payne’s gray is also great for shadows and shading other colors. For various greens, mix yellow ochre, blue, or brown with Hooker’s green. Use thin washes of light red and blue for the gray of distant objects and clouds.

A Useful List A Helpful List |
||
|---|---|---|
| ·COLORS· | ·WHAT·TO·ASK·FOR·IN·THE·SHOP· | |
| 1 | Yellow Yellow |
YELLOW OCHRE |
| 2 | Bright Yellow Vibrant Yellow |
GAMBOGE |
| 3 | Red Red |
LIGHT RED |
| 4 | Crimson Red |
CRIMSON LAKE |
| 5 | Brown Brown |
VANDYKE BROWN |
| 6 | Blue Blue |
NEW BLUE OR ULTRAMARINE |
| 7 | Green Green |
HOOKER’S GREEN No. 1 |
| 8 | Gray Gray |
PAYNE’S GRAY |
| —Supplementary— | ||
| 9 | Purple Purple |
MAUVE |
| 10 | Orange Orange |
ORANGE-VERMILION |
![[Profiles of men]](images/i_074.jpg)
![[Profiles of women]](images/i_075.jpg)
![[Chickens]](images/i_076.jpg)
![[Rabbit]](images/i_077.jpg)
![[Adjutant]](images/i_078.jpg)
This is really a remarkable book in which line is made a good reason for form. The youngest child may grasp the magic progress of this way of working and he will draw the picture naturally and well.
This is truly an impressive book in which line is established as a valid reason for form. Even the youngest child can understand the enchanting process of this approach and will draw the picture effortlessly and effectively.
INSTRUCTIONS are very brief, for the key lines of each object tell their own story and the child is entranced by the results soon gained. There is no stupid tracing in this book, for tracing accomplishes at most only a little muscular control.
INSTRUCTIONS are very brief, for the key lines of each object tell their own story, and the child is captivated by the results they quickly achieve. There is no pointless tracing in this book, as tracing only develops a bit of muscle control at most.
The book provides a step-by-step system that fixes the object in memory and develops naturally as a physical skill and a mental knowledge of proportion and form.
The book offers a step-by-step system that anchors the object in memory and evolves naturally into both a physical skill and a mental understanding of proportion and form.
Foreshortening and perspective, often bugbears to young artists, are overcome by the simplest progressive examples.
Foreshortening and perspective, which often frustrate young artists, can be mastered through the simplest progressive examples.
REMEMBERING THE KEY LINE opens the way to the completed object. There are hundreds of pictures to draw and all those most fascinating to the child, who is thrilled by the “magic” that makes drawing easy and delightfully interesting.
REMEMBERING THE KEY LINE opens the way to the finished piece. There are hundreds of images to create, and all of them are incredibly captivating to the child, who is excited by the "magic" that makes drawing simple and wonderfully engaging.
“Just remember the KEY LINE, that’s all.”
Just remember the key line, that’s all.
- Typos fixed; non-standard spelling and dialect retained.
Download ePUB
If you like this ebook, consider a donation!